

Key Capabilities
- Bidirectional flat file/XML parsing for position-delimited and character-delimited formats
- Support for multiple line types with control field identification
- Automatic hierarchy detection and XML nesting for master-detail relationships
- Comprehensive field mapping with custom data type handling
Overview
Each Flat File connector is configured with a specific flat file format to convert to XML or to generate from XML. The Flat File connector has two primary modes:- Position Delimited, where the connector is configured with an arbitrary set of field names, indices (such as positions), and lengths indicating where data appears in each line of the flat file.
- Character Delimited, where the connector is configured with the character that separates field values in the flat file.
You might also need a numeric control field. Follow the instructions in Non-Standard XML Control Fields to set this up.
Connector Configuration
File Details Tab
Control Field: Position Delimited
Settings related to the Control Field when the connector is set to Position Delimited.Control Field: Character Delimited
Settings related to the Control Field when the connector is set to Character Delimited.Line Types
This section lets you define the field names and positions in the flat file format. See Defining the Flat File Format for details on defining the flat file format. If File Type is Position Delimited and Multi-line Mode is enabled, click the Add Line Type button to define multiple line types. Each line type has a Control Field Value, which is used to identify the line type. For example, a header line might have the control field value of HEAD, while an item line has the control field value of ITEM. If File Type is set to Character Delimited, Multi-line Mode is enabled, and Generate Field/Line Type Names is enabled, you do not need to provide names and indexes for all of the fields or line types present in the flat file. In this case, the connector auto-generates XML element names for any unspecified fields or line types. Uncheck Generate Field/Line Type Names to manually specify the field names.Settings Tab
Configuration
Settings related to the core configuration of the connector.Advanced Tab
Logging
Other Settings
Miscellaneous
Automation Tab
Performance
Alerts Tab
SLAs Tab
Defining the Flat File Format
The first step in configuring a Flat File connector is defining the format of the flat file. This section describes formats that have a single line type; in other words, each line in the flat file has the same set of fields. For flat files with multiple line types, see Multiple Line Types.Character Delimited Single-line Format
For Character Delimited flat files, defining the format is simple: use the Delimiter property to specify the character that separates different fields in the flat file. The Column headers present field indicates whether the first line of the flat file is a header line; in other words, it contains the names of fields rather than actual data. If these column headers are present, the connector uses the header names as the names of XML elements in the resulting translated XML. Similarly, the connector uses the XML element names to generate a header row when translating from XML to flat file. If column headers are not present, the connector supports manually specifying the names of each field by adding the fields in the Line Types portion of the Settings tab. These field names are applied in index order, meaning that the first entry in Line Types is the name of the first field in the flat file line, and so on. You can also auto-generate generic field names by enabling Use auto generated field names.Position Delimited Single-line Format
For Position Delimited flat files, defining the format requires specifying the position of each field in the format. The Line Types portion of the Settings tab provides an interface for adding an arbitrary number of fields that are present in each line of the flat file. Each field must be identified by a name and the position in the file it appears. The Column headers present field indicates whether the first line of the flat file is a header line; in other words, it contains the names of fields rather than actual data. The field names must still be configured in the Line Types section; this setting simply helps ensure that a header row is not interpreted as real data.Non-standard XML Control Fields
Flat file data can include lines that contain a control field that is fully numeric or begins with a number. While this is normal in flat file data, it poses a challenge when converting that flat file data into XML, because XML elements cannot start with a number. They must begin with a letter or an underscore. To accommodate this in the Flat File Connector, if a control field starts with a number, automatically prepends two underscores (__) to that value in the output XML. In addition, alineType attribute is added to that element and its value corresponds to the original control field value. For example, the following flat file data includes two line types with control fields of 000 and 111:
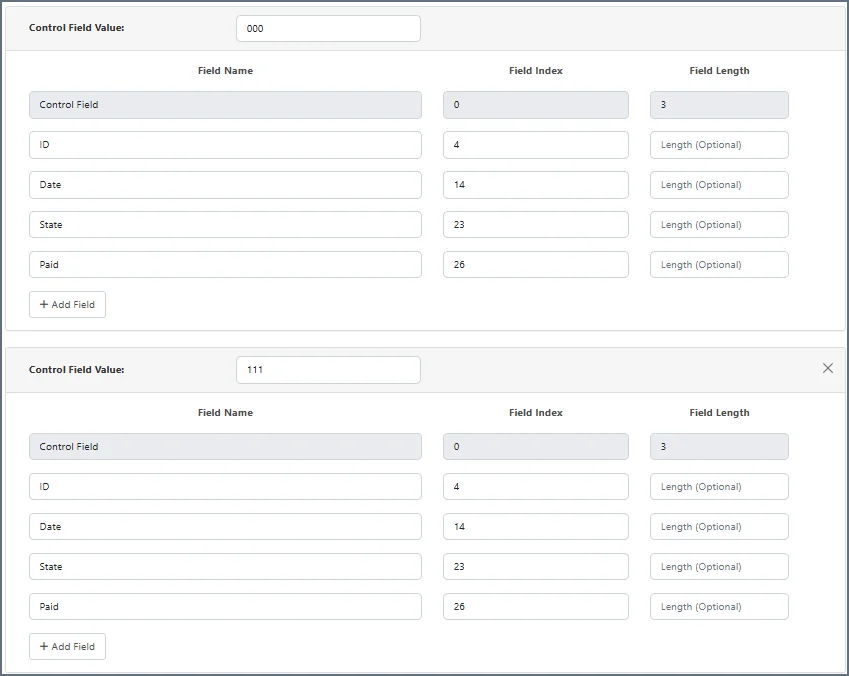
lineType attribute for the XML elements that correspond to the original control field value. This allows the flat file data and XML to be fully bi-directional, which means that when output XML is passed as input to the flat file connector, the output is flat file data containing the correct line type definitions without any underscores.
It also means that if you are going from XML to flat file and you need a control field for a line type beginning with a number (or is all numbers), you need to implement the lineType XML attribute on the appropriate XML elements in your document mapping, prior the document arrives at the Flat File connector.
Multiple Line Types
If your flat file format contains multiple types of lines, enable the Multi-line Mode property in the Control Field portion of the Settings tab. The field in the flat file that identifies the line type is known as the control field.Character Delimited Multi-line Format
When the File Type is Character Delimited, the Field Index setting determines where the control field appears in each line of the flat file. This index starts at 0, meaning that if the control field is the 5th value in the line, the Field Index should be 4. For each possible value that might appear in the control field define a new line type by clicking the Add Line Type button in the Line Types portion of the Settings tab. Set the value that identifies the line type in the Control Field Value for that line. Once each possible line type has been added and identified using a specific Control Field Value, the fields that appear in each line type should be specified in index order. If Generate Field/Line Type Names is enabled, you do not need to provide names and indexes for all of the fields or line types present in the flat file (only the Control Field is required). In this situation, the connector auto-generates XML element names for any unspecified fields or line types.Position Delimited Multi-line Format
When the File Type is Position Delimited, the Start Index setting determines the position where the control field begins in each line of the flat file. This index starts at 0, meaning that if the control field begins at the 15th character in the line, the Field Index should be 14. For each possible value that might appear in the control field, define a new line type by clicking the Add Line Type button. Set the value that identifies the line type in the Control Field Value for that line. Once each possible line type has been added and identified using a specific Control Field Value, the fields that appear in each line type should be specified along with the position in the line where they begin.Multi-line Example
For example, say that a flat file contains two types of lines, a shipment line type and a package line type. The shipment line contains information on the date, time, and address of shipment, and the package line type contains information on the items being shipped. The first field in each line is SHIP or PCKG to indicate what type of line it is. To handle this case, enable Multi-line mode, and set the Field Index or Start Index to 0 to indicate that the control field is the first field in the line. Then, configure two line types in the Line Types section: one with a Control Field Value of SHIP, which contains each field in a shipment line (for example, ShipDate, DeliveryDate, and ShipToAddress), and one with a Control Field Value of PCGK, which contains each field in a package line (such as ItemName and ItemWeight).XML Format
Once a flat file is converted to XML, the result has the following XML structure:- One
Items_element at the root of the document - Each line in the flat file has an element named the same as the Control Field Value for that line (or row if no Control Field Value is defined)
- Each field in the row is a child element of the Control Field Value element
Multi-Line Hierarchy
Flat files with multiple line types often have an implied hierarchical relationship between the line types. For example, one line might contain data for a Purchase Order (such as customer name and order date), while the following lines represent each line item in that order (for example item name and item quantity). The line items belong to the order, creating a hierarchical relationship. These relationships are sometimes referred to as master-detail relationships, which in our example means that the first line type (Purchase Order) is the master, and the following lines (line items) are details about that master line. In XML, this is often represented as a parent-child relationship. The Flat File connector can preserve these hierarchical relationships when translating flat files to XML. If you enable the Nest Line Types setting on the Advanced tab, the connector automatically indents the detail line types so that they are children of the master line types. The following is a simple example of translating a hierarchical flat file with Nest Line Types enabled. The section after the example explains the logic the connector uses to determine the hierarchical relationships.Multi-Line Hierarchy Example
Take as example input the following flat file:M and D:
M, or master, contains information for an order: customer name, order date, and a high-value customer flag.D, or detail, contains line item information for the preceding order: item name, item quantity, and item price.
D line type belongs to the M line type in a hierarchical relationship, you might want to preserve this hierarchy when translating the flat file to XML. To see what this looks like, take the following example output when the Nest Line Types setting is enabled and the flat file above is translated to XML:
D records are children of the M records, which accurately reflects the hierarchy present in the source data.
Multi-Line Hierarchy Logic
The Flat File connector uses the order of lines in the source flat file to determine the hierarchy between line types. When Nest Line Types is enabled, the connector uses the following logic:- The first line type the connector encounters is always treated as the top level of hierarchy (it is not indented in the resulting XML)
- After the first line type, when the connector encounters a new line type it assumes this line type is one level of hierarchy below the previous line type (it belongs to the previous line and is therefore indented in the resulting XML)
- When the connector encounters a line type it has encountered before, it returns to that line type’s level of hierarchy, closing all XML elements at hierarchy levels equal-to or below this level.