The SAP IDoc connector supports sending and receiving IDoc files to and from a variety of SAP systems. It is a data container that is used to exchange information between SAP and another process that can understand the syntax and semantics of the data.
Overview
IDoc connectors can connect to SAP using the following methods:
Windows
- NetWeaver RFC SDK
- Classic RFC SDK
- Classic RFC SDK with Unicode support
- SOAP (send-only)
Java
- Java connector (JCO)
- SOAP (send-only)
IDoc connectors can send and retrieve files formatted either as raw IDoc or as IDoc XML.
Connector Configuration
This section contains all of the configurable connector properties.
Settings Tab
Host Configuration
Settings related to establishing the connection to the SAP system.
| Setting | Description |
|---|
| Connector Id | The static, unique identifier for the connector. |
| Connector Type | Displays the connector name and a description of what it does. |
| Connector Description | An optional field to provide a free-form description of the connector and its role in the flow. |
| Connect Type | The method with which to connect to SAP. See the Establishing a Connection section for your method for additional information. |
| SAP Host | Hostname or IP address of the target SAP system. |
| System Number | The number by which the target SAP system is defined. Valid values are 0-99, and often this value should be 0. |
Client Authentication
Settings related to authenticating against the SAP system.
| Setting | Description |
|---|
| Client | The client that is authenticating to the SAP system. |
| User | The username credential for authentication. |
| Password | The password for the specified user. |
Receiver Options
Settings related to receiving IDoc files.
| Setting | Description |
|---|
| IDoc Receiver | Whether the connector should retrieve IDoc files from SAP. |
| Program ID | A unique name that identifies to the SAP system. |
| IDoc Format | Whether to receive files as raw IDoc or IDoc XML. |
Advanced Tab
Language Settings
Settings related to communication language.
| Setting | Description |
|---|
| Language | The language value to be used when connecting to the SAP system. Set this to the ISO 639-1 value for the language the SAP system uses. |
Gateway
Settings related to communicating with SAP through a gateway.
| Setting | Description |
|---|
| Gateway Host | The hostname or IP address of the gateway through which to connect. |
| Gateway Service | The gateway service to use. |
Logon Load Balancing
Settings related to logging in to the SAP system as a group to enable load balancing.
| Setting | Description |
|---|
| Message Server | The service name of the load balancer. |
| System ID | Identifies the SAP system. |
| Logon Group | The group to use when load balancing. |
Secure Network Communications (SNC)
Settings related to using an external security product to enhance the SAP connection security.
| Setting | Description |
|---|
| SNC Name | The SNC name for the machine making the connection. |
| SNC Partner Name | The SNC name of the SAP system the connector is connecting to. |
| SNC Quality of Protection Level | The level of protection added by the SNC product. |
| SNC Library | The path to the external security product’s library. |
Advanced Settings
Settings not included in the previous categories.
| Setting | Description |
|---|
| Processing Delay | The amount of time (in seconds) by which the processing of files placed in the Transactions tab is delayed. This is a legacy setting. Best practice is to use a File connector to manage local file systems instead of this setting. |
| Refresh Schema | When enabled, the connector attempts to update the schema it uses for parsing when a parsing error occurs. The schema is updated by reaching out to the SAP system and querying for the appropriate schema. |
Logging
Miscellaneous
Automation Tab
Automation Settings
Settings related to the automatic processing of files by the connector.
| Setting | Description |
|---|
| Send | Whether files arriving at the connector are automatically sent. |
| Retry Interval | The amount of time before a failed send is retried. |
| Max Attempts | The maximum number of times a failed send is retried. |
Alerts Tab
SLAs Tab
Establishing a Connection
Using NetWeaver RFC SDK
The following libraries from the NetWeaver RFC SDK must be placed into the www\\bin\\x64 folder (www\\bin\\x86 on 32-bit operating systems):
- sapnwrfc.dll
- icudt30.dll
- icuin30.dll
- icuuc30.dll
- libicudecnumber.dll
- libsapucum.dll
-
The .dll names might be different based on the version of the SAP RFC SDK you have installed. The examples above are for version 3.0.
-
You need to add the
sapgw00 service to your listed services for the NetWeaver SDK connection to work on your client machine. You can add it to the services file at C:\\Windows\\System32\\drivers\\etc\\services.
Using Classic RFC SDK
The non-Unicode library does not require anything other than librfc32.dll. Place librfc32.dll into the www\\bin\\x64 folder (www\\bin\\x86 on 32-bit operating systems).
These libraries are provided in both x86 and x64, so you must use the same platform that the process is using. If the application is running on a 64-bit version of Windows, the process is 64-bit.
Using Classic RFC SDK with Unicode Support
The following libraries from the SAP RFC SDK must be placed into the www\\bin\\x64 folder (www\\bin\\x86 on 32-bit operating systems):
- librfc32u.dll
- icudt30.dll
- icuin30.dll
- icuuc30.dll
-
The .dll names might be different based on the version of the SAP RFC SDK you have installed. The examples above are for version 3.0.
-
These libraries are provided in both x86 and x64, so you must use the same platform that the process is using. If the application is running on a 64-bit version of Windows, the process is 64-bit.
Using the Java Connector
To use the Java connector, add sapjco3.jar to the lib folder of your Java servlet container.
Using SOAP
SOAP can only be used to send IDocs to SAP. You must use a different connection type to receive IDocs from SAP.
This requires enabling SOAP connections on the SAP system.
Configuring Services
In addition to the dependencies above, the following services must be added to %WINDIR%\\system32\\drivers\\etc\\services, or /etc/services if your system is running Linux or Mac OS X. If SAP NetWeaver is already installed on the machine, no further action is required.
| Service Name | Connector Number/Protocol |
|---|
| sapdp00 | 3200/tcp |
| sapdp01 | 3201/tcp |
| sapdp02 | 3202/tcp |
| sapdp03 | 3203/tcp |
| sapdp04 | 3204/tcp |
| sapdp05 | 3205/tcp |
| sapdp06 | 3206/tcp |
| sapdp07 | 3207/tcp |
| sapdp08 | 3208/tcp |
| sapdp09 | 3209/tcp |
| sapdp10 | 3210/tcp |
| sapdp11 | 3211/tcp |
| sapdp12 | 3212/tcp |
| sapdp13 | 3213/tcp |
| sapdp14 | 3214/tcp |
| sapdp15 | 3215/tcp |
| sapdp16 | 3216/tcp |
| sapdp17 | 3217/tcp |
| sapdp18 | 3218/tcp |
| sapdp19 | 3219/tcp |
| sapdp20 | 3220/tcp |
| sapdp21 | 3221/tcp |
| sapdp22 | 3222/tcp |
| sapdp23 | 3223/tcp |
| sapdp24 | 3224/tcp |
| sapdp25 | 3225/tcp |
| sapdp26 | 3226/tcp |
| sapdp27 | 3227/tcp |
| sapdp28 | 3228/tcp |
| sapdp29 | 3229/tcp |
| sapdp30 | 3230/tcp |
| sapdp31 | 3231/tcp |
| sapdp32 | 3232/tcp |
| sapdp33 | 3233/tcp |
| sapdp34 | 3234/tcp |
| sapdp35 | 3235/tcp |
| sapdp36 | 3236/tcp |
| sapdp37 | 3237/tcp |
| sapdp38 | 3238/tcp |
| sapdp39 | 3239/tcp |
| sapdp40 | 3240/tcp |
| sapdp41 | 3241/tcp |
| sapdp42 | 3242/tcp |
| sapdp43 | 3243/tcp |
| sapdp44 | 3244/tcp |
| sapdp45 | 3245/tcp |
| sapdp46 | 3246/tcp |
| sapdp47 | 3247/tcp |
| sapdp48 | 3248/tcp |
| sapdp49 | 3249/tcp |
| sapdp50 | 3250/tcp |
| sapdp51 | 3251/tcp |
| sapdp52 | 3252/tcp |
| sapdp53 | 3253/tcp |
| sapdp54 | 3254/tcp |
| sapdp55 | 3255/tcp |
| sapdp56 | 3256/tcp |
| sapdp57 | 3257/tcp |
| sapdp58 | 3258/tcp |
| sapdp59 | 3259/tcp |
| sapdp60 | 3260/tcp |
| sapdp61 | 3261/tcp |
| sapdp62 | 3262/tcp |
| sapdp63 | 3263/tcp |
| sapdp64 | 3264/tcp |
| sapdp65 | 3265/tcp |
| sapdp66 | 3266/tcp |
| sapdp67 | 3267/tcp |
| sapdp68 | 3268/tcp |
| sapdp69 | 3269/tcp |
| sapdp70 | 3270/tcp |
| sapdp71 | 3271/tcp |
| sapdp72 | 3272/tcp |
| sapdp73 | 3273/tcp |
| sapdp74 | 3274/tcp |
| sapdp75 | 3275/tcp |
| sapdp76 | 3276/tcp |
| sapdp77 | 3277/tcp |
| sapdp78 | 3278/tcp |
| sapdp79 | 3279/tcp |
| sapdp80 | 3280/tcp |
| sapdp81 | 3281/tcp |
| sapdp82 | 3282/tcp |
| sapdp83 | 3283/tcp |
| sapdp84 | 3284/tcp |
| sapdp85 | 3285/tcp |
| sapdp86 | 3286/tcp |
| sapdp87 | 3287/tcp |
| sapdp88 | 3288/tcp |
| sapdp89 | 3289/tcp |
| sapdp90 | 3290/tcp |
| sapdp91 | 3291/tcp |
| sapdp92 | 3292/tcp |
| sapdp93 | 3293/tcp |
| sapdp94 | 3294/tcp |
| sapdp95 | 3295/tcp |
| sapdp96 | 3296/tcp |
| sapdp97 | 3297/tcp |
| sapdp98 | 3298/tcp |
| sapdp99 | 3299/tcp |
| sapgw00 | 3300/tcp |
| sapgw01 | 3301/tcp |
| sapgw02 | 3302/tcp |
| sapgw03 | 3303/tcp |
| sapgw04 | 3304/tcp |
| sapgw05 | 3305/tcp |
| sapgw06 | 3306/tcp |
| sapgw07 | 3307/tcp |
| sapgw08 | 3308/tcp |
| sapgw09 | 3309/tcp |
| sapgw10 | 3310/tcp |
| sapgw11 | 3311/tcp |
| sapgw12 | 3312/tcp |
| sapgw13 | 3313/tcp |
| sapgw14 | 3314/tcp |
| sapgw15 | 3315/tcp |
| sapgw16 | 3316/tcp |
| sapgw17 | 3317/tcp |
| sapgw18 | 3318/tcp |
| sapgw19 | 3319/tcp |
| sapgw20 | 3320/tcp |
| sapgw21 | 3321/tcp |
| sapgw22 | 3322/tcp |
| sapgw23 | 3323/tcp |
| sapgw24 | 3324/tcp |
| sapgw25 | 3325/tcp |
| sapgw26 | 3326/tcp |
| sapgw27 | 3327/tcp |
| sapgw28 | 3328/tcp |
| sapgw29 | 3329/tcp |
| sapgw30 | 3330/tcp |
| sapgw31 | 3331/tcp |
| sapgw32 | 3332/tcp |
| sapgw33 | 3333/tcp |
| sapgw34 | 3334/tcp |
| sapgw35 | 3335/tcp |
| sapgw36 | 3336/tcp |
| sapgw37 | 3337/tcp |
| sapgw38 | 3338/tcp |
| sapgw39 | 3339/tcp |
| sapgw40 | 3340/tcp |
| sapgw41 | 3341/tcp |
| sapgw42 | 3342/tcp |
| sapgw43 | 3343/tcp |
| sapgw44 | 3344/tcp |
| sapgw45 | 3345/tcp |
| sapgw46 | 3346/tcp |
| sapgw47 | 3347/tcp |
| sapgw48 | 3348/tcp |
| sapgw49 | 3349/tcp |
| sapgw50 | 3350/tcp |
| sapgw51 | 3351/tcp |
| sapgw52 | 3352/tcp |
| sapgw53 | 3353/tcp |
| sapgw54 | 3354/tcp |
| sapgw55 | 3355/tcp |
| sapgw56 | 3356/tcp |
| sapgw57 | 3357/tcp |
| sapgw58 | 3358/tcp |
| sapgw59 | 3359/tcp |
| sapgw60 | 3360/tcp |
| sapgw61 | 3361/tcp |
| sapgw62 | 3362/tcp |
| sapgw63 | 3363/tcp |
| sapgw64 | 3364/tcp |
| sapgw65 | 3365/tcp |
| sapgw66 | 3366/tcp |
| sapgw67 | 3367/tcp |
| sapgw68 | 3368/tcp |
| sapgw69 | 3369/tcp |
| sapgw70 | 3370/tcp |
| sapgw71 | 3371/tcp |
| sapgw72 | 3372/tcp |
| sapgw73 | 3373/tcp |
| sapgw74 | 3374/tcp |
| sapgw75 | 3375/tcp |
| sapgw76 | 3376/tcp |
| sapgw77 | 3377/tcp |
| sapgw78 | 3378/tcp |
| sapgw79 | 3379/tcp |
| sapgw80 | 3380/tcp |
| sapgw81 | 3381/tcp |
| sapgw82 | 3382/tcp |
| sapgw83 | 3383/tcp |
| sapgw84 | 3384/tcp |
| sapgw85 | 3385/tcp |
| sapgw86 | 3386/tcp |
| sapgw87 | 3387/tcp |
| sapgw88 | 3388/tcp |
| sapgw89 | 3389/tcp |
| sapgw90 | 3390/tcp |
| sapgw91 | 3391/tcp |
| sapgw92 | 3392/tcp |
| sapgw93 | 3393/tcp |
| sapgw94 | 3394/tcp |
| sapgw95 | 3395/tcp |
| sapgw96 | 3396/tcp |
| sapgw97 | 3397/tcp |
| sapgw98 | 3398/tcp |
| sapgw99 | 3399/tcp |
Logging on to SAP
The following settings are required to connect with your SAP system.
| Setting | Description |
|---|
| SAP Host | Host name of the target system. Host names can be regular host names defined in a hosts file, an IP address like 123.123.123.123, or an SAProuter address such as /H/hostname/S/connector/H/host/S/connector/... |
| System Number | The number by which the target system is defined. The valid range is 0 to 99, but in general this is 0. |
| Client | The client authenticating to the SAP system. |
| User | The user that is authenticating to the SAP system. |
| Password | The password for the authenticating user. |
Gateway
When connecting to SAP via a gateway, use the options in the Gateway section of the Advanced tab.
Load Balancing
To log on via load balancing, set the properties in the Logon Load Balancing section of the Advanced tab.
Secure Network Communications (SNC)
To enable secure network communications, check the Enable SNC box in the Secure Network Communications (SNC) section of the Advanced tab. Set SNC Library to the .dll of the SNC library you want to use to connect with SAP.
Sending IDocs to SAP
Once you have configured the IDoc connector to connect to your SAP system, you can begin sending IDoc files to SAP. The IDoc connector can send files formatted in raw IDoc or XML IDoc.
You can configure the connector to automatically insert control record information into the IDoc being sent to SAP: the DOCREL, SNDPOR, SNDPRT, and so on. This makes it easier to process outgoing IDocs to the configured system. Configure these settings in the Control Record Information Options section of the Settings tab.
Before sending an IDoc to your SAP system, make sure that you have properly configured a partner profile in SAP. If no partner profile in SAP matches the control record information in the IDoc you are sending, the data will not be processed by your SAP system. See Test Sending an IDoc to SAP for more information on setting up a partner profile.
You can use transaction code WE60 to search for segment documentation for different IDoc types.
Test Sending an IDoc to SAP
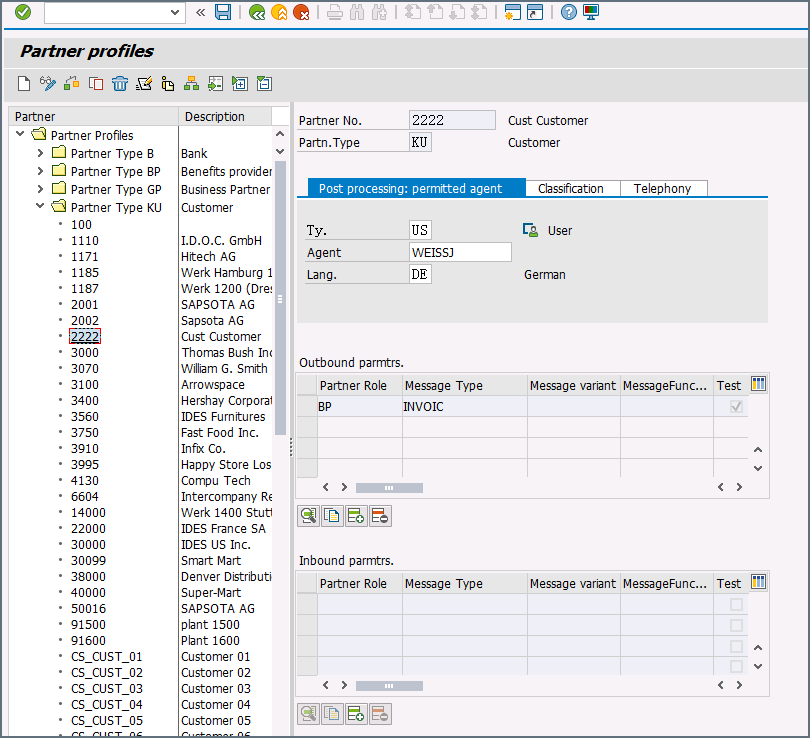
To test sending an IDoc to SAP, you first need to configure your SAP system to have a partner profile for . The following steps describe how to do this with an ORDERS IDoc.
-
Create a partner: Go to transaction code WE20 and define a partner profile. Set Partn Type to KU for Customer and Partner No to a valid customer number.
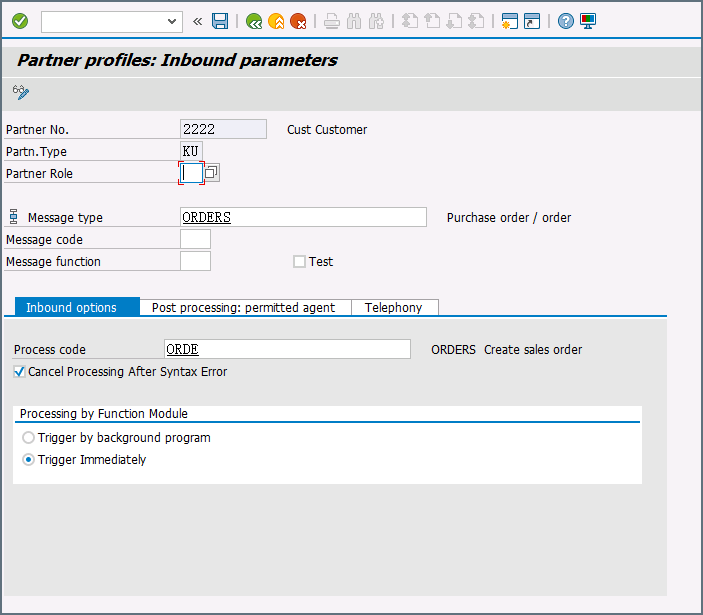
-
Add an inbound parameter for the ORDERS document: The message type for this document is ORDERS. On the Inbound Options tab, set Process code to ORDE to tell SAP how to create a sales order when a purchase order ORDERS document is received by the SAP system.
-
Assign the customer to a sales division: The customer configured in step one must be assigned to a sales organization, distribution channel, and division. Go to transaction VOE2 to configure these settings in the EDSDC table.
Receiving IDocs from SAP
Once you have configured the IDoc connector to connect to your SAP system, you can begin receiving IDoc files from SAP. The IDoc connector can receive files formatted in raw IDoc or XML IDoc.
To receive files from SAP, create an RFC destination for . You can then check Enable IDoc Receiver in the Receiver Options section of the Settings tab, then enter the Program Id that you registered in your SAP system for .
Test Receiving an IDoc from SAP
This example describes how to configure your SAP system to send a MATMAS IDoc to .
-
Define a logical system: First, go to transaction SALE. Then navigate to Basic Settings > Logical Systems > Define Logical System. Create a new entry with a valid name (for example, ) and description.
-
Create an RFC destination: Open transaction code SM59. Click the create button and fill in the fields for the RFC destination described below.
| Setting | Description |
|---|
| RFC Destination | A unique name for the new destination (for example, _DEST). |
| Connection Type | T for TCP/IP. |
| Description | A description for the destination. |
| Program Id | A unique name that will be set in to identify the destination. |
| Activation Type | Select Registered Server Program. |
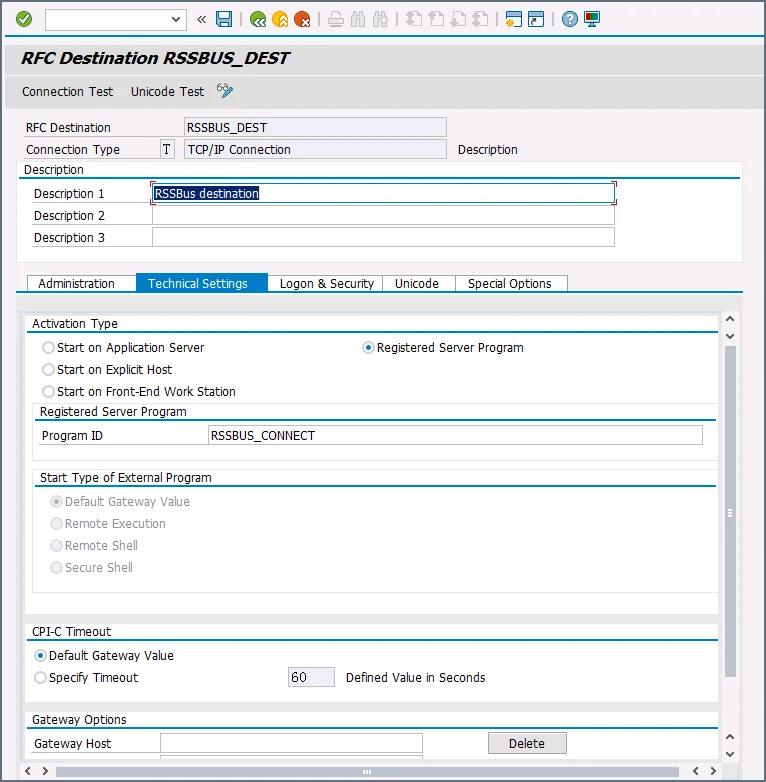 After you save the settings, test the connection to make sure you can successfully connect to .
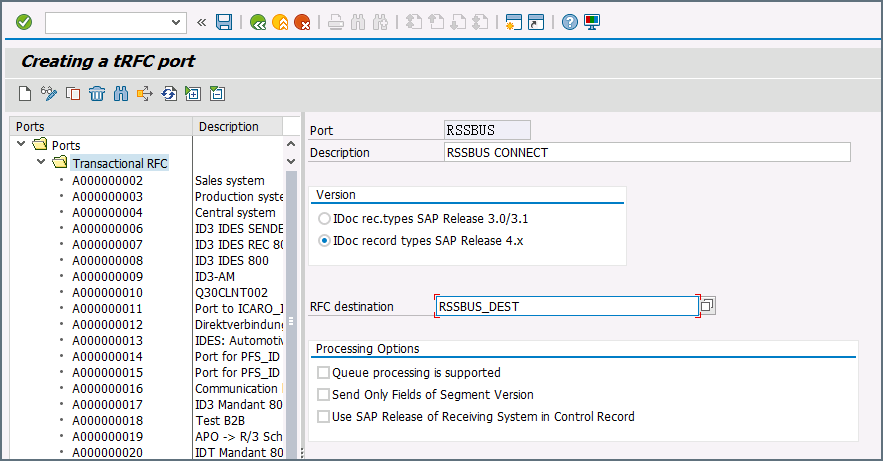
-
Create a processing connector: Go to transaction code WE21. Create a new Transactional RFC connector with a unique name and the same destination you created in step 2.
-
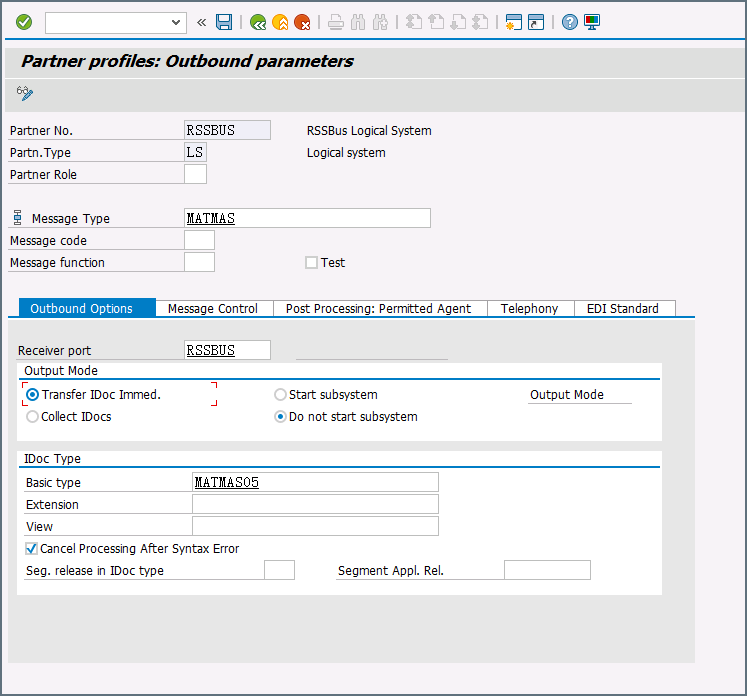
Create a partner profile: Open transaction WE20. Create a partner profile for the logical system that you added in step 1. Next, add an outbound parameter for the MATMAS document. Set the Message Type to MATMAS. On the Outbound Options tab, set the Receiver port to the value of the connector you configured in step 3, set the Output Mode to Transfer IDoc Immed, and set the IDoc Basic type to MATMAS05.
-
Send a test IDoc: Use transaction BD10 to send a test IDoc to for a specified material number. You need to configure the Message Type and Logical System before sending the message. Use transaction BD87 to monitor outgoing messages and process them again if necessary.
Macros
Examples

