

Connector Configuration
The following settings are available when you are receiving IDocs from SAP.Receiver Options
Settings related to receiving IDoc files.| Setting | Description |
|---|---|
| IDoc Receiver | Whether the connector should retrieve IDoc files from SAP. |
| Program ID | A unique name that identifies CData Arc to the SAP system. |
| IDoc Format | Whether to receive files as raw IDoc or IDoc XML. |
Advanced Settings
Settings not included in the previous categories.| Setting | Description |
|---|---|
| Processing Delay | The amount of time (in seconds) by which the processing of files placed in the Transactions tab is delayed. This is a legacy setting. Best practice is to use a File connector to manage local file systems instead of this setting. |
| Refresh Schema | When enabled, the connector attempts to update the schema it uses for parsing when a parsing error occurs. The schema is updated by reaching out to the SAP system and querying for the appropriate schema. |
| Local File Scheme | A scheme for assigning filenames to messages that are output by the connector. You can use macros in your filenames dynamically to include information such as identifiers and timestamps. For more information, see Macros. |
| Upload Schema | Use this to upload a schema and install it in the connector’s Schema folder. If a schema already exists, you are asked if you want to overwrite it. |
Message
Message settings determine how the connector searches for messages and manages them after processing. You can save messages to your Sent folder or you can group them based on a Sent folder scheme, as described below.| Setting | Description |
|---|---|
| Save to Sent Folder | Check this to copy files processed by the connector to the Sent folder for the connector. |
| Sent Folder Scheme | Instructs the connector to group files in the Sent folder according to the selected interval. For example, the Weekly option instructs the connector to create a new subfolder each week and store all sent files for the week in that folder. The blank setting instructs the connector to save all files directly in the Sent folder. For connectors that process many transactions, using subfolders can help keep files organized and improve performance. |
Logging
Settings that govern the creation and storage of logs.| Setting | Description |
|---|---|
| Log Level | The verbosity of logs generated by the connector. When you request support, set this to Debug. |
| Log Subfolder Scheme | Instructs the connector to group files in the Logs folder according to the selected interval. The Weekly option (which is the default) instructs the connector to create a new subfolder each week and store all logs for the week in that folder. Leaving this setting blank tells the connector to save all logs directly in the Logs folder. For connectors that process many transactions, using subfolders helps keep logs organized and improves performance. |
| Log Messages | Check this to have the log entry for a processed file include a copy of the file itself. If you disable this, you might not be able to download a copy of the file from the Transactions tab. |
Miscellaneous
Miscellaneous settings are for specific use cases.| Setting | Description |
|---|---|
| Other Settings | Enables you to configure hidden connector settings in a semicolon-separated list (for example, setting1=value1;setting2=value2). Normal connector use cases and functionality should not require the use of these settings. |
Receiving IDocs from SAP
Once you have configured the IDoc connector to connect to your SAP system, you can begin receiving IDoc files from SAP. The IDoc connector can receive files formatted in raw IDoc or XML IDoc. To receive files from SAP, create an RFC destination for Arc. You can then check Enable IDoc Receiver in the Receiver Options section of the Settings tab, then enter the Program Id that you registered in your SAP system for Arc.Test Receiving an IDoc from SAP
This example describes how to configure your SAP system to send a MATMAS IDoc to Arc.- Define a logical system: First, go to transaction SALE. Then navigate to Basic Settings > Logical Systems > Define Logical System. Create a new entry with a valid name (for example, Arc) and description.
-
Create an RFC destination: Open transaction code SM59. Click the create button and fill in the fields for the RFC destination described below.
Setting Description RFC Destination A unique name for the new destination (for example, Arc_DEST). Connection Type T for TCP/IP. Description A description for the destination. Program Id A unique name that will be set in Arc to identify the destination. Activation Type Select Registered Server Program. 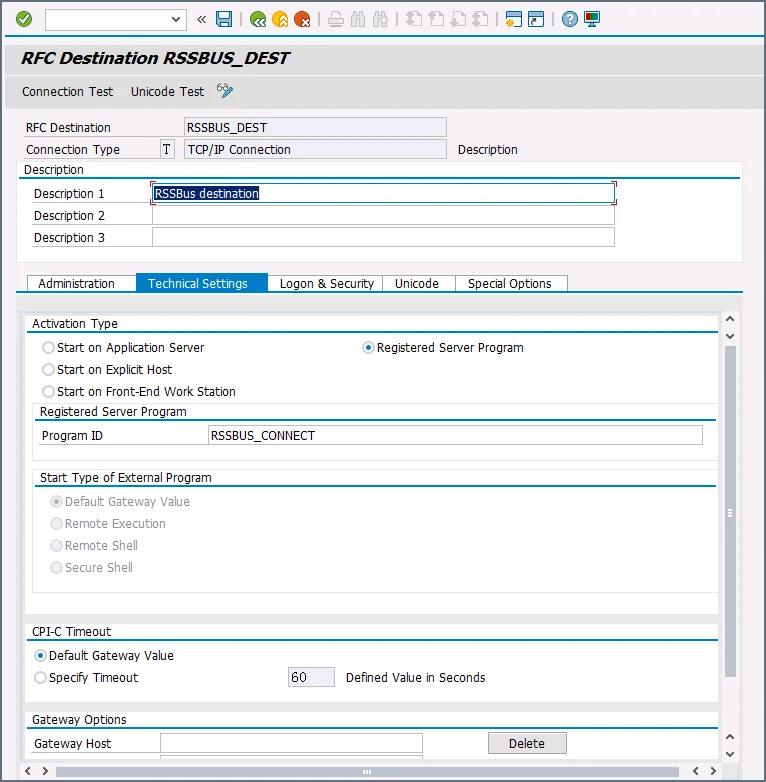
-
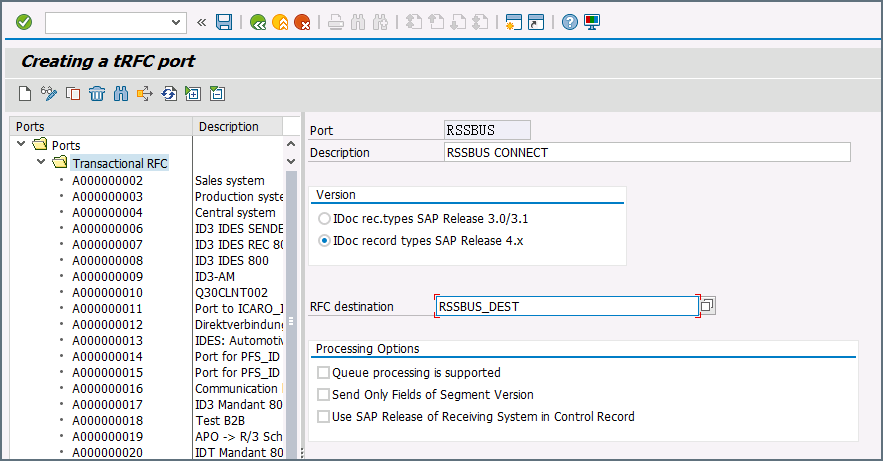
Create a processing connector: Go to transaction code WE21. Create a new Transactional RFC connector with a unique name and the same destination you created in step 2.
-
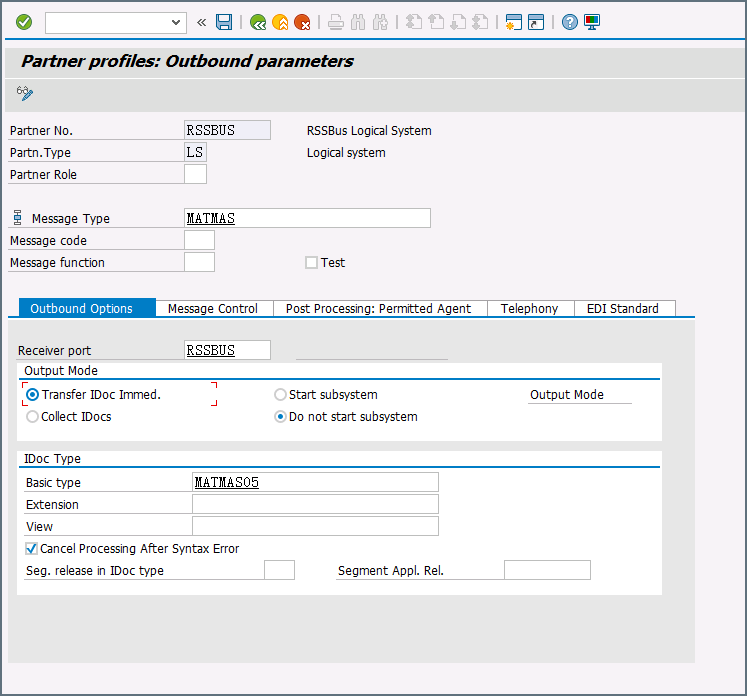
Create a partner profile: Open transaction WE20. Create a partner profile for the logical system that you added in step 1. Next, add an outbound parameter for the MATMAS document. Set the Message Type to MATMAS. On the Outbound Options tab, set the Receiver port to the value of the connector you configured in step 3, set the Output Mode to Transfer IDoc Immed, and set the IDoc Basic type to MATMAS05.
- Send a test IDoc: Use transaction BD10 to send a test IDoc to Arc for a specified material number. You need to configure the Message Type and Logical System before sending the message. Use transaction BD87 to monitor outgoing messages and process them again if necessary.