

Key Capabilities
- Full bidirectional translation between EDIFACT and XML formats
- Comprehensive interchange header validation and generation
- Support for multiple EDIFACT versions with automatic schema detection
- Interchange and functional acknowledgment support
Overview
When receiving EDIFACT documents, EDIFACT connectors validate EDIFACT interchange headers and convert the EDIFACT document into XML. This is useful as a staging step, because XML is the primary format that uses to manipulate data in a flow. The EDIFACT connector automatically reads the input file to determine the appropriate EDIFACT schema, then parses the document according to this schema. When generating EDIFACT documents, EDIFACT connectors convert XML into EDIFACT document syntax and apply the appropriate interchange headers. This is useful as the final step for creating an EDIFACT document, after the XML data has been fetched and transformed elsewhere in the flow.Interchange header validation can be avoided by enabling the Test Indicator setting.
Prerequisites
Before you begin, make sure you have the correct schema installed for the document type you need to process. The EDIFACT connector natively supports the following schema definitions: 4.1, D03A, D04A, D07A, D96A, D96B, D97A, D99A and D99B. You can find them in theapp_data/edifact_schemas directory of your installation. If you need different schemas, you can download the additional schema files from the website for free.
After you download and extract the zip archive, place the entire folder into an appropriately named subdirectory of the app_data/edifact_schemas directory.
Connector Configuration
This section contains all of the configurable connector properties.Settings Tab
Translation Configuration
Settings related to the core operation of the connector.EDI Partner
Interchange Settings
Settings related to the EDIFACT interchange headers. When generating EDIFACT documents from XML, these settings are used to generate document headers. When parsing EDIFACT documents, these settings are used to validate the incoming document.Acknowledgments
Settings related to generating and requesting acknowledgments.Sample Files Tab
Advanced Tab
EDI Delimiters
Settings that specify which characters separate elements, segments, and so on.Interchange Settings
Additional settings related to the EDIFACT interchange headers. These options appear or disappear based on the Syntax Version specified on the Settings tab.Functional Group Settings
Settings related to the functional group headers of EDIFACT documents. These optional identifiers can help group similar interchanges together or facilitate sub-addressing within an organization.Advanced Settings
Settings not included in the previous categories.Logging
Miscellaneous
EDI Partners Tab
Automation Tab
Automation
Settings related to the automatic processing of files by the connector.Performance
Alerts Tab
SLAs Tab
Converting Formats
The following sections detail the process of converting EDIFACT to XML and vice versa.EDIFACT to XML
Setting the Translation Type to EDI to XML instructs the connector to parse incoming EDIFACT documents into XML. The connector first reads all of the header information for the interchange and functional group sections of the document and validates them against the configured connector settings (unless Test Indicator is checked). The connector then parses out the specific EDIFACT schema used in the document and loads the schema from theedifact_schemas folder on disk (additional schema files can be downloaded from our website for free). Using the schema, the connector generates XML representing the EDIFACT structure of the document, populates the XML with the values from the document, and provides context to each value either as XML comments or as attributes in the XML elements (based on the value of Generate Descriptions As).
To see this process with a set of test EDIFACT documents, navigate to the Transactions tab of an EDIFACT connector (with Translation Type set to EDI to XML) and select More > Create Test Files. EDIFACT documents for an invoice, purchase order, purchase order acknowledgment, and shipping notice are automatically generated and placed in the Transactions directory. After these test files are processed by the connector, navigate to the Transactions tab to see the resulting XML.
Once EDIFACT documents are converted to XML, the data can be transformed and manipulated in many ways. Commonly, EDIFACT data needs to be stored in a database or other back-end application system. Since uses XML to represent inserts into these back-end systems, storing the EDIFACT data becomes a matter of mapping one XML structure onto another. This is typically done with the visual designer-driven XML Map connector.
XML to EDIFACT
Setting the Translation Type to XML to EDI instructs the connector to generate an EDIFACT document out of an XML representation of the document. After the connector has constructed the EDIFACT message out of the data parsed from the XML, it adds functional group and interchange headers according to the configured connector settings. To see this process with a set of test XML files, navigate to the Transactions tab of an EDIFACT connector (with Translation Type set to XML to EDI) and select More > Create Test Files. XML files representing an invoice, purchase order, purchase order acknowledgment, and shipping notice are automatically generated and placed in the Transactions directory. After these test files are processed by the connector, navigate to the Transactions tab to see the resulting EDIFACT document.Print View
Use With the XML Map Connector
Upload Test File
EDIFACT Acknowledgments
The following sections detail the two types of EDIFACT acknowledgments (ACKs), and how expects, processes, and generates ACKs.Technical versus Functional Acknowledgments
Technical ACKs, sometimes called interchange ACKs, are an indication that an interchange has taken place between the two parties, although not necessarily that any individual message has been exchanged. These serve as a receipt to the sender indicating that the EDIFACT message was successfully received, but it does not specify whether there were any issues with processing the message content. Functional ACKs are an indication that an interchange has been processed by the receiving party. They can report acceptance, acceptance with issues, or rejection of the received document. These serve as both a receipt that an interchange was successfully received and that it was fully processed.Expecting, Processing, and Generating Acknowledgments
Expecting Acknowledgements
EDIFACT connectors operating in XML to EDI mode can be configured so that technical and/or functional ACKs are expected for a message. When one or both Technical acknowledgment (CONTRL) and Functional acknowledgment (CONTRL) are checked in the Acknowledgments section of the Settings tab, the connector maintains a Pending ACK status for a transmission until the appropriate ACKs have been returned and processed. This means that the connector status can be used to determine whether the recipient has confirmed that they received the interchange. The following diagram shows the logical flow involved when expects an ACK from an invoice document: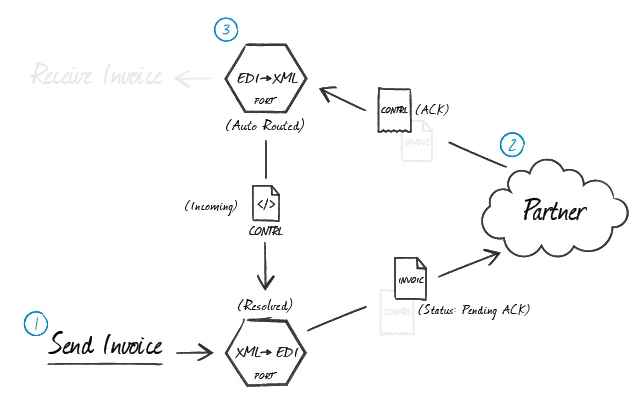
Processing Acknowledgments
In a typical flow, EDIFACT ACKs arrive at an EDIFACT connector operating in EDI to XML mode. This EDIFACT connector can be configured to automatically route any received acknowledgments to the EDIFACT connector that originally generated the document being acknowledged. Routing ACKs between EDIFACT connectors is configured visually on the Flows canvas by dragging the gray dot at the bottom of the EDIFACT connector in EDI to XML mode onto the EDIFACT connector that is in XML to EDI mode. Once the EDIFACT connector in XML to EDI mode receives the routed ACK, it pairs the ACK to the original message and changes its state from Pending ACK to Sent.Generating Acknowledgements
When an EDIFACT connector in EDI to XML mode receives a message and generates the corresponding XML, it can automatically generate CONTRL acknowledgments for the received message. To accomplish this, check Technical acknowledgment (CONTRL) and/or Functional acknowledgment (CONTRL) in the Acknowledgments section of the Settings tab. These acknowledgments must be routed to another EDIFACT connector (in XML to EDI mode) to finalize the ACK. The connector to which the ACK is routed applies interchange headings and passes the ACK along to the next connector in the flow like any other EDIFACT message. To route the ACK appropriately, drag the gray dot at the bottom of the EDIFACT connector in EDI to XML mode onto the EDIFACT connector that is in XML to EDI mode. The following diagram shows the logical flow involved when creating an ACK for a received invoice document: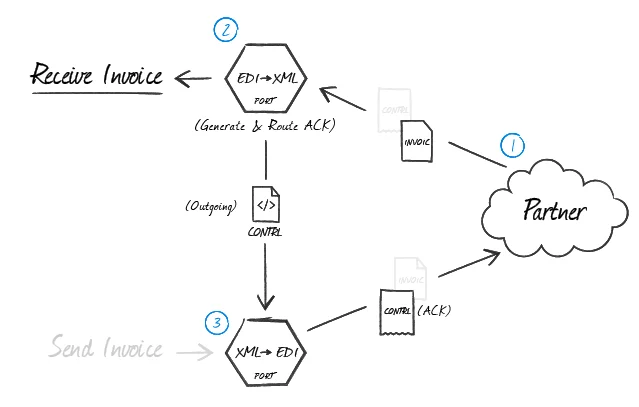
Master-Detail Hierarchy: Translating CPS and HYN Loops
In EDI documents, most hierarchical relationships are represented by the order of EDI segments. Some EDI structures, like CPS loops (found in DESADV documents) and HYN loops (found in PRICAT documents), do not follow this convention. Instead, they have the hierarchical relationships embedded in the EDI element data itself. This can make it difficult to preserve these hierarchical relationships when converting the EDI data to XML. The EDIFACT connector supports preserving hierarchical relationships in CPS and HYN segments via the Nest Loops setting on the Advanced tab. When enabled, the connector parses the elements in the CPS and HYN segments to determine which segments “belong to” other segments in a hierarchical relationship. These hierarchical relationships are reflected in the output XML as parent-child relationships; in other words, this setting converts hierarchy implied by the EDI content into hierarchy represented by the XML structure. This section explains how hierarchy is encoded in CPS and HYN data, and how this hierarchy is converted into XML when Nest Loops is checked.CPS and HYN Hierarchies
All CPS and HYN segments have two values that help establish hierarchy:- an Id value, which identifies the current segment (this value is stored in CPS01 or HYN01, or as the first element in a CPS or HYN segment)
- a parent-Id value, which identifies the current segment’s hierarchical parent (this value is stored in CPS02 or HYN02, or as the second element in a CPS or HYN segment)
Converting CPS and HYN Hierarchies to XML
When Nest Loops is checked, the EDIFACT connector automatically handles the conversion of CPS and HYN hierarchies to the XML hierarchy. The connector parses the Id and parent-Id values from the CPS and HYN segments, and ensures that the resulting XML elements are appropriately nested inside the elements representing their parents. In other words, ifsegmentA has a parent-Id value that is equal to segmentB, the resulting XML has segmentA as a child of segmentB. In this way, the hierarchical relationships are preserved in the XML structure when the EDI data is translated.
Macros
Examples
EDIFACT Operations
In addition to the Operations provided with , connectors can provide operations that extend functionality into Script. These connector operations can be called just like any other Script operation, except that they must be called through theconnector.rsc endpoint and must include an auth token.
The following operation is specific to the functionality of the EDIFACT connector.
edifactScan
Scans header values from the headers of an EDIFACT document.Required Parameters
- file: The path to the EDIFACT file.
Optional Parameters
- format: The file format. The default value is EDIFACT.
Output Attributes
- InterchangeSyntaxIdentifier: The Id of the syntax version being used (UNB1.1).
- InterchangeSyntaxVersion: The version of the syntax rules being used. Values range from 1 to 5, where higher numbers support more advanced character sets (UNB1.2).
- InterchangeSenderIdQualifier: The interchange qualifier of the sender Id (UNB2.2).
- InterchangeSenderId: The interchange sender Id (UNB2.1).
- InterchangeReceiverIdQualifier: The interchange qualifier of the receiver Id (UNB3.2).
- InterchangeReceiverId: The interchange receiver Id (UNB3.1).
- DocumentType: The document type or transaction set Identifier code (UNH2.1).
Common Errors
Following is a list of common errors, their causes, and the recommended solution.Error: Schema file not found ([schema major version] [schema document type])
Cause When parses an EDIFACT file, it first scans the file for the EDI version and document type to determine which schema to use during parsing. The application includes an extensive set of EDIFACT schemas in JSON format. They are stored in theschemas folder in the application directory (next to the data folder).
This error indicates that the application could not find a schema file matching the major version and document type reported by the file.
If the [schema major version] or [schema document type] values are missing in the error message, the EDI document does not contain the major version or document type.
Otherwise, this error indicates that the appropriate document schema is not included in the set of schema definitions automatically included with .
Resolution
If the EDI file does not contain the schema major version or document type, contact the trading partner (or other source of the EDI document) and inform them that these values must be included in the message header.
Otherwise, find the appropriate schema version from our free download page. Download the schema folder and place it in the following path:
[application_directory]\schemas\edifact_schemas\[major_version]\
Error: The segment at line [line number] with tag [segment name] is not in a valid position in the specified schema ([schema major version] [schema document type]). This may indicate that the input file contains segments that are out of order.
Cause When parses an EDIFACT file, it first scans the file for the EDI version and document type to determine which schema to use during parsing. The application includes an extensive set of EDIFACT schemas in JSON format, stored in thewww\app_data folder of the root installation directory.
This error indicates that the parser encountered an EDI segment in the file that does not match the order of segments defined in the relevant document schema. This can indicate a few different issues:
- The EDI file was generated incorrectly by the trading partner
- The EDI file was generated using a different schema version than what is indicated in the file
- The EDI file was generated using a custom schema
- Inside its folder on disk (for example,
<ConnectorDirectory>/Resources/Schemas/) - If a schema is used by multiple connectors, CData recommends you use a folder structure like this:
<ApplicationDirectory>/schemas/<type>_schemas/<major version>. In this example,<type>should beedifact.
- Manually edit the appropriate EDI schema file (found in the filepath above) to adjust the segment order so that it matches the partner’s EDI files. The error message indicates the line in the file where the segments diverge from the schema definition. Trace through the JSON definition of segment order until the divergence is found, and re-order the segments in the JSON to match the file provided by the partner.
- Contact the trading partner about the EDI file. Confirm that the file was generated according to the major version that is reported by the file, and explain that the order of the segments in the file is not recognized.