Key Capabilities
- Complete RESTful API client with support for all HTTP methods (GET, POST, PUT, PATCH, and DELETE)
- Swagger import capability for automatic API configuration and request generation
- Advanced authentication including OAuth 2.0, Bearer Token, AWS Signature, and Basic/Digest auth
- Dynamic request building with Script support in URLs, headers, and form data
- Flexible body types including raw, form-data, URL-encoded, and file uploads
Overview
REST connectors expose a simple interface to build the headers, authorization, body, and HTTP method for a REST request. The request body can be set statically in the connector configuration or dynamically generated based on the files processed by the connector.Actions
Connector Configuration
REST Details Tab
Settings related to the request details for the connector.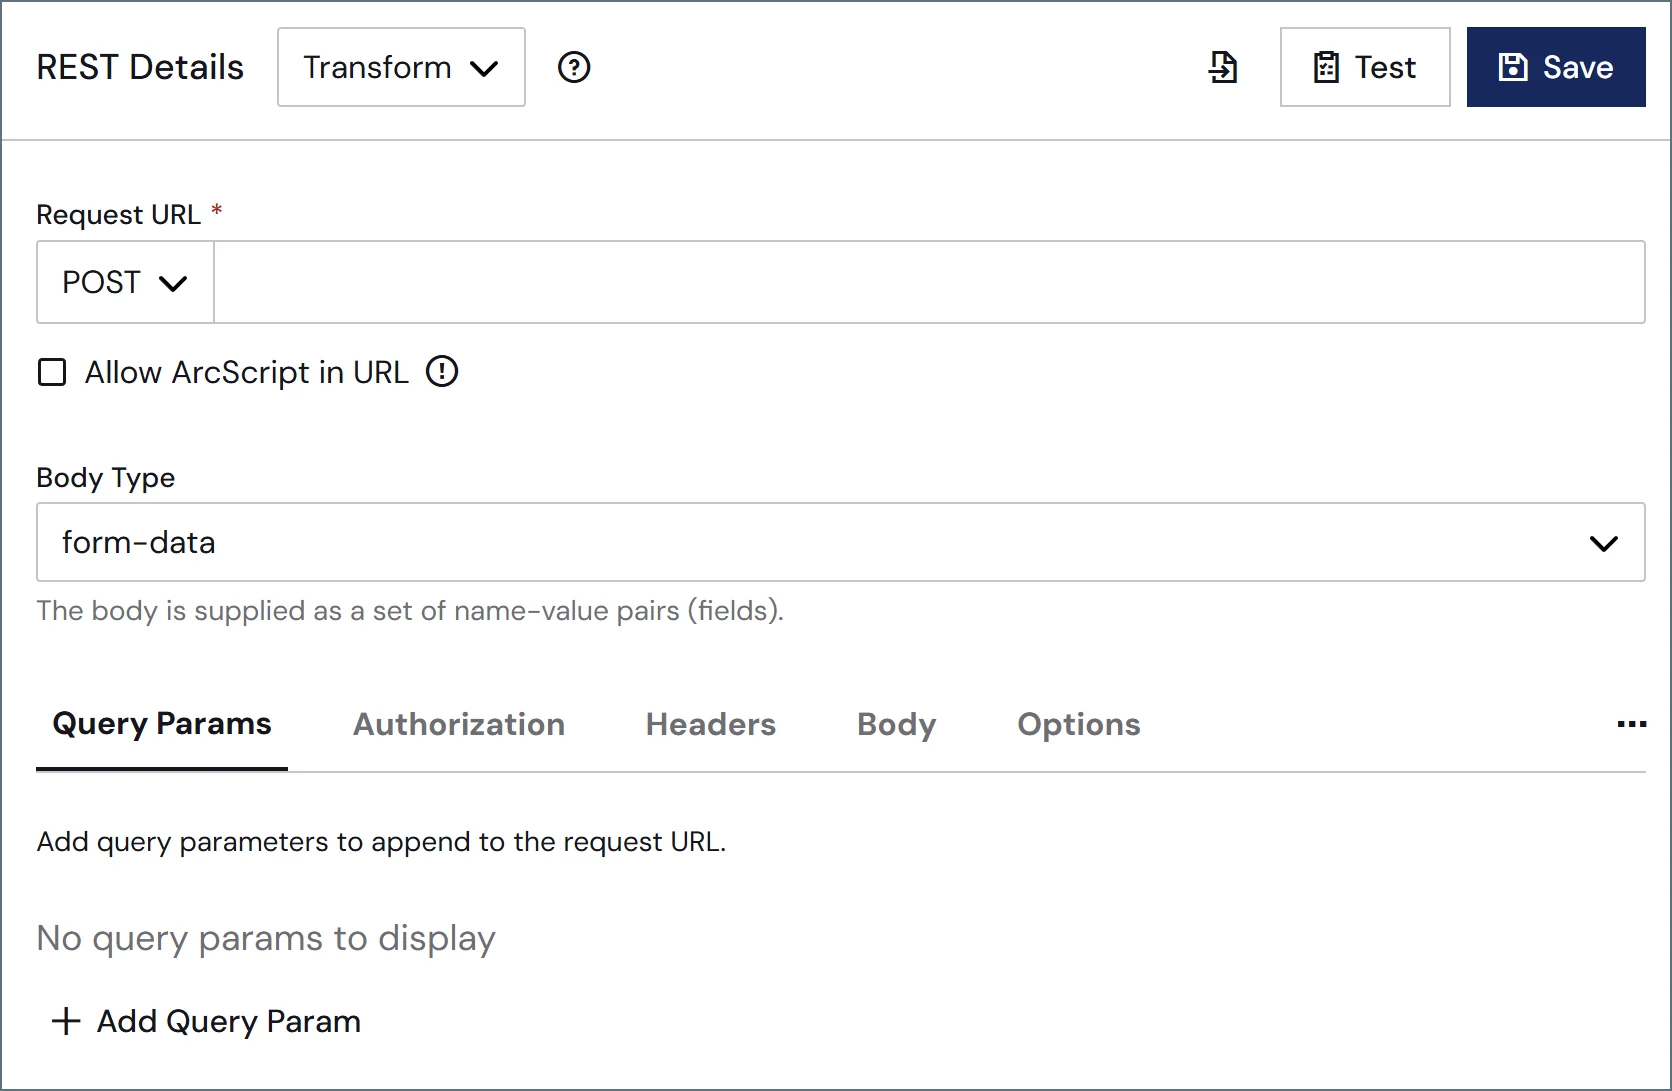
Authentication
Settings related to authenticating with the REST service.Request Details
| Setting | Description |
|---|---|
| Import from Swagger | Click the  icon to import API details directly from a Swagger URL. icon to import API details directly from a Swagger URL. |
| Test | Test the current configuration without creating a message or transaction that is sent down the flow. Clicking Test opens a window with four tabs (see Testing Request Configurations for more information): Response Body: View the body of the response from the server. Response Headers: View the headers that were included in the response from the server. Message Headers: View the message headers that were included in the output of the test. Log: View the connector log. |
| Action | Which action the connector should execute. (See Actions for details on the three options.) |
| Request URL | The HTTP method and target HTTP URL for the REST request. The available method options are: GET, POST, PUT, PATCH, and DELETE. |
| Body Type | The type of body content supplied with the REST request. Not visible when the HTTP method is GET. See Body Types for descriptions of each option. |
| Headers | The Headers tab supports adding a list of HTTP headers to include in the outgoing REST request. Headers are specified as name-value pairs. See Static Requests for more information. |
| Body | If the Body Type is set to form-data or x-www-urlencoded, use the Body tab to supply a set of name-value pairs (fields) that form the body of the request. See Body Types for details. |
Settings Tab
Settings related to the core configuration of the connector.Configuration
Advanced Settings
Advanced Tab
TLS Client Authentication
Advanced Settings
Settings not included in the previous categories.Proxy Settings
Logging
Miscellaneous
Automation Tab
Automation Settings
Settings related to the automatic processing of files by the connector.Performance
Alerts Tab
SLAs Tab
Transactions Tab
This tab lists all messages associated with the connector. Use the search bar to find specific messages, or click the funnel icon to apply a filter. You can filter by time, message direction, and/or status. Options on this tab vary depending on the connector’s action type:- If your connector is a Trigger, use the Receive Files button to start the flow.
- If your connector is a Transform or Terminal, use the Upload Files button to upload files to the flow.
Establishing a Connection
A valid target URL is required to establish a connection to any REST service. The service URL can support various HTTP methods, and you should configure the Method based on the particular web service action or data set to retrieve. Some services might also require authentication or a set of custom headers in order to consume the service. If the target URL is an HTTPS URL, set the TLS Server Certificate to the public key certificate identifying the server. To implicitly trust the target endpoint, set the field toAny Certificate.
Authenticating
The REST connector supports a number of authentication types, and each type has its own requirements:- Basic (plain text), Digest (encrypted), and NTLM require username-password authentication. These credentials are supplied to the REST service as headers in the request.
- OAuth authentication requires an app registration in the REST service’s web portal or development console. The Callback URL to include in the app registration is shown in the UI. Choose the Grant Type that applies to the REST service, and specify the remaining settings from the details shown in the REST service’s web portal or development console. Then click Get New Access Token to obtain the necessary tokens to interact with the service. Once the initial tokens have been retrieved, the application refreshes the tokens as they approach expiration.
- Bearer Token authentication requires a token from the service’s web portal or development console.
- AWS Signature authentication, for authenticating against Amazon, requires configuration credentials provided by Amazon: Access Key, Secret Key, and so forth.
Testing Request Configurations
At any time you can test your current configuration without creating a message or transaction that is sent down the flow. Click Test on the REST Details tab. The following image shows the Response Body results of a successful test.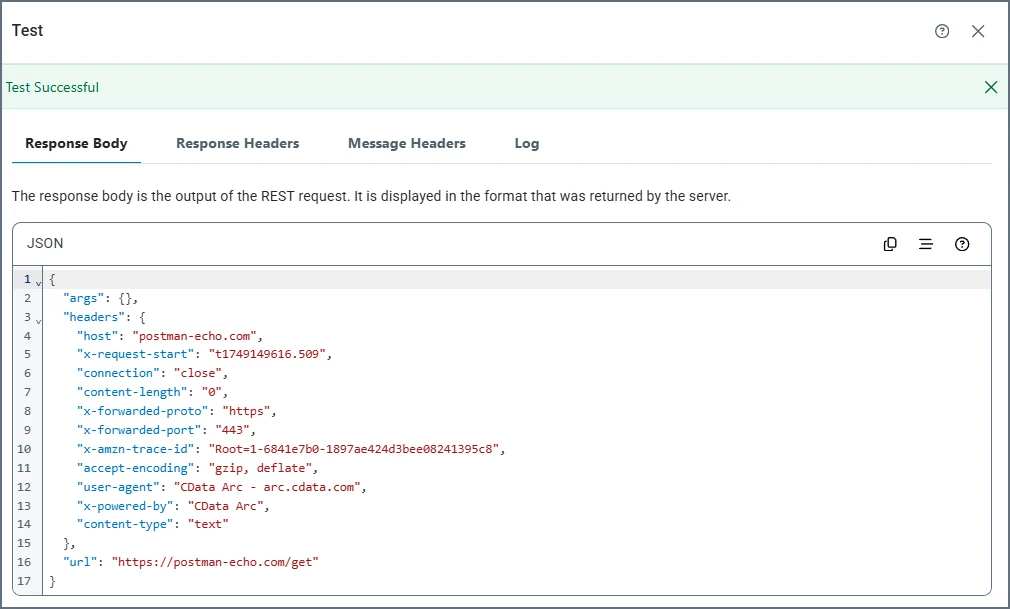
- Response Body: Displays the output of the REST request in the format that was returned from the server.
- Response Headers: Displays the response headers that were included in the response returned from the server.
- Message Headers: Displays the message headers that were included in the output of the test.
- Log: Displays the test logs.
Body Types
Use the connector Request Details tab to specify how the body is configured, and what type of information is supplied. The following list describes each option in more detail.- none: No body is supplied with the REST request.
- form-data: The body is supplied as a set of name-value pairs (fields). Use the dropdown list next to Name to select the field type.
- Static: Supply both the Name and the Value.
- XML: Supply the Name in the UI. The Value is dynamically read from the input file processed by the connector. For more information, see Dynamic Form Data.
- File: Each connector can have one body field set to File. This causes the input file to be sent in the body of the request. The Value field is greyed out since the connector uses the input file itself as the form data.
Note: The File option is incompatible with dynamic requests and other file requests. If you use this option, you can only combine it with static fields. - Header: Use the Value field to specify which header from the input message to read from for the body.
- Script: The Value supplied is rendered as Script, and the resulting value is used in the request body.
- x-www-urlencoded: The body is configured in the same way as form-data; however, the name-value pairs are encoded as a URL query string instead of multipart form data.
- raw: The body is set to the contents of the input file processed by the connector. Select the Content Type of the body using the dropdown, or by specifying it as a custom header in the Header section.
Static Requests
REST requests that have entirely static content (such as requests that use the HTTP GET method) do not require an input file, since the request content is configured entirely in the connector UI. Simply add any necessary name-value pairs as custom headers in the Header section or form data in the Body section. Static requests can be automatically sent according to a schedule if Receive Automation is enabled. The response to each request is stored in the output folder or passed along to the next connector in the flow. If Send Automation is enabled, files arriving at the connector input folder also trigger a static request. The content of the input file is ignored, and the request is sent according to the configuration in the UI.Dynamic Requests
REST requests can be dynamically populated with data from files that arrive in the connector input folder.Raw Input Data
If you set the Body Type of the request toraw, the content of input files is sent as the body of the REST request.
Use the Content Type dropdown to set the specific content type of the data. If the content type you need is not listed, you can add a Content-Type header in the Header section.
Dynamic Form Data
If you set the Body Type of the request toform-data or x-www-urlencoded, the connector looks for specific values from the input file to populate the request. For each name-value pair that is set to XML, the connector scans input files for an XML element that shares the same name as the field name, and that uses a specific XML structure, as shown below:
CustomerID, and the input file has the XML shown below, the REST connector sets the value of the CustomerID field to 12354.
Dynamic Templates with XML Map
Use the XML Map connector in conjunction with the REST connector to easily build dynamic requests out of other XML data structures. The XML Map connector converts custom XML structures into the XML structure that the REST connector expects. First, configure the REST connector with the set of dynamic (and static) Body fields that should be present in the request. Next, connect an XML Map connector to the REST connector in the flow and save the flow changes. This allows the XML Map connector to detect which fields the REST connector expects in incoming input files. Then, inside the XML Map connector, the Destination File dropdown includes the REST request schema. Select this as the Destination, and set the Source File to a custom XML structure. This populates the XML Map Mapping Editor, and you can drag and drop the data that needs to be included in the REST request from the source structure into the destination structure. Once the mapping is complete, the XML Map connector automatically converts files that match the source file into a valid REST request structure. For more information on using the XML Map connector, please see the XML Map connector documentation.URL
If you select Allow Script in URL on the Advanced tab of the connector configuration pane, expressions in Script can be evaluated to generate dynamic strings as URLs. For example, the following URL includes the date and time:http://myendpoint.com/api?day=[_ | now('yyyyMMdd')]
This URL includes a header on the incoming message for queries triggered through send automation:
http://myendpoint.com/api?customer=[_message.header:customerid]
Finally, this URL uses a dynamic date range beginning from the time of the last query to the current timestamp, using a default timestamp for the first query:
http://myendpoint.com/api?DateFrom=[_connector.lastruntimestamp | def('2025-01-01T00:00:00-04:00')]&DateTo=[_connector.currenttimestamp]
Headers
If you select Allow Script in Headers on the Advanced tab of the connector configuration pane, expressions in Script can be evaluated to generate dynamic strings as header values. For example, the following header contains the date and time:Timestamp [_ | now('yyyyMMdd')]
The header below contains a customer Id for queries triggered through send automation:
Customer [_message.header:customerid]
Response Event
You can use a response event in the REST connector to interact with the response received from the server (which includes the body, headers, cookies, and so on), and to enrich the output message generated from the connector. You can use the following special items in theResponse event.
Response Event Example
This script reads the JSON response received from a REST call, parses out the access token contained in the JSON, and adds it as a header onto the output message created by the REST connector:_response.body and is set to the text attribute of the jsonDOMGet operation. Other attributes of jsonDOMGet are also populated, such as the map attribute with the jsonpath to the desired token in the response body.
2 The jsonDOMGet operation is called. If the token is found in the response JSON body, it is added as a message header to the output message of the REST connector via the _message.header:access_token syntax. If the token is not found, the value of the access_token header is set to a static string: Token not found!.
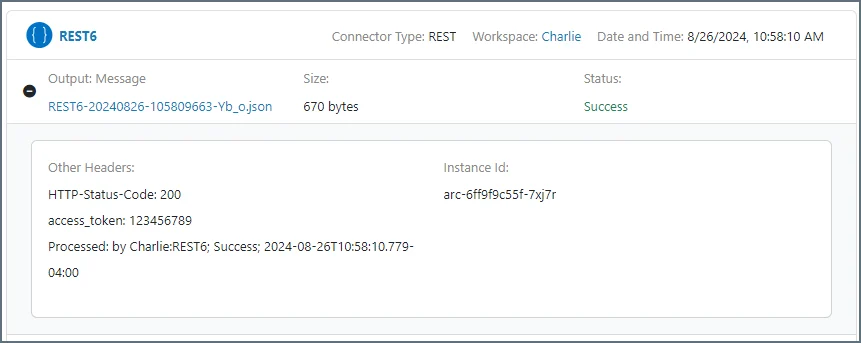
Here is what that result looks like in when you view the output message details of the message from the REST connector: