

Key Capabilities
- Databricks lakehouse platform integration with Personal Access Token and Azure Service Principal authentication
- HTTP Path configuration for targeting specific Databricks compute resources and clusters
- Standard database operations (Select, Lookup, Upsert, and Stored Procedure) for data manipulation
Establish a Connection
To allow Arc to use data from Databricks, you must first establish a connection to Databricks. There are two ways to establish this connection:- Add a Databricks connector to your flow. Then, in the settings pane, click Create next to the Connection drop-down list.
- Open the Arc Settings page, then open the Connections tab. Click Add, select Databricks, and click Next.
- The login process is only required the first time the connection is created.
- Connections to Databricks can be re-used across multiple Databricks connectors.
Enter Connection Settings
After opening a new connection dialogue, follow these steps:-
Enter the connection information:
- Name — The static name of the connection.
- Type — This is always set to Databricks.
- Auth Scheme — The authentication scheme to use for the connection. Options are Personal Access Token and Azure Service Principal.
-
Create the connection according to your selected Auth scheme:
- Personal Access Token — Enter the following information:
- Server — The host name or IP address of the server hosting Databricks.
- HTTP Path — The endpoint path on the Databricks instance where API requests should be sent, typically in the format
/sql/1.0/warehouses/{warehouse_id}. - Access Token — Your Databricks access token.
- Azure Service Principal — Enter the following information:
- Server — The host name or IP address of the server hosting Databricks.
- HTTP Path — The endpoint path on the Databricks instance where API requests should be sent, typically in the format
/sql/1.0/warehouses/{warehouse_id}. - AzureTenantId — The tenant Id of your Microsoft Azure Active Directory.
- AzureClientId — The application (client) Id of your Microsoft Azure Active Directory application.
- Azure Client Secret — The application (client) secret of your Microsoft Azure Active Directory application.
- Azure Subscription Id — The subscription Id of your Microsoft Azure Databricks Service Workspace.
- Azure Resource Group — The resource group name of your Microsoft Azure Databricks Service workspace.
- Azure Workspace — The name of your Microsoft Azure Databricks Service Workspace.
- Personal Access Token — Enter the following information:
- If necessary, click Advanced to open the drop-down menu of advanced connection settings. These settings should not be needed in most cases.
- Click Test Connection to ensure that Arc can connect to Databricks with the provided information. If an error occurs, check all fields and try again.
- Click Add Connection to finalize the connection.
- In the Connection drop-down list of the connector configuration pane, select the newly-created connection.
- Click Save Changes.
Select an Action
After establishing a connection to Databricks, you must choose the action that the Databricks connector will perform. The table below outlines each action and where it belongs in an Arc flow.Advanced Tab
Many of the settings on the Advanced tab are dynamically loaded from the data source you are working with, so they are not covered in this documentation. You can find detailed information for your data source on the Online Help Files page of the CData website. The options described below are available for all data sources.Message
The Save to Sent Folder and Sent Folder Scheme settings are deprecated and hidden by default. They appear only on connectors where they were previously enabled or configured to a non-default value. To retain copies of successfully processed files, right-click the connector in the flow, choose Show Success Path, and connect the success path to a File connector.
Advanced Settings
Advanced settings are common settings for connectors that rely on arbitrary database drivers (for example, Database, CData, and API connectors) in order to make connections to various data sources.Miscellaneous
Miscellaneous settings are for specific use cases.Automation Tab
Automation Settings
Settings related to the automatic processing of files by the connector.Performance
Settings related to the allocation of resources to the connector.Alerts Tab
Settings related to configuring alerts. Before you can execute Service Level Agreements (SLAs), you need to set up email alerts for notifications. By default, Arc uses the global settings on the Alerts tab. To use other settings for this connector, toggle Override global setting on. By default, error alerts are enabled, which means that emails are sent whenever there is an error. To turn them off, uncheck the Enable checkbox. Enter a Subject (mandatory), then optionally enter a comma-separated list of Recipient emails.SLAs Tab
Settings related to configuring Service Level Agreements (SLAs). SLAs enable you to configure the volume you expect connectors in your flow to send or receive, and to set the time frame in which you expect that volume to be met. Arc sends emails to warn the user when an SLA is not met, and marks the SLA as At Risk, which means that if the SLA is not met soon, it will be marked as Violated. This gives the user an opportunity to step in and determine the reasons the SLA is not being met, and to take appropriate actions. If the SLA is still not met at the end of the at-risk time period, the SLA is marked as violated, and the user is notified again. To define an SLA, toggle Expected Volume on, then click the Settings tab.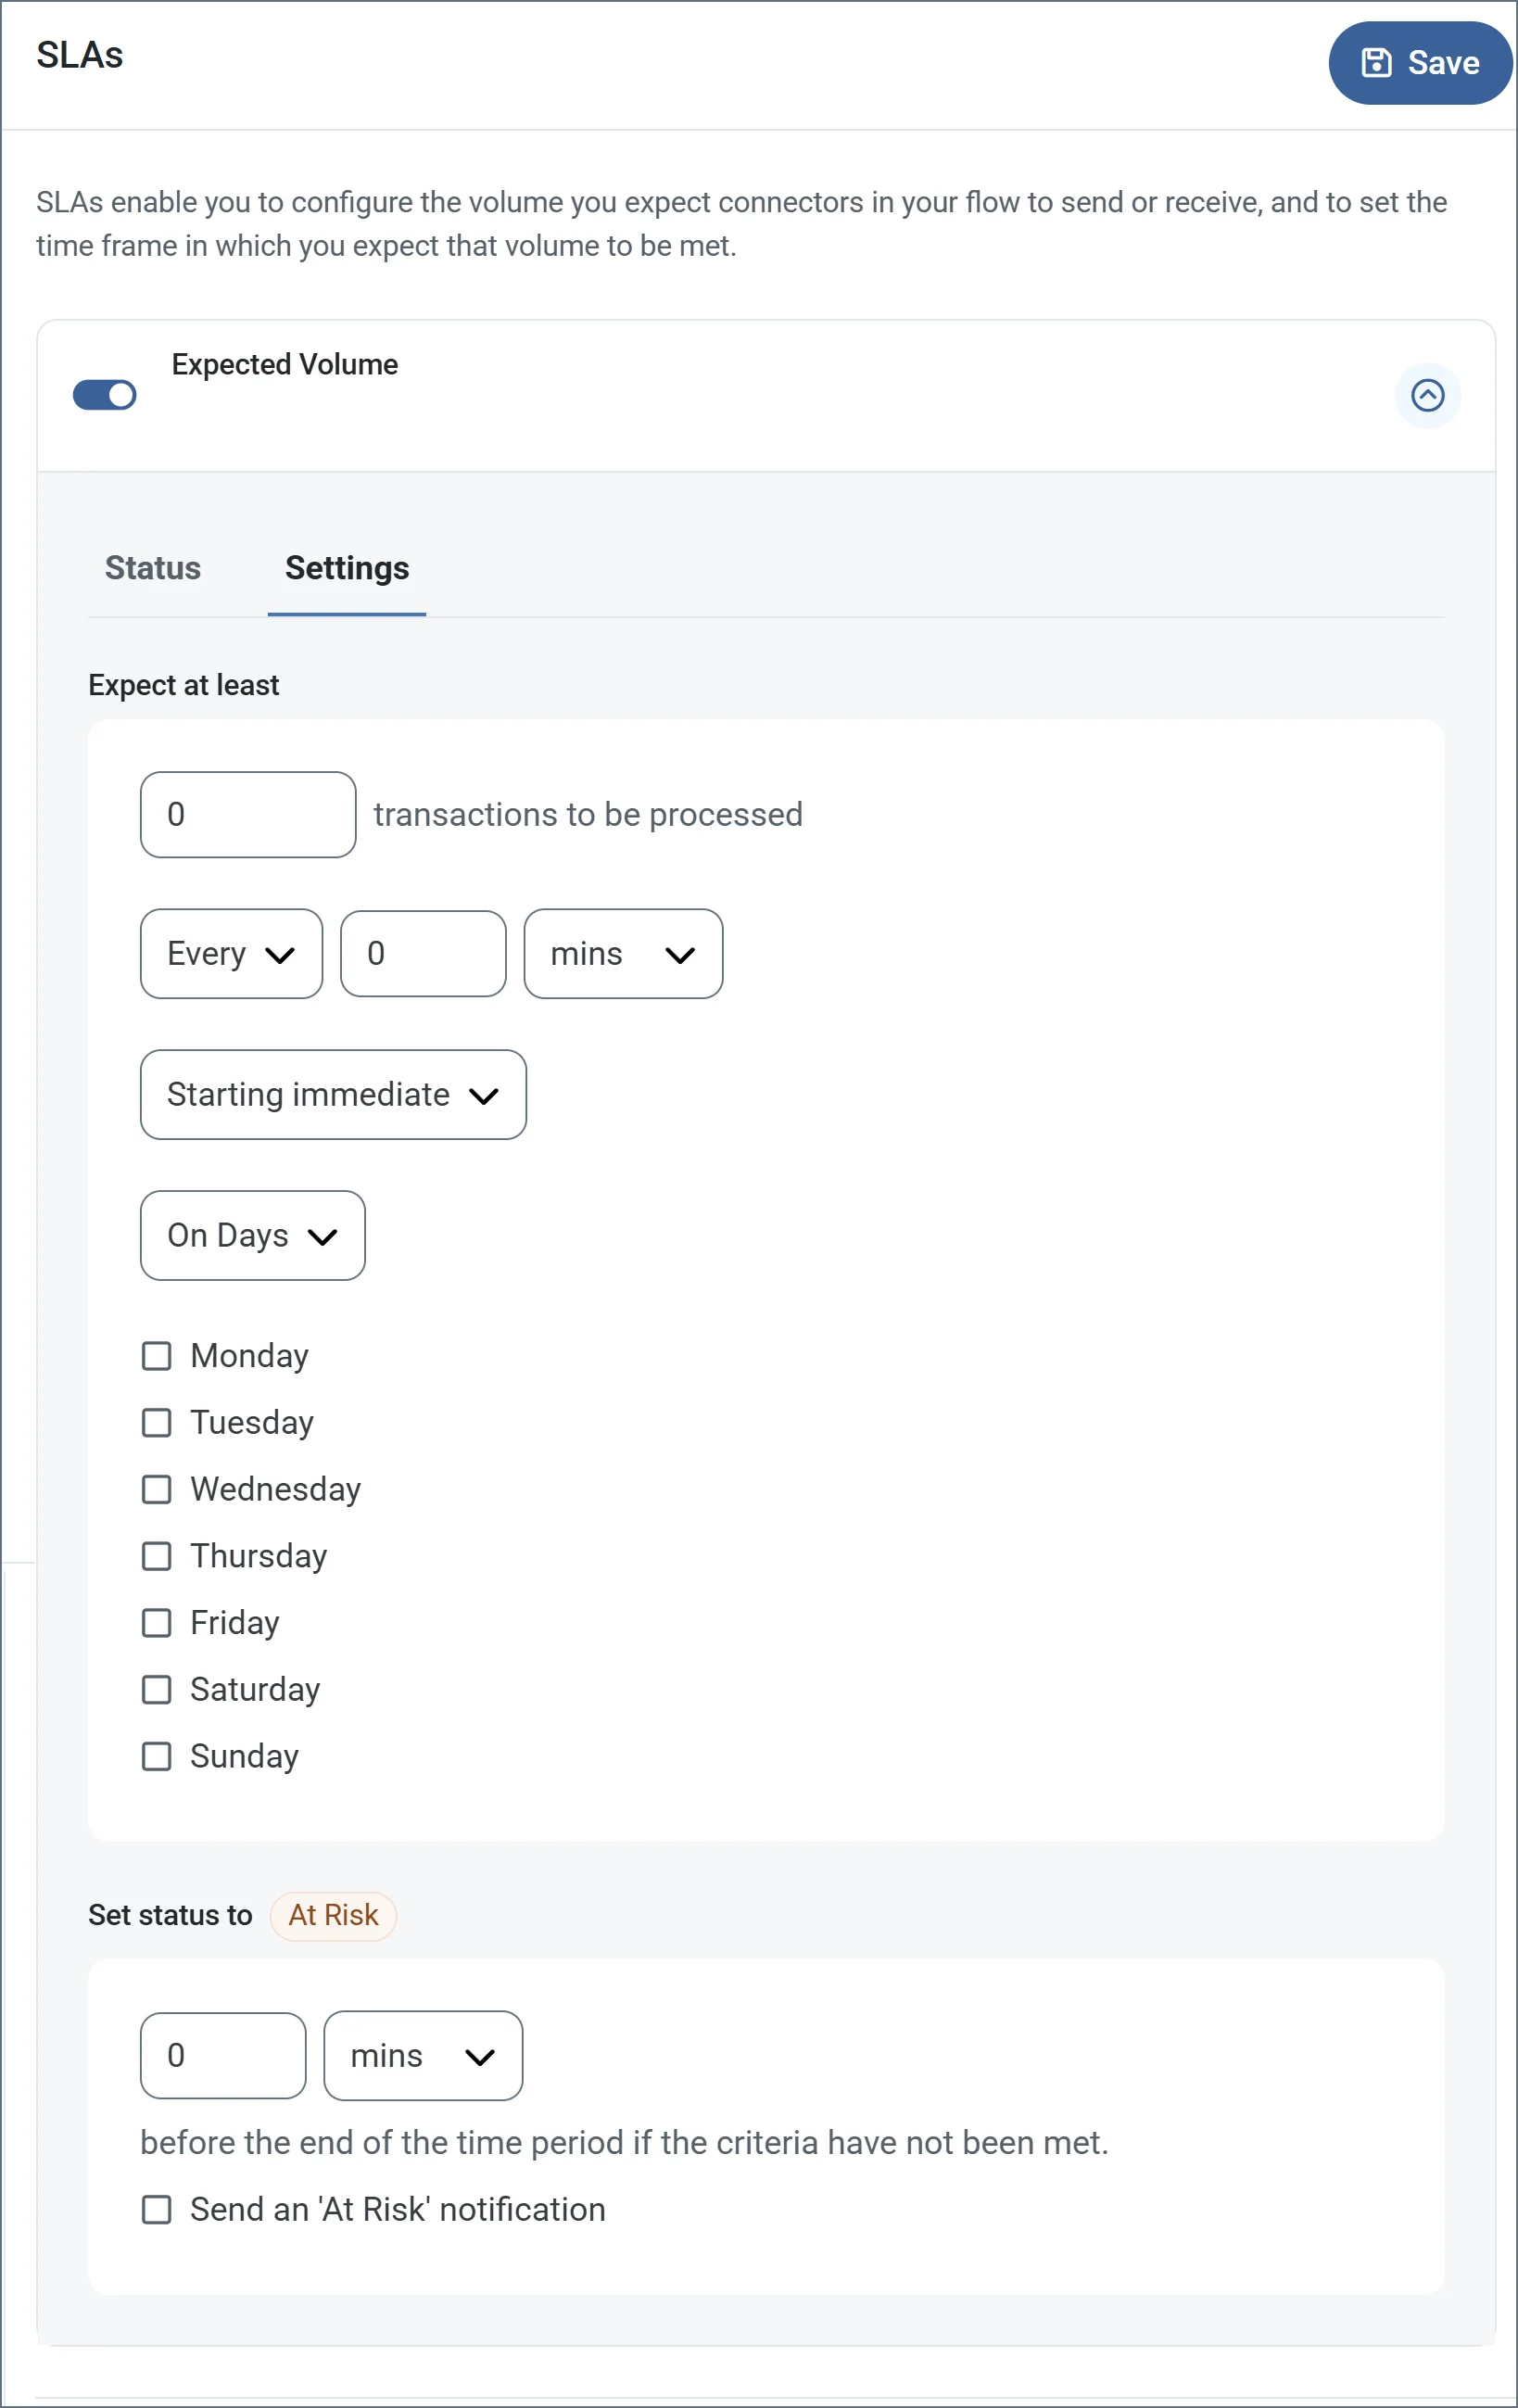
- If your connector has separate send and receive actions, use the radio buttons to specify which direction the SLA pertains to.
- In the Expect at least portion of the window:
- Set the minimum number of transactions you expect to be processed (the volume)
- Use the Every fields to specify the time frame
- Indicate when the SLA should go into effect. If you choose Starting on, complete the date and time fields.
- Check the boxes for the days of the week that you want the SLA to be in effect. Use the dropdown to choose Everyday if necessary.
- In the Set status to ‘At Risk’ portion of the window, specify when the SLA should be marked as at risk.
- By default, notifications are not sent until an SLA is in violation. To change that, check Send an ‘At Risk’ notification.
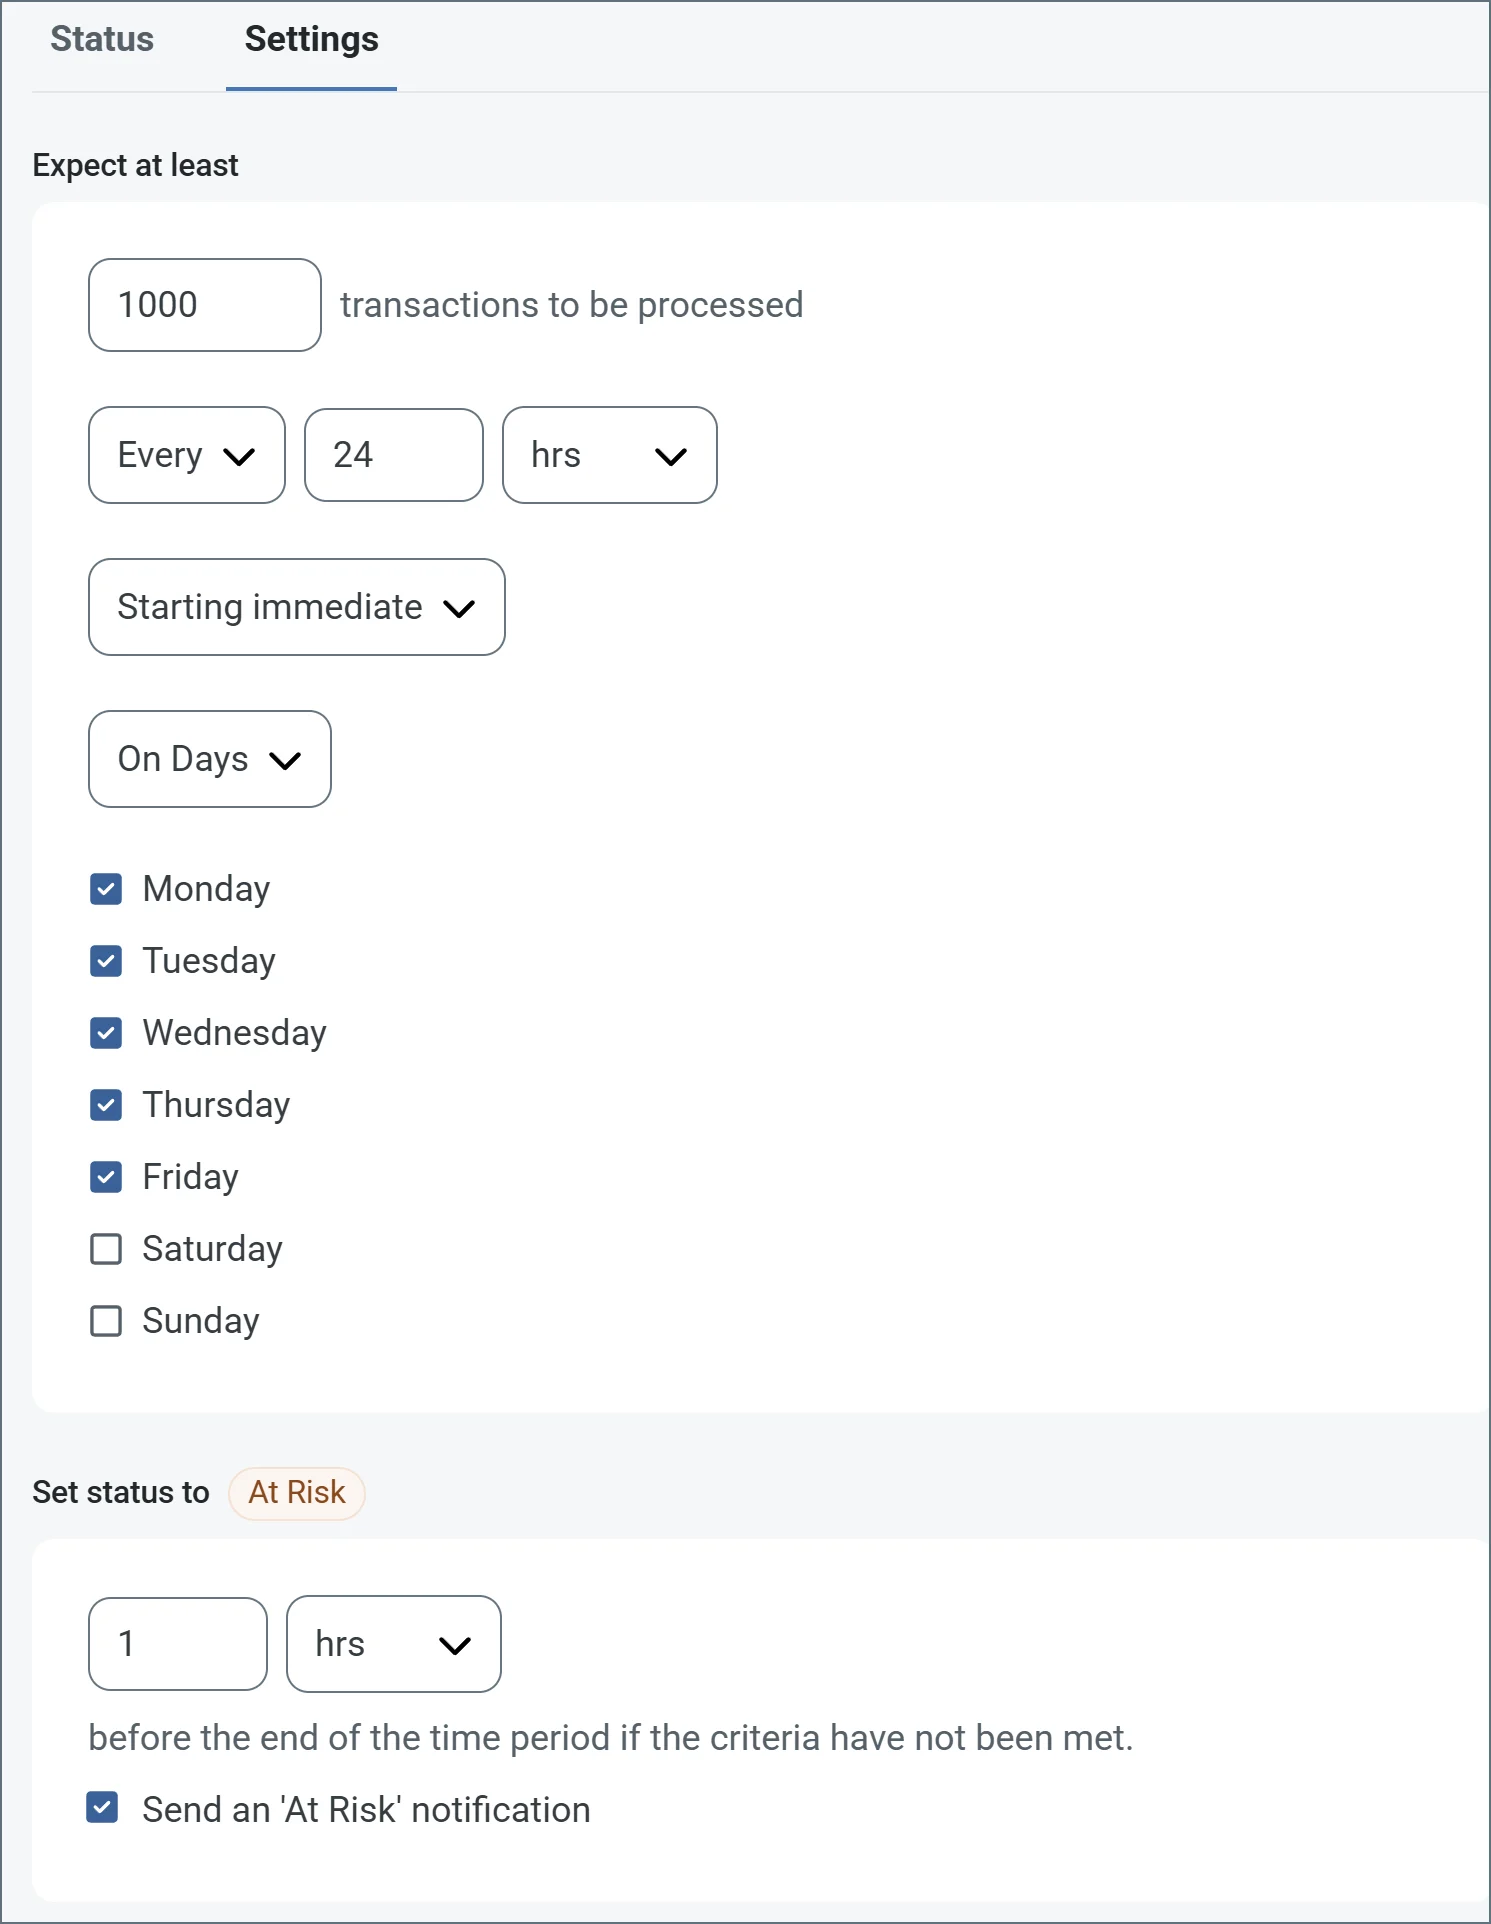
You can turn off SLA alerts if necessary. This can be useful during maintenance windows. Click Settings on the navbar, then navigate to Alerts > General Alerts. Click the tablet and pencil icon to edit, and uncheck the SLA Alerts setting.
Macros
Using macros in file naming strategies can enhance organizational efficiency and contextual understanding of data. By incorporating macros into filenames, you can dynamically include relevant information such as identifiers, timestamps, and header information, providing valuable context to each file. This helps ensure that filenames reflect details important to your organization. Arc supports these macros, which all use the following syntax:%Macro%.
Examples
Some macros, such as %Ext% and %ShortDate%, do not require an argument, but others do. All macros that take an argument use the following syntax:%Macro:argument%
Here are some examples of the macros that take an argument:
- %Header:headername%: Where
headernameis the name of a header on a message. - %Header:mycustomheader% resolves to the value of the
mycustomheaderheader set on the input message. - %Header:ponum% resolves to the value of the
ponumheader set on the input message. - %RegexFilename:pattern%: Where
patternis a regex pattern. For example,%RegexFilename:^([\w][A-Za-z]+)%matches and resolves to the first word in the filename and is case insensitive (test_file.xmlresolves totest). - %Vault:vaultitem%: Where
vaultitemis the name of an item in the vault. For example,%Vault:companyname%resolves to the value of thecompanynameitem stored in the vault. - %DateFormat:format%: Where
formatis an accepted date format (see Sample Date Formats for details). For example,%DateFormat:yyyy-MM-dd-HH-mm-ss-fff%resolves to the date and timestamp on the file.
- Combining multiple macros in one filename:
%DateFormat:yyyy-MM-dd-HH-mm-ss-fff%%EXT% - Including text outside of the macro:
MyFile_%DateFormat:yyyy-MM-dd-HH-mm-ss-fff% - Including text within the macro:
%DateFormat:'DateProcessed-'yyyy-MM-dd_'TimeProcessed-'HH-mm-ss%