REST connectors expose a simple interface to build the headers, authorization, body, and HTTP method for a REST request. The request body can be set statically in the connector configuration or dynamically generated based on the files processed by the connector.
A scheme for assigning filenames to messages that are output by the connector. You can use macros in your filenames dynamically to include information such as identifiers and timestamps. For more information, see Macros.
Settings related to the request details for the connector.
Setting
Description
REST Details
Select the action the connector should execute. (See Actions for details on the three options.)
Import from Swagger
Click the icon to import API details directly from a Swagger URL.
Test
Test the current configuration without creating a message or transaction that is sent down the flow. Clicking Test opens a window with additional tabs (see Testing Request Configurations for more information).
Request URL
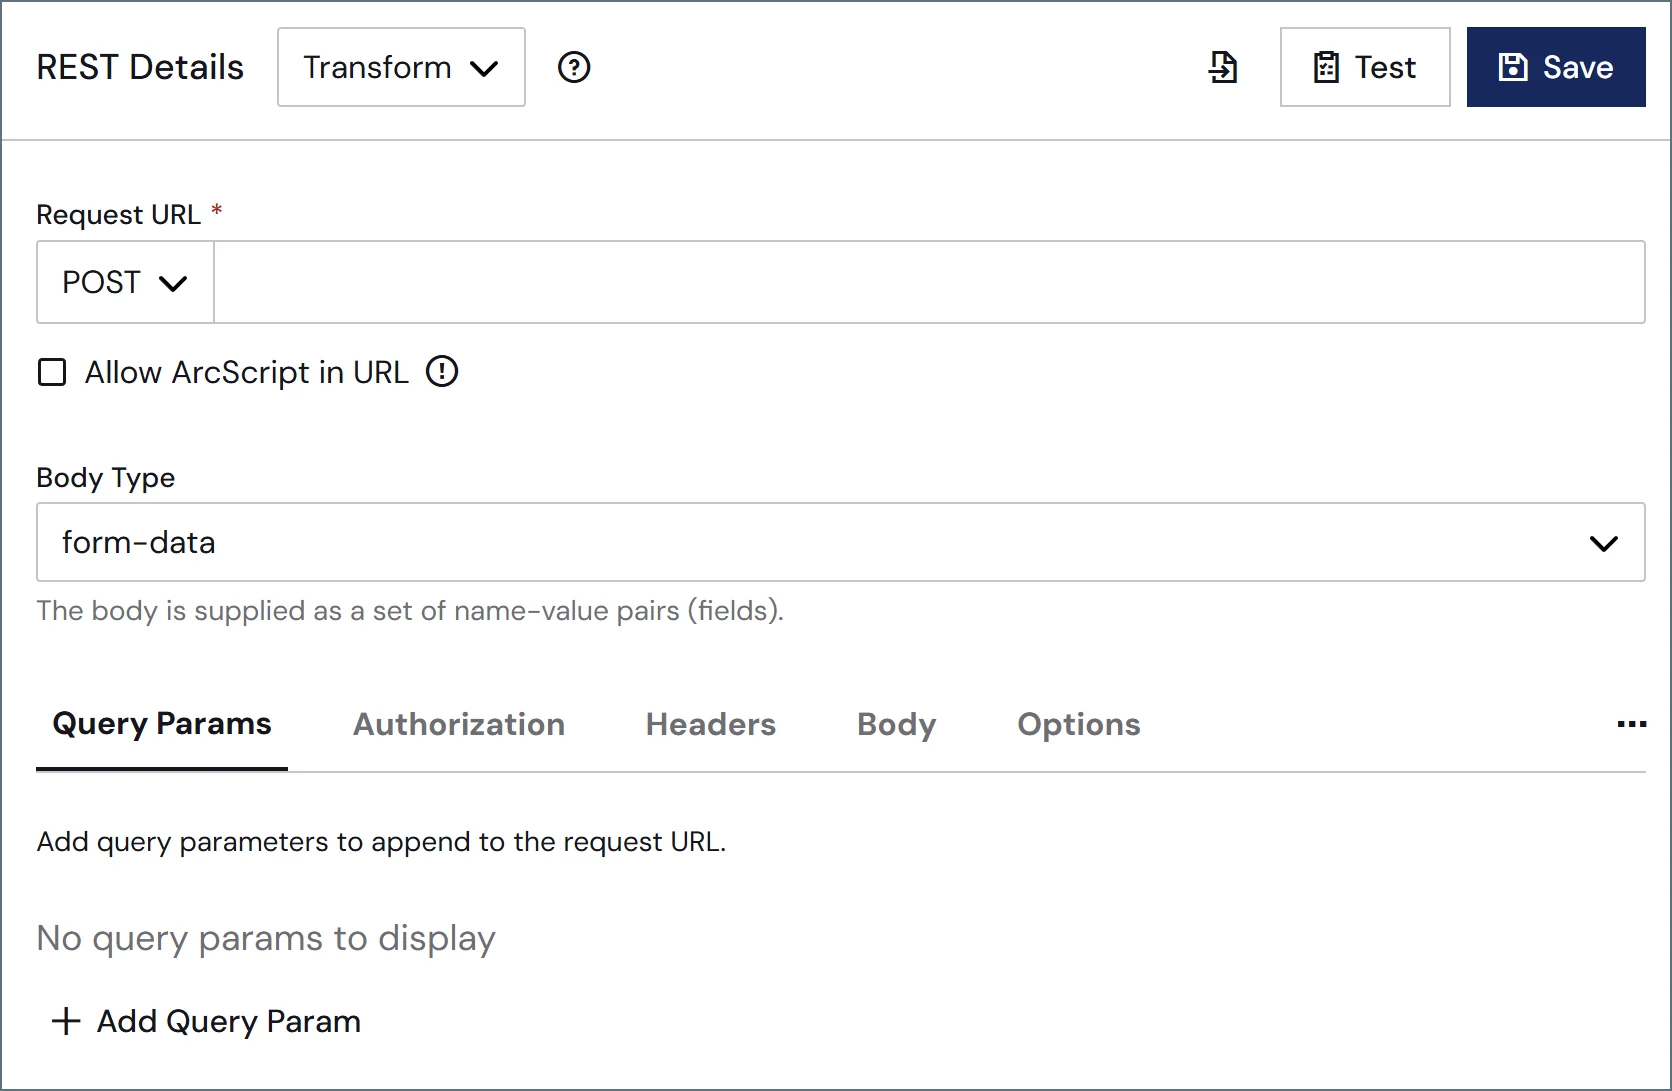
The HTTP method and target HTTP URL for the REST request. The available method options are: GET, POST, PUT, PATCH, and DELETE.
Allow Script in URL
Check this to allow the evaluation of Script expressions in the URL before the query is issued. When you select this, the button appears, which enables you to build dynamic request URLs using Script. See Using the Script Editor for Request URLs and Headers for details.
Body Type
The type of body content supplied with the REST request. Not visible when the HTTP method is GET. See Body for descriptions of each option.
Content Type
The type of content used for raw data transfers. Only visible when Body Type is set to raw.
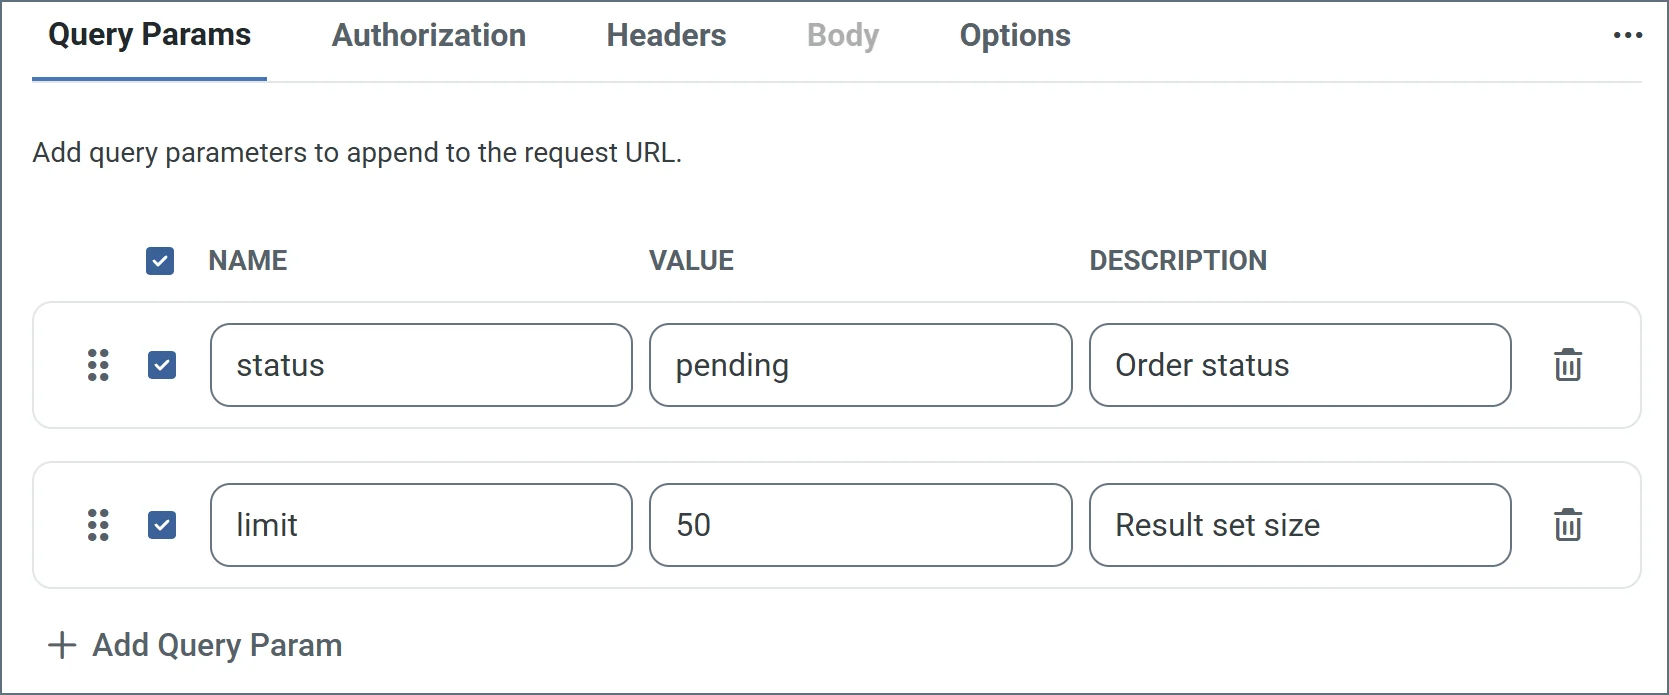
Use this tab to add query parameters to your request URL. Supply the parameters as name-value pairs, with optional descriptions. Click Save to update the URL with your parameters.The previous image includes two sets of query parameters. When the connector is saved, the api.example.com request URL becomes: https://api.example.com/orders?status=pending&limit=50Click the ellipses on the right to set two other options: Bulk Edit View and Hide Description Column.
Use this tab to configure authentication credential for API requests.
Setting
Description
Credentials
Whether to supply authentication credentials from a previously configured Connection, create a new connection, or send requests without authentication. From Connection: Select this, then choose your Connection from the dropdown. Note: Create a new connection by clicking the plus sign next to Connection. No Credentials: Select this to send requests without authentication. Use this option for public APIs or when authentication is handled through query parameters or headers.
TLS Server Certificate
The public key certificate used to verify the identity of a TLS server. You can upload a certificate, leave the field blank to allow the underlying OS/JVM to perform certificate validation, or set it to Any Certificate to trust the target server’s identity. Use Any Certificate with caution: the certificate verifies that you are connecting to the intended server.
This tab enables you to add a list of HTTP headers to include in the outgoing REST request. Headers are also specified as name-value pairs. See Static Requests and Dynamic Requests for more information. Click the ellipses on the right to access three other options: Bulk Edit View, Allow Script in Headers, and Show Autogenerated Headers. See Using the ArcScript Editor for Request URLs and Headers for details on using the Script editor.
If the Body Type is set to form-data or x-www-urlencoded, use the Body tab to supply the set of name-value pairs (fields) that form the body of the request. The following list describes each option in more detail.
none: No body is supplied with the REST request.
form-data: The body is supplied as a set of name-value pairs (fields). Use the dropdown list next to Name to select the field type.
Static: Supply both the Name and the Value.
XML: Supply the Name in the UI. The Value is dynamically read from the input file processed by the connector. For more information, see Dynamic Form Data.
File: Each connector can have one body field set to File. This causes the input file to be sent in the body of the request. The Value field is greyed out since the connector uses the input file itself as the form data.
Header: Use the Value field to specify which header from the input message to read from for the body.
Script: The Value supplied is rendered as Script, and the resulting value is used in the request body.
x-www-urlencoded: The body is configured in the same way as form-data; however, the name-value pairs are encoded as a URL query string instead of multipart form data.
raw: The body is set to the contents of the input file processed by the connector. Select the Content Type of the body using the dropdown, or by specifying it as a custom header in the Header section.
Click the ellipses on the right to access two other settings: Bulk Edit View and Show Content Type Column. Showing the content type column enables you to supply the content type on a per-field basis for form-data and x-www-form-urlencoded body types.
By default, the connector does not output a message to the flow when the response is sent with a status code that does not indicate success. Enable this setting to have the connector output a message to the flow for these error responses. You can use the HTTP-Status-Code header to filter messages later in the flow.
Compress HTTP Request
Enable this to compress the body of PUT or POST requests into gzip format before sending the request. The Content-Encoding header is also added to the outgoing request.
GET Request Body
Allows GET requests to use the input message data as the body of the request.
HTTP Version
Whether to use HTTP 1.0, 1.1, or 2.0 when connecting to the REST service.
Whether to use HTTP Chunked Transfer Encoding when sending requests. This allows the application to send portions (chunks) of the message sequentially to avoid overloading the connection.
Chunk Size
The size, in bytes, of each chunk when Chunked Encoding is enabled.
Follow Authorization Header
When enabled, retains the authorization header when a redirect happens to a different protocol or hostname.
Output Behavior
By default, the connector outputs a message containing the Response data. The other options allow you to output the Input Message so it can be processed further, or to not output a message at all. See Response Event for more information.
Timeout (seconds)
The duration in seconds to wait for a response from the REST server before throwing a timeout error.
Response Headers
When set, the connector promotes the specified headers from the REST message as metadata on the downloaded message. You can specify multiple headers in a comma-separated list.
Preserve Cookies
To preserve cookies on output messages, supply a comma-separated list of the cookie names to persist. Use * to preserve all cookies. Note: Only the name-value pairs are preserved, and no attribute checks are performed. Users are responsible for ensuring cookies are not leaked to unintended destinations.
TLS Enabled Protocols
The list of TLS/SSL protocols supported when establishing outgoing connections. Best practice is to only use TLS protocols. SSL v2 and SSL v3 are considered vulnerable and should only be used if your partner does not support higher versions. Keep in mind that TLS v1.3 is not universally adopted, and might be refused if the destination server does not support it.
Processing Delay
The amount of time (in seconds) by which the processing of files placed in the Transactions tab is delayed. This is a legacy setting. Best practice is to use a File connector to manage local file systems instead of this setting.
Settings related to the automatic processing of files by the connector.
Setting
Description
Send
A toggle that instructs the connector to automatically send files when they are ready.
Retry Interval
The interval the connector waits before retrying a failed send.
Max Attempts
The number of attempts the connector makes to send the message. Setting this value to 1 instructs the connector to only make the initial send attempt without retrying. The connector waits the duration specified by Retry Interval between each attempt.
Receive
A toggle that instructs the connector to automatically make the REST request at the configured interval.
Interval
The interval at which the connector makes the configured REST request. The next field depends on the selection here: Hourly: A Minutes Past the Hour dropdown menu allows you to specify the number of minutes past the hour to process receive files. Daily: A Time field appears to specify the time of day (in UTC) to process receive files. Weekly: Two fields appear. Day allows you to select the day of the week for processing, and Time allows you to specify the time (in UTC) to process receive files. Monthly: Two fields appear. Day allows you to select the day of the month for processing, and Time allows you to specify the time (in UTC) to process receive files. Minute: A Minutes field appears to specify the number of minutes between processing intervals. Advanced: A five-position Cron Expression field allows you to specify exact processing intervals.
Minutes Past the Hour
The minutes offset for an hourly schedule. Only applicable when Receive is set to Hourly. For example, if this value is set to 5, the automation service sends requests at 1:05, 2:05, 3:05, etc.
This tab lists all messages associated with the connector. Use the search bar to find specific messages, or click the funnel icon to apply a filter. You can filter by time, message direction, and/or status.Options on this tab vary depending on the connector’s action type:
If your connector is a Trigger, use the Receive Files button to start the flow.
If your connector is a Transform or Terminal, use the Upload Files button to upload files to the flow.
A valid target URL is required to establish a connection to any REST service. The service URL can support various HTTP methods, and you should configure the method based on the particular web service action or dataset to retrieve. Some services might also require authentication or a set of custom headers in order to consume the service.The Credentials section of the Authorization tab enables you to specify your connection credentials. Choose from the following options:
From Connection: Choose a previously configured shared Connection, or click the plus sign next to the Connection field to Create a Connection.
No Credentials for public APIs or when authentication is being handled through query parameters or headers. If the target URL is an HTTPS URL, set the TLS Server Certificate to the public key certificate identifying the server. To implicitly trust the target endpoint, set the field to Any Certificate.
The REST connector supports a number of authentication types, and each type has its own requirements:
Basic (plain text), Digest (encrypted), and NTLM require username-password authentication. These credentials are supplied to the REST service as headers in the request.
OAuth authentication requires an app registration in the REST service’s web portal or development console. The Callback URL to include in the app registration is shown in the UI. Choose the Grant Type that applies to the REST service, and specify the remaining settings from the details shown in the REST service’s web portal or development console. Then click Get New Access Token to obtain the necessary tokens to interact with the service. Once the initial tokens have been retrieved, the application refreshes the tokens as they approach expiration.
Bearer Token authentication requires a token from the service’s web portal or development console.
AWS Signature authentication, for authenticating against Amazon, requires configuration credentials provided by Amazon: Access Key, Secret Key, and so forth.
API Key authentication requires a key-value pair, then you must specify whether the key should be added as a header or as a query parameter.
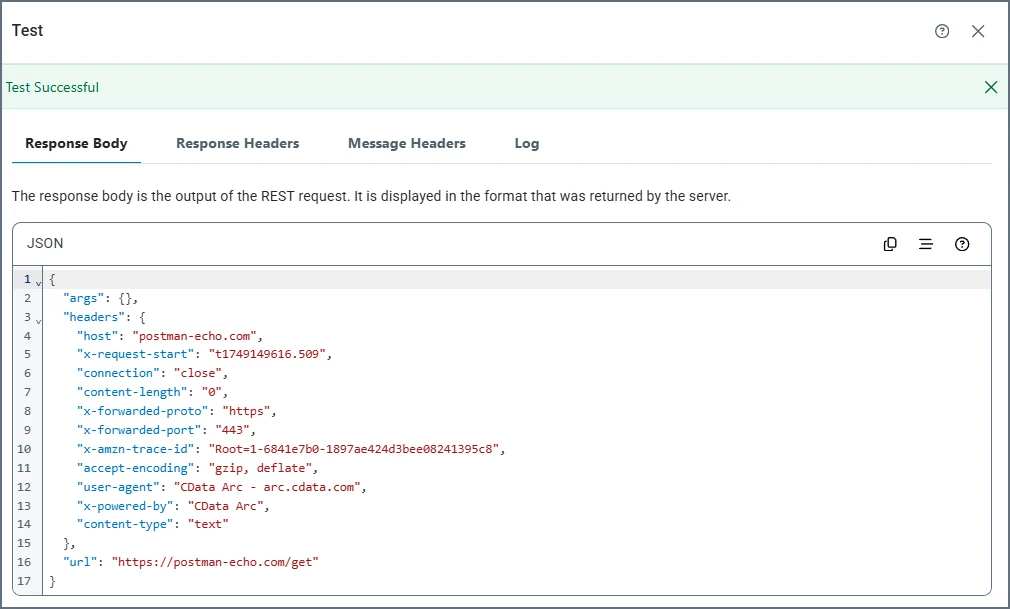
At any time you can test your current configuration without creating a message or transaction that is sent down the flow. Click Test on the REST Details tab. The following image shows the Response Body results of a successful test of a Trigger connector.
Response Body: Displays the output of the REST request in the format that was returned from the server.
Response Headers: Displays the response headers that were included in the response returned from the server.
Message Headers: Displays the message headers that were included in the output of the test.
Log: Displays the test logs.
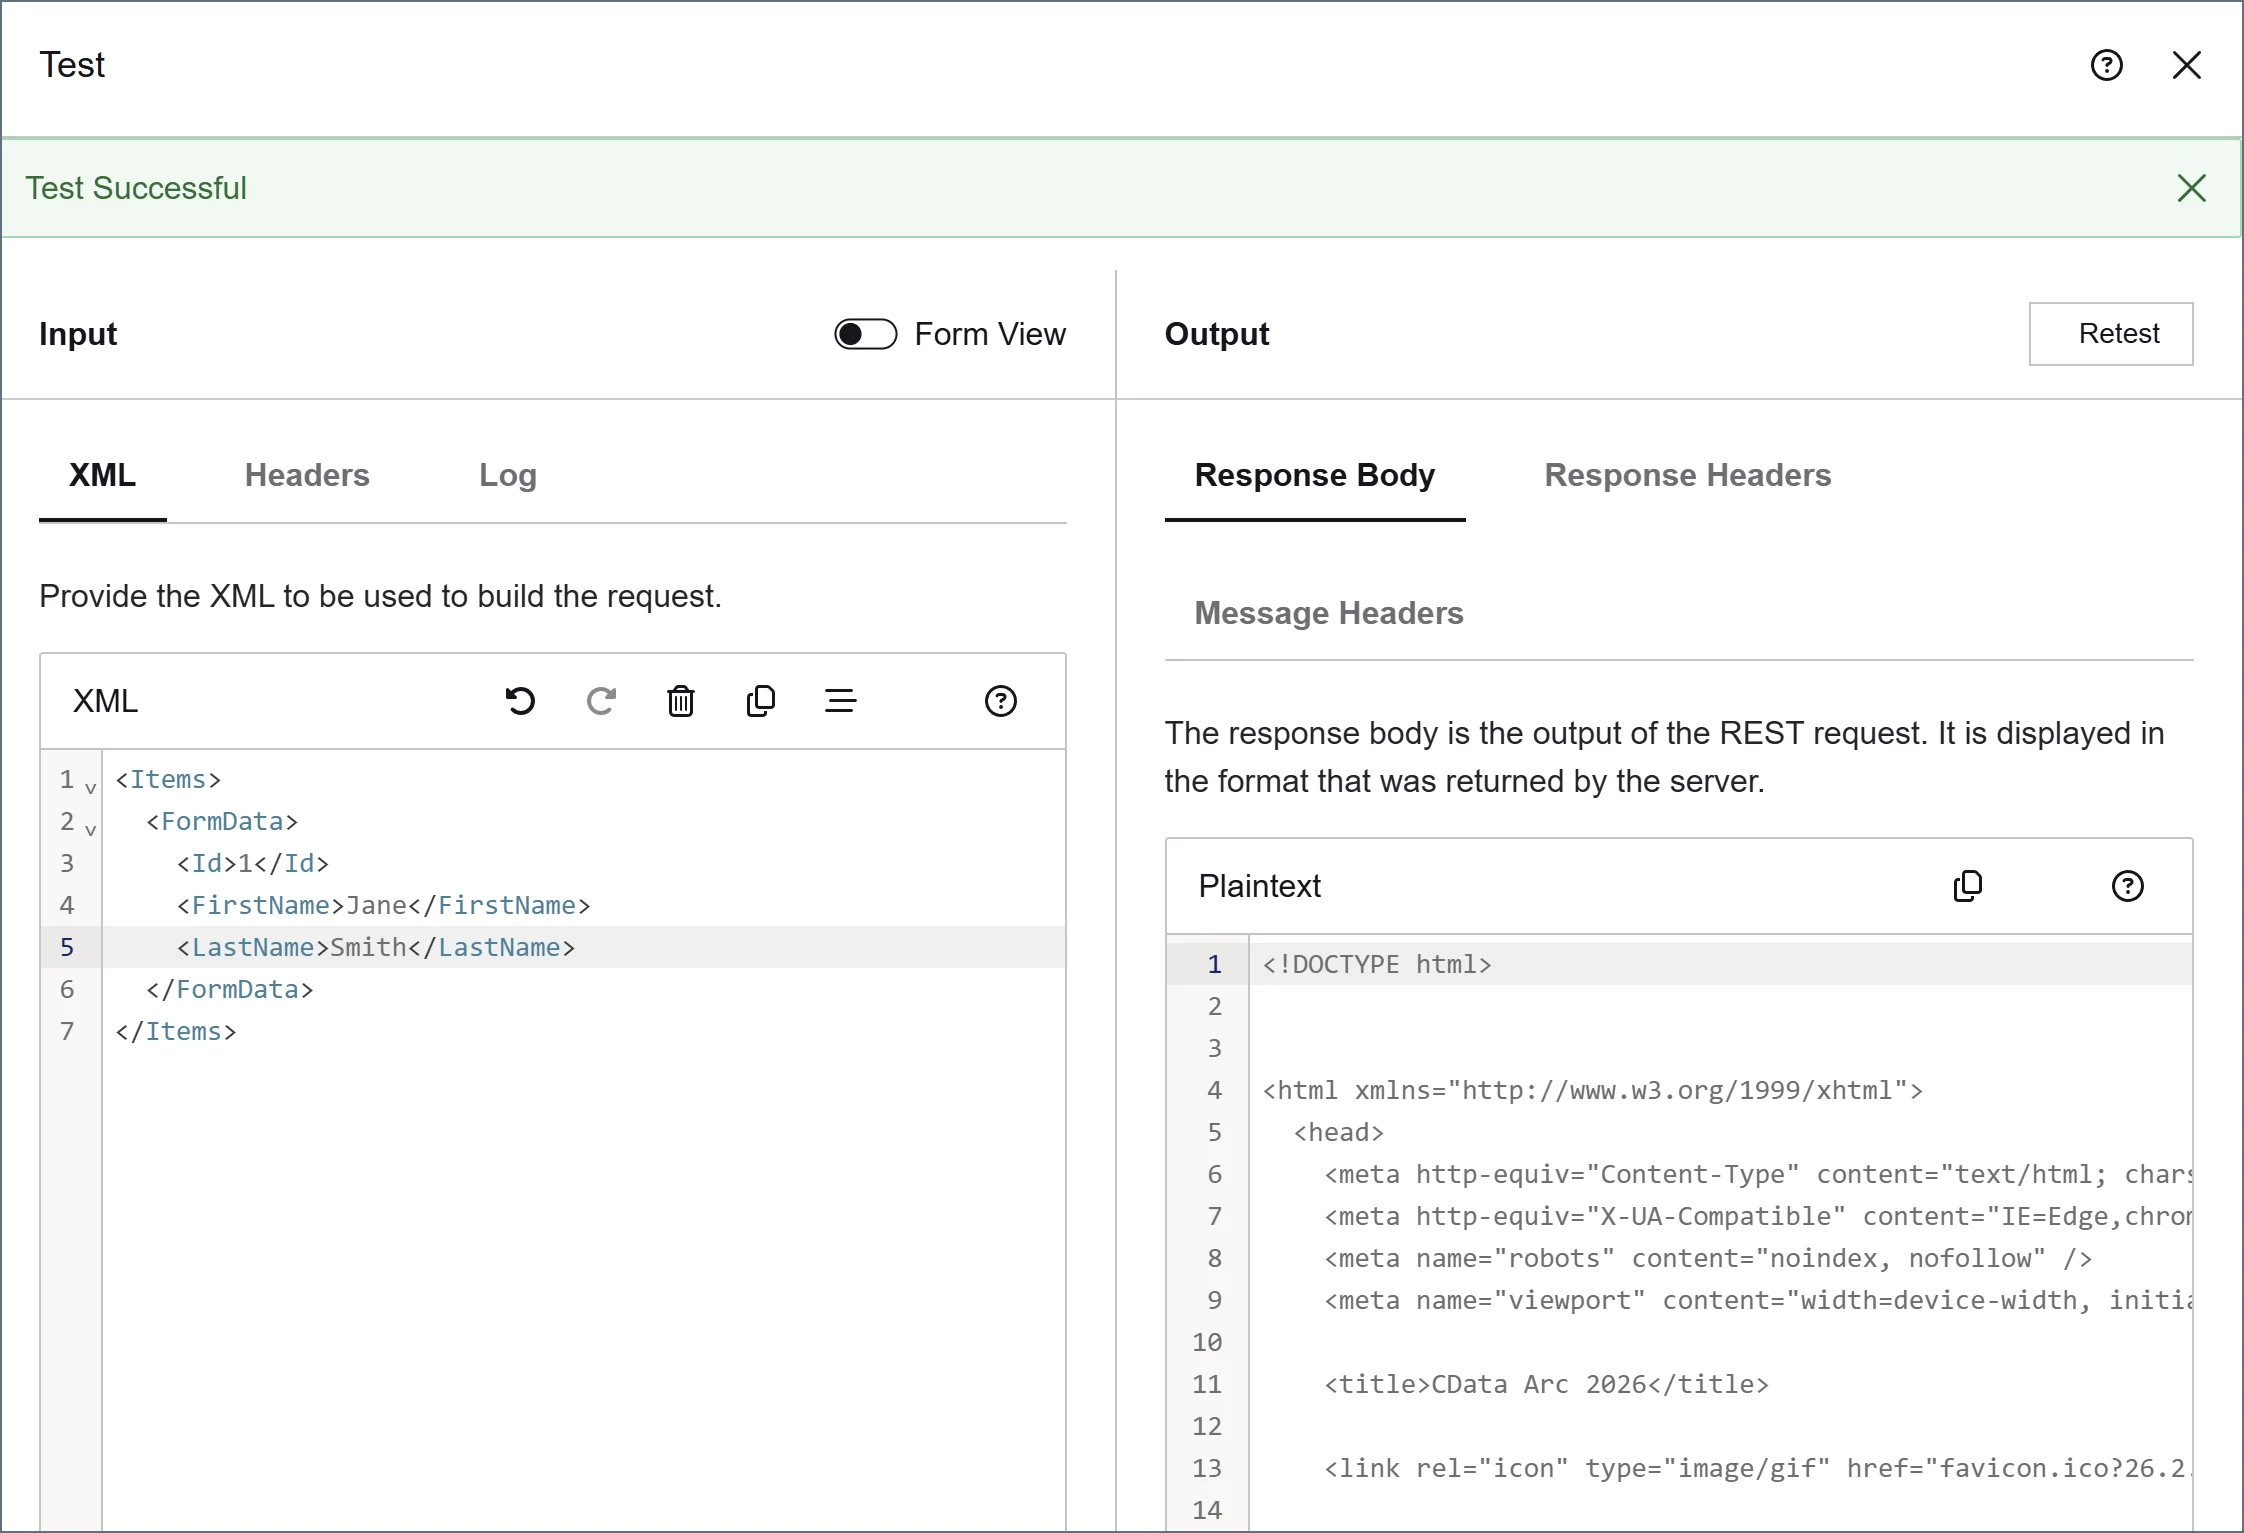
Transform and Terminal connectors have an Input pane with tabs for XML, Headers, and Logs.
The XML tab is only populated if you have defined XML fields in the body of your request, as shown in the following image.
If Allow Script in URL or Allow Script in Headers is checked, use the Headers tab to supply message headers that might be used in scripting contexts (see Using the Script Editor for Request URLs and Headers for details on those options). If your request has a Header configured as an element of the form-data or x-www-form-urlencoded body, the header name appears here and you can supply a value to use for the test.
The Logs tab contains the results of your last test.
REST requests that have entirely static content (such as requests that use the HTTP GET method) do not require an input file, since the request content is configured entirely in the connector UI. Simply add any necessary name-value pairs as custom headers in the Header section or form data in the Body section.Static requests can be automatically sent according to a schedule if Receive Automation is enabled. The response to each request is stored in the output folder or passed along to the next connector in the flow.If Send Automation is enabled, files arriving at the connector Transactions folder also trigger a static request. The content of the input file is ignored, and the request is sent according to the configuration in the UI.
If you set the Body Type of the request to raw, the content of input files is sent as the body of the REST request.Use the Content Type dropdown to set the specific content type of the data. If the content type you need is not listed, you can add a Content-Type header in the Header section.
If you set the Body Type of the request to form-data or x-www-urlencoded, the connector looks for specific values from the input file to populate the request. For each name-value pair that is set to XML, the connector scans input files for an XML element that shares the same name as the field name, and that uses a specific XML structure, as shown below:
To fit this structure, CData strongly recommends that you use an XML Map connector in front of the REST connector in the flow, as described below.When the connector finds an element that matches the field name and required XML structure, the value in this element is used as the value in the name-value pair. For example, if the body has a dynamic field with the name CustomerID, and the input file has the XML shown below, the REST connector sets the value of the CustomerID field to 12354.
Use the XML Map connector in conjunction with the REST connector to easily build dynamic requests out of other XML data structures. The XML Map connector converts custom XML structures into the XML structure that the REST connector expects.First, configure the REST connector with the set of dynamic (and static) Body fields that should be present in the request. Next, connect an XML Map connector to the REST connector in the flow and save the flow changes. This allows the XML Map connector to detect which fields the REST connector expects in incoming input files.Then, inside the XML Map connector, the Destination File dropdown includes the REST request schema. Select this as the Destination, and set the Source File to a custom XML structure. This populates the XML Map Mapping Editor, and you can drag and drop the data that needs to be included in the REST request from the source structure into the destination structure. Once the mapping is complete, the XML Map connector automatically converts files that match the source file into a valid REST request structure.For more information on using the XML Map connector, please see the XML Map connector documentation.
Using the Script Editor for Request URLs and Headers
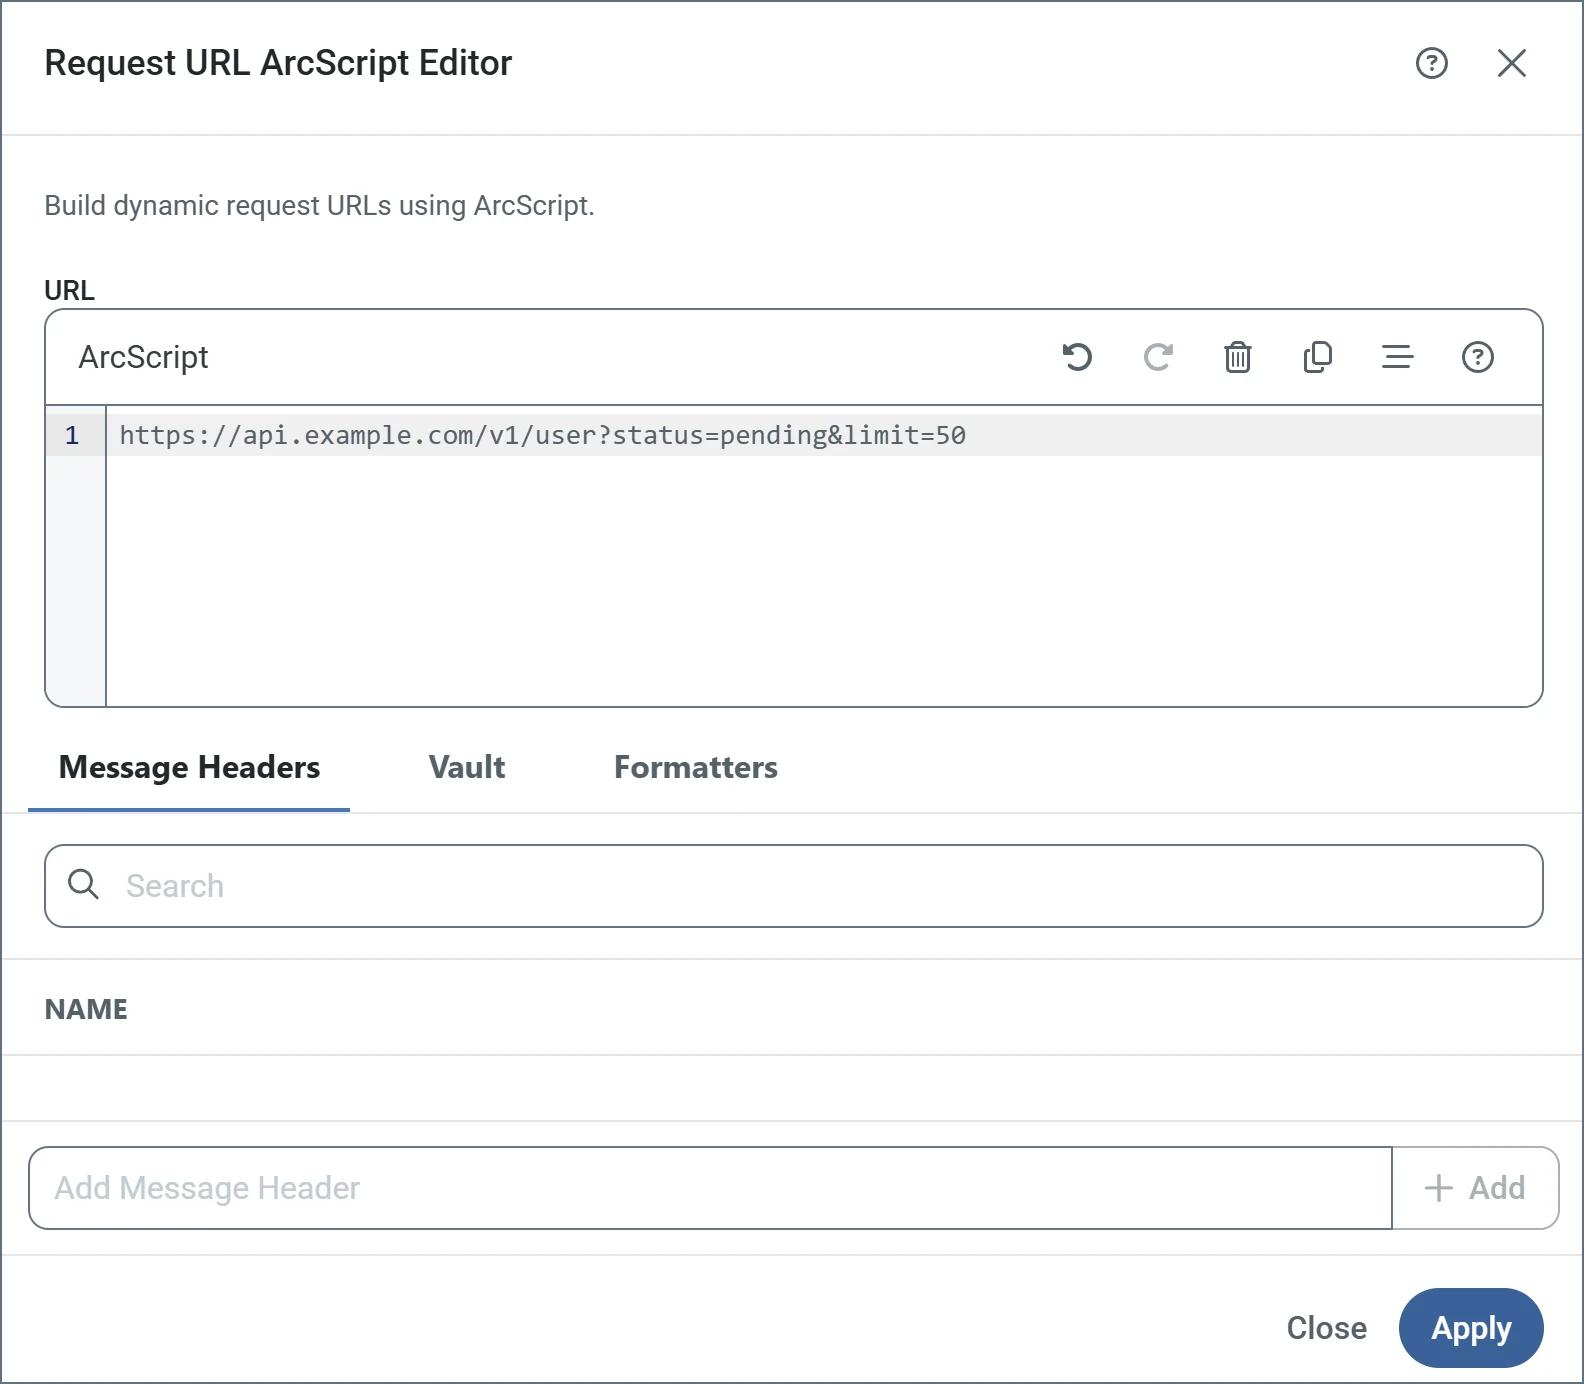
You can use the Script editor shown below to build your request URLs and in headers. The following image shows the request URL editor, but the header value editor works the same way.Select Allow Script in URL on the REST Details tab of the connector configuration pane to allow expressions in Script to be evaluated to generate dynamic strings as URLs. For example, the following URL includes the date and time:http://myendpoint.com/api?day=[_ | now('yyyyMMdd HH:mm:ss')]This URL includes a header on the incoming message for queries triggered through send automation:http://myendpoint.com/api?customer=[_message.header:customerid]Finally, this URL uses a dynamic date range beginning from the time of the last query to the current timestamp, using a default timestamp for the first query:http://myendpoint.com/api?DateFrom=[_connector.lastruntimestamp | def('2025-01-01T00:00:00-04:00')]&DateTo=[_connector.currenttimestamp]You can add the expressions directly to the URL, or use the editor to write them.Select Allow Script in Headers to enable the evaluation of Script expressions in headers before the query is issued. For example, the following header contains the date and time:Timestamp [_ | now('yyyyMMdd')]This header contains a customer Id for queries triggered through send automation:Customer [_message.header:customerid]
Message headers help track the progress of data through flows. All Tracked Headers appear on the Message Header tab in the editor, and you can reference them in your expression.You can also include other message headers in your expression by using the Add Message Header field in the editor and providing the name of an existing header. These do not have to be tracked headers.
Use the Vault tab to add items from your Global Settings Vault to an expression. This is useful if you have values that you reuse in different places throughout a flow. You can define those values in the vault, then reference them at the beginning of the expression. Keep in mind that if you want the mapping to use the value of the item in the vault, you need to reference it inside square brackets; otherwise the editor interprets the item name as a literal.
Formatters support manipulating the values returned at different xpaths. Formatters are separated by a pipe character (|) in the expression, and evaluated from left to right. For example:[xpath('City') | toupper | substring(0,3)]In this example, before the value of the City xpath is returned, all string characters are converted to upper case characters, and a substring of the first three characters is returned in the result. For example, if the source document had a value of:<City>Durham</City>The resulting expression returns the following:DURThe formatters are listed on the Formatters tab. Add a formatter to the expression by clicking it in the list.
You can use a response event in the REST connector to interact with the response received from the server (which includes the body, headers, cookies, and so on), and to enrich the output message generated from the connector. You can use the following special items in the Response event.
This script reads the JSON response received from a REST call, parses out the access token contained in the JSON, and adds it as a header onto the output message created by the REST connector:
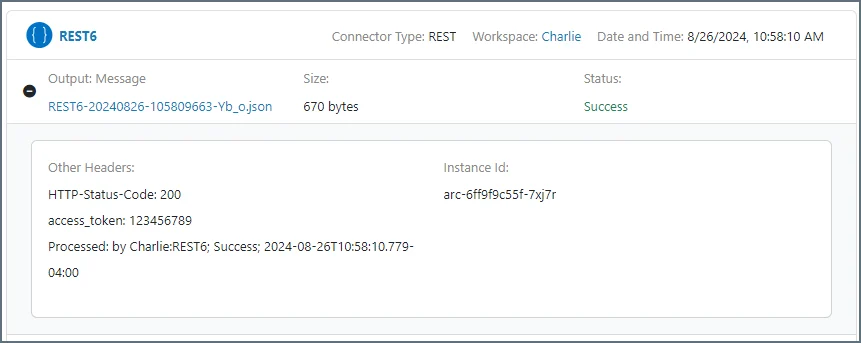
The following steps detail what happens:1 The body of the response sent by the server back to the REST connector in Arc is accessed via _response.body and is set to the text attribute of the jsonDOMGet operation. Other attributes of jsonDOMGet are also populated, such as the map attribute with the jsonpath to the desired token in the response body.2 The jsonDOMGet operation is called. If the token is found in the response JSON body, it is added as a message header to the output message of the REST connector via the _message.header:access_token syntax. If the token is not found, the value of the access_token header is set to a static string: Token not found!.Here is what that result looks like in when you view the output message details of the message from the REST connector:This type of script is useful when you need to parse data from the raw JSON response body received back from a server after a request is sent to it. The header can then be read and used in subsequent connectors in the flow.
If the server responds using XML, you can achieve the same result using xmlDOMget.


 icon to import API details directly from a Swagger URL.
 button appears, which enables you to build dynamic request URLs using Script. See Using the Script Editor for Request URLs and Headers for details.