

Key Capabilities
- Full bidirectional translation between EANCOM and XML formats
- Comprehensive interchange header validation and generation
- Support for multiple EANCOM versions with automatic schema detection
- Interchange and functional acknowledgment support
Overview
When receiving EANCOM documents, EANCOM connectors validate interchange headers and convert the EANCOM document into XML. This is useful as a staging step, because XML is the primary format that uses to manipulate data within a flow. The EANCOM connector automatically reads the input file to determine the appropriate schema, then parses the document according to this schema. When generating EANCOM documents, EANCOM connectors convert XML into EANCOM document syntax and apply the appropriate interchange headers. This is useful as the final step for creating an EANCOM document, after the XML data has been fetched and transformed elsewhere in the flow.Connector Configuration
This section contains all of the configurable connector properties.Settings Tab
Translation Configuration
Settings related to the core operation of the connector.EDI Partner
Interchange Settings
Settings related to the EANCOM interchange headers. When converting EANCOM documents into XML, the document headers are validated against these settings; when generating EANCOM documents from XML, these settings are used to generate document headers.Acknowledgments
Settings related to generating and requesting acknowledgments.Sample Files Tab
Advanced Tab
EDI Delimiters
Settings that specify which characters separate elements, segments, etc.Interchange Settings
Additional settings related to the EANCOM interchange headers. These options appear or disappear based on the Syntax Version specified on the Settings tab.Functional Group Settings
Settings related to the functional group headers of EANCOM documents. These optional identifiers can help group similar interchanges together, or facilitate sub-addressing within an organization.Advanced Settings
Settings not included in the previous categories.Logging
Miscellaneous
EDI Partners Tab
Automation Tab
Automation
Settings related to the automatic processing of files by the connector.Performance
Alerts Tab
SLAs Tab
XML to EANCOM
When generating EANCOM files, select XML to EANCOM as the Translation Type. The application reads the header information for the interchange, functional group, and message sections from the settings configured on the Settings tab. These settings include the sender identifier and code qualifier, receiver identifier and code qualifier, and so on. Once you have configured the connector with the settings from your trading partner agreement, click the Transactions tab and select More > Create Test Files. The application creates a set of test XML files that provide example data of what the XML should look like for the connector to generate an EANCOM document. You can also select the documents and click Send to see the generated EANCOM documents.EANCOM to XML
When generating XML, select EANCOM to XML as the Translation Type. The application only processes EANCOM files when this option is selected. You need to configure the settings for the trading partner agreement on this page for the application to validate the information in EANCOM documents during processing. XML files are generated into the Output folder for this connector. Click the Transactions tab and select More > Create Test Files to create test EANCOM files for several EANCOM documents. You can select these documents and click Send to see the generated XML.Use With the XML Map Connector
Upload Test File
Acknowledgements
Acknowledgments are routed to the connector specified by the grey dotted line in the flow diagram, as shown in the following image: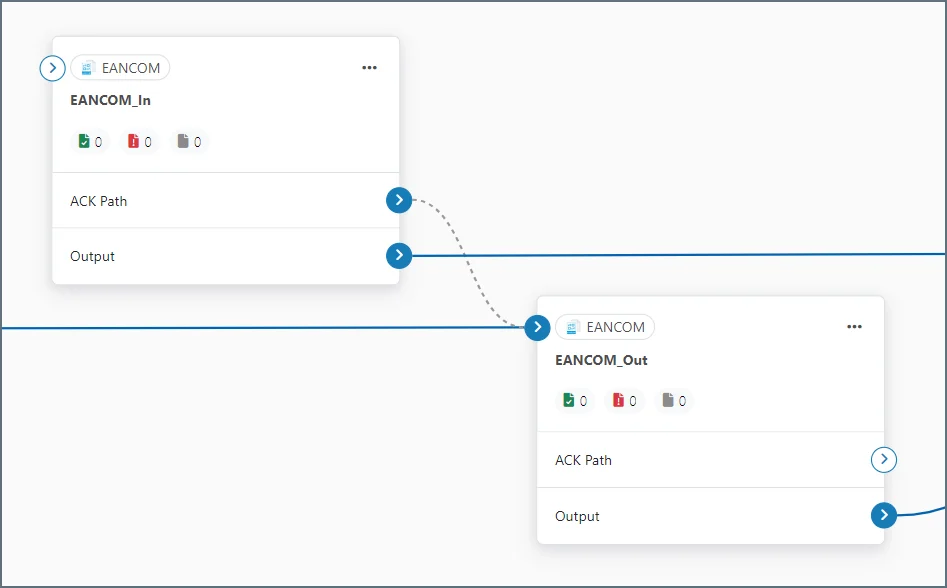
Interchange Acknowledgments
This is an indication that an interchange has taken place between the two parties (though not necessarily that any individual message has been exchanged). They are automatically generated in response to a request in the interchange.Functional Acknowledgments
Functional acknowledgments are an indication that an individual message such as an Invoice or PO has been accepted. These are generated in response to a bidirectional agreement by both parties.Message Originator
Requesting Acknowledgements
EANCOM connectors in XML-to-EDI mode can be configured so that both interchange and functional acknowledgments can be requested for a message. Select the Technical acknowledgment (CONTRL) and Functional acknowledgment (CONTRL) checkboxes on the Settings tab to direct the connector to maintain a Pending ACK status for the transmission until the appropriate acknowledgments have been returned and processed.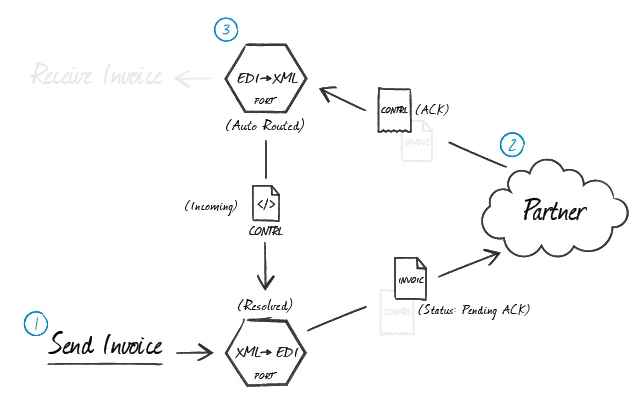
Processing Acknowledgements
When interchange and functional EANCOM acknowledgments are received at an EANCOM connector in EDI-to-XML mode, the connector can be configured to automatically route any detected acknowledgments to the EANCOM connector that first generated the transmission. In the flow diagram, drag the grey circle from the receiving (EDI-to-XML) EANCOM connector onto the originating (XML-to-EDI) EANCOM connector. The configured (XML-to-EDI) EANCOM connector pairs the acknowledgments to the original message and resolves the matching message.Message Recipient
Generating Acknowledgements
When an EANCOM connector in EDI-to-XML mode processes received messages from the originator and generates XML, tell the connector to automatically generate CONTRL acknowledgments by selecting the Acknowledgment check boxes in the Settings tab. Route these acknowledgments to an EANCOM connector in XML-to-EDI mode to generate the EANCOM acknowledgement. In the flow diagram, drag the grey circle onto the (XML-to-EDI) EANCOM connector that generates EANCOM documents for this partner.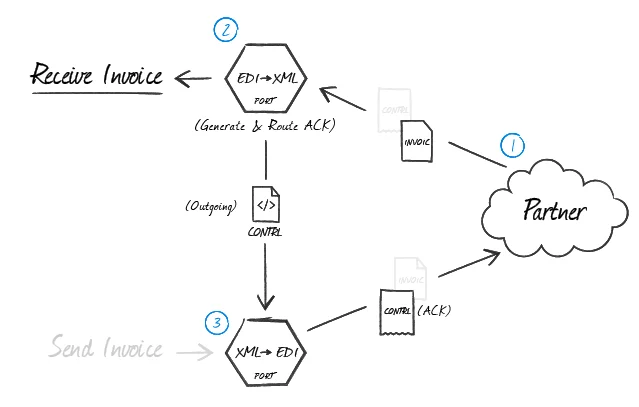
Master-Detail Hierarchy: Translating CPS Loops
In EDI documents, most hierarchical relationships are represented by the order of EDI segments. Some EDI structures, like CPS Loops (which are found in DESADV documents), do not follow this convention and instead have the hierarchical relationships embedded in the EDI element data itself. This can make it difficult to preserve these hierarchical relationships when converting the EDI data to XML. The EANCOM connector supports preserving hierarchical relationships in CPS segments via the Nest Loops setting on the Advanced tab. When enabled, the connector parses the elements in the CPS segments to determine which segments “belong to” other segments in a hierarchical relationship. These hierarchical relationships are reflected in the output XML as parent-child relationships: in other words, this setting converts hierarchy implied by the EDI content into hierarchy represented by the XML structure. This section briefly explains both how hierarchy is encoded in CPS data, and how this hierarchy is converted into XML when Nest Loops is enabled.CPS Hierarchy
All CPS segments have two values that help establish hierarchy:- an Id value, which identifies the current CPS segment (this value is stored in CPS01, or the first element in a CPS segment)
- a parent-Id value, which identifies the current CPS segment’s hierarchical parent (this value is stored in CPS02, or the second element in a CPS segment)
Converting CPS Hierarchy to XML
When Nest Loops is enabled, the EANCOM connector handles the conversion of CPS hierarchy to XML hierarchy automatically. The connector parses the Id and parent-Id values from CPS segments and ensures that the resulting XML elements are appropriately nested (indented) inside the elements representing their parents. In other words, ifsegmentA has a parent-Id value that is equal to segmentB, the resulting XML has segmentA as a child of segmentB. In this way, the hierarchical relationships are preserved in the XML structure when the EDI data is translated.