> ## Documentation Index
> Fetch the complete documentation index at: https://docs.arc.cdata.com/llms.txt
> Use this file to discover all available pages before exploring further.
# PDF Label Connector
> Configuration and usage guide for the CData Arc PDF Label connector.
export const SlasTab = ({siteName = "CData Arc"}) => <>
サービスレベルアグリーメント(SLA)の設定に関する設定です。
SLA を使用すると、フロー内のコネクタが送受信すると見込まれるボリュームを設定し、そのボリュームを達成すると見込まれる期間を設定できます。{siteName} は、SLA が達成されない場合にユーザーへ警告するメールを送信し、SLA をAt Risk としてマークします。これは、SLA が間もなく達成されない場合にViolated としてマークされることを意味します。これにより、ユーザーは介入してSLA が達成されない理由を特定し、適切な対応を取る機会を得られます。At Risk 期間の終了時点でもSLA が達成されない場合、SLA はviolated としてマークされ、ユーザーに再度通知されます。
SLA を定義するには、Expected Volume をオンに切り替え、Settings タブをクリックします。
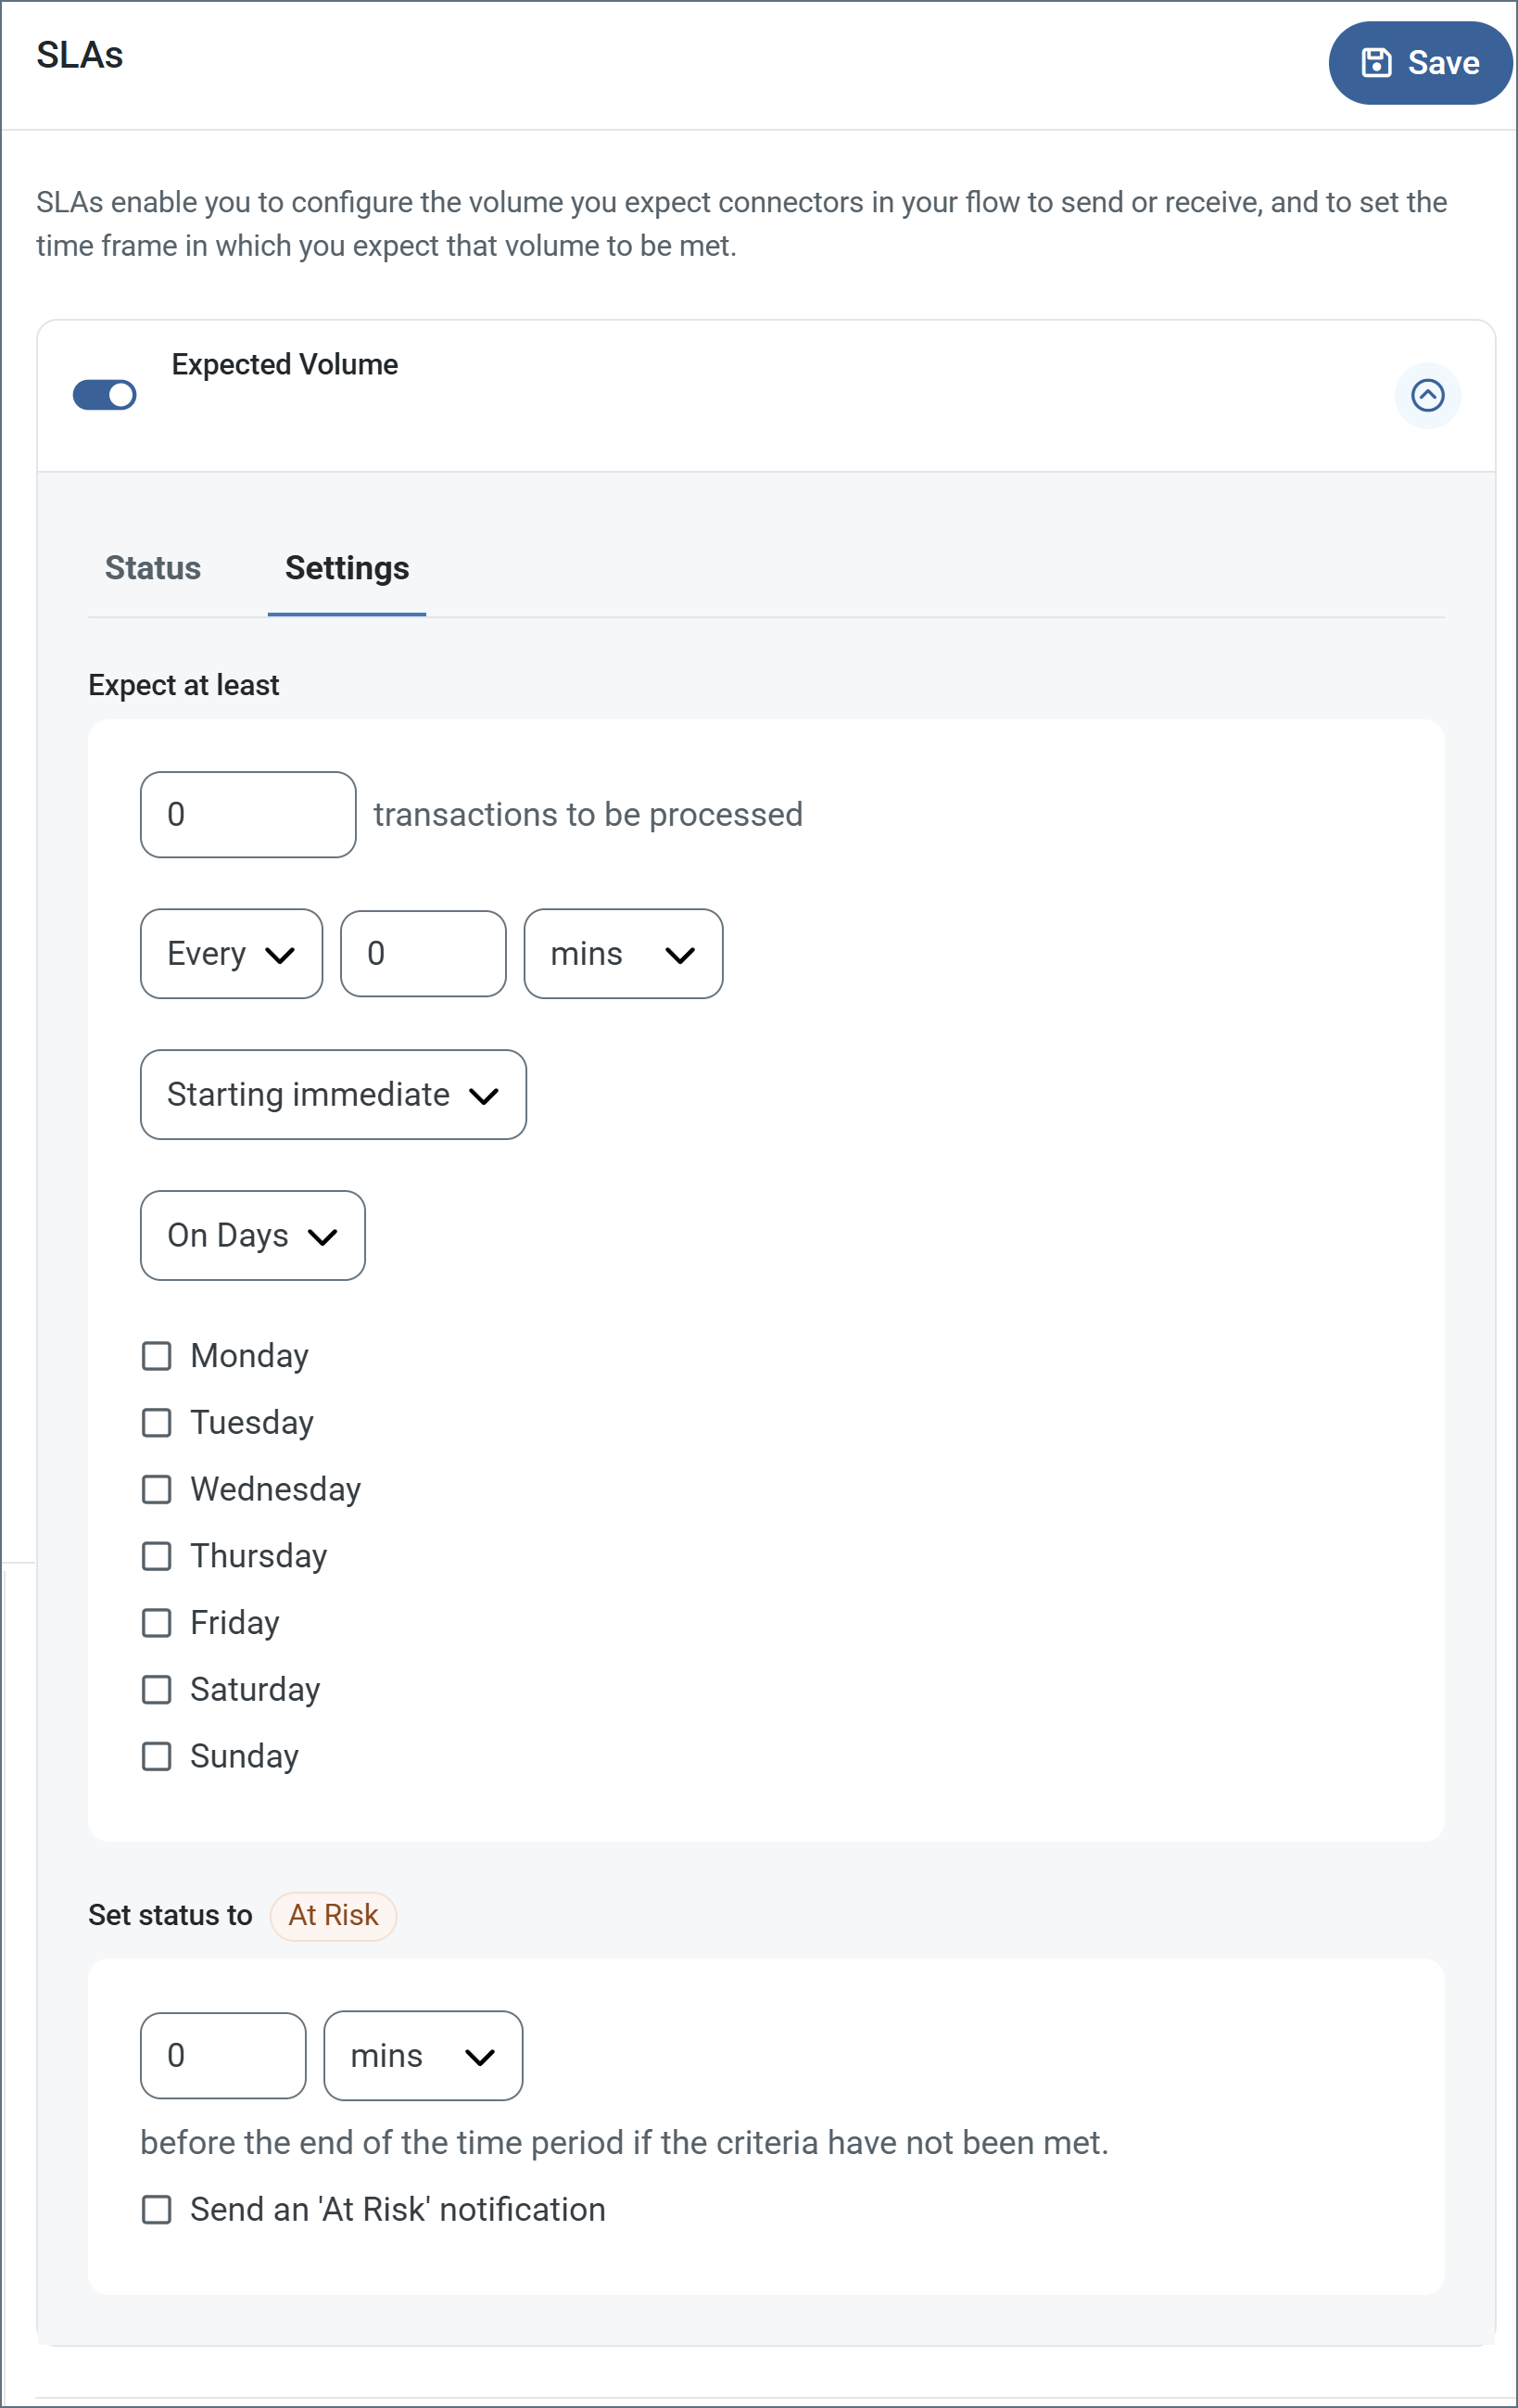
- コネクタに送信と受信の個別のアクションがある場合は、ラジオボタンを使用してSLA がどちらの方向に適用されるかを指定します。
- ウィンドウのExpect at least 部分で、次を設定します。
- 処理を見込む最小トランザクション数(ボリューム)を設定します。
- Every フィールドを使用して期間を指定します。
- SLA を有効にするタイミングを指定します。Starting on を選択した場合は、日付および時刻フィールドを入力します。
- SLA を有効にしたい曜日のチェックボックスをオンにします。必要に応じて、ドロップダウンでEveryday を選択します。
- ウィンドウのSet status to 'At Risk' 部分で、SLA をAt Risk としてマークするタイミングを指定します。
- デフォルトでは、SLA が違反状態になるまで通知は送信されません。これを変更するには、Send an 'At Risk' notification をオンにします。
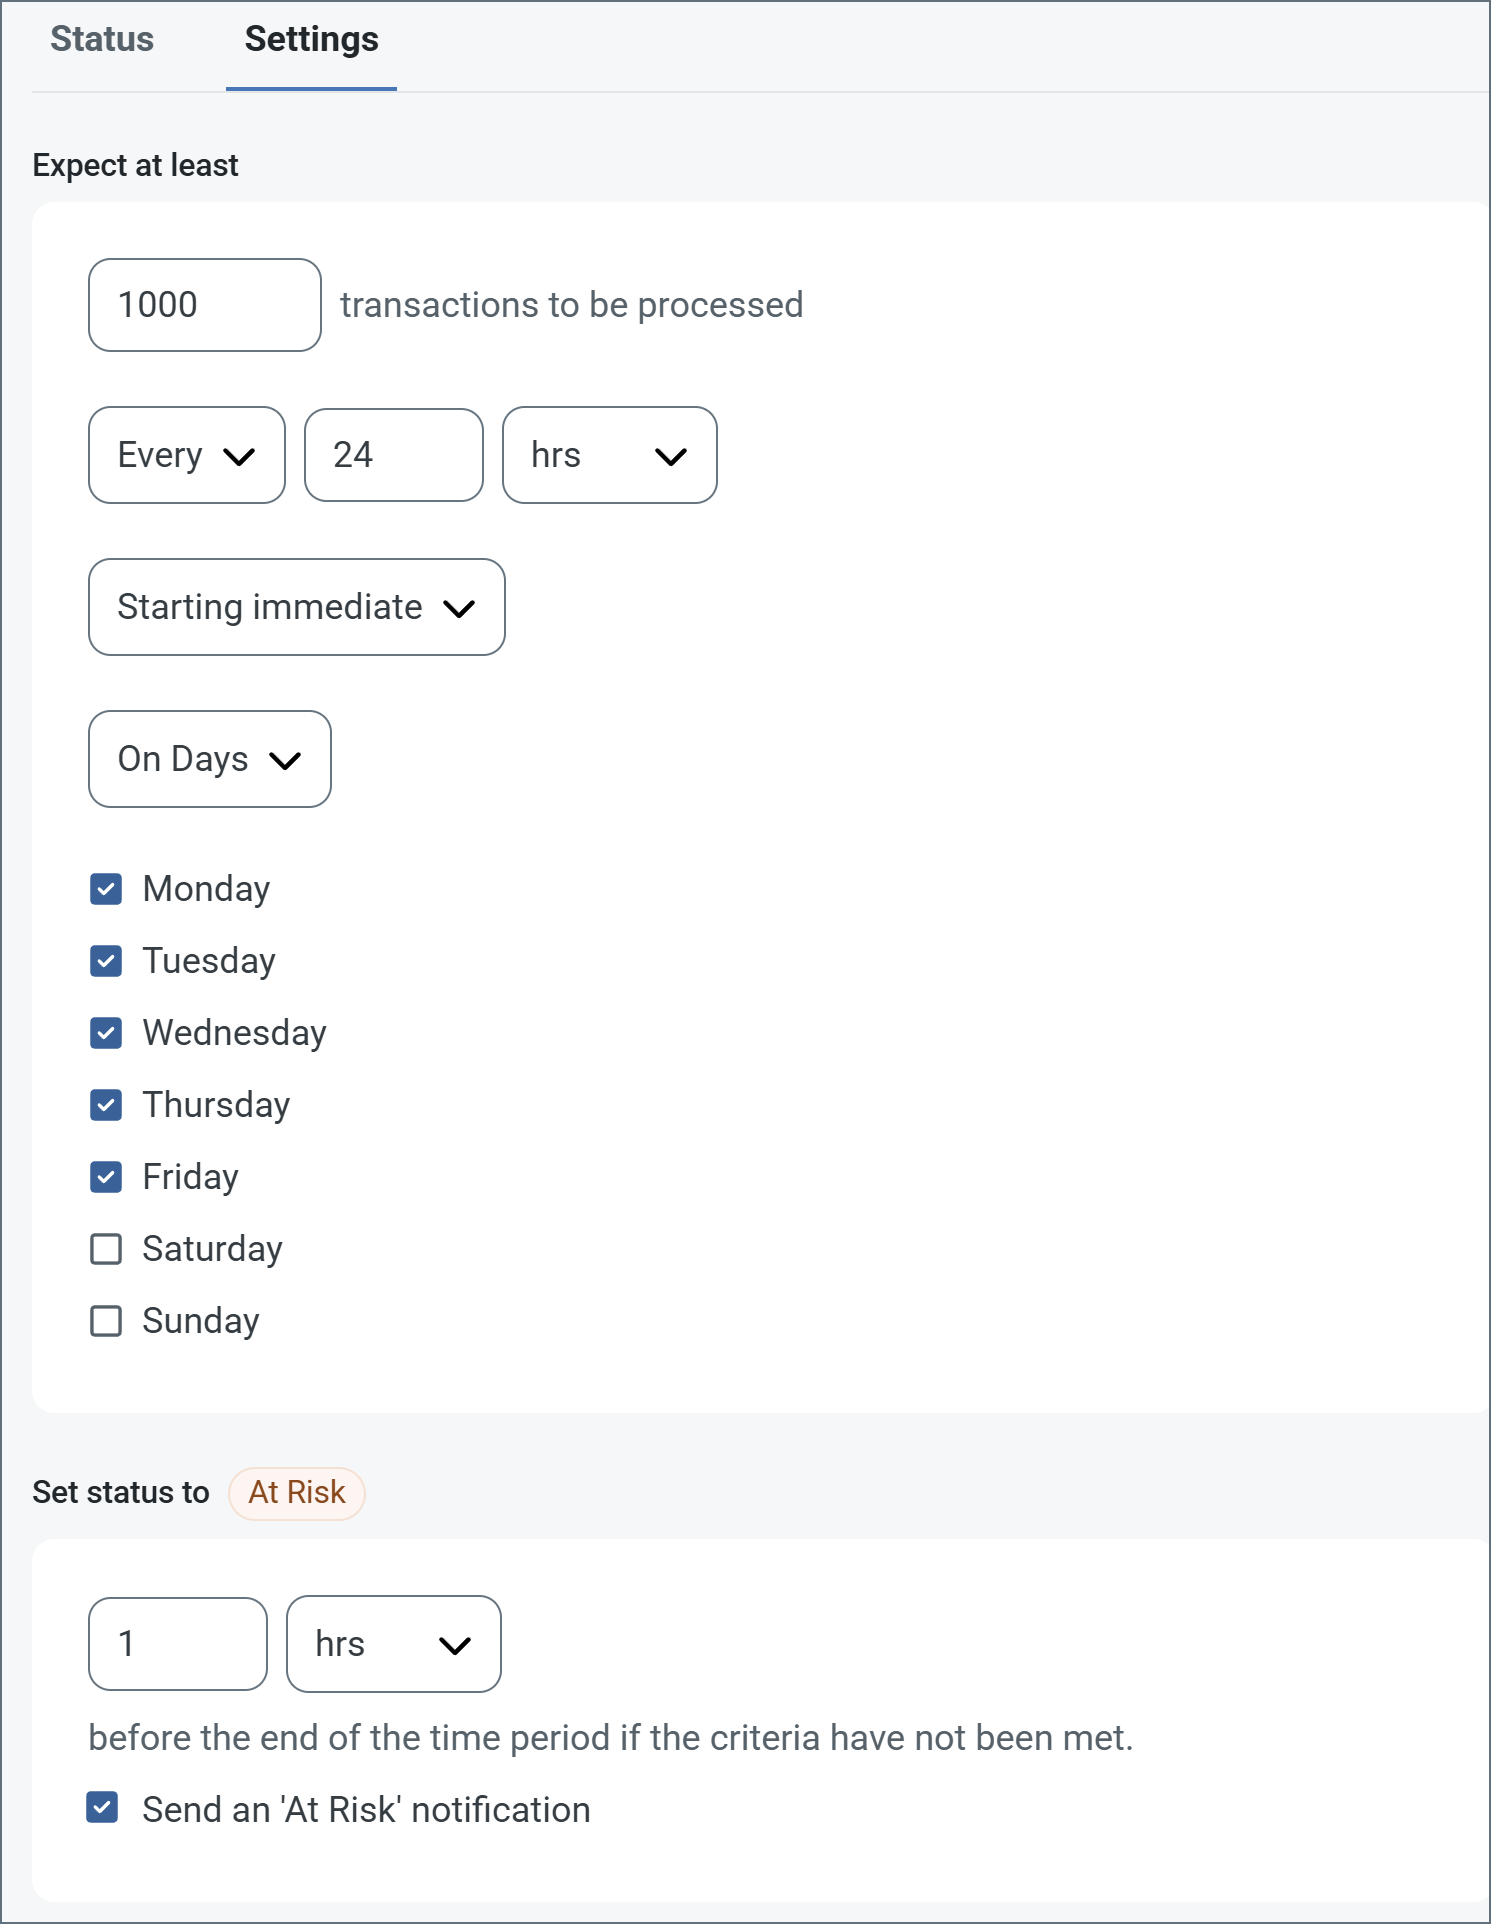
次の例は、月曜日から金曜日まで毎日1000 件のファイルを受信すると見込むコネクタ向けに設定されたSLA を示しています。1000 件のファイルが受信されていない場合、期間の終了の1時間前にAt Risk 通知が送信されます。
 必要に応じてSLA アラートをオフにすることができます。これはメンテナンスウィンドウ中に役立ちます。navbar でSettings をクリックし、Alerts > General Alerts に移動します。タブレットと鉛筆のアイコンをクリックして編集し、SLA Alerts 設定のチェックを外します。
;
export const AlertsTab = ({siteNameShort = "Arc"}) => <>
必要に応じてSLA アラートをオフにすることができます。これはメンテナンスウィンドウ中に役立ちます。navbar でSettings をクリックし、Alerts > General Alerts に移動します。タブレットと鉛筆のアイコンをクリックして編集し、SLA Alerts 設定のチェックを外します。
;
export const AlertsTab = ({siteNameShort = "Arc"}) => <>
アラートの設定に関する設定です。
サービスレベルアグリーメント(SLA)を実行する前に、通知用のメールアラートをセットアップする必要があります。デフォルトでは、{siteNameShort} はAlerts タブのグローバル設定を使用します。このコネクタに別の設定を使用するには、Override global setting をオンに切り替えます。
デフォルトではエラーアラートが有効になっており、エラーが発生するたびにメールが送信されます。これをオフにするには、Enable チェックボックスのチェックを外します。
Subject(必須)を入力します。Allow {siteNameShort}Script in Subject をチェックすると、Subject フィールドで{siteNameShort}Script を使用できます。これを選択すると、{siteNameShort}Script エディタボタンが表示されます( )。
)。
必要に応じてRecipient のメールアドレスをカンマ区切りのリストで入力します。
;
export const Message = () => <>
Message 設定は、コネクタがメッセージを検索する方法と、処理後にメッセージを管理する方法を決定します。
Note: 以下の設定は非推奨となり、デフォルトで非表示になっています。以前に有効化またはデフォルト以外の値に設定されていたコネクタにのみ表示されます。処理済みファイルのコピーを保持するには、フロー内のコネクタを右クリックし、成功パスを表示を選択して、成功パスをFile コネクタに接続してください。
| 設定 | 説明 |
|---|
| Sent フォルダに保存(非推奨) |
コネクタが処理したファイルをSent フォルダにコピーします。デフォルトで無効です。Sent フォルダに保存されたファイルは保存データの暗号化の対象外です。 |
| Sent フォルダのスキーム(非推奨) |
選択した時間間隔でSent フォルダ内のファイルをグループ化します。Sent フォルダに保存が有効な場合のみ適用されます。 |
;
export const MiscConnector = () => <>
Miscellaneous 設定は、特定のユースケース向けの設定です。
| 設定 |
説明 |
| Other Settings |
非表示のコネクタ設定をセミコロン区切りのリストで設定できます(例:setting1=value1;setting2=value2)。通常のコネクタのユースケースや機能では、これらの設定の使用は必要ありません。 |
;
export const Logging = () => <>
ログの作成と保存を制御する設定です。
| 設定 |
説明 |
| Log Level |
コネクタが生成するログの詳細度です。サポートを依頼する際は、これをDebug に設定してください。 |
| Log Subfolder Scheme |
選択した間隔に従って、コネクタがLogs フォルダ内のファイルをグループ化するよう指示します。Weekly オプション(デフォルト)は、コネクタが毎週新しいサブフォルダを作成し、その週のすべてのログをそのフォルダに保存するよう指示します。この設定を空白のままにすると、コネクタはすべてのログをLogs フォルダに直接保存します。多数のトランザクションを処理するコネクタでは、サブフォルダを使用することでログを整理しやすくなり、パフォーマンスが向上します。 |
| Log Messages |
処理したファイルのログエントリにファイル自体のコピーを含めるには、これをオンにします。これを無効にすると、Transactions タブからファイルのコピーをダウンロードできなくなる場合があります。 |
;
export const MacrosExamples = ({extraMacros = []}) => <>
%Ext% や %ShortDate% などの一部のマクロは引数を必要としませんが、引数を必要とするものもあります。
引数を取るすべてのマクロは次の構文を使用します。%Macro:argument%
引数を取るマクロの例を次に示します。
- %Header:headername%:
headername はメッセージ上のヘッダーの名前です。
- %Header:mycustomheader% は、入力メッセージに設定された
mycustomheader ヘッダーの値に解決されます。
- %Header:ponum% は、入力メッセージに設定された
ponum ヘッダーの値に解決されます。
- %RegexFilename:pattern%:
pattern は正規表現パターンです。例えば、%RegexFilename:^([\w][A-Za-z]+)% は、ファイル名の最初の単語にマッチしてそれに解決され、大文字・小文字を区別しません(test_file.xml はtest に解決されます)。
- %Vault:vaultitem%:
vaultitem はVault 内のアイテムの名前です。例えば、%Vault:companyname% は、Vault に保存されたcompanyname アイテムの値に解決されます。
- %DateFormat:format%:
format は許容される日付形式です(詳細は日付形式のサンプルを参照してください)。例えば、%DateFormat:yyyy-MM-dd-HH-mm-ss-fff% は、ファイルの日付とタイムスタンプに解決されます。
{extraMacros.filter(item => item.example).map(item => - {item.example}
)}
次の例に示すように、より高度なマクロを作成することもできます。
- 1 つのファイル名で複数のマクロを組み合わせる:
%DateFormat:yyyy-MM-dd-HH-mm-ss-fff%%EXT%
- マクロの外側にテキストを含める:
MyFile_%DateFormat:yyyy-MM-dd-HH-mm-ss-fff%
- マクロの内側にテキストを含める:
%DateFormat:'DateProcessed-'yyyy-MM-dd_'TimeProcessed-'HH-mm-ss%
;
export const MacrosTable = ({siteName = "CData Arc", extraMacros = []}) => <>
ファイル命名戦略でマクロを使用すると、データの整理効率と文脈の理解を高めることができます。
ファイル名にマクロを組み込むことで、識別子、タイムスタンプ、ヘッダー情報などの関連情報を
動的に含めることができ、各ファイルに有用な文脈を提供します。
{siteName} は次のマクロをサポートしています。これらはすべて次の構文を使用します。%Macro%
| マクロ | 説明 |
|---|
| ConnectorID | コネクタのConnectorID に評価されます。 |
| ConnectorName | コネクタの名前に評価されます。ファイル名やパスに接続名を含めることができます。例えば、どのデータベース接続が生成したかによってバックアップファイルにタグを付けるために使用できます。 |
| Ext | コネクタが現在処理しているファイルの拡張子に評価されます。 |
| Filename | コネクタが現在処理しているファイルのファイル名(拡張子を含む)に評価されます。 |
| FilenameNoExt | コネクタが現在処理しているファイルのファイル名(拡張子を除く)に評価されます。 |
| MessageId | コネクタが出力しているメッセージのMessageId に評価されます。 |
| RegexFilename:pattern | コネクタが現在処理しているファイルのファイル名に正規表現パターンを適用します。 |
| Header:headername | コネクタが現在処理しているメッセージ上の対象ヘッダー(headername)の値に評価されます。 |
| LongDate | システムの現在の日時を長い形式(例:Wednesday, January 24, 2024)で評価します。 |
| ShortDate | システムの現在の日時をyyyy-MM-dd 形式(例:2024-01-24)で評価します。 |
| DateFormat:format | システムの現在の日時を指定された形式(format)で評価します。利用可能な日時形式については、日付形式のサンプルを参照してください。 |
| Vault:vaultitem | 指定されたVault アイテムの値に評価されます。 |
{extraMacros.map(item =>
| {item.name} |
{item.description} |
)}
;
export const Performance = () => <>
コネクタへのリソースの割り当てに関する設定です。
;
export const siteNameShort = "Arc";
export const siteName = "CData Arc";
The PDF connector supports generating rich visual business forms as PDF documents from XML, by using a PDF template.
## Key Capabilities
* PDF form generation from XML input using template-based field mapping
* Multi-page output support with selective page generation and barcode field integration
* Support for Code39, Code128, GS1-128, and QR code barcode types with advanced configuration
## Overview
PDF connectors translate XML input into PDF output. XML element names are matched with form field names in the PDF template. The value of each XML element is pushed into the appropriate form field to generate the PDF output file.
## Connector Configuration
This section contains all of the configurable connector properties.
### Settings Tab
#### Configuration
*Settings related to the core operation of the connector.*
| Setting | Description |
| ------------------------- | --------------------------------------------------------------------------------------------------------------------------------------------------------------------------------------------------------------------------------------------------------------------------------------------------------------------------------- |
| **Connector Id** | The static, unique identifier for the connector. |
| **Connector Type** | Displays the connector name and a description of what it does. |
| **Connector Description** | An optional field to provide a free-form description of the connector and its role in the flow. |
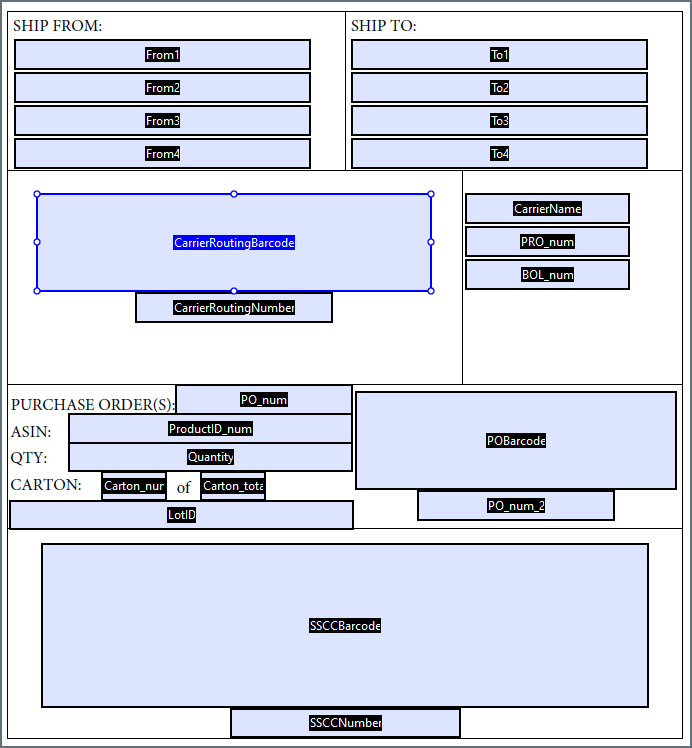
| **Template File** | The PDF file to use as an output template. This file must have form fields whose names match the incoming XML data. The fields must also be arranged in the format you want for all PDF files generated by the connector. The [Example](#example) below shows how the XML and the template file work together to generate output. |
#### Other Settings
| Setting | Description |
| --------------------- | --------------------------------------------------------------------------------------------------------------------------------------------------------------------------------------------------------------------------------------- |
| **Local File Scheme** | A scheme for assigning filenames to messages that are output by the connector. You can use macros in your filenames dynamically to include information such as identifiers and timestamps. For more information, see [Macros](#macros). |
### Advanced Tab
#### Other Settings
| Setting | Description |
| -------------------- | ---------------------------------------------------------------------------------------------------------------------------------------------------------------------------------------------------------------------------------------------------------------------------------------- |
| **Processing Delay** | The amount of time (in seconds) by which the processing of files placed in the **Transactions** tab is delayed. This is a legacy setting. Best practice is to [use a File connector](../flows/designing-a-flow#ローカルファイルシステムとのやり取り) to manage local file systems instead of this setting. |
#### Message
#### Logging
#### Miscellaneous
### Automation Tab
#### Automation Settings
*Settings related to the automatic processing of files by the connector.*
| Setting | Description |
| -------- | ----------------------------------------------------------------------- |
| **Send** | Whether messages arriving at the connector are automatically processed. |
#### Performance
### Alerts Tab
### SLAs Tab
## Generating a PDF Document
The PDF connector reads XML input files and uses the data from these XML files to generate PDF documents that match the **Template File** PDF document specified on the [Settings tab](#settings-tab). The structure of these XML input files should match the structure described below, or the [legacy structure](#legacy-xml-format) described in the next section.
### XML Format
Here is an example of an XML input file:
```xml theme={null}
Some data
>5789337490548932
```
As shown in the example above, the XML should match this structure:
* An *Items* element at the root
* A *PDF* child element representing a PDF document
* Inside the *PDF* element, an element that matches the name of each form field that should be dynamically populated with data
The names for each form field (the names to use for elements in the *PDF* element) come from the **Template File** PDF document. Whatever value is used to label the form fields in this template should be used as the element names to ensure the correct data is injected into the appropriate field in the resulting PDF.
#### Multi-Page Outputs
If the template file PDF contains multiple pages, the connector automatically generates the appropriate number of pages when processing an XML input file. In addition, multiple copies of the template file can be generated from a single XML file, in which case the additional copies are appended as multiple PDF pages for the same single output file.
To generate multiple copies of the template file as a multi-page output, simply repeat the *PDF* element that is a direct child of the root *Items* element. Each *PDF* element at this position is considered a separate instance of the template file, so it should contain all of the named form field values necessary to fill out the template.
#### Output a Subset of Pages
If the template file PDF contains multiple pages, the connector supports generating a subset of these template pages by specifying the appropriate pages in the XML input file. The *Items* element at the root of the input document accepts a *pages* attribute with a comma-delimited list of the page numbers (zero-indexed) that should be included in the output.
For example, if the template file contains 4 pages, and only the first and last page should be included in the output, the XML input file would look like this:
```xml theme={null}
Some data
```
### Barcodes
Barcode fields (form fields that should contain barcode data) are treated just like other form fields: the barcode field has a label in the PDF template which should be used as the element name in the input XML. In addition, barcode fields should have a *type* attribute that determines the barcode type to generate. The connector supports four barcode types:
* code39
* code128
* gs1128
* qrcode
The numerical data for the barcode is then provided as the XML value for the appropriately named element.
#### Advanced Barcode Configuration
In addition to specifying the barcode type in the XML input file, the barcode can be configured directly in the PDF template file. When creating and editing the form field that holds the barcode, you can add configuration information to the field tooltip that affects the resulting bar code. This configuration information should always have the following form:
`$$parameter1:value,parameter2:value$$`
The following parameters are supported for barcodes:
* **barcode**: the type of barcode (redundant when using the *type* attribute described in the previous section)
* **qrcodeversion**: the version of the QR code when the barcode type is set to *qrcode*
* **eclevel**: the level of error correction when using a QR code. Accepted values are *L* (low), *M* (medium), *Q* (quartile), and *H* (high)
* **quietzone**: a whitespace buffer surrounding the barcode. The value should be an integer value representing a multiple of the smallest bar size (with a recommended value 10 or higher)
The following parameters are uncommon and should only be used for barcodes with special requirements:
* **heightnarrowratio**: the width of the narrowest bar in relation to the height of the barcode; must be specified as a ratio where height is 1 (for example, '0.05' for 1/20th)
* **widenarrowratio**: the width of the narrowest bar in relation to the width of the widest bar; must be specified as a ratio where the widest bar is 1 (for example, '0.2' for 1/5th)
* **spacebarratio**: the width of a space in a barcode in relation to the width of the bar; must be specified as a ratio where the bar width is 1 (default value is 1)
## Example
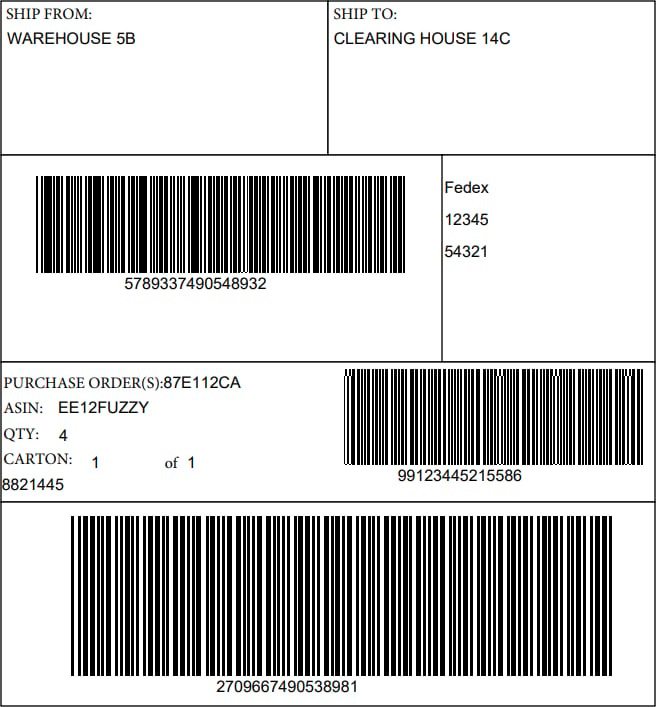
Below is an example XML input file, PDF **Template File**, and resulting PDF output.
The template file image below is of the Adobe Pro form editor, which displays the names of each form field. Remember that the field names in the template file must match the element labels in the XML.
### Input XML
```xml theme={null}
WAREHOUSE 5B
CLEARING HOUSE 14C
5789337490548932
5789337490548932
Fedex
12345
54321
87E112CA
EE12FUZZY
4
99123445215586
99123445215586
1
1
8821445
2709667490538981
2709667490538981
```
### Template File
 ### Output
 ## Legacy XML Format
In addition to the XML format described in [Generating a PDF Document](#generating-a-pdf-document), the connector supports an older XML input file structure to maintain backwards compatibility. CData recommends that you use the syntax described in the previous section when designing new Flows.
Following is an example of the legacy XML format:
```xml theme={null}
## Legacy XML Format
In addition to the XML format described in [Generating a PDF Document](#generating-a-pdf-document), the connector supports an older XML input file structure to maintain backwards compatibility. CData recommends that you use the syntax described in the previous section when designing new Flows.
Following is an example of the legacy XML format:
```xml theme={null}
- Wayne Tech Plant 1
- 100 Wayne Ave.
- Chapel Hill, NC 27514
- Same as billing address
```
In this structure, all children of the root *Items* element should be called *Item*, and the *name* XML attribute should match the form field name in the PDF template file. The same XML attributes described in the previous sections are available in the legacy format (such as *type* for specifying barcode fields, and *pages* for generating a subset of output pages).
## Macros
### Examples