> ## Documentation Index
> Fetch the complete documentation index at: https://docs.arc.cdata.com/llms.txt
> Use this file to discover all available pages before exploring further.
# EANCOM Connector
> Configuration and usage guide for the CData Arc EANCOM connector.
export const SampleFilesTab = () => <>
サンプルファイルをアップロードすると、接続されているCSV Map またはXML Map コネクタでのマッピングが容易になります。
Sample Files タブを使用して、CSV Map またはXML Map コネクタで使用するソースまたは宛先のXML テンプレートを生成します。Add Sample File をクリックします。
1. データの想定される形式と構造を反映したサンプルファイルが既にある場合は、File Upload を選択してファイルを参照します。あるいは、Manually Create を選択して、アプリケーション内で直接ファイルを作成します。Manually Create を選択した場合は、サンプルファイルに名前を付けます。Next をクリックします。
2. 既存のファイルを参照した場合、View File タブにその内容が表示されます。手動でファイルを作成することを選択した場合は、このタブにサンプルデータを入力します。Next をクリックします。
3. Translate and Preview タブには、XML に変換されたサンプルデータのプレビューが表示されます。サンプルに問題がなければ、Add をクリックします。
;
export const EdiUploadTestFile = ({fileFormat = "EDI", documentType}) => {
const docLabel = documentType || fileFormat;
return <>
入力ファイルのXML 表現を生成するには、次の手順を実行します。
1. コネクタのTransactions タブで、More ドロップダウンをクリックし、Upload Test File をクリックします。
2. XML としてモデル化したいディスク上のファイルに移動し、それを選択してOK をクリックします。
3. フロー内で{fileFormat} コネクタをXML Map コネクタに接続します。この接続はいずれの方向でも可能です。XML Map コネクタへのインバウンド、またはXML Map コネクタからのアウトバウンドのいずれかです。
XML Map コネクタは、テストファイルの構造を自動的に検出します。{fileFormat} コネクタを配置した場所に応じて、ファイルはXML Map コネクタのSource File またはDestination File ドロップダウンメニューに表示されます。
XML Map コネクタにはソーステンプレートとデスティネーションテンプレートの両方が必要なため、残りのテンプレートは、データの元となる構造、または変換先となる構造に基づいて設定する必要があります。例えば、{docLabel} ドキュメントのデータをデータベースに挿入する必要がある場合、XML Map コネクタのもう一方のテンプレートはデータベース挿入のXML モデルになります。2 つのテンプレートファイル間のマッピングの作成について詳しくは、XML Map コネクタのマッピングエディタの使用を参照してください。
;
};
export const EdiXmlMapIntro = ({fileFormat = "EDI"}) => Arc の規約に従い、{fileFormat} コネクタは2 つのうちいずれかの動作を行います。XML 入力を受け取るか、XML 出力を生成するかのいずれかです。入力ファイルと出力ファイルが正しいXML 構造を持つようにするため、CData は、送信{fileFormat} ドキュメントを生成する際にはフロー内の前のステップとして、また受信{fileFormat} ドキュメントを受け取る際にはフロー内の次のステップとして、XML Map コネクタを使用することを強く推奨します。XML Map コネクタと{fileFormat} コネクタ間のやり取りは、以下で説明するUpload Test File 機能によって簡単になります。
;
export const DynamicallyProcessPartnersDetail = ({customImage1 = "edi_partners_tab.png", customImage2 = "edi_dynamically_process_partners_disabled.png"}) => <>
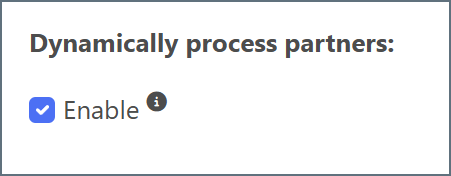
デフォルトでは、コネクタのSettings タブにあるDynamically process partners チェックボックスは有効になっています。これは、コネクタがEDI トランザクションからトレーディングパートナーとの関係を自動的に識別し追跡することを意味します。この場合、コネクタはライセンス上限までのすべてのパートナーを動的に管理し、上限に達したときに通知するため、手動でのパートナー設定は不要です。コネクタは処理するファイルに基づいて識別子を追跡するため、すべてのパートナーに対して単一のコネクタを使用できる可能性があります。
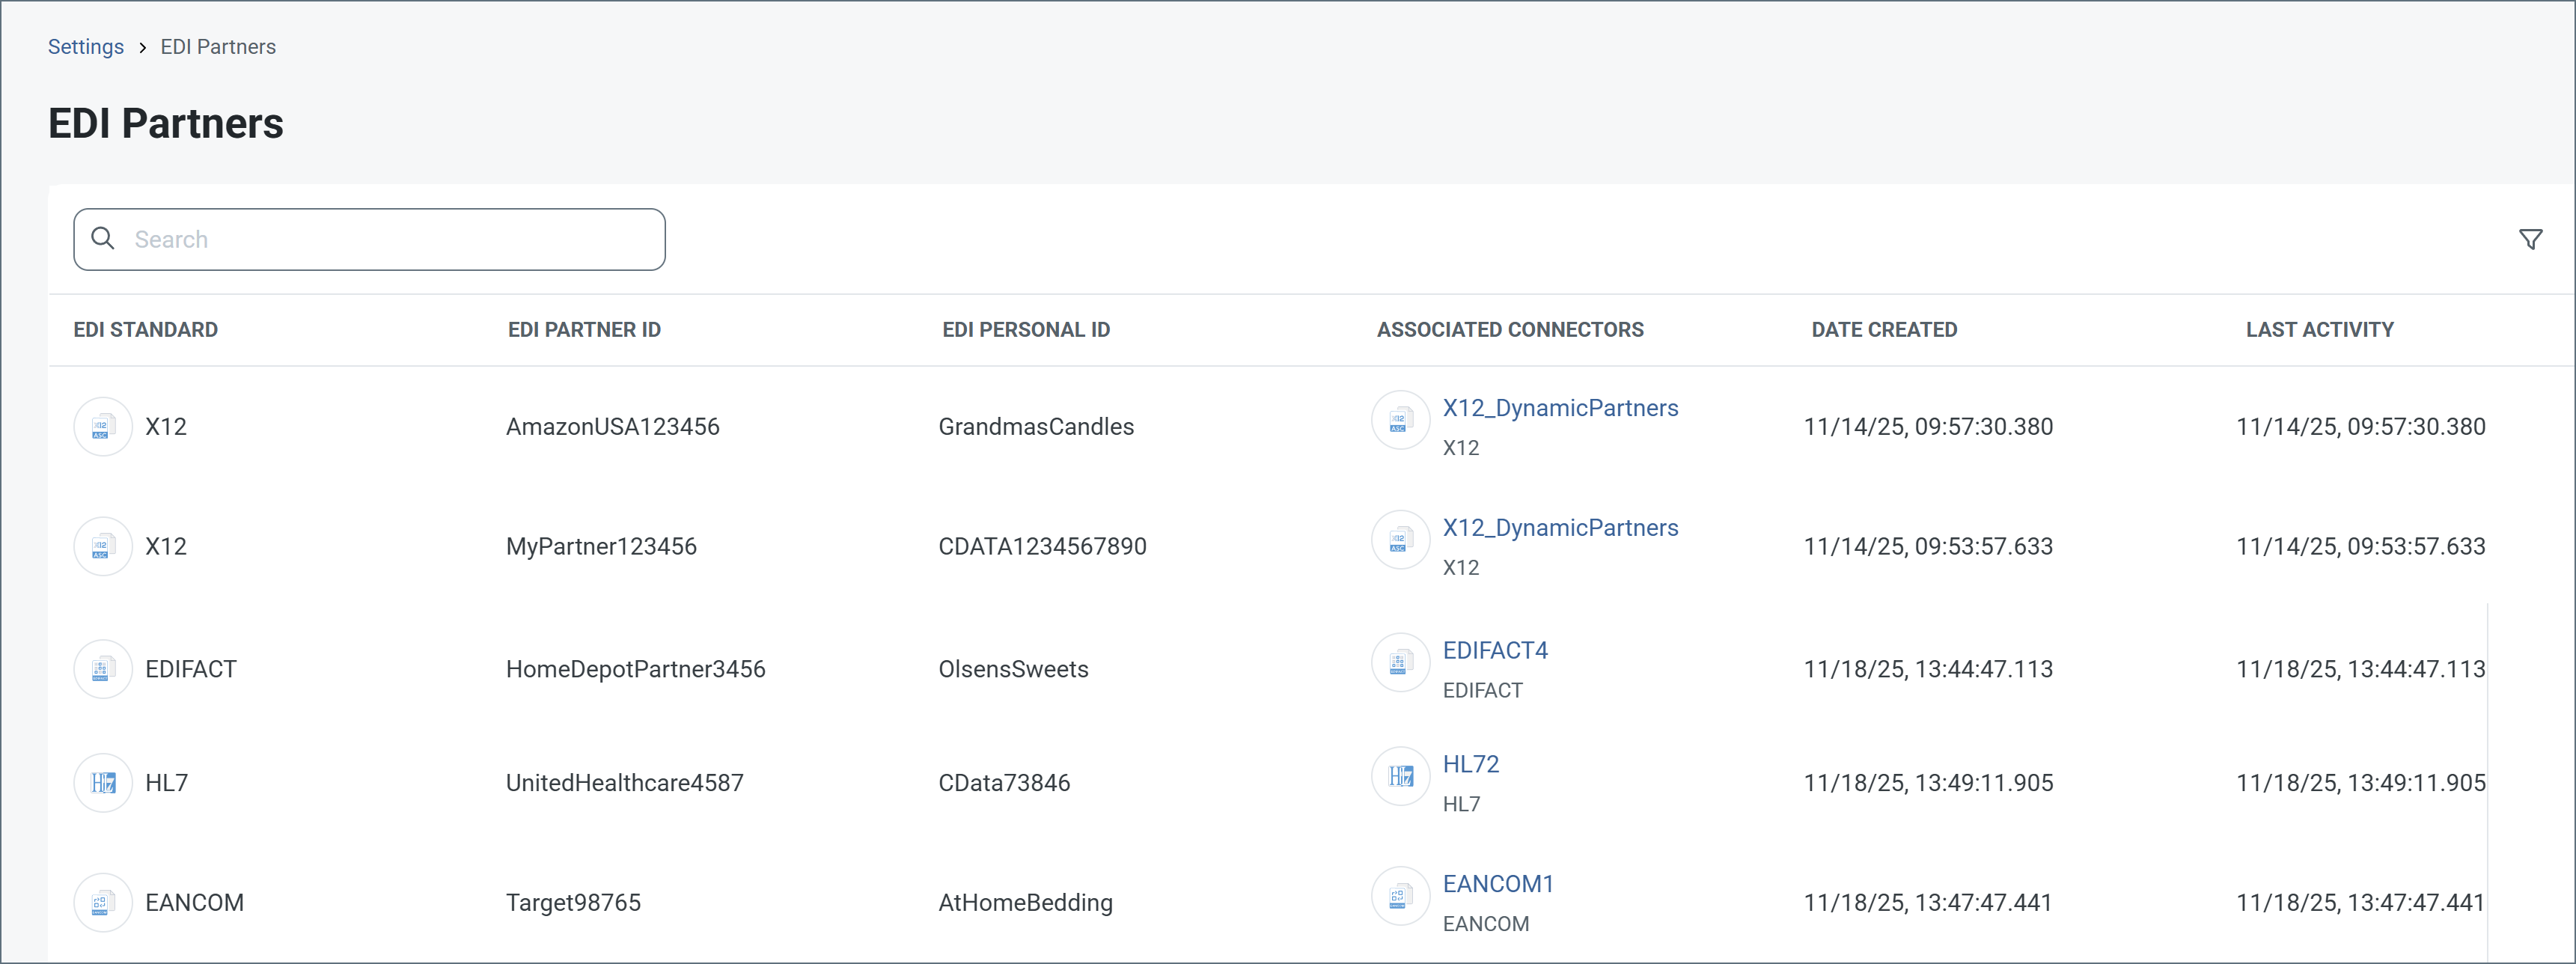
EDI Partners タブは、Arc がパートナーを動的に処理している場合にのみ有効になります。このタブには、コネクタが識別した各関係のパートナー識別子およびローカル識別子と、そのパートナーのファイルの最終処理日が表示されます。EDI Partners タブでは、最終処理日が30 日以上前のパートナーを、パートナーにカーソルを合わせてゴミ箱アイコンをクリックすることで削除できます。

この設定を有効にすると、コネクタが識別したすべてのパートナーとの関係が、ライセンスの目的で自動的に追跡されます。これらはSettings > License タブのConnector Usage 部分に表示されます。ここでは、パートナー識別子およびローカル識別子、関連するコネクタ、日付情報を確認できます。
この設定を無効にする場合は、次の画像に示すように、Settings タブのPartner Identifier およびPersonal Identifier フィールドでパートナーとの関係を明示的に設定する必要があります。

手動で定義したパートナーとの関係も、Settings > License タブのConnector Usage 部分に表示されます。
;
export const CommonPendingAck = () => 確認応答(ACK)を必要とするEDI メッセージがその確認応答を受け取っていない場合、Pending-Timeout ヘッダーがメッセージに追加されます。メッセージはACK を待つ間、Pending ステータスになります。割り当てられた時間内にACK を受信しない場合、Pending-Timeout ヘッダーには、メッセージのステータスがError に変わった日時が設定されます。ACK を受信してメッセージがSuccess に更新されると、空文字列の値を持つ新しいヘッダーが追加されます。
;
export const SlasTab = ({siteName = "CData Arc"}) => <>
サービスレベルアグリーメント(SLA)の設定に関する設定です。
SLA を使用すると、フロー内のコネクタが送受信すると見込まれるボリュームを設定し、そのボリュームを達成すると見込まれる期間を設定できます。{siteName} は、SLA が達成されない場合にユーザーへ警告するメールを送信し、SLA をAt Risk としてマークします。これは、SLA が間もなく達成されない場合にViolated としてマークされることを意味します。これにより、ユーザーは介入してSLA が達成されない理由を特定し、適切な対応を取る機会を得られます。At Risk 期間の終了時点でもSLA が達成されない場合、SLA はviolated としてマークされ、ユーザーに再度通知されます。
SLA を定義するには、Expected Volume をオンに切り替え、Settings タブをクリックします。
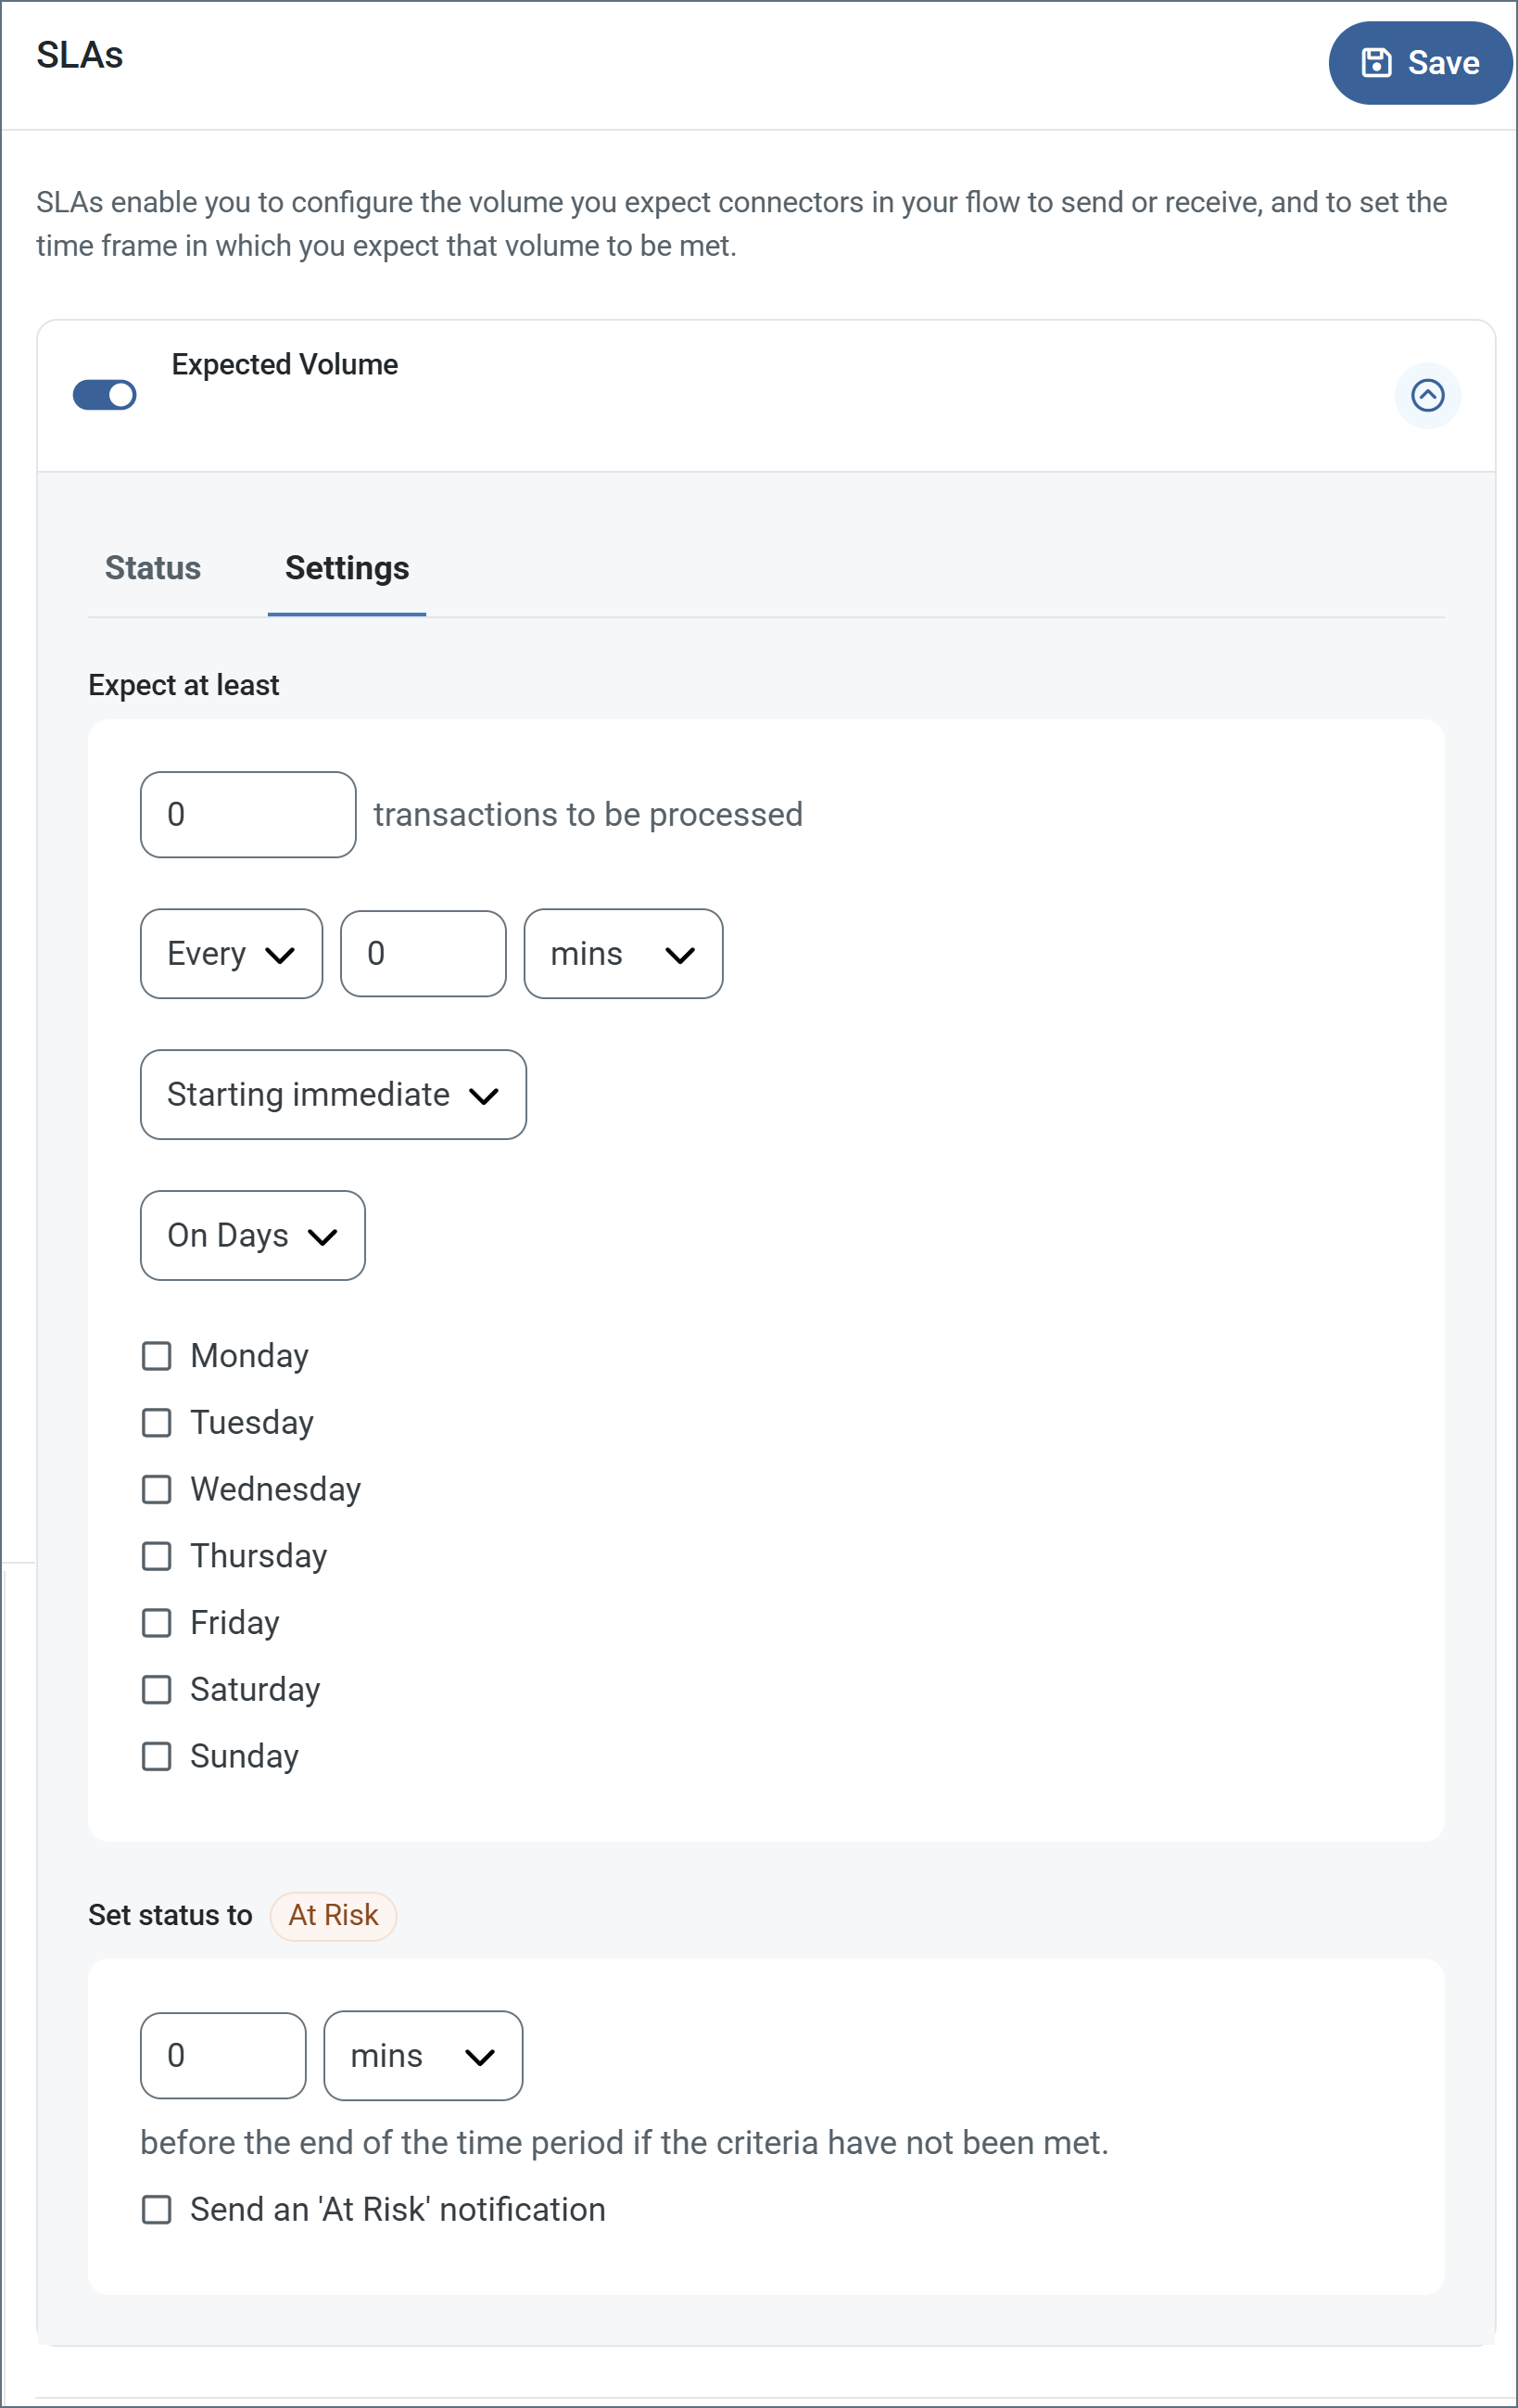
- コネクタに送信と受信の個別のアクションがある場合は、ラジオボタンを使用してSLA がどちらの方向に適用されるかを指定します。
- ウィンドウのExpect at least 部分で、次を設定します。
- 処理を見込む最小トランザクション数(ボリューム)を設定します。
- Every フィールドを使用して期間を指定します。
- SLA を有効にするタイミングを指定します。Starting on を選択した場合は、日付および時刻フィールドを入力します。
- SLA を有効にしたい曜日のチェックボックスをオンにします。必要に応じて、ドロップダウンでEveryday を選択します。
- ウィンドウのSet status to 'At Risk' 部分で、SLA をAt Risk としてマークするタイミングを指定します。
- デフォルトでは、SLA が違反状態になるまで通知は送信されません。これを変更するには、Send an 'At Risk' notification をオンにします。
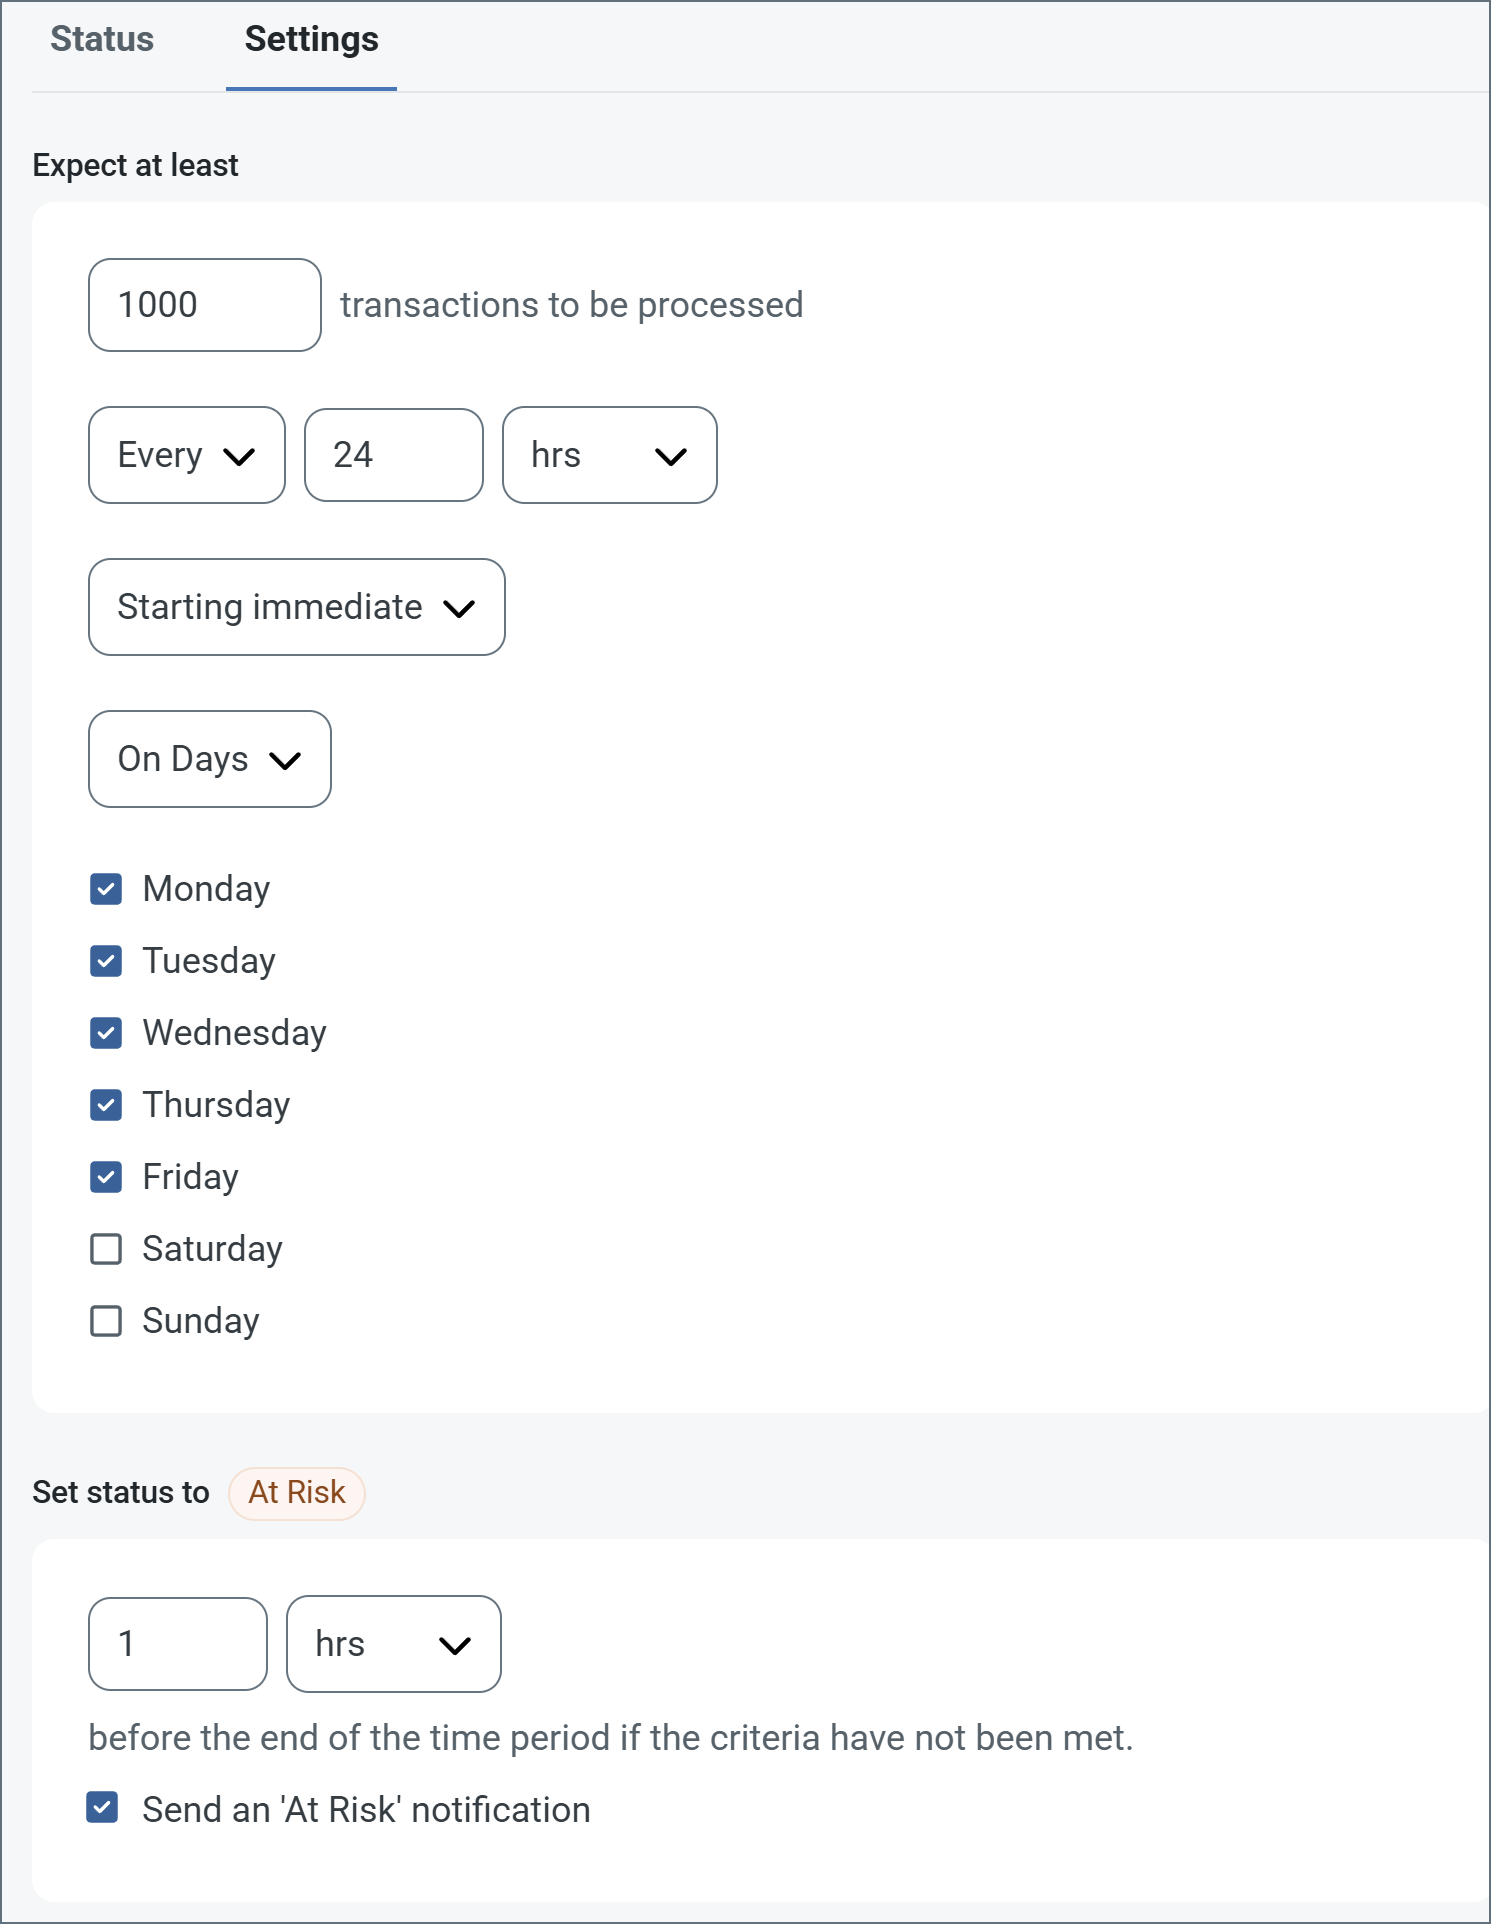
次の例は、月曜日から金曜日まで毎日1000 件のファイルを受信すると見込むコネクタ向けに設定されたSLA を示しています。1000 件のファイルが受信されていない場合、期間の終了の1時間前にAt Risk 通知が送信されます。
 必要に応じてSLA アラートをオフにすることができます。これはメンテナンスウィンドウ中に役立ちます。navbar でSettings をクリックし、Alerts > General Alerts に移動します。タブレットと鉛筆のアイコンをクリックして編集し、SLA Alerts 設定のチェックを外します。
;
export const AlertsTab = ({siteNameShort = "Arc"}) => <>
必要に応じてSLA アラートをオフにすることができます。これはメンテナンスウィンドウ中に役立ちます。navbar でSettings をクリックし、Alerts > General Alerts に移動します。タブレットと鉛筆のアイコンをクリックして編集し、SLA Alerts 設定のチェックを外します。
;
export const AlertsTab = ({siteNameShort = "Arc"}) => <>
アラートの設定に関する設定です。
サービスレベルアグリーメント(SLA)を実行する前に、通知用のメールアラートをセットアップする必要があります。デフォルトでは、{siteNameShort} はAlerts タブのグローバル設定を使用します。このコネクタに別の設定を使用するには、Override global setting をオンに切り替えます。
デフォルトではエラーアラートが有効になっており、エラーが発生するたびにメールが送信されます。これをオフにするには、Enable チェックボックスのチェックを外します。
Subject(必須)を入力します。Allow {siteNameShort}Script in Subject をチェックすると、Subject フィールドで{siteNameShort}Script を使用できます。これを選択すると、{siteNameShort}Script エディタボタンが表示されます( )。
)。
必要に応じてRecipient のメールアドレスをカンマ区切りのリストで入力します。
;
export const Message = () => <>
Message 設定は、コネクタがメッセージを検索する方法と、処理後にメッセージを管理する方法を決定します。
Note: 以下の設定は非推奨となり、デフォルトで非表示になっています。以前に有効化またはデフォルト以外の値に設定されていたコネクタにのみ表示されます。処理済みファイルのコピーを保持するには、フロー内のコネクタを右クリックし、成功パスを表示を選択して、成功パスをFile コネクタに接続してください。
| 設定 | 説明 |
|---|
| Sent フォルダに保存(非推奨) |
コネクタが処理したファイルをSent フォルダにコピーします。デフォルトで無効です。Sent フォルダに保存されたファイルは保存データの暗号化の対象外です。 |
| Sent フォルダのスキーム(非推奨) |
選択した時間間隔でSent フォルダ内のファイルをグループ化します。Sent フォルダに保存が有効な場合のみ適用されます。 |
;
export const MiscConnector = () => <>
Miscellaneous 設定は、特定のユースケース向けの設定です。
| 設定 |
説明 |
| Other Settings |
非表示のコネクタ設定をセミコロン区切りのリストで設定できます(例:setting1=value1;setting2=value2)。通常のコネクタのユースケースや機能では、これらの設定の使用は必要ありません。 |
;
export const Logging = () => <>
ログの作成と保存を制御する設定です。
| 設定 |
説明 |
| Log Level |
コネクタが生成するログの詳細度です。サポートを依頼する際は、これをDebug に設定してください。 |
| Log Subfolder Scheme |
選択した間隔に従って、コネクタがLogs フォルダ内のファイルをグループ化するよう指示します。Weekly オプション(デフォルト)は、コネクタが毎週新しいサブフォルダを作成し、その週のすべてのログをそのフォルダに保存するよう指示します。この設定を空白のままにすると、コネクタはすべてのログをLogs フォルダに直接保存します。多数のトランザクションを処理するコネクタでは、サブフォルダを使用することでログを整理しやすくなり、パフォーマンスが向上します。 |
| Log Messages |
処理したファイルのログエントリにファイル自体のコピーを含めるには、これをオンにします。これを無効にすると、Transactions タブからファイルのコピーをダウンロードできなくなる場合があります。 |
;
export const MacrosExamples = ({extraMacros = []}) => <>
%Ext% や %ShortDate% などの一部のマクロは引数を必要としませんが、引数を必要とするものもあります。
引数を取るすべてのマクロは次の構文を使用します。%Macro:argument%
引数を取るマクロの例を次に示します。
- %Header:headername%:
headername はメッセージ上のヘッダーの名前です。
- %Header:mycustomheader% は、入力メッセージに設定された
mycustomheader ヘッダーの値に解決されます。
- %Header:ponum% は、入力メッセージに設定された
ponum ヘッダーの値に解決されます。
- %RegexFilename:pattern%:
pattern は正規表現パターンです。例えば、%RegexFilename:^([\w][A-Za-z]+)% は、ファイル名の最初の単語にマッチしてそれに解決され、大文字・小文字を区別しません(test_file.xml はtest に解決されます)。
- %Vault:vaultitem%:
vaultitem はVault 内のアイテムの名前です。例えば、%Vault:companyname% は、Vault に保存されたcompanyname アイテムの値に解決されます。
- %DateFormat:format%:
format は許容される日付形式です(詳細は日付形式のサンプルを参照してください)。例えば、%DateFormat:yyyy-MM-dd-HH-mm-ss-fff% は、ファイルの日付とタイムスタンプに解決されます。
{extraMacros.filter(item => item.example).map(item => - {item.example}
)}
次の例に示すように、より高度なマクロを作成することもできます。
- 1 つのファイル名で複数のマクロを組み合わせる:
%DateFormat:yyyy-MM-dd-HH-mm-ss-fff%%EXT%
- マクロの外側にテキストを含める:
MyFile_%DateFormat:yyyy-MM-dd-HH-mm-ss-fff%
- マクロの内側にテキストを含める:
%DateFormat:'DateProcessed-'yyyy-MM-dd_'TimeProcessed-'HH-mm-ss%
;
export const MacrosTable = ({siteName = "CData Arc", extraMacros = []}) => <>
ファイル命名戦略でマクロを使用すると、データの整理効率と文脈の理解を高めることができます。
ファイル名にマクロを組み込むことで、識別子、タイムスタンプ、ヘッダー情報などの関連情報を
動的に含めることができ、各ファイルに有用な文脈を提供します。
{siteName} は次のマクロをサポートしています。これらはすべて次の構文を使用します。%Macro%
| マクロ | 説明 |
|---|
| ConnectorID | コネクタのConnectorID に評価されます。 |
| ConnectorName | コネクタの名前に評価されます。ファイル名やパスに接続名を含めることができます。例えば、どのデータベース接続が生成したかによってバックアップファイルにタグを付けるために使用できます。 |
| Ext | コネクタが現在処理しているファイルの拡張子に評価されます。 |
| Filename | コネクタが現在処理しているファイルのファイル名(拡張子を含む)に評価されます。 |
| FilenameNoExt | コネクタが現在処理しているファイルのファイル名(拡張子を除く)に評価されます。 |
| MessageId | コネクタが出力しているメッセージのMessageId に評価されます。 |
| RegexFilename:pattern | コネクタが現在処理しているファイルのファイル名に正規表現パターンを適用します。 |
| Header:headername | コネクタが現在処理しているメッセージ上の対象ヘッダー(headername)の値に評価されます。 |
| LongDate | システムの現在の日時を長い形式(例:Wednesday, January 24, 2024)で評価します。 |
| ShortDate | システムの現在の日時をyyyy-MM-dd 形式(例:2024-01-24)で評価します。 |
| DateFormat:format | システムの現在の日時を指定された形式(format)で評価します。利用可能な日時形式については、日付形式のサンプルを参照してください。 |
| Vault:vaultitem | 指定されたVault アイテムの値に評価されます。 |
{extraMacros.map(item =>
| {item.name} |
{item.description} |
)}
;
export const Performance = () => <>
コネクタへのリソースの割り当てに関する設定です。
;
export const companyName = "CData";
export const siteNameShort = "Arc";
export const siteName = "CData Arc";
export const fileFormat = "EANCOM";
export const documentType = "EANCOM";
EANCOM connectors support generating EANCOM documents (also known as GS1 documents) from XML or converting EANCOM documents into XML.
## Key Capabilities
* Full bidirectional translation between EANCOM and XML formats
* Comprehensive interchange header validation and generation
* Support for multiple EANCOM versions with automatic schema detection
* Interchange and functional acknowledgment support
## Overview
When receiving EANCOM documents, EANCOM connectors validate interchange headers and convert the EANCOM document into XML. This is useful as a staging step, because XML is the primary format that {siteNameShort} uses to manipulate data within a flow. The EANCOM connector automatically reads the input file to determine the appropriate schema, then parses the document according to this schema.
When generating EANCOM documents, EANCOM connectors convert XML into EANCOM document syntax and apply the appropriate interchange headers. This is useful as the final step for creating an EANCOM document, after the XML data has been fetched and transformed elsewhere in the flow.
## Connector Configuration
This section contains all of the configurable connector properties.
### Settings Tab
#### Translation Configuration
*Settings related to the core operation of the connector.*
| Setting | Description |
| -------------------------------- | ------------------------------------------------------------------------------------------------------------------------------------------------------------------------------------------------------------------------------------------------------ |
| **Connector Id** | The static, unique identifier for the connector. |
| **Connector Type** | Displays the connector name and a description of what it does. |
| **Connector Description** | An optional field to provide a free-form description of the connector and its role in the flow. |
| **Translation Type** | Whether the connector should convert EANCOM documents into XML, or generate EANCOM documents from XML. |
| **Dynamically process partners** | When enabled, the connector automatically identifies and tracks trading partner relationships from EDI transactions. When disabled, you must manually define the partner relationship. See [EDI Partners Tab](#edi-partners-tab) for more information. |
#### EDI Partner
| Setting | Description |
| --------------------------------- | -------------------------------------------------------------------------------------------------------------------------------------------------------------------------------------------------------------------------------------------- |
| **Partner Identifier (UNB2.1)** | The unique Id identifying the sending party in the EANCOM communication. When you are generating an EANCOM document, this should be your identifier. Only applicable when **Dynamically process partners** is unchecked. |
| **Recipient Identifier (UNB3.1)** | The unique Id identifying the receiving party in the EANCOM communication. When you are generating an EANCOM document, this should be your trading partner's identifier. Only applicable when **Dynamically process partners** is unchecked. |
#### Interchange Settings
*Settings related to the EANCOM interchange headers. When converting EANCOM documents into XML, the document headers are validated against these settings; when generating EANCOM documents from XML, these settings are used to generate document headers.*
| Setting | Description |
| ------------------------------------ | --------------------------------------------------------------------------------------------------------------------------------------------------------------------------------------------------------------------------------- |
| **Syntax Identifier (UNB1.1)** | Identifies the character set used in the EANCOM document. |
| **Syntax Version (UNB1.2)** | In combination with the **Syntax Identifier**, determines the syntax to be used in the EANCOM document. Based on your selection here, other interchange setting options appear or disappear on the [Advanced tab](#advanced-tab). |
| **Partner Code Qualifier (UNB2.2)** | The qualifier for the **Sender Identifier**, which provides context to the value (for example, an EAN location number). |
| **Personal Code Qualifier (UNB3.2)** | The qualifier for the **Recipient Identifier**, which provides context to the value (for example, an EAN location number). |
| **Test Indicator (UNB11)** | Whether the interchange is in test mode or production mode. If you check this, interchange headers are *not* validated when documents are received. |
| **Functional Group** | Check this to automatically add the sender and recipient identifiers to the [Functional Group Settings](#functional-group-settings) on the **Advanced** tab. |
#### Acknowledgments
*Settings related to generating and requesting acknowledgments.*
| Setting | Description |
| -------------------------------------- | ------------------------------------------------------------------------------------------------------------------------------------------------------------------------------------------------------------- |
| **Technical acknowledgment (CONTRL)** | Whether a technical CONTRL ACK should be returned (when receiving) and requested (when sending). A technical acknowledgment serves as a receipt of the interchange. |
| **Functional acknowledgment (CONTRL)** | Whether a functional CONTRL ACK should be returned (when receiving) and requested (when sending). A functional acknowledgment serves as an indication of acceptance or rejection of the received interchange. |
### Sample Files Tab
### Advanced Tab
#### EDI Delimiters
*Settings that specify which characters separate elements, segments, etc.*
| Setting | Description |
| ------------------------------- | --------------------------------------------------------------------------------------------------------------------------------------------------------------------------------------------------------------- |
| **Data Element Separator** | The character that separates individual data elements in the document. |
| **Component Element Separator** | The character that separates elements within a composite data structure in the document. |
| **Segment Terminator** | The character that indicates the end of a segment in the document. |
| **Release Char** | The character that *releases* (escapes) the next character, overriding its usual meaning. This allows reserved characters to appear as data within documents, as long as they are preceded by the Release Char. |
| **Repetition Char** | The character that indicates repetition of element values. |
| **Suffix** | Appended to the **Segment Terminator** to distinguish segments. |
#### Interchange Settings
*Additional settings related to the EANCOM interchange headers. These options appear or disappear based on the **Syntax Version** specified on the Settings tab.*
| Setting | Description |
| ------------------------------------------------------- | ----------------------------------------------------------------------------------------------------------------------------------------------------------- |
| **Service Code List Directory Version Number (UNB1.3)** | Further specifies the syntax to be used in the EANCOM document. Only applicable for EANCOM syntax version 4. |
| **Character Encoding (UNB1.4)** | Specifies the character encoding (such as ASCII or UTF-8). Only applicable for EANCOM syntax version 4. |
| **Address for Reverse Routing (UNB2.3)** | The optional address in the sender's system to which responding interchanges should be sent. Only applicable for EANCOM syntax versions prior to version 4. |
| **Partner Internal ID (UNB2.3)** | An additional sender identifier to facilitate internal routing of response interchanges. Only applicable for EANCOM syntax version 4. |
| **Partner Internal Sub-Identification (UNB2.4)** | Further identifies the sender when sub-level identification is required. Only applicable for EANCOM syntax version 4. |
| **Routing Address (UNB3.3)** | The optional address in the recipient's system to which interchanges should be routed. Only applicable for EANCOM syntax versions prior to version 4. |
| **Personal Internal ID (UNB3.3)** | An additional recipient identifier to facilitate internal routing of received interchanges. Only applicable for EANCOM syntax version 4. |
| **Personal Internal Sub-Identification (UNB3.4)** | Further identifies the recipient when sub-level identification is required. Only applicable for EANCOM syntax version 4. |
| **Partner Password (UNB6.1)** | Reference or password to gain access to the recipient's system. |
| **Partner Password Qualifier (UNB6.2)** | The qualifier that provides context to the **Partner Password**, if applicable. |
| **Application Reference ID (UNB7)** | Identifies the application group to which the messages in the interchange relate. |
| **Processing Priority Code (UNB8)** | Code for requesting processing priority for the interchange. |
| **Communication Agreement (UNB10)** | Defines the type of communication agreement controlling the interchange. |
#### Functional Group Settings
*Settings related to the functional group headers of EANCOM documents. These optional identifiers can help group similar interchanges together, or facilitate sub-addressing within an organization.*
| Setting | Description |
| -------------------------------------------- | ------------------------------------------------------------------------------------------------- |
| **Application Partner Identifier (UNG2.1)** | Identifies the application sending the document (such as a division, branch, or computer system). |
| **Application Personal Identifier (UNG2.1)** | Identifies the application for which the document is intended. |
#### Advanced Settings
*Settings not included in the previous categories.*
| Setting | Description |
| ---------------------------- | ----------------------------------------------------------------------------------------------------------------------------------------------------------------------------------------------------------------------------------------------------------------------------------------------------------------------------------------------------------------------------------------------------- |
| **Batch Transactions** | An interchange can contain multiple transactions. When this is not checked, the connector creates a separate output file for each transaction in the interchange. When checked, the connector groups all transactions into a single output file. |
| **Encoding** | Specifies the character encoding (such as ASCII or UTF-8). |
| **Expand Qualifier Values** | When checked, XML elements containing an EDI qualifier include child elements containing the qualifier code and value. For example: `STShip To`. |
| **Functional Acks** | By default, all functional acknowledgments (997, 999) are routed to the connector selected in the flow diagram, and XML translations are not received in the **Transactions** tab. Check this to have the translated acknowledgment also be included in the **Transactions** tab. This allows functional acknowledgments to be integrated into a destination source in addition to new EDI documents. |
| **Generate Description As** | When translating EANCOM into XML, descriptions of the EANCOM segments and elements can be provided as context for the EANCOM data. Use this dropdown to choose whether to add this context as an XML comment or as XML attributes. |
| **Local File Scheme** | A scheme for assigning filenames to messages that are output by the connector. You can use macros in your filenames dynamically to include information such as identifiers and timestamps. For more information, see [Macros](#macros). |
| **Nest Loops** | When checked, the connector detects EDI structures that have hierarchical relationships embedded in the EDI data, and generates XML with these hierarchical relationships represented as parent-child relationships. See [Master-Detail Hierarchy: Translating CPS Loops](#master-detail-hierarchy-translating-cps-loops) for more information. |
| **Processing Delay** | The amount of time (in seconds) by which the processing of files placed in the **Transactions** tab is delayed. This is a legacy setting. Best practice is to [use a File connector](../flows/designing-a-flow#ローカルファイルシステムとのやり取り) to manage local file systems instead of this setting. |
| **Strict Schema Validation** | Whether the connector should Ignore, Warn, or Fail when the following are detected: repeat counts above the allowed number, missing required elements or segments, invalid qualifier and code values, disallowed element lengths, and invalid element values. Choosing Disable turns off the schema validation checks. |
| **Track UNB2.1** | Whether to add UNB2.1 values as tracked headers to processed messages. |
| **Track UNB3.1** | Whether to add UNB3.1 values as tracked headers to processed messages. |
| **Track Transaction Types** | Whether to add transaction types as tracked headers to processed messages. |
| **Validate Identifiers** | Check this to ensure that the identifiers in the translated document match the identifiers in the connector's configuration. |
| **Duplicate File Action** | How the connector should behave when it receives a message with a control number that the connector has seen before (a duplicate). When set to `Ignore`, the connector silently skips the duplicate and continues processing. When set to `Warn`, the connector processes the file but returns a warning. When set to `Fail`, the connector does not accept the file and returns an error. |
| **Upload Schema** | Use this to upload a schema and install it in the connector's Schema folder. If a schema already exists, you are asked if you want to overwrite it. |
| **Reset State** | EDI connectors keep track of control numbers that have been used and increment that number to ensure that future runs do not duplicate data. Use this button to reset the counter to its initial state without changing any of the configured settings. |
#### Message
#### Logging
#### Miscellaneous
### EDI Partners Tab
### Automation Tab
#### Automation
*Settings related to the automatic processing of files by the connector.*
| Setting | Description |
| ------------------------ | ----------------------------------------------------------------------------------------------------------------------------------------------------------------------------------------------------------------------------------------------------------------------------------------------------------------------------------------------------------------------------- |
| **Send** | A toggle that instructs the connector to automatically send files when they are ready. |
| **Resend Interval** | The interval the connector waits before resending a file that received a negative ACK. For example, if a trading partner receives the file but something is wrong with it and they send back a negative ACK, this setting specifies how long to wait before sending the file again. |
| **Max Attempts (async)** | The maximum number of times the connector processes the input file when a functional ACK is requested. Success is based on the return of a functional ACK within the **Resend Interval**. If a successful functional ACK is not returned, the connector resends the file until **Max Attempts** is reached. If this is set to 0, the connector resends the file indefinitely. |
#### Performance
### Alerts Tab
### SLAs Tab
## XML to EANCOM
When generating EANCOM files, select **XML to EANCOM** as the **Translation Type**. The application reads the header information for the interchange, functional group, and message sections from the settings configured on the [Settings tab](#settings-tab). These settings include the sender identifier and code qualifier, receiver identifier and code qualifier, and so on.
Once you have configured the connector with the settings from your trading partner agreement, click the **Transactions** tab and select **More > Create Test Files**. The application creates a set of test XML files that provide example data of what the XML should look like for the connector to generate an EANCOM document. You can also select the documents and click **Send** to see the generated EANCOM documents.
## EANCOM to XML
When generating XML, select **EANCOM to XML** as the **Translation Type**. The application only processes EANCOM files when this option is selected. You need to configure the settings for the trading partner agreement on this page for the application to validate the information in EANCOM documents during processing. XML files are generated into the Output folder for this connector.
Click the **Transactions** tab and select **More > Create Test Files** to create test EANCOM files for several EANCOM documents. You can select these documents and click **Send** to see the generated XML.
## Use With the XML Map Connector
### Upload Test File
## Acknowledgements
Acknowledgments are routed to the connector specified by the grey dotted line in the flow diagram, as shown in the following image:
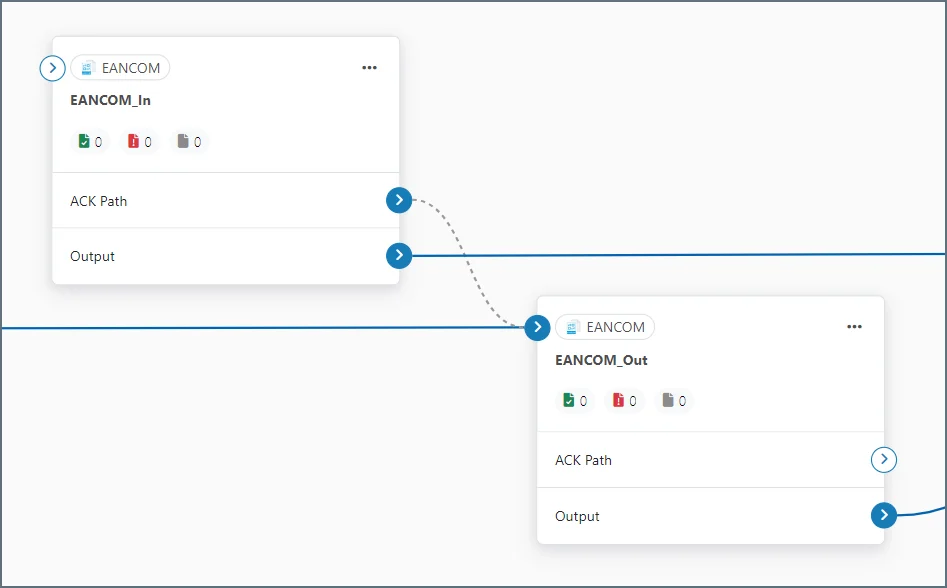 The specified connector generates acknowledgments using the transaction data received by the current connector. The specified connector adds interchange headers and passes the acknowledgment along in the flow like any other message. Thus this should typically be set to a pre-configured EANCOM connector that generates outbound documents for the intended recipient.
Acknowledgments can be automatically generated and processed by the application. There are two commonly requested types of acknowledgments used in EANCOM communications, interchange and functional. Both of the acknowledgments types are classified as EANCOM CONTRL messages.
#### Interchange Acknowledgments
This is an indication that an interchange has taken place between the two parties (though not necessarily that any individual message has been exchanged). They are automatically generated in response to a request in the interchange.
#### Functional Acknowledgments
Functional acknowledgments are an indication that an individual message such as an Invoice or PO has been accepted. These are generated in response to a bidirectional agreement by both parties.
### Message Originator
#### Requesting Acknowledgements
EANCOM connectors in XML-to-EDI mode can be configured so that both interchange and functional acknowledgments can be requested for a message. Select the **Technical acknowledgment (CONTRL)** and **Functional acknowledgment (CONTRL)** checkboxes on the [Settings tab](#settings-tab) to direct the connector to maintain a Pending ACK status for the transmission until the appropriate acknowledgments have been returned and processed.
The specified connector generates acknowledgments using the transaction data received by the current connector. The specified connector adds interchange headers and passes the acknowledgment along in the flow like any other message. Thus this should typically be set to a pre-configured EANCOM connector that generates outbound documents for the intended recipient.
Acknowledgments can be automatically generated and processed by the application. There are two commonly requested types of acknowledgments used in EANCOM communications, interchange and functional. Both of the acknowledgments types are classified as EANCOM CONTRL messages.
#### Interchange Acknowledgments
This is an indication that an interchange has taken place between the two parties (though not necessarily that any individual message has been exchanged). They are automatically generated in response to a request in the interchange.
#### Functional Acknowledgments
Functional acknowledgments are an indication that an individual message such as an Invoice or PO has been accepted. These are generated in response to a bidirectional agreement by both parties.
### Message Originator
#### Requesting Acknowledgements
EANCOM connectors in XML-to-EDI mode can be configured so that both interchange and functional acknowledgments can be requested for a message. Select the **Technical acknowledgment (CONTRL)** and **Functional acknowledgment (CONTRL)** checkboxes on the [Settings tab](#settings-tab) to direct the connector to maintain a Pending ACK status for the transmission until the appropriate acknowledgments have been returned and processed.
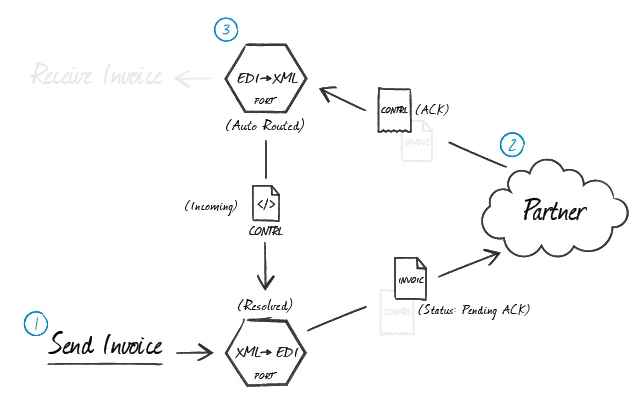 The illustration above shows a complete message exchange from the standpoint of the message originator. An EANCOM connector in XML-to-EDI mode generates the document to be exchanged **(1)** and holds it in a Pending ACK state. The trading partner processes the transmission in their business logic and creates acknowledgments in accordance with the configured exchange parameters and the bidirectional agreement between parties **(2)**. When the acknowledgments are returned, they are parsed with and an EANCOM connector in EDI-to-XML mode and routed to the original EANCOM connector (XML-to-EDI) to resolve the status of the transfer **(3)**.
#### Processing Acknowledgements
When interchange and functional EANCOM acknowledgments are received at an EANCOM connector in EDI-to-XML mode, the connector can be configured to automatically route any detected acknowledgments to the EANCOM connector that first generated the transmission. In the flow diagram, drag the grey circle from the receiving (EDI-to-XML) EANCOM connector onto the originating (XML-to-EDI) EANCOM connector.
The configured (XML-to-EDI) EANCOM connector pairs the acknowledgments to the original message and resolves the matching message.
### Message Recipient
#### Generating Acknowledgements
When an EANCOM connector in EDI-to-XML mode processes received messages from the originator and generates XML, tell the connector to automatically generate CONTRL acknowledgments by selecting the **Acknowledgment** check boxes in the Settings tab. Route these acknowledgments to an EANCOM connector in XML-to-EDI mode to generate the EANCOM acknowledgement. In the flow diagram, drag the grey circle onto the (XML-to-EDI) EANCOM connector that generates EANCOM documents for this partner.
The illustration above shows a complete message exchange from the standpoint of the message originator. An EANCOM connector in XML-to-EDI mode generates the document to be exchanged **(1)** and holds it in a Pending ACK state. The trading partner processes the transmission in their business logic and creates acknowledgments in accordance with the configured exchange parameters and the bidirectional agreement between parties **(2)**. When the acknowledgments are returned, they are parsed with and an EANCOM connector in EDI-to-XML mode and routed to the original EANCOM connector (XML-to-EDI) to resolve the status of the transfer **(3)**.
#### Processing Acknowledgements
When interchange and functional EANCOM acknowledgments are received at an EANCOM connector in EDI-to-XML mode, the connector can be configured to automatically route any detected acknowledgments to the EANCOM connector that first generated the transmission. In the flow diagram, drag the grey circle from the receiving (EDI-to-XML) EANCOM connector onto the originating (XML-to-EDI) EANCOM connector.
The configured (XML-to-EDI) EANCOM connector pairs the acknowledgments to the original message and resolves the matching message.
### Message Recipient
#### Generating Acknowledgements
When an EANCOM connector in EDI-to-XML mode processes received messages from the originator and generates XML, tell the connector to automatically generate CONTRL acknowledgments by selecting the **Acknowledgment** check boxes in the Settings tab. Route these acknowledgments to an EANCOM connector in XML-to-EDI mode to generate the EANCOM acknowledgement. In the flow diagram, drag the grey circle onto the (XML-to-EDI) EANCOM connector that generates EANCOM documents for this partner.
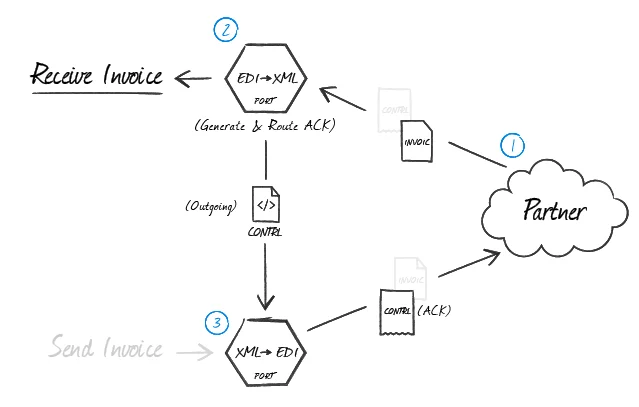 As shown in the diagram above, when a partner sends a message where an acknowledgment is expected **(1)**, the (EDI-to-XML) EANCOM connector configured for that partner automatically generates an acknowledgment **(2)** as an XML file containing the transactional information relevant for that file. This XML acknowledgment must be routed back to an (XML-to-EDI) EANCOM connector **(3)** so that all of the EDI party agreement settings are used when generating the EANCOM file that is sent back to your trading partner.
## Master-Detail Hierarchy: Translating CPS Loops
In EDI documents, most hierarchical relationships are represented by the order of EDI segments. Some EDI structures, like CPS Loops (which are found in DESADV documents), do not follow this convention and instead have the hierarchical relationships embedded in the EDI element data itself. This can make it difficult to preserve these hierarchical relationships when converting the EDI data to XML.
The EANCOM connector supports preserving hierarchical relationships in CPS segments via the **Nest Loops** setting on the [Advanced tab](#advanced-tab). When enabled, the connector parses the elements in the CPS segments to determine which segments "belong to" other segments in a hierarchical relationship. These hierarchical relationships are reflected in the output XML as parent-child relationships: in other words, this setting converts hierarchy implied by the EDI content into hierarchy represented by the XML structure.
This section briefly explains both how hierarchy is encoded in CPS data, and how this hierarchy is converted into XML when **Nest Loops** is enabled.
### CPS Hierarchy
All CPS segments have two values that help establish hierarchy:
* an Id value, which identifies the current CPS segment (this value is stored in CPS01, or the first element in a CPS segment)
* a parent-Id value, which identifies the current CPS segment's hierarchical parent (this value is stored in CPS02, or the second element in a CPS segment)
For example, a CPS segment has an Id value of '2'. If the next CPS segment should "belong to" this prior segment in a hierarchical relationship, the next CPS segment's parent-Id should also be '2'.
If a CPS segment's parent-ID is '0', the segment does not have a parent (it is at the top level of the hierarchy).
### Converting CPS Hierarchy to XML
When **Nest Loops** is enabled, the EANCOM connector handles the conversion of CPS hierarchy to XML hierarchy automatically. The connector parses the Id and parent-Id values from CPS segments and ensures that the resulting XML elements are appropriately nested (indented) inside the elements representing their parents.
In other words, if `segmentA` has a parent-Id value that is equal to `segmentB`, the resulting XML has `segmentA` as a child of `segmentB`. In this way, the hierarchical relationships are preserved in the XML structure when the EDI data is translated.
## Macros
### Examples
As shown in the diagram above, when a partner sends a message where an acknowledgment is expected **(1)**, the (EDI-to-XML) EANCOM connector configured for that partner automatically generates an acknowledgment **(2)** as an XML file containing the transactional information relevant for that file. This XML acknowledgment must be routed back to an (XML-to-EDI) EANCOM connector **(3)** so that all of the EDI party agreement settings are used when generating the EANCOM file that is sent back to your trading partner.
## Master-Detail Hierarchy: Translating CPS Loops
In EDI documents, most hierarchical relationships are represented by the order of EDI segments. Some EDI structures, like CPS Loops (which are found in DESADV documents), do not follow this convention and instead have the hierarchical relationships embedded in the EDI element data itself. This can make it difficult to preserve these hierarchical relationships when converting the EDI data to XML.
The EANCOM connector supports preserving hierarchical relationships in CPS segments via the **Nest Loops** setting on the [Advanced tab](#advanced-tab). When enabled, the connector parses the elements in the CPS segments to determine which segments "belong to" other segments in a hierarchical relationship. These hierarchical relationships are reflected in the output XML as parent-child relationships: in other words, this setting converts hierarchy implied by the EDI content into hierarchy represented by the XML structure.
This section briefly explains both how hierarchy is encoded in CPS data, and how this hierarchy is converted into XML when **Nest Loops** is enabled.
### CPS Hierarchy
All CPS segments have two values that help establish hierarchy:
* an Id value, which identifies the current CPS segment (this value is stored in CPS01, or the first element in a CPS segment)
* a parent-Id value, which identifies the current CPS segment's hierarchical parent (this value is stored in CPS02, or the second element in a CPS segment)
For example, a CPS segment has an Id value of '2'. If the next CPS segment should "belong to" this prior segment in a hierarchical relationship, the next CPS segment's parent-Id should also be '2'.
If a CPS segment's parent-ID is '0', the segment does not have a parent (it is at the top level of the hierarchy).
### Converting CPS Hierarchy to XML
When **Nest Loops** is enabled, the EANCOM connector handles the conversion of CPS hierarchy to XML hierarchy automatically. The connector parses the Id and parent-Id values from CPS segments and ensures that the resulting XML elements are appropriately nested (indented) inside the elements representing their parents.
In other words, if `segmentA` has a parent-Id value that is equal to `segmentB`, the resulting XML has `segmentA` as a child of `segmentB`. In this way, the hierarchical relationships are preserved in the XML structure when the EDI data is translated.
## Macros
### Examples