> ## Documentation Index
> Fetch the complete documentation index at: https://docs.arc.cdata.com/llms.txt
> Use this file to discover all available pages before exploring further.
# User Roles
> How to create and manage roles, policies, and permissions in CData Arc.
export const siteNameShort = "Arc";
export const siteName = "CData Arc";
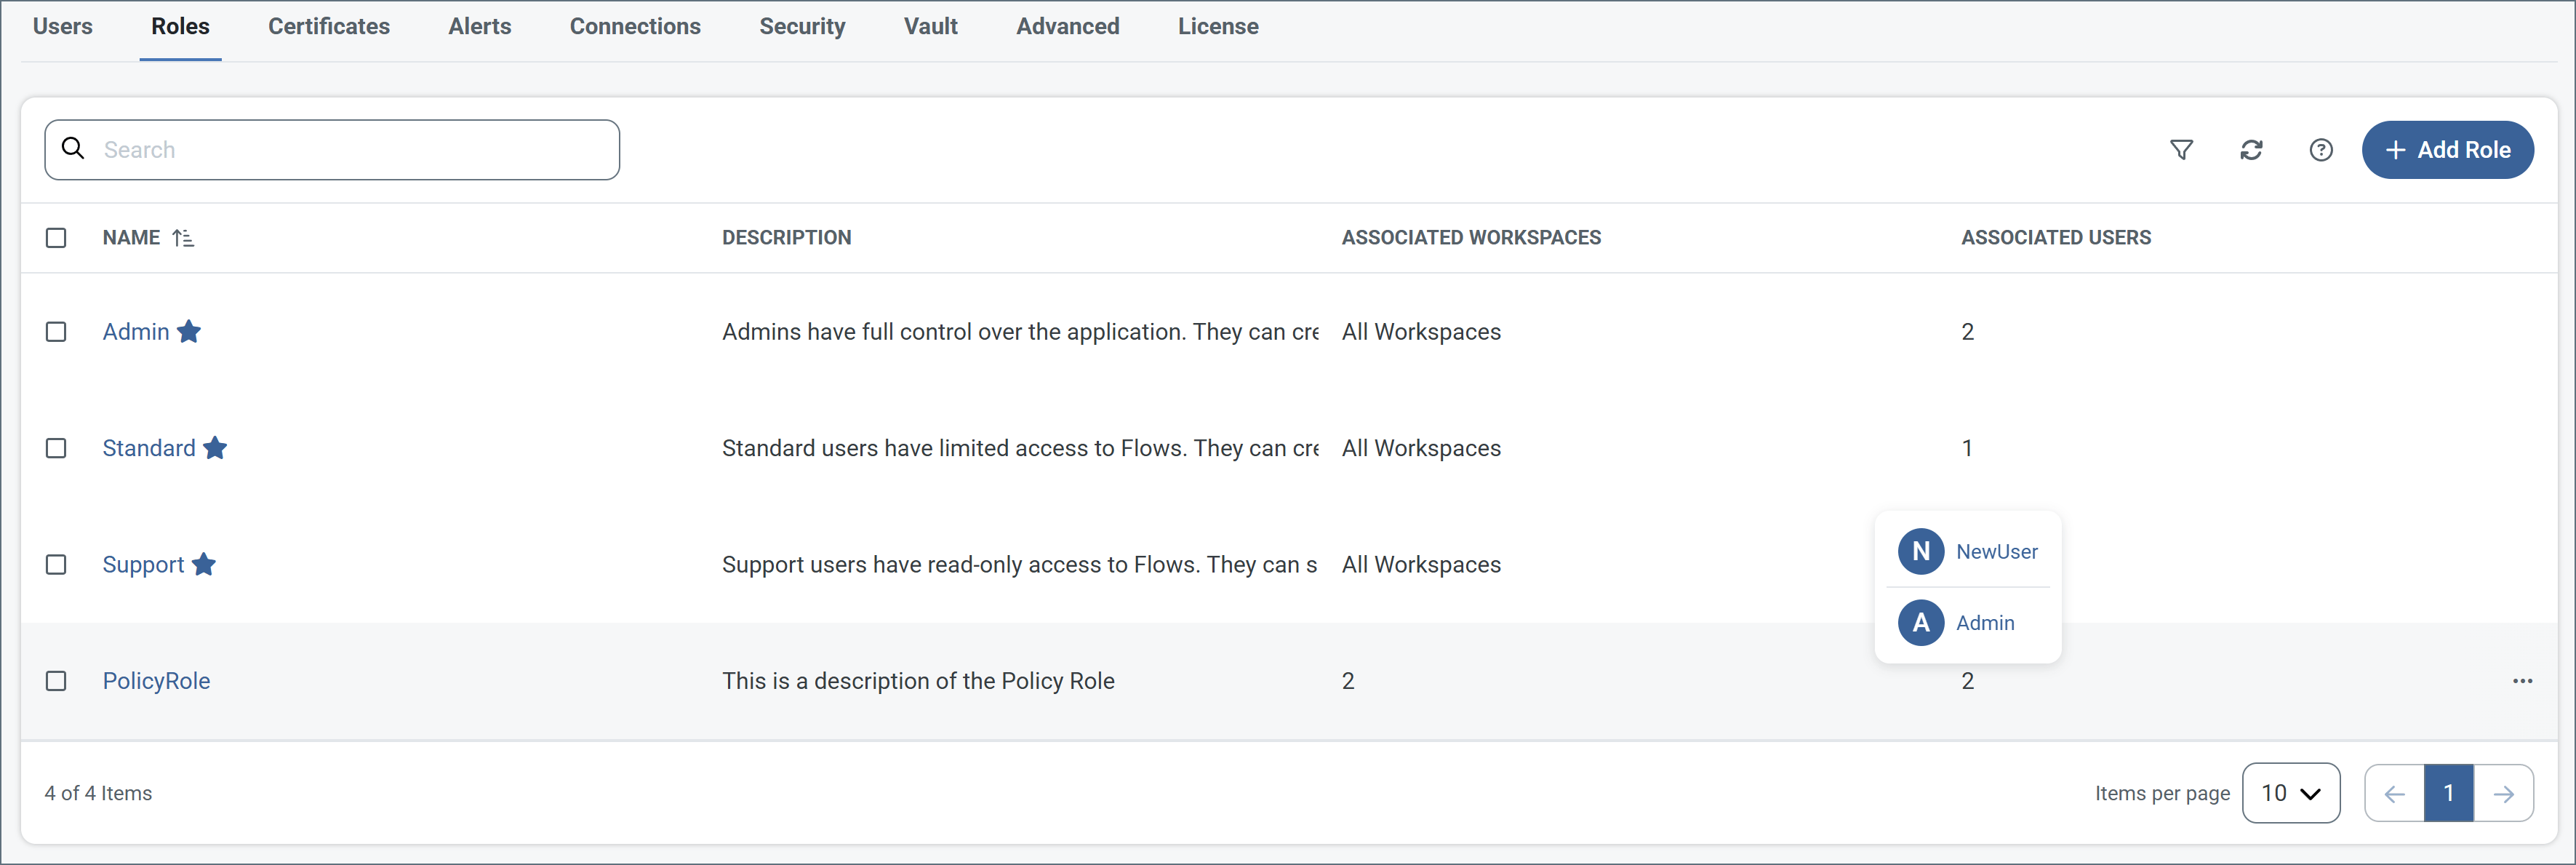
The **Roles** tab displays a table of all roles defined in the application, along with the associated workspaces and a link to all users who can assume each role. Roles enable you to restrict users to only performing certain actions in certain workspaces. The roles assigned to a user affect everything that they see in {siteNameShort}, including but not limited to:
* [Workspaces](../../../flows/workspaces)
* [Reports](../reports)
* [Dashboard data](../dashboard)
* [Logs](../activity)
To create and manage roles, navigate to the [Settings page](./settings-page), then the **Roles** tab. For information about creating and managing the users who are assigned these roles, see [Users](./users).
Every installation of {siteNameShort} includes three built-in roles:
* [Admin](#admin-role)
* [Standard](#standard-role)
* [Support](#support-role)
These are global roles that cannot be edited or deleted. They apply to all workspaces. However, you can define [custom roles](#custom-roles) which limit each user's permissions. Custom roles are made up of *policies*, which provide the most granular control over exactly what users can see or do in {siteNameShort}. Custom roles also identify which workspaces, Flow APIs, connections, and certificates users can see and interact with.
The following sections describe each built-in role, explain how to define new policies and roles, and provide an example policy. Use the [comparison table](#user-roles-comparison-table) for help building your own policies and roles.
## Admin Role
The **Admin** role provides full control over the application. An admin can create new [flows](../../../flows), delete existing flows, change [Profile](../profiles) settings, and perform every other operation supported by the console.
In addition, only admins can view the [Audit Log](../activity#audit-logs), which records all changes made by any user in the application in a [tamper-evident manner](../activity#tamper-evident-logging).
## Standard Role
Members of the **Standard** role can create, edit, and delete connectors and flows. However, they cannot change any application-wide settings, such as those exposed in the [Profile](../profiles) page.
Standard users can upload new files into flows, and can upload public certificates for use by connectors. They cannot upload private certificates that are set in a Profile.
## Support Role
The **Support** role is a read-only role; members of this role cannot create or delete flows, or change application settings. **Support** users *can* send files through existing flows using the *Send* operation, but cannot upload new files (in other words, they can only process files already present in the **Transactions** tab of a connector).
## Custom Roles
Custom roles give you more granular control over what each user can see or do in {siteNameShort}. Custom roles are defined by creating policies, which specify the exact permissions members of that role have. A single policy can grant permissions across three areas: workspaces (including Flow APIs and connectors), connections, and certificates. They also identify which specific workspaces, connections, and certificates users can see and interact with.
### Creating Roles and Policies
1. To create a custom role, navigate to the [Settings page](./settings-page), then the **Roles** tab.
2. Click **Add Role**. Give the role a meaningful name and description, then click **Add Role**.
3. To define the policy, click **Add Policy**.
4. A policy is organized into permission sections—**Workspace Permissions** (which also includes Connectors and Flow API access), **Connection Permissions**, and **Certificate Permissions**. Use the toggle next to each section to enable it, then set the allowed actions and access scope for that section as described below. For each type of access, use the corresponding **All current and future** toggle to grant access to every current and future item of that type, or clear the toggle and select a specific subset.
5. To add another policy, click **Add Policy** and repeat the previous steps.
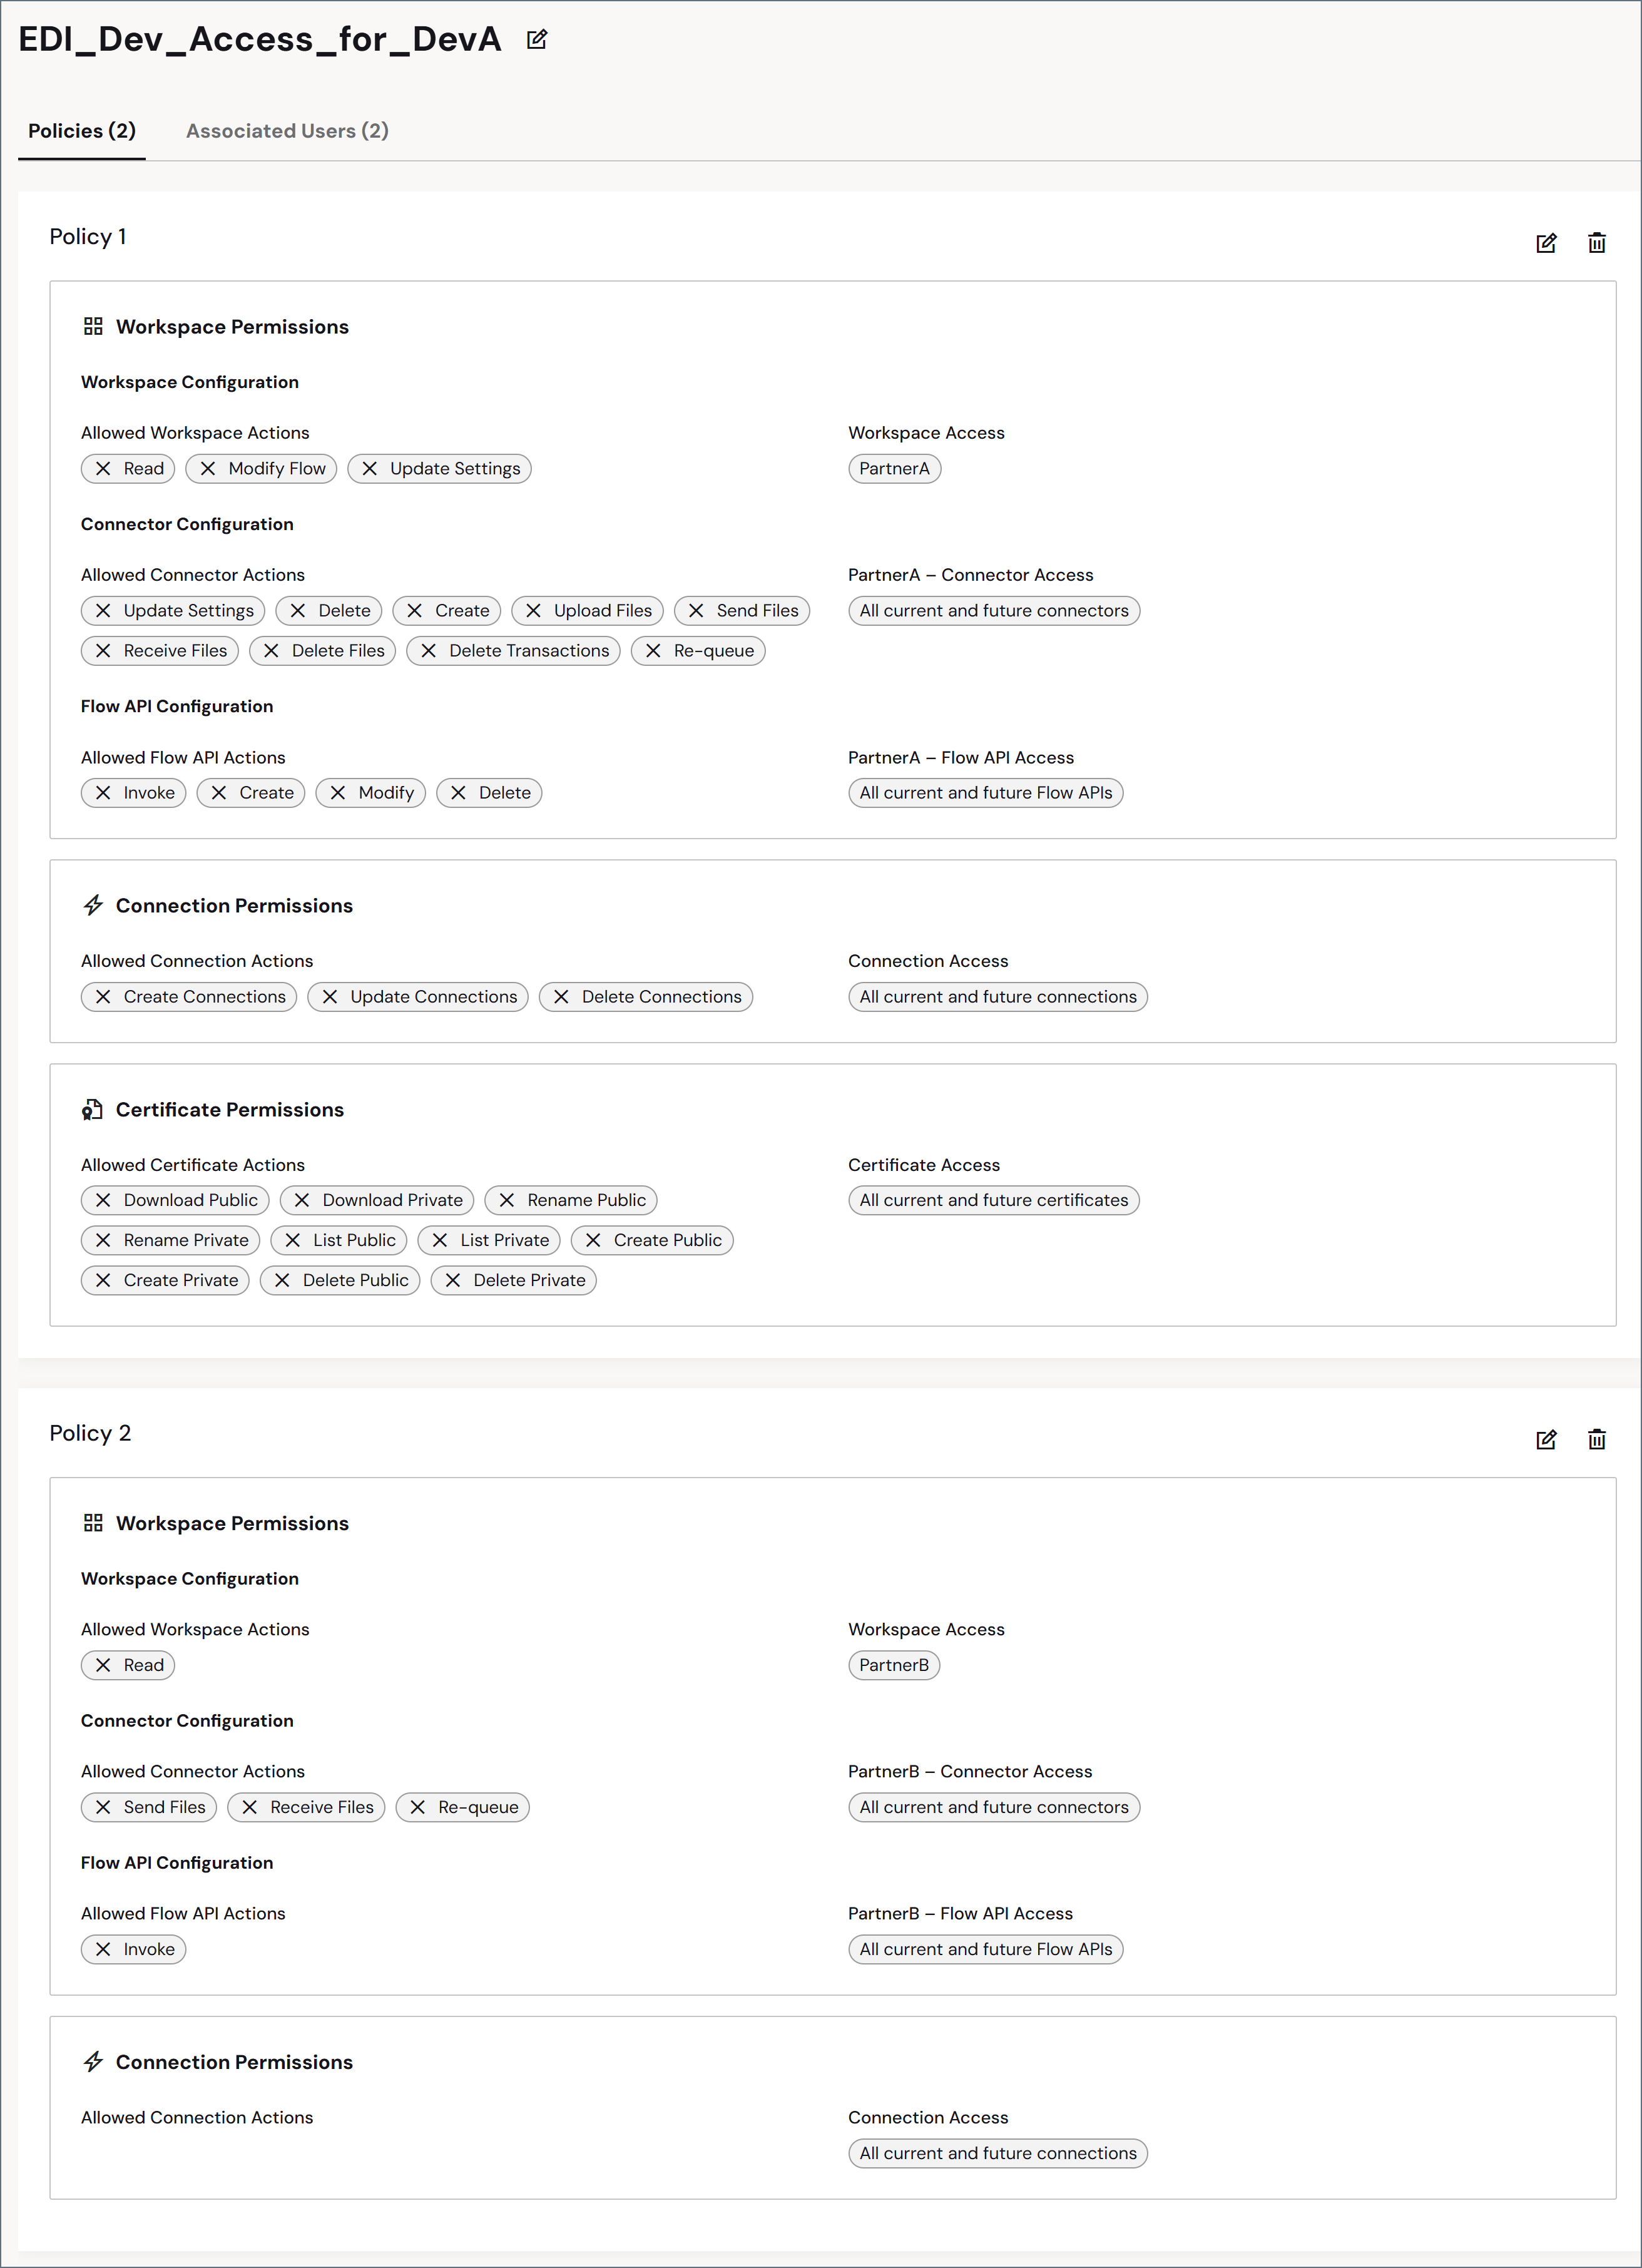
6. When you are finished, click **Save**. The following image shows a role with two policies.
 ### Workspace Permissions
#### Workspace Configuration
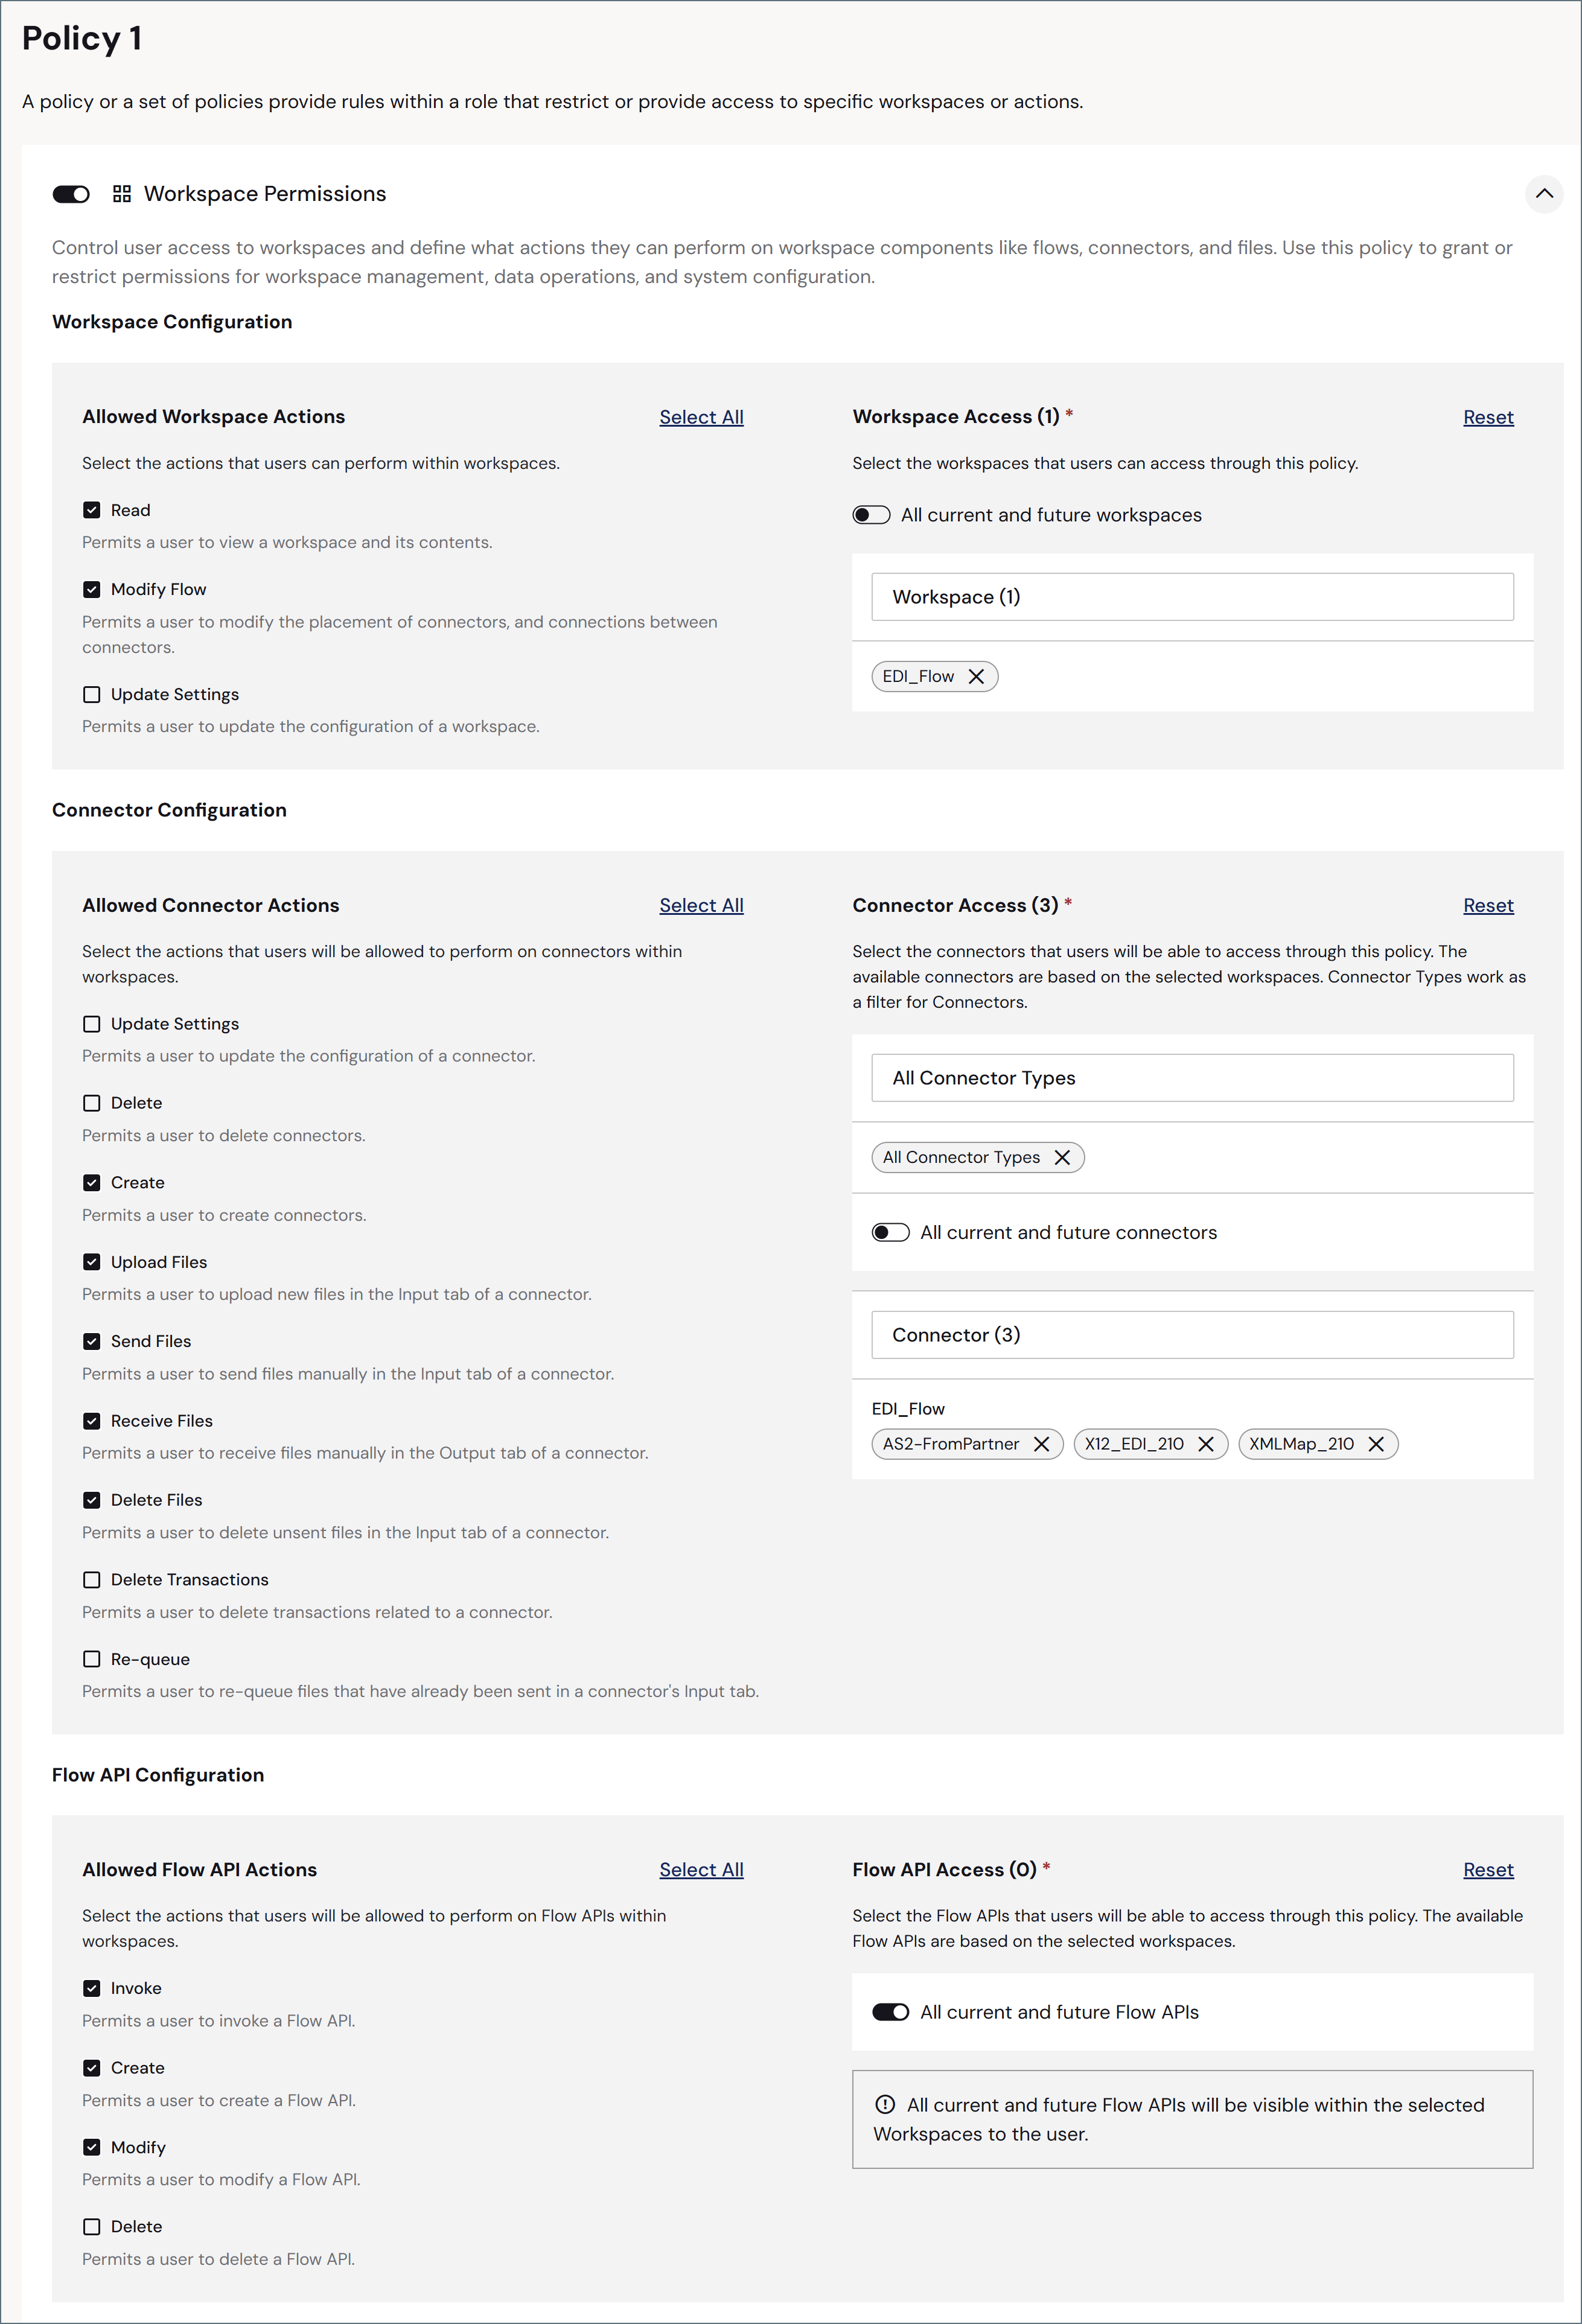
Check the checkboxes next to the **Allowed Workspace Actions** you want to assign, then use the **Workspace Access** section to assign the policy to one or more workspaces. To assign it to all workspaces, use the **All current and future workspaces** toggle.
#### Connector Configuration
The **Connector Configuration** area within this section controls what users can do with the connectors in the selected workspaces. Check the checkboxes next to the **Allowed Connector Actions** you want to assign, then use **Connector Access** to scope the policy to specific connector types, or to all current and future connectors.
#### Flow API Configuration
Within the **Workspace Permissions** section, the **Flow API Configuration** area controls what users can do with [Flow API](../../../flows/flow-api) endpoints. Check the checkboxes next to the **Allowed Flow API Actions** you want to assign.
Use **Flow API Access** to scope the policy to specific Flow APIs, or use the **All current and future Flow APIs** toggle to grant access to every Flow API within the selected workspaces.
The **Invoke** action is independent of workspace access. A [service account](./users#user-types) that is granted only the **Invoke** permission can call a Flow API endpoint without having any other access to—or visibility into—the {siteNameShort} UI. This lets you expose a Flow API endpoint to an automated client without giving it broader access to the application.
The following image shows **Policy 1** with completed **Workspace**, **Connector**, and **Flow API** permissions.
### Workspace Permissions
#### Workspace Configuration
Check the checkboxes next to the **Allowed Workspace Actions** you want to assign, then use the **Workspace Access** section to assign the policy to one or more workspaces. To assign it to all workspaces, use the **All current and future workspaces** toggle.
#### Connector Configuration
The **Connector Configuration** area within this section controls what users can do with the connectors in the selected workspaces. Check the checkboxes next to the **Allowed Connector Actions** you want to assign, then use **Connector Access** to scope the policy to specific connector types, or to all current and future connectors.
#### Flow API Configuration
Within the **Workspace Permissions** section, the **Flow API Configuration** area controls what users can do with [Flow API](../../../flows/flow-api) endpoints. Check the checkboxes next to the **Allowed Flow API Actions** you want to assign.
Use **Flow API Access** to scope the policy to specific Flow APIs, or use the **All current and future Flow APIs** toggle to grant access to every Flow API within the selected workspaces.
The **Invoke** action is independent of workspace access. A [service account](./users#user-types) that is granted only the **Invoke** permission can call a Flow API endpoint without having any other access to—or visibility into—the {siteNameShort} UI. This lets you expose a Flow API endpoint to an automated client without giving it broader access to the application.
The following image shows **Policy 1** with completed **Workspace**, **Connector**, and **Flow API** permissions.
 ### Connection Permissions
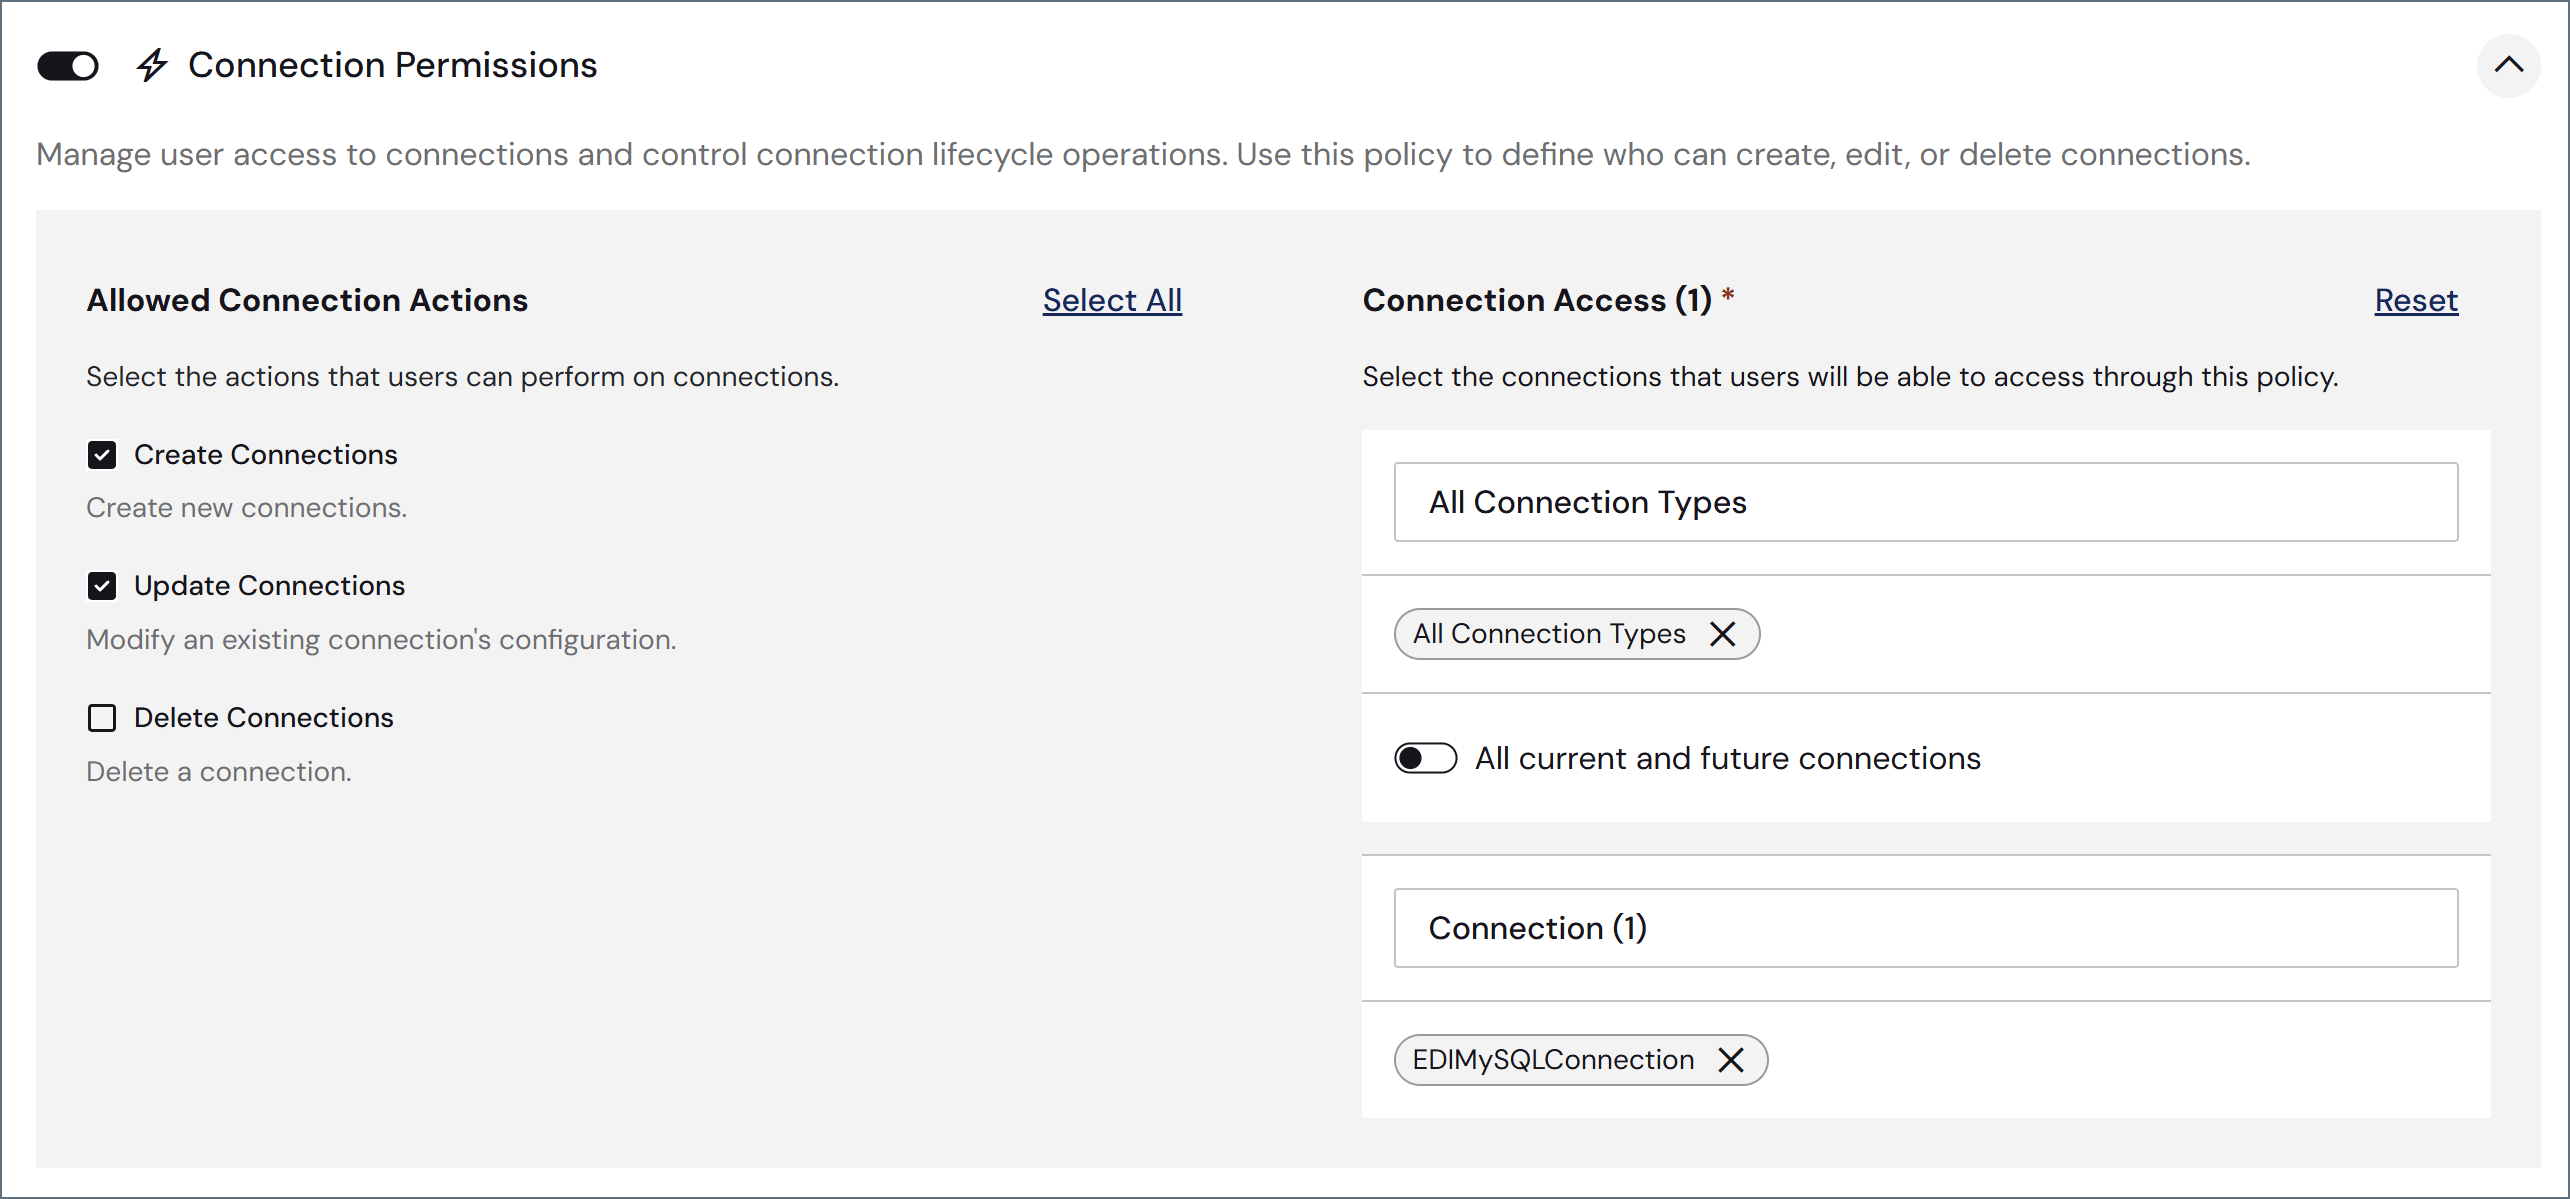
The **Connection Permissions** section controls the connection lifecycle: creating, updating, and deleting connections. Check the checkboxes next to the **Allowed Connection Actions** you want to assign.
The ability to view a connection is implicit whenever the policy grants any connection permission.
Use **Connection Access** to scope the policy by connection name, by connection type (such as SFTP, Amazon S3, or Salesforce), or both. When you set both a name filter and a type filter, they are combined—only connections that match *both* are in scope. To grant access to every connection regardless of these filters, use the **All current and future connections** toggle, which overrides the name and type filters.
The following image shows a policy with completed **Connection** permissions.
### Connection Permissions
The **Connection Permissions** section controls the connection lifecycle: creating, updating, and deleting connections. Check the checkboxes next to the **Allowed Connection Actions** you want to assign.
The ability to view a connection is implicit whenever the policy grants any connection permission.
Use **Connection Access** to scope the policy by connection name, by connection type (such as SFTP, Amazon S3, or Salesforce), or both. When you set both a name filter and a type filter, they are combined—only connections that match *both* are in scope. To grant access to every connection regardless of these filters, use the **All current and future connections** toggle, which overrides the name and type filters.
The following image shows a policy with completed **Connection** permissions.
 Use caution when defining connection permissions. When a policy grants access to only a subset of connections, it is possible for a user governed by that policy to create a connection that falls outside their scope. When this happens, the user cannot view or list the new connection after its creation, because it is not one of the connections included in the policy.
### Certificate Permissions
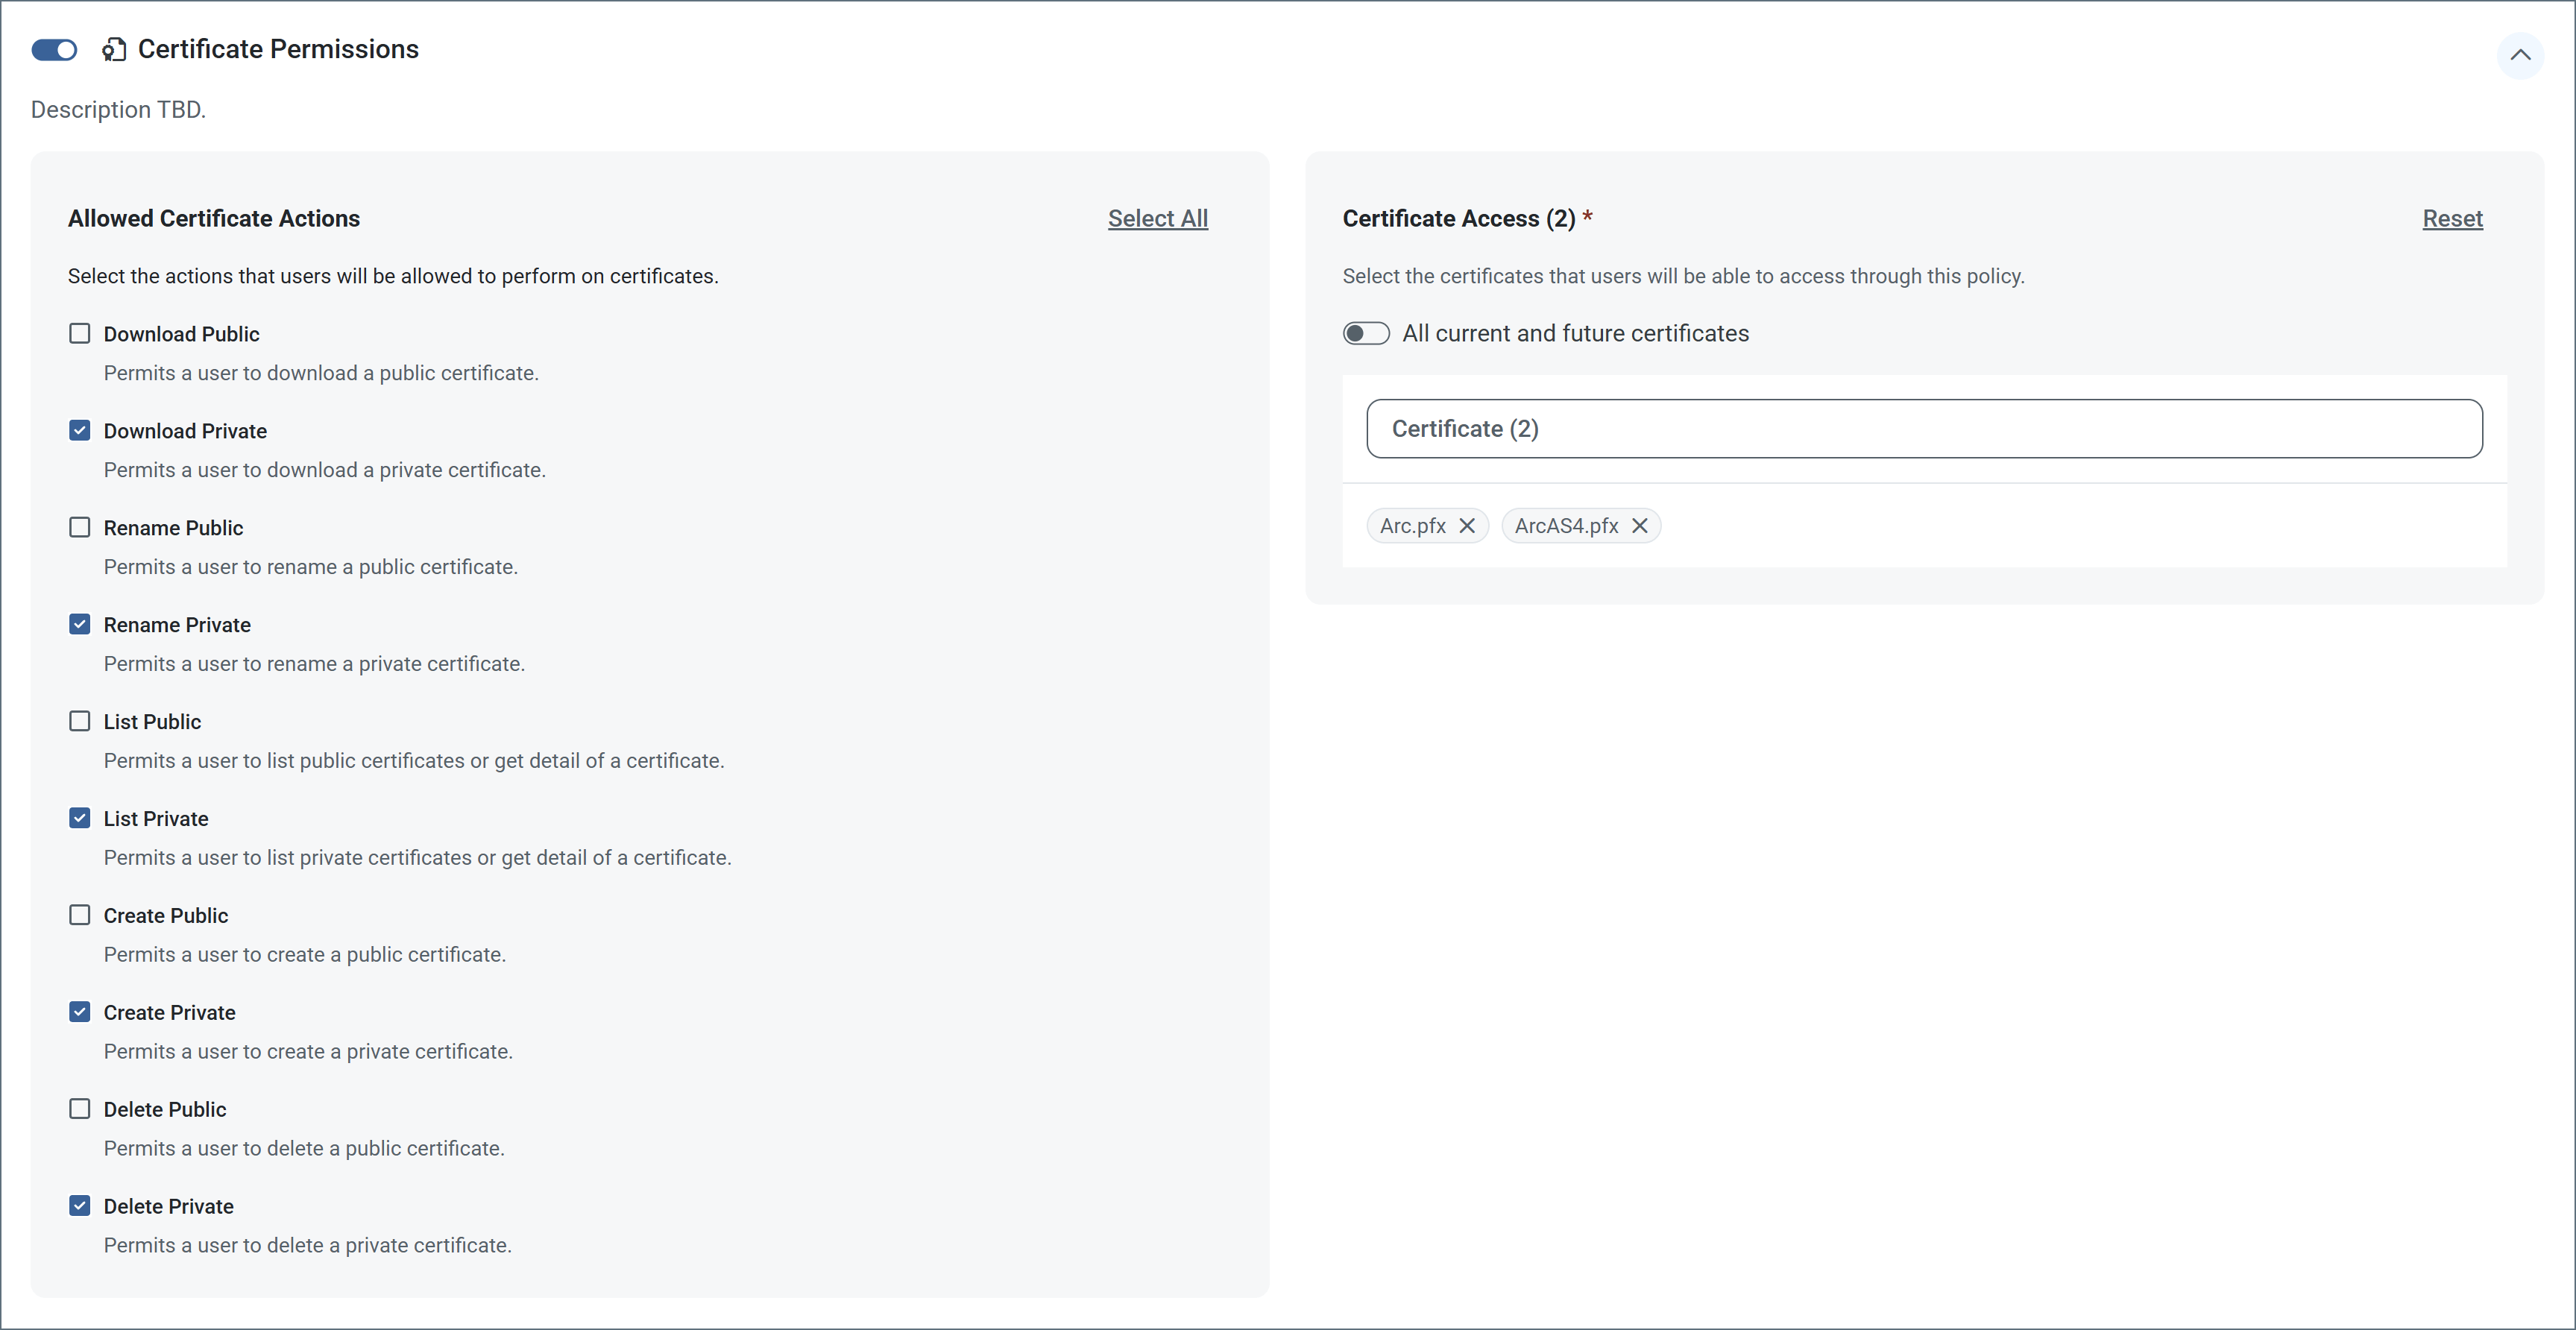
The **Certificate Permissions** section gives you control over what users can do with public and private certificates. Check the checkboxes next to the **Allowed Certificate Actions** you want to assign, then use **Certificates Access** to assign the policy to one or more certificates.
Use caution when defining connection permissions. When a policy grants access to only a subset of connections, it is possible for a user governed by that policy to create a connection that falls outside their scope. When this happens, the user cannot view or list the new connection after its creation, because it is not one of the connections included in the policy.
### Certificate Permissions
The **Certificate Permissions** section gives you control over what users can do with public and private certificates. Check the checkboxes next to the **Allowed Certificate Actions** you want to assign, then use **Certificates Access** to assign the policy to one or more certificates.
 ### Associating Users with Roles
1. To add users to the role, click the **Associated Users** tab.
2. Click **Add Users**, then select the user(s) who can assume this role.
3. When you are finished, click **Add Users**.
4. Use the **Roles** tab to view summary information for each role, including the associated workspaces and users. Hover over the counts to see details.
### Associating Users with Roles
1. To add users to the role, click the **Associated Users** tab.
2. Click **Add Users**, then select the user(s) who can assume this role.
3. When you are finished, click **Add Users**.
4. Use the **Roles** tab to view summary information for each role, including the associated workspaces and users. Hover over the counts to see details.
 If a certificate policy includes access to a specific subset of certificates, a user who is governed by that policy can create a new certificate but they cannot view or list it in a connector after its creation. This is because the new certificate is not one of the subset of certificates in the policy.
### Role and Policy Example
Imagine a scenario where your company has a group of EDI developers. The company has multiple trading partners; we will use two trading partners and two developers for this example.
The trading partner flows are broken up into two separate workspaces: PartnerA and PartnerB. Each EDI developer (DevA and DevB) works primarily in their corresponding workspace (DevA = PartnerA), but they also need to be able to view or send files as necessary in the PartnerB workspace. To manage this, you can create the DevA user, create a custom role for DevA, and assign two policies to the role, as shown in the following image.
* Policy1 gives DevA full access to the PartnerA workspace.
* Policy2 gives DevA limited access to the PartnerB workspace, allowing them to view and send files, but not create or delete connectors, or modify flows or settings.
## User Roles Comparison Table
This table describes the functionality available in all types of roles.
| Action | Admin | Standard | Support | Custom |
| ----------------------------------------------------- | :---: | :------: | :-----: | :----: |
| Modify Flows | ✔ | ✔ | | ✔ |
| Update Settings | ✔ | ✔ | | ✔ |
| Delete Connectors | ✔ | ✔ | | ✔ |
| Create Connectors | ✔ | ✔ | | ✔ |
| Upload Files | ✔ | ✔ | | ✔ |
| Send Files | ✔ | ✔ | ✔ | ✔ |
| Receive Files (on a connector's **Transactions** tab) | ✔ | ✔ | ✔ | ✔ |
| Delete Files | ✔ | ✔ | | ✔ |
| Delete Transactions | ✔ | ✔ | | ✔ |
| Re-queue | ✔ | ✔ | ✔ | ✔ |
| Invoke Flow API Endpoints | ✔ | ✔ | ✔ | ✔ |
| Create, Modify, and Delete Flow API Endpoints | ✔ | ✔ | | ✔ |
| Create, Update, and Delete Connections | ✔ | ✔ | | ✔ |
| View Connectors and Flows | ✔ | ✔ | ✔ | ✔ [^1] |
| View Application and Transaction Logs | ✔ | ✔ | ✔ | ✔ [^1] |
| Upload Private Certificate Files to the Profile | ✔ | | | |
| Change Profile Settings | ✔ | | | |
| View Audit Logs | ✔ | | | |
| Add and Manage Users | ✔ | | | |
[^1]: You must have access to the workspace to perform this action.
If a certificate policy includes access to a specific subset of certificates, a user who is governed by that policy can create a new certificate but they cannot view or list it in a connector after its creation. This is because the new certificate is not one of the subset of certificates in the policy.
### Role and Policy Example
Imagine a scenario where your company has a group of EDI developers. The company has multiple trading partners; we will use two trading partners and two developers for this example.
The trading partner flows are broken up into two separate workspaces: PartnerA and PartnerB. Each EDI developer (DevA and DevB) works primarily in their corresponding workspace (DevA = PartnerA), but they also need to be able to view or send files as necessary in the PartnerB workspace. To manage this, you can create the DevA user, create a custom role for DevA, and assign two policies to the role, as shown in the following image.
* Policy1 gives DevA full access to the PartnerA workspace.
* Policy2 gives DevA limited access to the PartnerB workspace, allowing them to view and send files, but not create or delete connectors, or modify flows or settings.
## User Roles Comparison Table
This table describes the functionality available in all types of roles.
| Action | Admin | Standard | Support | Custom |
| ----------------------------------------------------- | :---: | :------: | :-----: | :----: |
| Modify Flows | ✔ | ✔ | | ✔ |
| Update Settings | ✔ | ✔ | | ✔ |
| Delete Connectors | ✔ | ✔ | | ✔ |
| Create Connectors | ✔ | ✔ | | ✔ |
| Upload Files | ✔ | ✔ | | ✔ |
| Send Files | ✔ | ✔ | ✔ | ✔ |
| Receive Files (on a connector's **Transactions** tab) | ✔ | ✔ | ✔ | ✔ |
| Delete Files | ✔ | ✔ | | ✔ |
| Delete Transactions | ✔ | ✔ | | ✔ |
| Re-queue | ✔ | ✔ | ✔ | ✔ |
| Invoke Flow API Endpoints | ✔ | ✔ | ✔ | ✔ |
| Create, Modify, and Delete Flow API Endpoints | ✔ | ✔ | | ✔ |
| Create, Update, and Delete Connections | ✔ | ✔ | | ✔ |
| View Connectors and Flows | ✔ | ✔ | ✔ | ✔ [^1] |
| View Application and Transaction Logs | ✔ | ✔ | ✔ | ✔ [^1] |
| Upload Private Certificate Files to the Profile | ✔ | | | |
| Change Profile Settings | ✔ | | | |
| View Audit Logs | ✔ | | | |
| Add and Manage Users | ✔ | | | |
[^1]: You must have access to the workspace to perform this action.