> ## Documentation Index
> Fetch the complete documentation index at: https://docs.arc.cdata.com/llms.txt
> Use this file to discover all available pages before exploring further.
# SSO and User Provisioning
> How to configure single sign-on via SAML 2.0 or OpenID Connect in CData Arc, including Microsoft Entra ID and Okta integration.
export const siteNameShort = "Arc";
export const siteName = "CData Arc";
{siteName} supports single sign-on (SSO) via either the SAML 2.0 or OpenID authentication protocols. This feature enables identity providers such as Microsoft Entra ID (formerly Azure Active Directory) or Okta, which support these protocols, to serve as SSO platforms for {siteNameShort}.
## Overview
Enabling SSO requires that you configure a group of settings on the **Security** tab of the **Settings** page. When you configure the SSO settings, users that are created within {siteNameShort} should be given a federation Identifier (Id). This federation Id associates a {siteNameShort} username with an identity provider entity. When the {siteNameShort} user attempts to log in to the application, it is redirected to the SSO platform where the credentials for the appropriate identity must be entered.
If Just-in-Time (JIT) user provisioning is enabled (also from the **Security** tab), a new user account is automatically created in {siteNameShort} at the time of login, based on attributes that are received from the identity provider (for example, the user's name and email address). This identity and access management (IAM) process streamlines onboarding by eliminating the need for manual account creation. For more details, see [Just-in-Time (JIT) User Provisioning](#just-in-time-jit-user-provisioning).
After SSO is configured and {siteNameShort} users have a federation Id value to associate them with an identity provider, any additional advanced configuration for SSO user management should be performed directly in the SSO platform, as explained in the following sections.
* Once SSO is enabled, existing users who are not members of the [Admin role](./user-roles#admin-role) cannot log in unless they have a federation Id (described below) on their account. Admin users can still log in without SSO in case the SSO settings need to be reconfigured.
* Currently, {siteNameShort} supports only individual users, not groups of users. If an SSO platform provides access for a group of users, each individual user within that group must be added as a user on the {siteNameShort} **Settings** page in order to log in. Each user should reference the federation Id from the identity provider.
The following sections explain how to set up SSO configuration through two identity providers, Microsoft Entra ID and Okta, with the OpenID Connect and SAML 2.0 authentication protocols.
## SSO Settings
This section describes each of the SSO settings and what they represent in {siteNameShort}. The details of these settings might differ based on your IdP.
### OpenID Connect Settings
| Setting | Description |
| ----------------------------------- | --------------------------------------------------------------------------------------------------------------------------------------------------------------------------------------------------------------------------------------------------------------------------------------------------------------------------------------------------------------------------------------------------------- |
| **Callback URL** | The callback URL is configured in the IdP (not {siteNameShort}) to indicate where users should be returned once they perform the authentication against the IdP. |
| **OAuth Client Id** | The client Id associated with the OAuth application created in the IdP. |
| **OAuth Client Secret** | The client secret associated with the OAuth application created in the IdP. |
| **Audience URIs** | The intended recipient of SSO login tokens. This ensures that tokens generated by the SSO platform are intended for use by {siteNameShort}. Set this value to the URI that identifies {siteNameShort} as a trusted application in your SSO platform (for example, the *Application Id* that the SSO platform generated for {siteNameShort}). To accommodate multiple URIs, supply a comma-separated list. |
| **Discovery URL** | Required to import settings from your SSO provider. |
| **Issuer Certificate** | The public portion of the certificate that the IdP uses to sign JWT tokens. This helps ensure that only tokens generated by the expected IdP are accepted. |
| **Token Issuer Identifier** | The identifier used by the IdP when generating JWT tokens. {siteNameShort} validates tokens to ensure that they include this identifier. This helps ensure that only tokens generated by the expected IdP are accepted. |
| **Authorization URL** | The URL where the user should perform authorization via the IdP. When an SSO user attempts to login in to {siteNameShort}, the application redirects the user to this URL where they enter their SSO platform credentials. |
| **Token URL** | The URL where a secure authentication token can be obtained from the IdP. |
| **Logoff URL** | Specifies where the {siteNameShort} user is redirected after logging out of the application. |
| **Default Scopes** | A space-separated list of scopes (sets of permissions) to request from the IdP. Typically the scope(s) should at least include `profile openid` to request identity verification. |
| **Key Claim** | The value from the IdP to treat as the federation Id. In other words, this specifies the claim to use as the federation Id when mapping users from the IdP to {siteNameShort} usernames. |
| **Token Signature Algorithm** | Which signature algorithms are accepted from signed JWT tokens. Unsigned tokens are never accepted. |
| **Just-in-Time (JIT) Provisioning** | Whether a new user account is created automatically in {siteNameShort} when a user first logs in. User details are based on the attributes provided in the claim. |
| **Default Role** | The [Role](./user-roles) (Support, Standard, or Admin) assigned to accounts created during JIT provisioning. If you select **No Default Role**, the role specified in the claim is used. |
### SAML 2.0 Settings
| Setting | Description |
| ----------------------------------------- | ------------------------------------------------------------------------------------------------------------------------------------------------------------------------------------------------- |
| **Assertion Consumer Services (ACS) URL** | The endpoint on the {siteNameShort} application where the IdP sends the SAML authentication response after a user successfully logs in. This is similar to the Callback URL setting in OpenID. |
| **Audience URI** | A unique identifier (typically the application's Entity ID) that the SAML assertion is intended for. Used to validate that the response is meant for your application. |
| **SAML Discovery URL** | The endpoint used to determine which IdP should be used for authentication. Required to import settings from your SSO provider. |
| **Issuer Certificate** | The public portion of the certificate that the IdP uses to sign JWT tokens. Helps ensure that only tokens generated by the expected IdP are accepted. |
| **Entity ID** | A globally unique identifier used to identify an IdP or service provider in a SAML authentication process (often formatted as a URI). |
| **SSO URL** | The IdP endpoint where the service provider redirects the user to initiate the SAML authentication flow. |
| **Logoff URL** | Specifies where the {siteNameShort} user is redirected after logging out of the application. |
| **Just-in-Time (JIT) Provisioning** | Whether a new user account is created automatically in {siteNameShort} when a user first logs in. User details are based on the attributes provided in the SAML assertion. |
| **Default Role** | The [Role](./user-roles) (Support, Standard, or Admin) assigned to accounts created during JIT provisioning. If you select **No Default Role**, the role specified in the SAML assertion is used. |
## Configuring Microsoft Entra ID for SSO
The following sections explain how to set up Microsoft Entra ID for SSO via either OpenID Connect or SAML 2.0.
### OpenID Connect Configuration
Single sign-on (SSO) with Microsoft Entra ID streamlines access to {siteName}, enabling just-in-time provisioning at the time of login. The following steps explain how to set up Microsoft Entra ID for SSO with the OpenID Connect protocol.
1. Log in to the Azure portal and open Microsoft Entra ID.
2. Log in to {siteName} and select **Settings > SSO** to open the **Single Sign-On (SSO) Settings** dialog box.
3. Browse to **Entra ID > App registrations > New registration** and create an application registration for {siteNameShort}. Follow the prompts to complete the process.
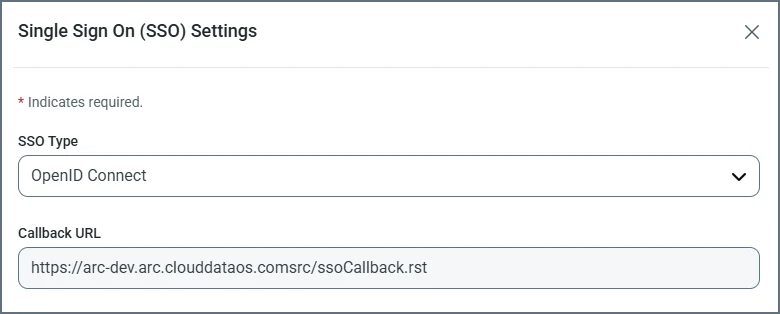
4. In your app registration, set the redirect URL to the **Callback URL** value that is specified in the **Single Sign-On (SSO) Settings** dialog box in {siteNameShort}, as shown below.
 5. In the **Single Sign-On (SSO) Settings** dialog box in {siteNameShort}, specify the following properties:
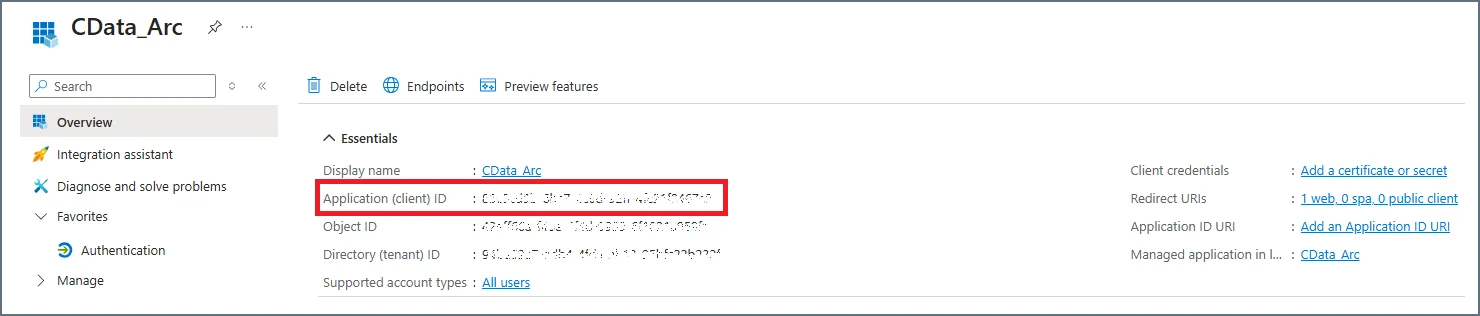
1. Set the **Client ID** property to the value of **Application (client) Id** that is found in the new app registration shown below.
5. In the **Single Sign-On (SSO) Settings** dialog box in {siteNameShort}, specify the following properties:
1. Set the **Client ID** property to the value of **Application (client) Id** that is found in the new app registration shown below.
 2. Set the **Client Secret** property to the value of the new client secret that you created in the **Client credentials** section of your app registration.
3. Set **Discovery URL** to the **OpenID Connect MetaData document** value from the **Endpoint** page in your app registration. Then, click **Import** to import the remaining settings into {siteNameShort}.
6. Click **Save and Test** in {siteNameShort} to verify the SSO configuration. {siteNameShort} opens a new tab and prompts you to sign in to your Microsoft account. If the test succeeds, {siteNameShort} displays a success message along with claim details.
7. (Optional) Update your {siteNameShort} user account with your federation Id.
1. Copy the federation Id from the **Single Sign-On (SSO) Settings** dialog box in step 5.
2. Navigate to **Settings > Users**. Then, locate your user account and click **Edit**.
3. Add the federation Id to your user account. Then click **Save** to save your change and exit the dialog box.
At this point, you have completed the basic OpenID Connect SSO setup, allowing your users to log in to {siteNameShort} through Microsoft Entra ID.
### SAML 2.0 Configuration
With SAML-based single sign-on (SSO), users can seamlessly authenticate through their organization's identity provider, enabling just-in-time provisioning at the time of login. The following steps explain how to set up Microsoft Entra ID SSO with the SAML 2.0 protocol.
1. Log in to the Azure portal and open Microsoft Entra ID and navigate to the **Enterprise applications** page.
2. Select **New application > Create your own application**. In the **Create your own application** dialog box:
1. Enter a name for your application (for example, **CData Arc**).
2. Specify what you want to do with your application by selecting one of the options under **What are you looking to do with your application?**
3. Click **Create**.
3. In your newly created application, select **Set up single sign on**.
4. Select **SAML** as the sign-on method.
5. Log into {siteName} and select **Settings > SSO**. On that **SSO** tab, click **Configure** in the **Single Sign On (SSO) Settings** section. This action displays the **Single Sign On (SSO) Settings** dialog box.
6. Select **SAML 2.0**. This selection displays the Assertion Consumer Services (ACS) URL and the audience URI.
2. Set the **Client Secret** property to the value of the new client secret that you created in the **Client credentials** section of your app registration.
3. Set **Discovery URL** to the **OpenID Connect MetaData document** value from the **Endpoint** page in your app registration. Then, click **Import** to import the remaining settings into {siteNameShort}.
6. Click **Save and Test** in {siteNameShort} to verify the SSO configuration. {siteNameShort} opens a new tab and prompts you to sign in to your Microsoft account. If the test succeeds, {siteNameShort} displays a success message along with claim details.
7. (Optional) Update your {siteNameShort} user account with your federation Id.
1. Copy the federation Id from the **Single Sign-On (SSO) Settings** dialog box in step 5.
2. Navigate to **Settings > Users**. Then, locate your user account and click **Edit**.
3. Add the federation Id to your user account. Then click **Save** to save your change and exit the dialog box.
At this point, you have completed the basic OpenID Connect SSO setup, allowing your users to log in to {siteNameShort} through Microsoft Entra ID.
### SAML 2.0 Configuration
With SAML-based single sign-on (SSO), users can seamlessly authenticate through their organization's identity provider, enabling just-in-time provisioning at the time of login. The following steps explain how to set up Microsoft Entra ID SSO with the SAML 2.0 protocol.
1. Log in to the Azure portal and open Microsoft Entra ID and navigate to the **Enterprise applications** page.
2. Select **New application > Create your own application**. In the **Create your own application** dialog box:
1. Enter a name for your application (for example, **CData Arc**).
2. Specify what you want to do with your application by selecting one of the options under **What are you looking to do with your application?**
3. Click **Create**.
3. In your newly created application, select **Set up single sign on**.
4. Select **SAML** as the sign-on method.
5. Log into {siteName} and select **Settings > SSO**. On that **SSO** tab, click **Configure** in the **Single Sign On (SSO) Settings** section. This action displays the **Single Sign On (SSO) Settings** dialog box.
6. Select **SAML 2.0**. This selection displays the Assertion Consumer Services (ACS) URL and the audience URI.
 Keep this dialog box open because you need to return to it later in these steps.
7. In Entra ID, set **Reply URL (Assertion Consumer Service URL)** to the **Assertion Consumer Services (ACS) URL** value in {siteNameShort}. Then, set **Identifier (Entity ID)** in Entra ID to the **Audience URI** value in {siteNameShort}.
Leave the **Sign on URL** text box empty if you plan to use sign-on initiated by your identity provider.
8. In the {siteNameShort} **Single Sign-On (SSO) Settings** dialog box, set **Discovery URL** to the **App Federation Metadata URL** value that is found in Entra ID. Then, click **Import** to import the remaining settings into {siteNameShort}.
9. Click **Save and Test** in {siteNameShort} to verify the SSO configuration. {siteNameShort} opens a new tab and prompts you to sign in to your Microsoft account. If the test succeeds, {siteNameShort} displays a success message along with claim details.
If you use the [.NET edition](../../installation/windows-edition), see [Known SAML 2.0 Configuration Issue for .NET](#known-saml-2-0-configuration-issue-in-net) for information on a .NET issue that can affect the test.
10. (Optional) Update your {siteNameShort} user account with your federation Id.
1. Copy the federation Id from the **Single Sign-On (SSO) Settings** dialog box in step 9.
2. Navigate to **Settings > Users**. Then, locate your user account and click **Edit**.
3. Add the federation Id to your user account. Then click **Save** to save your change and exit the dialog box.
At this point, you have completed the basic SAML SSO setup, allowing your users to log in to {siteNameShort} through Microsoft Entra ID.
## Configuring Okta for SSO
The following sections explain how to set up Okta for SSO via either OpenID Connect or SAML 2.0.
### OpenID Connect Configuration
Single sign-on (SSO) with Okta streamlines access to {siteName}, enabling just-in-time provisioning at the time of login. The following steps explain how to set up Okta for SSO with the OpenID Connect protocol.
1. Log in to the Okta Admin Console and select **Applications > Applications > Create App Integration**.
Keep this dialog box open because you need to return to it later in these steps.
7. In Entra ID, set **Reply URL (Assertion Consumer Service URL)** to the **Assertion Consumer Services (ACS) URL** value in {siteNameShort}. Then, set **Identifier (Entity ID)** in Entra ID to the **Audience URI** value in {siteNameShort}.
Leave the **Sign on URL** text box empty if you plan to use sign-on initiated by your identity provider.
8. In the {siteNameShort} **Single Sign-On (SSO) Settings** dialog box, set **Discovery URL** to the **App Federation Metadata URL** value that is found in Entra ID. Then, click **Import** to import the remaining settings into {siteNameShort}.
9. Click **Save and Test** in {siteNameShort} to verify the SSO configuration. {siteNameShort} opens a new tab and prompts you to sign in to your Microsoft account. If the test succeeds, {siteNameShort} displays a success message along with claim details.
If you use the [.NET edition](../../installation/windows-edition), see [Known SAML 2.0 Configuration Issue for .NET](#known-saml-2-0-configuration-issue-in-net) for information on a .NET issue that can affect the test.
10. (Optional) Update your {siteNameShort} user account with your federation Id.
1. Copy the federation Id from the **Single Sign-On (SSO) Settings** dialog box in step 9.
2. Navigate to **Settings > Users**. Then, locate your user account and click **Edit**.
3. Add the federation Id to your user account. Then click **Save** to save your change and exit the dialog box.
At this point, you have completed the basic SAML SSO setup, allowing your users to log in to {siteNameShort} through Microsoft Entra ID.
## Configuring Okta for SSO
The following sections explain how to set up Okta for SSO via either OpenID Connect or SAML 2.0.
### OpenID Connect Configuration
Single sign-on (SSO) with Okta streamlines access to {siteName}, enabling just-in-time provisioning at the time of login. The following steps explain how to set up Okta for SSO with the OpenID Connect protocol.
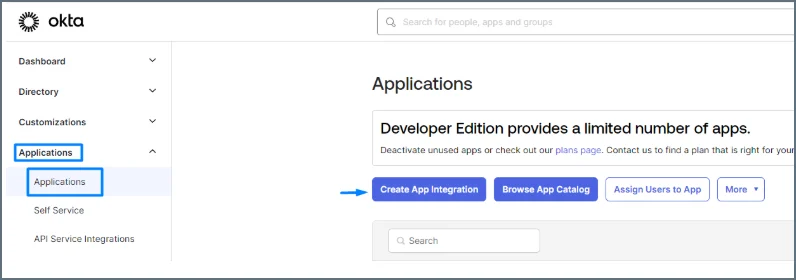
1. Log in to the Okta Admin Console and select **Applications > Applications > Create App Integration**.
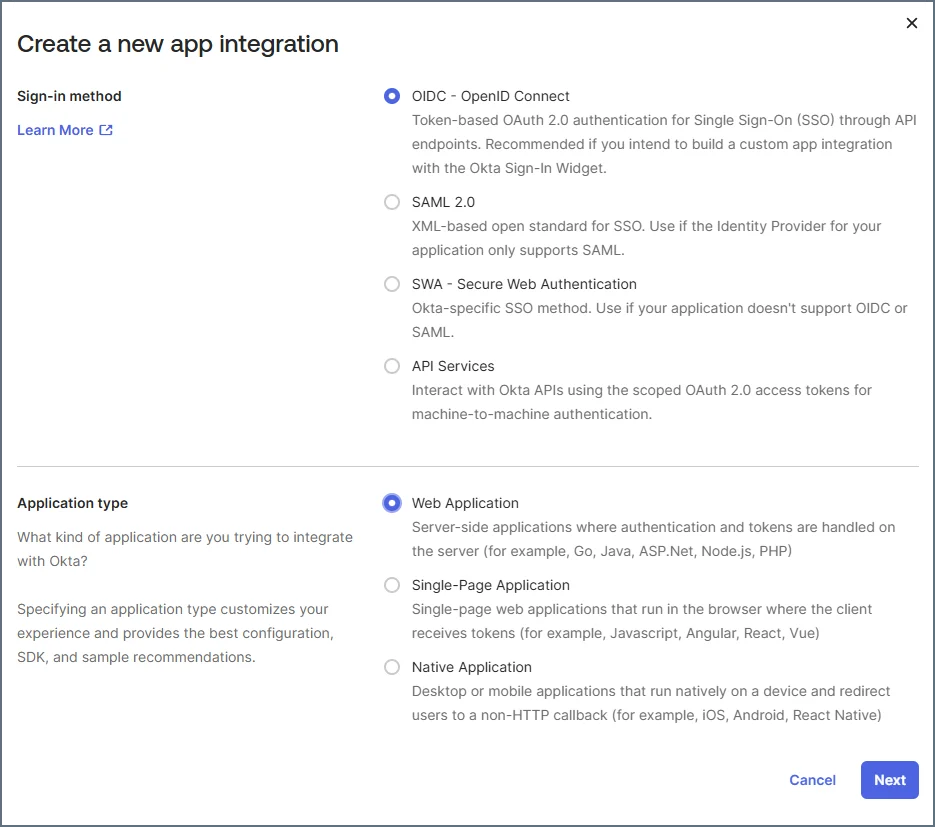
 2. In the **Create a new app integration** dialog box, select **OIDC - OpenID Connect** for **Sign-in method** and **Web Application** for **Application type**. Then click **Next**.
 3. Log in to {siteName} and select **Settings > SSO** to open the **Single Sign-On (SSO) Settings** dialog box.
4. In Okta, set the redirect URI to the **Callback URL** value that is specified in the **Single Sign-On (SSO) Settings** dialog box in {siteNameShort}, as shown below.
3. Log in to {siteName} and select **Settings > SSO** to open the **Single Sign-On (SSO) Settings** dialog box.
4. In Okta, set the redirect URI to the **Callback URL** value that is specified in the **Single Sign-On (SSO) Settings** dialog box in {siteNameShort}, as shown below.
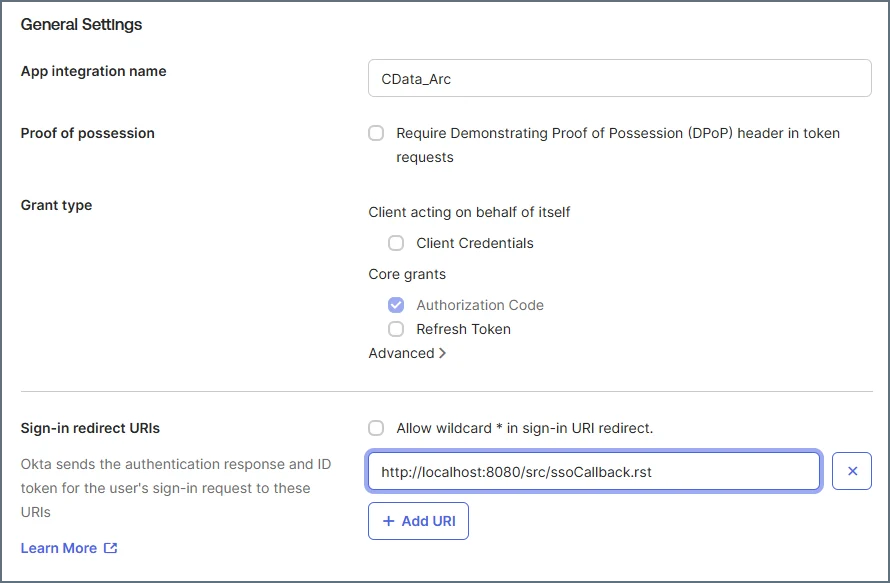 Then, click **Next** to create your application.
5. Locate and copy the Issuer URL, as follows.
1. Click the **Sign-On** tab for your application in the Okta Admin Console.
2. Scroll to the **OpenID Connect ID Token** section.
3. Copy the URL from the **Issuer** field.
If you want to sign in through an authorization server, you must obtain the Issuer URL for that particular server. In the Okta Admin Console, click **Security** in the left navigation pane, and then select **API** to display the **Authorization Servers** list. Locate your authorization server and copy the URL from the **Issuer** field.
6. In the **Single Sign-On (SSO) Settings** dialog box in {siteNameShort}, specify the following properties:
1. Set the **Client ID** and **Client Secret** properties to the corresponding values that are found on the **General** tab in Okta.
2. Set **Discovery URL** to the Issuer URL that you copied previously, and append the OpenID Connect Discovery endpoint (`.well-known/openid-configuration`).
**Example:** `https://MyOrganization.okta.com/.well-known/openid-configuration`
Then, click **Import** to import the remaining settings into {siteNameShort}.
7. Click **Save and Test** in {siteNameShort} to verify the SSO configuration. {siteNameShort} opens a new tab and prompts you to sign in to your Okta account. If the test succeeds, {siteNameShort} displays a success message along with claim details.
8. (Optional) Update your {siteNameShort} user account with your federation Id.
1. Copy the federation Id from the **Single Sign-On (SSO) Settings** dialog box in step 6.
2. Navigate to **Settings > Users**. Then, locate your user account and click **Edit**.
3. Add the federation Id to your user account. Then click **Save** to save your change and exit the dialog box.
At this point, you have completed the basic OpenID Connect SSO setup, allowing your users to log in to {siteNameShort} through Okta.
### SAML 2.0 Configuration
With SAML-based single sign-on (SSO), users can seamlessly authenticate through their organization's identity provider, enabling just-in-time provisioning at the time of login. The following steps explain how to set up Okta for SSO with the SAML 2.0 protocol.
1. Log in to the Okta Admin Console and select **Applications > Create App Integration**. This step opens the **Create a new app integration** dialog box.
2. Select **SAML 2.0** as the sign-in method. Then, click **Next**, which opens the **Create SAML Integration** dialog box.
3. Enter a descriptive name (for example, **{siteName}**) for your application in the **App Name** text box. You can also add a logo for your application, if you choose. Then, click **Next**.
4. In the {siteNameShort} application, click the **SSO** tab on the **Settings** page. On that tab, click **Configure** in the **Single Sign On (SSO) Settings** section. This action displays the **Single Sign On (SSO) Settings** dialog box.
5. Select **SAML 2.0**. This selection displays the Assertion Consumer Services (ACS) URL and the audience URI.
Keep this dialog box open because you need to return to it later in these steps.
6. In Okta, enter the **Assertion Consumer Services (ACS) URL** value from {siteNameShort} into the **Single sign on URL** text box. Then, enter the **Audience URI** value from {siteNameShort} into the **Audience URI (SP Entity ID)** text box. You can leave the default settings for the remaining Okta fields.
7. In {siteNameShort}, set **Discovery URL** to the domain of your registered Okta organization, followed by `/oauth2/default/.well-known/openid-configuration`.
**Example:** `https://trial-1234567.okta.com/oauth2/default/.well-known/openid-configuration`
Then, click **Import** to import the remaining settings into {siteNameShort}.
8. Click **Save and Test** in {siteNameShort} to verify the SSO configuration. {siteNameShort} opens a new tab and prompts you to sign in to your Okta account. If the test succeeds, {siteNameShort} displays a success message along with claim details.
If you use the [.NET edition](../../installation/windows-edition), see [Known SAML 2.0 Configuration Issue for .NET](#known-saml-2-0-configuration-issue-in-net) for information on a .NET issue that can affect the test.
9. (Optional) Update your {siteNameShort} user account with your federation Id.
1. Copy the federation Id from the **Single Sign-On (SSO) Settings** dialog box in step 8.
2. Navigate to **Settings > Users**. Then, locate your user account and click **Edit**.
3. Add the federation Id to your user account. Then click **Save** to save your change and exit the dialog box.
At this point, you have completed the basic SAML SSO setup, which enables you to log in to {siteNameShort} through Okta.
## Just-in-Time (JIT) User Provisioning
As mentioned [earlier](#overview), *Just-in-Time user provisioning* enables {siteNameShort} to create and manage user accounts automatically at first login by using information that is provided by your identity provider. JIT provisioning is particularly useful when users access {siteNameShort} through an identity provider for the first time, and the application receives a secure message confirming their identity. The resulting account is assigned a default role, as specified in the SSO settings. This functionality streamlines user onboarding and ensures account details remain consistent with identity claims.
When a user logs in to {siteNameShort} by using SAML or OpenID Connect, {siteNameShort} searches for that user via a federation Id.
* If a user **does not** exist, {siteNameShort} creates a new user automatically by using the information that is provided in the authentication claim.
* If a user **does** exist, {siteNameShort} updates the user's username and email if they do not match the claim values.
### Requirements and Mappings in your Identity Provider
Identity-provider requirements vary depending on whether you use SAML 2.0 or OpenID Connect. This section explains claim requirements for each authentication method.
**OpenID Connect**
* By default, subcontrols are mapped to the user's role and the claim is mapped to the federation Id. As an option, **admin** users can use a different field (for example, **oid**) by setting the **Key Claim** property in {siteNameShort}.
* The **Email** claim maps to **Email Address** in {siteNameShort}.
* The **preferred\_username** claim maps to **name** in {siteNameShort}.
**SAML 2.0**
* The **NameID** and **Email** claims are required.
* (Optional) You can add the **Name** claim, which maps to **Username** in {siteNameShort}.
* (Optional) You can add the **Role** claim, which controls the user's role.
### JIT Configuration in Arc
To enable and configure JIT provisioning in {siteNameShort}:
1. Enable JIT provisioning, as follows:
1. Select **Settings > SSO** in {siteNameShort}.
2. Click the tablet and pencil
Then, click **Next** to create your application.
5. Locate and copy the Issuer URL, as follows.
1. Click the **Sign-On** tab for your application in the Okta Admin Console.
2. Scroll to the **OpenID Connect ID Token** section.
3. Copy the URL from the **Issuer** field.
If you want to sign in through an authorization server, you must obtain the Issuer URL for that particular server. In the Okta Admin Console, click **Security** in the left navigation pane, and then select **API** to display the **Authorization Servers** list. Locate your authorization server and copy the URL from the **Issuer** field.
6. In the **Single Sign-On (SSO) Settings** dialog box in {siteNameShort}, specify the following properties:
1. Set the **Client ID** and **Client Secret** properties to the corresponding values that are found on the **General** tab in Okta.
2. Set **Discovery URL** to the Issuer URL that you copied previously, and append the OpenID Connect Discovery endpoint (`.well-known/openid-configuration`).
**Example:** `https://MyOrganization.okta.com/.well-known/openid-configuration`
Then, click **Import** to import the remaining settings into {siteNameShort}.
7. Click **Save and Test** in {siteNameShort} to verify the SSO configuration. {siteNameShort} opens a new tab and prompts you to sign in to your Okta account. If the test succeeds, {siteNameShort} displays a success message along with claim details.
8. (Optional) Update your {siteNameShort} user account with your federation Id.
1. Copy the federation Id from the **Single Sign-On (SSO) Settings** dialog box in step 6.
2. Navigate to **Settings > Users**. Then, locate your user account and click **Edit**.
3. Add the federation Id to your user account. Then click **Save** to save your change and exit the dialog box.
At this point, you have completed the basic OpenID Connect SSO setup, allowing your users to log in to {siteNameShort} through Okta.
### SAML 2.0 Configuration
With SAML-based single sign-on (SSO), users can seamlessly authenticate through their organization's identity provider, enabling just-in-time provisioning at the time of login. The following steps explain how to set up Okta for SSO with the SAML 2.0 protocol.
1. Log in to the Okta Admin Console and select **Applications > Create App Integration**. This step opens the **Create a new app integration** dialog box.
2. Select **SAML 2.0** as the sign-in method. Then, click **Next**, which opens the **Create SAML Integration** dialog box.
3. Enter a descriptive name (for example, **{siteName}**) for your application in the **App Name** text box. You can also add a logo for your application, if you choose. Then, click **Next**.
4. In the {siteNameShort} application, click the **SSO** tab on the **Settings** page. On that tab, click **Configure** in the **Single Sign On (SSO) Settings** section. This action displays the **Single Sign On (SSO) Settings** dialog box.
5. Select **SAML 2.0**. This selection displays the Assertion Consumer Services (ACS) URL and the audience URI.
Keep this dialog box open because you need to return to it later in these steps.
6. In Okta, enter the **Assertion Consumer Services (ACS) URL** value from {siteNameShort} into the **Single sign on URL** text box. Then, enter the **Audience URI** value from {siteNameShort} into the **Audience URI (SP Entity ID)** text box. You can leave the default settings for the remaining Okta fields.
7. In {siteNameShort}, set **Discovery URL** to the domain of your registered Okta organization, followed by `/oauth2/default/.well-known/openid-configuration`.
**Example:** `https://trial-1234567.okta.com/oauth2/default/.well-known/openid-configuration`
Then, click **Import** to import the remaining settings into {siteNameShort}.
8. Click **Save and Test** in {siteNameShort} to verify the SSO configuration. {siteNameShort} opens a new tab and prompts you to sign in to your Okta account. If the test succeeds, {siteNameShort} displays a success message along with claim details.
If you use the [.NET edition](../../installation/windows-edition), see [Known SAML 2.0 Configuration Issue for .NET](#known-saml-2-0-configuration-issue-in-net) for information on a .NET issue that can affect the test.
9. (Optional) Update your {siteNameShort} user account with your federation Id.
1. Copy the federation Id from the **Single Sign-On (SSO) Settings** dialog box in step 8.
2. Navigate to **Settings > Users**. Then, locate your user account and click **Edit**.
3. Add the federation Id to your user account. Then click **Save** to save your change and exit the dialog box.
At this point, you have completed the basic SAML SSO setup, which enables you to log in to {siteNameShort} through Okta.
## Just-in-Time (JIT) User Provisioning
As mentioned [earlier](#overview), *Just-in-Time user provisioning* enables {siteNameShort} to create and manage user accounts automatically at first login by using information that is provided by your identity provider. JIT provisioning is particularly useful when users access {siteNameShort} through an identity provider for the first time, and the application receives a secure message confirming their identity. The resulting account is assigned a default role, as specified in the SSO settings. This functionality streamlines user onboarding and ensures account details remain consistent with identity claims.
When a user logs in to {siteNameShort} by using SAML or OpenID Connect, {siteNameShort} searches for that user via a federation Id.
* If a user **does not** exist, {siteNameShort} creates a new user automatically by using the information that is provided in the authentication claim.
* If a user **does** exist, {siteNameShort} updates the user's username and email if they do not match the claim values.
### Requirements and Mappings in your Identity Provider
Identity-provider requirements vary depending on whether you use SAML 2.0 or OpenID Connect. This section explains claim requirements for each authentication method.
**OpenID Connect**
* By default, subcontrols are mapped to the user's role and the claim is mapped to the federation Id. As an option, **admin** users can use a different field (for example, **oid**) by setting the **Key Claim** property in {siteNameShort}.
* The **Email** claim maps to **Email Address** in {siteNameShort}.
* The **preferred\_username** claim maps to **name** in {siteNameShort}.
**SAML 2.0**
* The **NameID** and **Email** claims are required.
* (Optional) You can add the **Name** claim, which maps to **Username** in {siteNameShort}.
* (Optional) You can add the **Role** claim, which controls the user's role.
### JIT Configuration in Arc
To enable and configure JIT provisioning in {siteNameShort}:
1. Enable JIT provisioning, as follows:
1. Select **Settings > SSO** in {siteNameShort}.
2. Click the tablet and pencil  icon to open the **Just-in-Time (JIT) Provisioning** dialog box.
3. Select **Enabled** under the **JIT Provisioning** category.
4. (Optional) Set a default role by selecting a role from the **Default Role** list.
5. Click **Save** to save your selection and exit the dialog box.
When a user logs in, {siteNameShort} adjusts the role based on the following order:
1. If the claim contains a role, {siteNameShort} searches for that role and updates the user account.
2. If the role claim does not exist or is invalid, {siteNameShort} uses the configured default role. This means that unless the role is assigned in the claim by the identity provider, users created with a default role using JIT cannot have their role overridden by an admin user in {siteNameShort}.
3. If a default role is not configured, the user account has no role and the **Admin** user must update the user's role manually.
## Known SAML 2.0 Configuration Issue in .NET
When you configure SAML 2.0 in the .NET edition, clicking the **Save and Test** button appears to authenticate successfully but then displays an error. This is a known .NET platform issue, and your actual SAML login is unaffected.
These settings are not included in Web.Config by default because relaxing the SameSite cookie restrictions can increase exposure to cross-site request forgery (CSRF) attacks. Enabling this workaround trades stricter default security for compatibility with certain SAML 2.0 login flows in .NET.
Follow these steps to work around the issue:
1. Add the following to your Web.Config file (by default, the file is in C:\Program Files\CData\CData Arc\www):
* `cookieSameSite="None" requireSSL="true"` in `authentication mode="forms"`
* `sameSite="None" requireSSL="true"` in `httpCookies`
* `cookieSameSite="None" cookieless="UseCookies"` in `sessionState`
2. Restart Arc with HTTPS.
This sample Web.Config file shows the necessary updates:
```xml theme={null}
```
icon to open the **Just-in-Time (JIT) Provisioning** dialog box.
3. Select **Enabled** under the **JIT Provisioning** category.
4. (Optional) Set a default role by selecting a role from the **Default Role** list.
5. Click **Save** to save your selection and exit the dialog box.
When a user logs in, {siteNameShort} adjusts the role based on the following order:
1. If the claim contains a role, {siteNameShort} searches for that role and updates the user account.
2. If the role claim does not exist or is invalid, {siteNameShort} uses the configured default role. This means that unless the role is assigned in the claim by the identity provider, users created with a default role using JIT cannot have their role overridden by an admin user in {siteNameShort}.
3. If a default role is not configured, the user account has no role and the **Admin** user must update the user's role manually.
## Known SAML 2.0 Configuration Issue in .NET
When you configure SAML 2.0 in the .NET edition, clicking the **Save and Test** button appears to authenticate successfully but then displays an error. This is a known .NET platform issue, and your actual SAML login is unaffected.
These settings are not included in Web.Config by default because relaxing the SameSite cookie restrictions can increase exposure to cross-site request forgery (CSRF) attacks. Enabling this workaround trades stricter default security for compatibility with certain SAML 2.0 login flows in .NET.
Follow these steps to work around the issue:
1. Add the following to your Web.Config file (by default, the file is in C:\Program Files\CData\CData Arc\www):
* `cookieSameSite="None" requireSSL="true"` in `authentication mode="forms"`
* `sameSite="None" requireSSL="true"` in `httpCookies`
* `cookieSameSite="None" cookieless="UseCookies"` in `sessionState`
2. Restart Arc with HTTPS.
This sample Web.Config file shows the necessary updates:
```xml theme={null}
```