> ## Documentation Index
> Fetch the complete documentation index at: https://docs.arc.cdata.com/llms.txt
> Use this file to discover all available pages before exploring further.
# Clustering
> How to configure multiple CData Arc installations to work together for high availability and scalability.
export const siteNameShort = "Arc";
export const siteName = "CData Arc";
Clustering allows multiple {siteName} installations to work together, processing the same data with the same configuration. Workloads can be distributed horizontally across clustered {siteNameShort} installations to improve scalability and ensure availability.
## Overview
To take advantage of the high-availability and failover features supported in {siteNameShort}, the application should be installed on multiple systems in the same server farm (the same cluster). A load balancer then distributes incoming traffic across the multiple systems hosting {siteNameShort} instances.
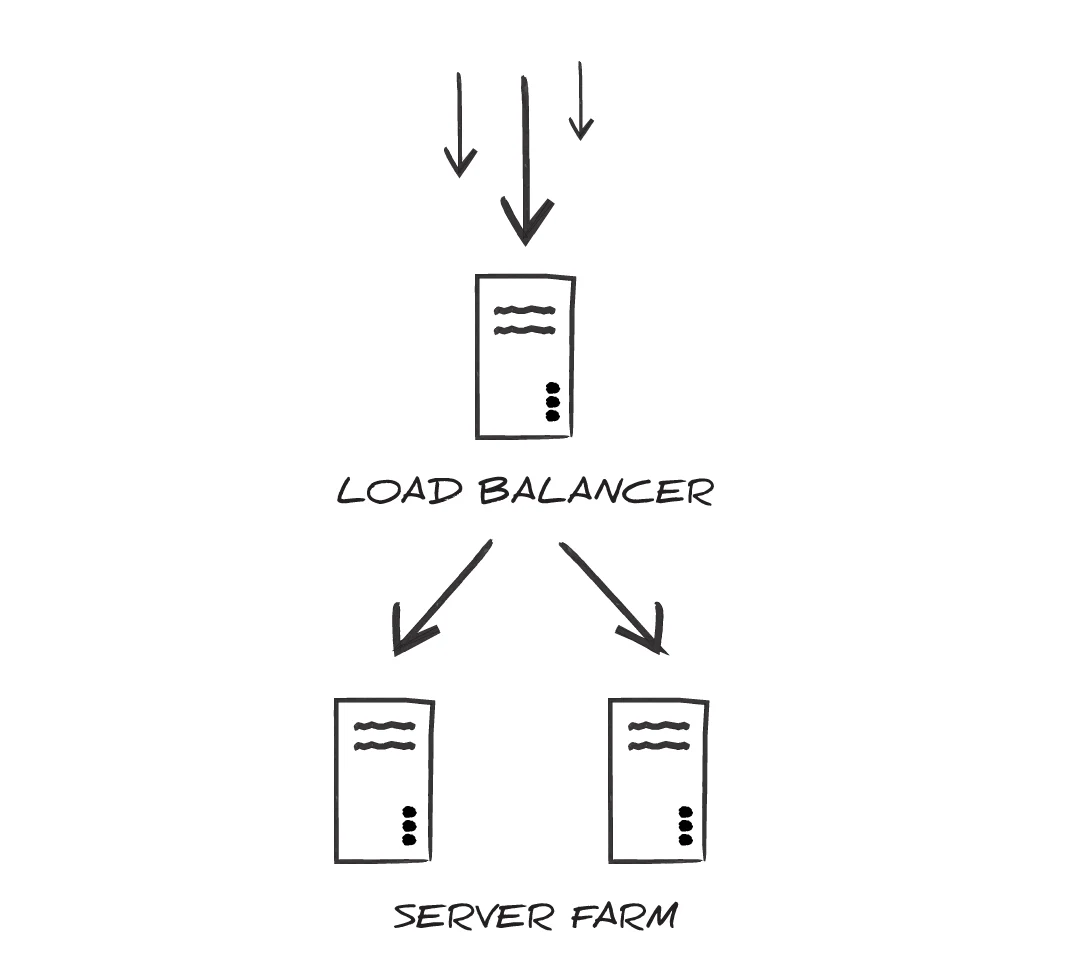 When configured for clustering, each {siteNameShort} installation in the server farm uses the same application configuration, processes data to and from the same locations on disk, and logs transactions in the same database tables.
As a result, multiple instances of the application behave like a single instance, and any particular instance can go down without jeopardizing the performance of the cluster.
## Configuring {siteNameShort} for Clustering
After {siteNameShort} has been installed on each node in the cluster, each installation should be configured to use the same *Application Database* and *Application Data Directory*.
### Licensing
You must apply a unique license key to each node in the cluster. Go to the licensing page for each node and apply one of your keys. The application creates a license file in the shared directory of the cluster. The license file name includes the machine name of both nodes in the shared directory.
### Application Database
{siteNameShort} uses a database to log transaction history and any errors that occur in the application. Each instance of {siteNameShort} should be configured to use the same application database to ensure that all files processed end up consolidated in the database.
#### .NET Edition
To configure the application database in the .NET edition, the `AppDb` environment variable must be set to include the appropriate connection string and provider. To accomplish this, modify the `Web.Config` file in the installation www folder. In this file is a commented-out XML element called *connectionStrings*, for example:
```xml theme={null}
```
Un-comment the *connectionStrings* element and set the `connectionString` and `providerName` attributes to the appropriate connection parameters for the desired database. If {siteNameShort} can successfully establish a connection with this connection string, it uses this database as the application database.
#### Embedded Java Server
When using the Cross-Platform edition with the embedded Jetty server, the application database is configured in the `arc.xml` file located in the installation directory webapp folder. In this server configuration file, the `APP_DB` environment variable must be set to a JDBC connection string containing the appropriate connection parameters for the desired database. For example:
```xml theme={null}
APP_DB
jdbc:cdata:mysql:Server=MySQLServer;Port=3306;Database=mysql;User=user;Password=password
```
If {siteNameShort} can successfully establish a connection with the `APP_DB` connection string, it uses that database as the application database.
#### External Java Server
When using the Cross-Platform edition with an external Java servlet (any server other than the Jetty server that is included with the application), the details of configuring the application database depend upon the specific servlet used. Using the syntax appropriate for the specific servlet, use one of the following approaches to configure the server:
* Define a JNDI datasource to include the connection properties for the target database.
* Set the `APP_DB` environment variable to a JDBC connection string.
If {siteNameShort} can use the JDNI datasource or `APP_DB` connection string to connect to a database, it uses that database as the application database.
### Application Data Directory
{siteNameShort} stores all configuration data and application data in a folder on disk called the data directory. When clustering, each instance of {siteNameShort} should be configured to use the same data directory. This ensures that all instances are processing the same files and using the same configuration.
#### .NET Edition
To configure the application data directory in the .NET edition, the `AppDirectory` environment variable must be set to the path where the directory should be created. To accomplish this, modify the `Web.Config` file in the installation directory www folder. In this file is a commented-out XML element called *AppDirectory*, and below this an element called *appSettings* where a custom data directory location can be specified:
```xml theme={null}
```
Un-comment the *appSettings* element and set the `AppDirectory` key value to the appropriate path on disk for the data directory. If {siteNameShort} can find the path, and has the appropriate permissions to read and write at the given path, it creates the data folder in the specified directory.
#### Embedded Java Server
When using the Cross-Platform edition with the embedded Jetty server, the application data directory is configured in the `arc.xml` file found in the installation directory webapp folder. In this server configuration file, the `AppDirectory` environment variable must be set to the path to the desired directory. The following example demonstrates what this might look like when setting the data directory to a shared folder on a mounted drive:
```xml theme={null}
AppDirectory
/mnt/shared/arc
```
If {siteNameShort} can find the path, and has the appropriate permissions to read and write at the given path, it creates the data folder in the specified directory.
#### External Java Server
When using the Cross-Platform edition with an external Java servlet (any server other than the Jetty server that is included with the application), the details of configuring the application data directory depend upon the specific servlet used. Using the syntax appropriate for the specific servlet, the `AppDirectory` environment variable must be set to the path to the desired directory.
If {siteNameShort} can find the `AppDirectory` path, and has the appropriate permissions to read and write at the given path, it creates the data folder in the specified directory.
### Locking and Concurrency
{siteNameShort} uses locks to ensure that multiple instances do not interfere with each other or process the same file twice. In a clustered environment, efficient locking is critical to maintain throughput and prevent collisions. Thus it is strongly recommended not to cluster {siteNameShort} instances across multiple server farms, such that file system latency might come into play.
Setting a shared Application Directory for each instance of {siteNameShort} is sufficient to ensure that the file locks are respected by each instance.
### Configuring Reverse Proxies
A reverse proxy is a server that sits between clients and backend servers, intercepting incoming traffic and forwarding it to the appropriate destination. When configured properly, reverse proxies can preserve the real client IP address through header forwarding while protecting your backend infrastructure from direct exposure. This architecture provides benefits such as load balancing, improved security, caching, and SSL termination.
When a reverse proxy forwards client information through headers like `X-Forwarded-For`, it is critical to restrict which proxies are trusted. If you don't explicitly trust only your known proxy IP addresses, malicious users can fabricate these headers to spoof their origin, potentially bypassing security controls or logging mechanisms.
#### Cross-Platform Edition
To configure reverse proxies in the Cross-Platform edition, set the [proxyMode](../installation/arc-properties-configuration#cdata-http-proxymode) setting in the `arc.properties` file to true, as shown in the following string: `cdata.http.proxyMode=true`.
When `proxyMode=true`, the embedded Jetty server uses `ForwardedRequestCustomizer` to extract and apply the real client IP from forwarded headers.
If you are using an external Java servlet container, configure request rewriting at the servlet level to handle forwarded headers appropriately.
#### .NET Edition
To configure reverse proxies in the .NET edition, you must provide a comma-separated list of header names that the app should use to determine the client IP address in the **HTTP Forwarded Header** field on the [Proxy Settings](./settings/proxy-settings) portion of the **Security** page.
#### Example: Setting a Reverse Proxy Using an nginx Proxy
It is the proxy's responsibility to ensure clients cannot spoof the header being used for the forwarded IP address. This example illustrates a proxy setting which includes reverse proxy settings.
```
location /arc/ {
proxy_pass http://localhost:8080/;
proxy_set_header Host $host;
proxy_set_header Referer $http_referer;
proxy_set_header X-Forwarded-For $proxy_add_x_forwarded_for;
proxy_set_header X-Forwarded-Proto $scheme;
proxy_set_header X-Forwarded-Port $server_port;
proxy_set_header X-NginX-Proxy true;
proxy_redirect http://localhost:8008/ http://$host:8008/arc/;
}
# Declare all trusted IP or CIDR
set_real_ip_from 192.168.1.100;
set_real_ip_from 10.0.0.0/8;
# Define the request header field whose value will be used to replace the client address
real_ip_header X-Forwarded-For;
# Enable recursive resolution to skip all trusted proxy IPs from X-Forwarded-For
real_ip_recursive on
# Optionally, set the real client IP to a new header
Jetty_Forwarded-For: $remote_addr
```
This configuration prevents header spoofing by explicitly trusting only the specified proxy IPs (192.168.1.100 and 10.0.0.0/8). If a malicious user fabricates an `X-Forwarded-For` header, nginx ignores it and uses the IP closest to the client that came through the trusted proxy.
When configured for clustering, each {siteNameShort} installation in the server farm uses the same application configuration, processes data to and from the same locations on disk, and logs transactions in the same database tables.
As a result, multiple instances of the application behave like a single instance, and any particular instance can go down without jeopardizing the performance of the cluster.
## Configuring {siteNameShort} for Clustering
After {siteNameShort} has been installed on each node in the cluster, each installation should be configured to use the same *Application Database* and *Application Data Directory*.
### Licensing
You must apply a unique license key to each node in the cluster. Go to the licensing page for each node and apply one of your keys. The application creates a license file in the shared directory of the cluster. The license file name includes the machine name of both nodes in the shared directory.
### Application Database
{siteNameShort} uses a database to log transaction history and any errors that occur in the application. Each instance of {siteNameShort} should be configured to use the same application database to ensure that all files processed end up consolidated in the database.
#### .NET Edition
To configure the application database in the .NET edition, the `AppDb` environment variable must be set to include the appropriate connection string and provider. To accomplish this, modify the `Web.Config` file in the installation www folder. In this file is a commented-out XML element called *connectionStrings*, for example:
```xml theme={null}
```
Un-comment the *connectionStrings* element and set the `connectionString` and `providerName` attributes to the appropriate connection parameters for the desired database. If {siteNameShort} can successfully establish a connection with this connection string, it uses this database as the application database.
#### Embedded Java Server
When using the Cross-Platform edition with the embedded Jetty server, the application database is configured in the `arc.xml` file located in the installation directory webapp folder. In this server configuration file, the `APP_DB` environment variable must be set to a JDBC connection string containing the appropriate connection parameters for the desired database. For example:
```xml theme={null}
APP_DB
jdbc:cdata:mysql:Server=MySQLServer;Port=3306;Database=mysql;User=user;Password=password
```
If {siteNameShort} can successfully establish a connection with the `APP_DB` connection string, it uses that database as the application database.
#### External Java Server
When using the Cross-Platform edition with an external Java servlet (any server other than the Jetty server that is included with the application), the details of configuring the application database depend upon the specific servlet used. Using the syntax appropriate for the specific servlet, use one of the following approaches to configure the server:
* Define a JNDI datasource to include the connection properties for the target database.
* Set the `APP_DB` environment variable to a JDBC connection string.
If {siteNameShort} can use the JDNI datasource or `APP_DB` connection string to connect to a database, it uses that database as the application database.
### Application Data Directory
{siteNameShort} stores all configuration data and application data in a folder on disk called the data directory. When clustering, each instance of {siteNameShort} should be configured to use the same data directory. This ensures that all instances are processing the same files and using the same configuration.
#### .NET Edition
To configure the application data directory in the .NET edition, the `AppDirectory` environment variable must be set to the path where the directory should be created. To accomplish this, modify the `Web.Config` file in the installation directory www folder. In this file is a commented-out XML element called *AppDirectory*, and below this an element called *appSettings* where a custom data directory location can be specified:
```xml theme={null}
```
Un-comment the *appSettings* element and set the `AppDirectory` key value to the appropriate path on disk for the data directory. If {siteNameShort} can find the path, and has the appropriate permissions to read and write at the given path, it creates the data folder in the specified directory.
#### Embedded Java Server
When using the Cross-Platform edition with the embedded Jetty server, the application data directory is configured in the `arc.xml` file found in the installation directory webapp folder. In this server configuration file, the `AppDirectory` environment variable must be set to the path to the desired directory. The following example demonstrates what this might look like when setting the data directory to a shared folder on a mounted drive:
```xml theme={null}
AppDirectory
/mnt/shared/arc
```
If {siteNameShort} can find the path, and has the appropriate permissions to read and write at the given path, it creates the data folder in the specified directory.
#### External Java Server
When using the Cross-Platform edition with an external Java servlet (any server other than the Jetty server that is included with the application), the details of configuring the application data directory depend upon the specific servlet used. Using the syntax appropriate for the specific servlet, the `AppDirectory` environment variable must be set to the path to the desired directory.
If {siteNameShort} can find the `AppDirectory` path, and has the appropriate permissions to read and write at the given path, it creates the data folder in the specified directory.
### Locking and Concurrency
{siteNameShort} uses locks to ensure that multiple instances do not interfere with each other or process the same file twice. In a clustered environment, efficient locking is critical to maintain throughput and prevent collisions. Thus it is strongly recommended not to cluster {siteNameShort} instances across multiple server farms, such that file system latency might come into play.
Setting a shared Application Directory for each instance of {siteNameShort} is sufficient to ensure that the file locks are respected by each instance.
### Configuring Reverse Proxies
A reverse proxy is a server that sits between clients and backend servers, intercepting incoming traffic and forwarding it to the appropriate destination. When configured properly, reverse proxies can preserve the real client IP address through header forwarding while protecting your backend infrastructure from direct exposure. This architecture provides benefits such as load balancing, improved security, caching, and SSL termination.
When a reverse proxy forwards client information through headers like `X-Forwarded-For`, it is critical to restrict which proxies are trusted. If you don't explicitly trust only your known proxy IP addresses, malicious users can fabricate these headers to spoof their origin, potentially bypassing security controls or logging mechanisms.
#### Cross-Platform Edition
To configure reverse proxies in the Cross-Platform edition, set the [proxyMode](../installation/arc-properties-configuration#cdata-http-proxymode) setting in the `arc.properties` file to true, as shown in the following string: `cdata.http.proxyMode=true`.
When `proxyMode=true`, the embedded Jetty server uses `ForwardedRequestCustomizer` to extract and apply the real client IP from forwarded headers.
If you are using an external Java servlet container, configure request rewriting at the servlet level to handle forwarded headers appropriately.
#### .NET Edition
To configure reverse proxies in the .NET edition, you must provide a comma-separated list of header names that the app should use to determine the client IP address in the **HTTP Forwarded Header** field on the [Proxy Settings](./settings/proxy-settings) portion of the **Security** page.
#### Example: Setting a Reverse Proxy Using an nginx Proxy
It is the proxy's responsibility to ensure clients cannot spoof the header being used for the forwarded IP address. This example illustrates a proxy setting which includes reverse proxy settings.
```
location /arc/ {
proxy_pass http://localhost:8080/;
proxy_set_header Host $host;
proxy_set_header Referer $http_referer;
proxy_set_header X-Forwarded-For $proxy_add_x_forwarded_for;
proxy_set_header X-Forwarded-Proto $scheme;
proxy_set_header X-Forwarded-Port $server_port;
proxy_set_header X-NginX-Proxy true;
proxy_redirect http://localhost:8008/ http://$host:8008/arc/;
}
# Declare all trusted IP or CIDR
set_real_ip_from 192.168.1.100;
set_real_ip_from 10.0.0.0/8;
# Define the request header field whose value will be used to replace the client address
real_ip_header X-Forwarded-For;
# Enable recursive resolution to skip all trusted proxy IPs from X-Forwarded-For
real_ip_recursive on
# Optionally, set the real client IP to a new header
Jetty_Forwarded-For: $remote_addr
```
This configuration prevents header spoofing by explicitly trusting only the specified proxy IPs (192.168.1.100 and 10.0.0.0/8). If a malicious user fabricates an `X-Forwarded-For` header, nginx ignores it and uses the IP closest to the client that came through the trusted proxy.