> ## Documentation Index
> Fetch the complete documentation index at: https://docs.arc.cdata.com/llms.txt
> Use this file to discover all available pages before exploring further.
# AI Connector
> Connect to AI models via a REST API to process messages using configurable prompts and generate structured outputs within your data flows.
export const CommonActionType = ({resource = "script"}) => <>
This connector can perform any of the three connector action types:
• Trigger executes a {resource} on a schedule and might produce files to be sent down the flow. This action serves as the starting point of a flow.
• Transform accepts messages from the flow as input for a {resource} and produces output. This action serves as the middle of a flow.
• Terminal accepts messages from the flow as input for a {resource} and acts as the terminal point of the flow.
;
export const SlasTab = ({siteName = "CData Arc"}) => <>
Settings related to configuring Service Level Agreements (SLAs).
SLAs enable you to configure the volume you expect connectors in your flow to send or receive, and to set the time frame in which you expect that volume to be met. {siteName} sends emails to warn the user when an SLA is not met, and marks the SLA as At Risk, which means that if the SLA is not met soon, it will be marked as Violated. This gives the user an opportunity to step in and determine the reasons the SLA is not being met, and to take appropriate actions. If the SLA is still not met at the end of the at-risk time period, the SLA is marked as violated, and the user is notified again.
To define an SLA, toggle Expected Volume on, then click the Settings tab.
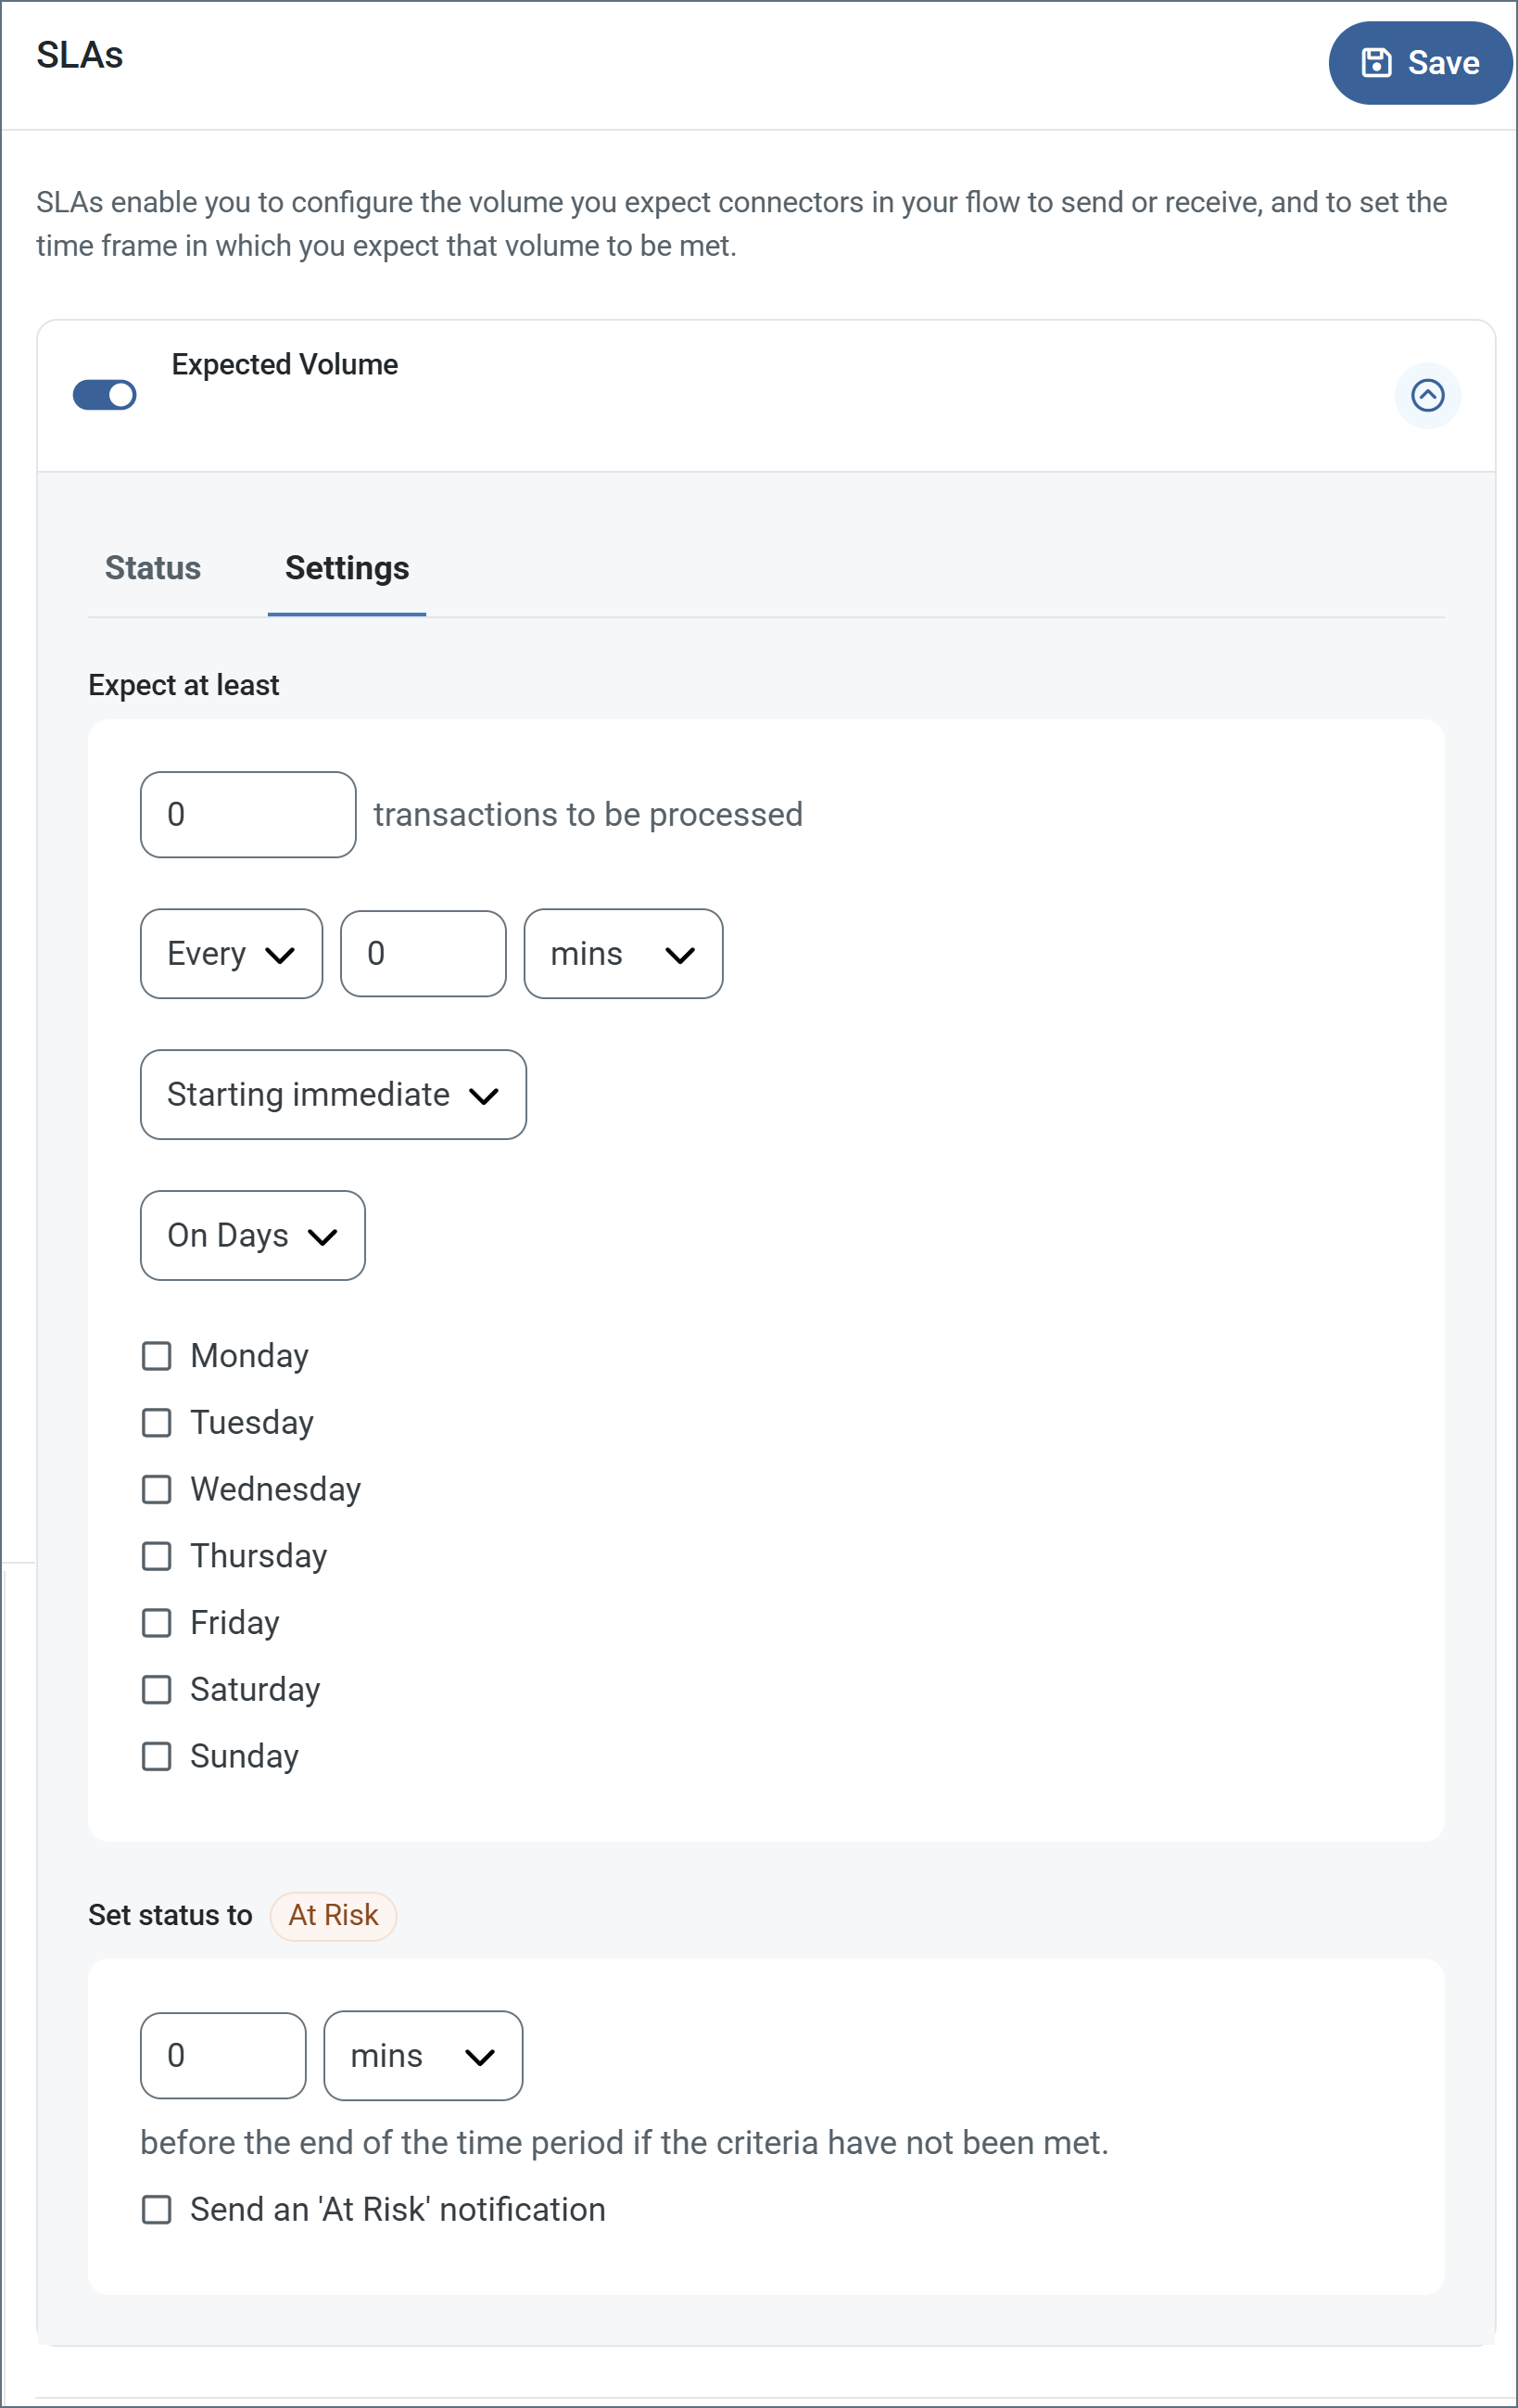
- If your connector has separate send and receive actions, use the radio buttons to specify which direction the SLA pertains to.
- In the Expect at least portion of the window:
- Set the minimum number of transactions you expect to be processed (the volume)
- Use the Every fields to specify the time frame
- Indicate when the SLA should go into effect. If you choose Starting on, complete the date and time fields.
- Check the boxes for the days of the week that you want the SLA to be in effect. Use the dropdown to choose Everyday if necessary.
- In the Set status to 'At Risk' portion of the window, specify when the SLA should be marked as at risk.
- By default, notifications are not sent until an SLA is in violation. To change that, check Send an 'At Risk' notification.
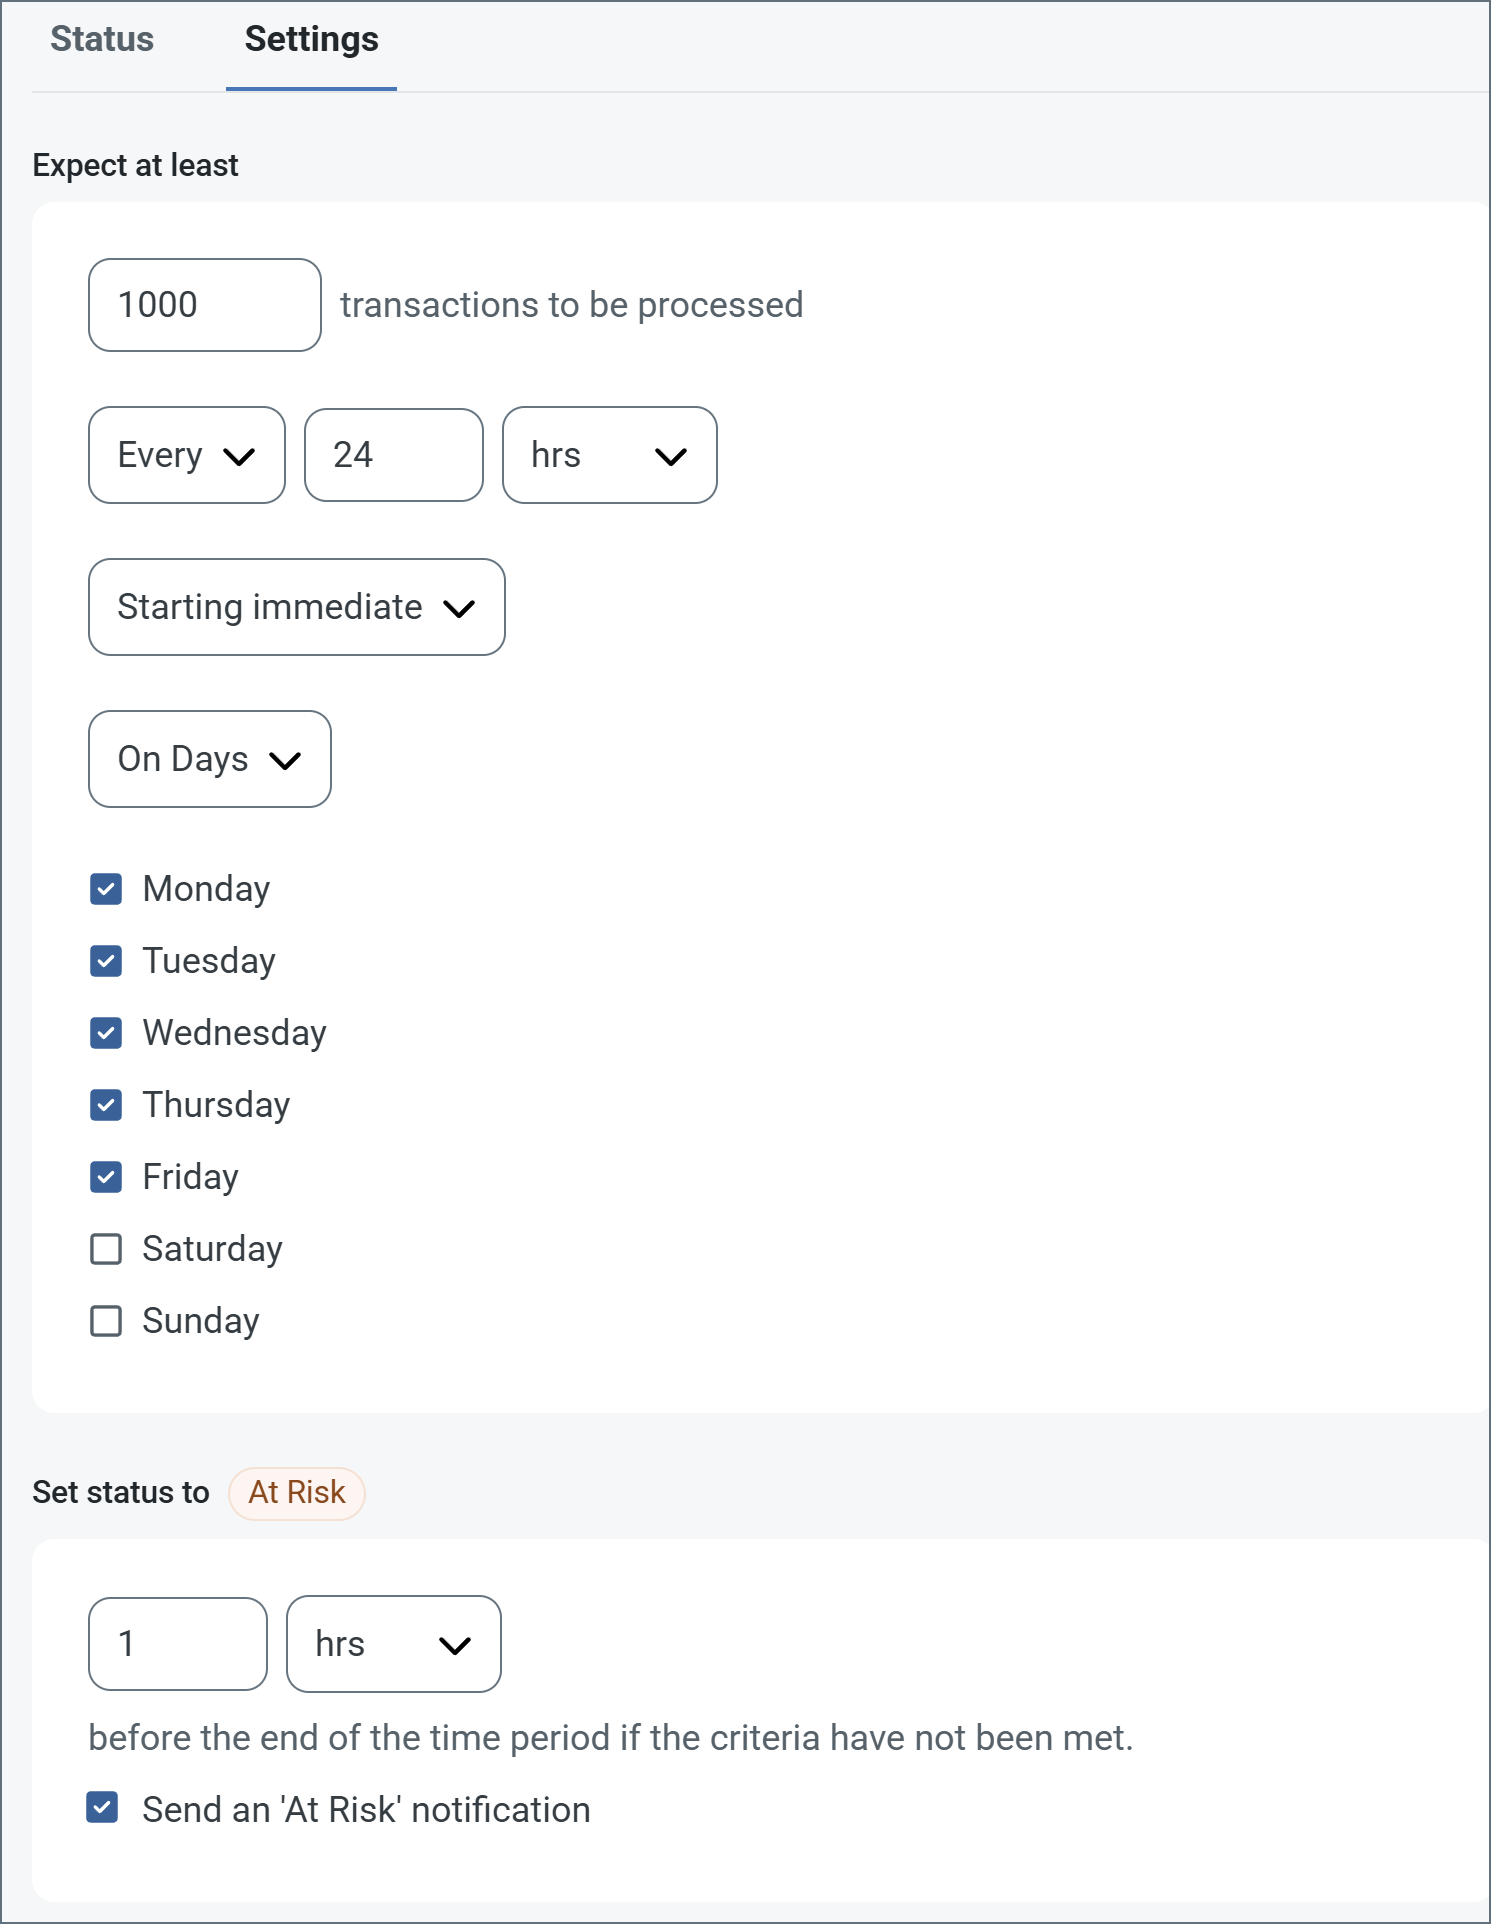
The following example shows an SLA configured for a connector that expects to receive 1000 files every day Monday-Friday. An at-risk notification is sent 1 hour before the end of the time period if the 1000 files have not been received.
 You can turn off SLA alerts if necessary. This can be useful during maintenance windows. Click Settings on the navbar, then navigate to Alerts > General Alerts. Click the tablet and pencil icon to edit, and uncheck the SLA Alerts setting.
;
export const AlertsTab = ({siteNameShort = "Arc"}) => <>
You can turn off SLA alerts if necessary. This can be useful during maintenance windows. Click Settings on the navbar, then navigate to Alerts > General Alerts. Click the tablet and pencil icon to edit, and uncheck the SLA Alerts setting.
;
export const AlertsTab = ({siteNameShort = "Arc"}) => <>
Settings related to configuring alerts.
Before you can execute Service Level Agreements (SLAs), you need to set up email alerts for notifications. By default, {siteNameShort} uses the global settings on the Alerts tab. To use other settings for this connector, toggle Override global setting on.
By default, error alerts are enabled, which means that emails are sent whenever there is an error. To turn them off, uncheck the Enable checkbox.
Enter a Subject (mandatory). Check Allow {siteNameShort}Script in Subject to use {siteNameShort}Script in the Subject field. When you select this, the {siteNameShort}Script Editor button appears ( ).
).
Optionally, enter a comma-separated list of Recipient emails.
;
export const CommonProxySettings = () => <>
These are a collection of settings that identify and authenticate to the proxy through which the connection should be routed. By default, this section uses the global settings on the Proxy Settings portion of the Security Settings page. Clear the checkbox to supply settings specific to your connector.
| Setting | Description |
|---|
| Proxy Type |
The protocol used by a proxy-based firewall. |
| Proxy Host |
The name or IP address of a proxy-based firewall. |
| Proxy Port |
The TCP port for a proxy-based firewall. |
| Proxy User |
The user name to use to authenticate with a proxy-based firewall. |
| Proxy Password |
A password used to authenticate to a proxy-based firewall. |
| Authentication Scheme |
Leave the default None or choose from one of the following authentication schemes: Basic, Digest, Proprietary, or NTLM. |
;
export const Message = () => <>
Message settings determine how the connector searches for messages and manages them after processing.
Note: The settings below are deprecated and hidden by default. They appear only on connectors where they were previously enabled or configured to a non-default value. To retain copies of successfully processed files, right-click the connector in the flow, choose Show Success Path, and connect the success path to a File connector.
| Setting | Description |
|---|
| Save to Sent Folder (Deprecated) |
Copies files processed by the connector to the Sent folder. Disabled by default. Files saved to the Sent folder are not covered by Encryption at Rest. |
| Sent Folder Scheme (Deprecated) |
Groups files in the Sent folder by the selected time interval. Only relevant when Save to Sent Folder is enabled. |
;
export const MiscConnector = () => <>
Miscellaneous settings are for specific use cases.
| Setting |
Description |
| Other Settings |
Enables you to configure hidden connector settings in a semicolon-separated list (for example, setting1=value1;setting2=value2). Normal connector use cases and functionality should not require the use of these settings. |
;
export const Logging = () => <>
Settings that govern the creation and storage of logs.
| Setting |
Description |
| Log Level |
The verbosity of logs generated by the connector. When you request support, set this to Debug. |
| Log Subfolder Scheme |
Instructs the connector to group files in the Logs folder according to the selected interval. The Weekly option (which is the default) instructs the connector to create a new subfolder each week and store all logs for the week in that folder. Leaving this setting blank tells the connector to save all logs directly in the Logs folder. For connectors that process many transactions, using subfolders helps keep logs organized and improves performance. |
| Log Messages |
Check this to have the log entry for a processed file include a copy of the file itself. If you disable this, you might not be able to download a copy of the file from the Transactions tab. |
;
export const MacrosExamples = ({extraMacros = []}) => <>
Some macros, such as %Ext% and %ShortDate%, do not require an argument, but others do. All
macros that take an argument use the following syntax: %Macro:argument%
Here are some examples of the macros that take an argument:
- %Header:headername%: Where
headername is the name of a header on a message.
- %Header:mycustomheader% resolves to the value of the
mycustomheader header set on the input message.
- %Header:ponum% resolves to the value of the
ponum header set on the input message.
- %RegexFilename:pattern%: Where
pattern is a regex pattern. For example, %RegexFilename:^([\w][A-Za-z]+)% matches and resolves to the first word in the filename and is case insensitive (test_file.xml resolves to test).
- %Vault:vaultitem%: Where
vaultitem is the name of an item in the vault. For example, %Vault:companyname% resolves to the value of the companyname item stored in the vault.
- %DateFormat:format%: Where
format is an accepted date format (see Sample Date Formats for details). For example, %DateFormat:yyyy-MM-dd-HH-mm-ss-fff% resolves to the date and timestamp on the file.
{extraMacros.filter(item => item.example).map(item => - {item.example}
)}
You can also create more sophisticated macros, as shown in the following examples:
- Combining multiple macros in one filename:
%DateFormat:yyyy-MM-dd-HH-mm-ss-fff%%EXT%
- Including text outside of the macro:
MyFile_%DateFormat:yyyy-MM-dd-HH-mm-ss-fff%
- Including text within the macro:
%DateFormat:'DateProcessed-'yyyy-MM-dd_'TimeProcessed-'HH-mm-ss%
;
export const MacrosTable = ({siteName = "CData Arc", extraMacros = []}) => <>
Using macros in file naming strategies can enhance organizational efficiency and contextual
understanding of data. By incorporating macros into filenames, you can dynamically include
relevant information such as identifiers, timestamps, and header information, providing
valuable context to each file.
{siteName} supports these macros, which all use the following syntax: %Macro%.
| Macro | Description |
|---|
| ConnectorID | Evaluates to the ConnectorID of the connector. |
| ConnectorName | Evaluates to the name of the connector. Enables you to include the connection name in file names or paths: for example, to tag backup files by which database connection produced them. |
| Ext | Evaluates to the file extension of the file currently being processed by the connector. |
| Filename | Evaluates to the filename (extension included) of the file currently being processed by the connector. |
| FilenameNoExt | Evaluates to the filename (without the extension) of the file currently being processed by the connector. |
| MessageId | Evaluates to the MessageId of the message being output by the connector. |
| RegexFilename:pattern | Applies a RegEx pattern to the filename of the file currently being processed by the connector. |
| Header:headername | Evaluates to the value of a targeted header (headername) on the current message being processed by the connector. |
| LongDate | Evaluates to the current datetime of the system in long-handed format (for example, Wednesday, January 24, 2024). |
| ShortDate | Evaluates to the current datetime of the system in a yyyy-MM-dd format (for example, 2024-01-24). |
| DateFormat:format | Evaluates to the current datetime of the system in the specified format (format). See Sample Date Formats for the available datetime formats. |
| Vault:vaultitem | Evaluates to the value of the specified vault item. |
{extraMacros.map(item =>
| {item.name} |
{item.description} |
)}
;
export const siteNameShort = "Arc";
export const siteName = "CData Arc";
AI connectors are designed to connect to a number of AI models that expose a REST API. The supported list is [below](./ai#ai-config-tab).
## Key Capabilities
* Multi-provider AI integration
* Flexible prompt engineering
* Customizable AI model selection
* Structured output control
* Intelligent content processing
## Overview
The {siteName} AI connector is a flexible integration tool that connects to any AI model via REST APIs, enabling you to process input messages using configurable system and user prompts to generate structured outputs within your data flows. It supports popular AI services like OpenAI, Gemini, Ollama, and other OpenAI-compatible providers, with full control over API endpoints, models, and parameters. With {siteNameShort}Script-enabled prompts and customizable output formats, the connector enables use cases such as extracting insights from unstructured feedback, translating content across languages, and transforming text data into actionable structured information.
### Actions
## Connector Configuration
This section contains all of the configurable connector properties.
### AI Config Tab
If you have not already configured the global AI settings at **Settings > Advanced > AI Settings**, the **AI Config** tab displays a message that you must do this before you can use the connector. Click the **Configure AI Settings** button, and follow the instructions in [AI Settings](../getting-started/administration/settings/ai-settings). If the global settings have already been configured but you want to override them in this connector, click **Edit**. To override the global settings, toggle on **Override global setting**. Now you can select which AI provider you want to use, enter the appropriate connection details and then save the configuration. The connector supports the following providers:
* Claude
* Deepseek
* Gemini
* Grok
* Ollama (cloud and local)
* OpenAI
* OpenAI Compatible (any AI provider that implements OpenAI's API)
Use the **Edit AI Settings** pane to define the **Base URL** (only available when the provider is **Ollama** or **OpenAI Compatible**), add the provider's **API Key**, and select a **Model**.
To populate the **User Prompt** field, you can click **Suggested Prompts** to see a set of predefined prompts for a variety of use cases, or you can enter your own prompt directly into the field. This is where you define the task or request that you want the connector to perform when it receives a file. For example, you could enter something like *Summarize the inbound EDI X12 file using natural language* so that employees who are not familiar with the EDI X12 structure can read the summary and understand what information the document contains. This field supports {siteNameShort}Script.
You can also choose to **Attach input messages to requests**. This is especially useful when you are providing binary files (such as a PDF or image) to the AI provider.
To include non-binary files in the request, you need to use \_message.body in your prompt, like this:
```
[_message.body]
```
See the Summarize option in the Suggested Prompts dropdown for a complete example.
Toggle **System Prompt** to provide a set of specific instructions, constraints, languages, or roles that the AI provider should use when providing its response. For example: *Do not use any em dashes or emojis in your response.* This field also supports {siteNameShort}Script.
The way in which you test your configuration and prompts varies by the connector's [action type](#actions):
* If your connector is a trigger, click the **Test** button.
* If your connector is a transform or terminal, on the **Testing** tab, paste content into the **Input Body** or use the dropdown to add **Headers** and values, then click the **Test** button.
In both cases, the test results appear in the **Testing** tab. Logs from the test are displayed in the **Log** tab.
### Settings Tab
*Settings related to the core configuration of the connector.*
#### Configuration
| Setting | Description |
| ------------------------- | ------------------------------------------------------------------------------------------------------------------------------------------------------------------------------------------------------------------------------------------------------------------------------------- |
| **Connector Id** | The static, unique identifier for the connector. |
| **Connector Type** | Displays the connector name and a description of what it does. |
| **Connector Description** | An optional field to provide a free-form description of the connector and its role in the flow. |
| **Action** | The action this connector is performing: trigger, transform, or terminal. |
| **Output in JSON** | If your model supports structured outputs, check this to deliver the connector output in JSON format. This is useful when you want to ensure the AI output is structured and machine-readable, so it is easier to parse, extract data, or use in downstream connectors and processes. |
#### Advanced Settings
| Setting | Description |
| --------------------- | --------------------------------------------------------------------------------------------------------------------------------------------------------------------------------------------------------------------------------------- |
| **Local File Scheme** | A scheme for assigning filenames to messages that are output by the connector. You can use macros in your filenames dynamically to include information such as identifiers and timestamps. For more information, see [Macros](#macros). |
### Advanced Tab
#### Other Settings
| Setting | Description |
| ----------- | --------------------------------------------------------------------------------- |
| **Timeout** | The AI response timeout, in seconds. By default, this value is set to 60 seconds. |
#### Proxy Settings
#### Message
#### Logging
#### Miscellaneous
### Automation Tab
#### Automation Settings
*Settings related to the automatic processing of files by the connector.*
| Setting | Description |
| ------------------------- | ----------------------------------------------------------------------------------------------------------------------------------------------------------------------------------------------------------------- |
| **Send** | Whether files arriving at the connector are automatically uploaded. |
| **Retry Interval** | The amount of time before a failed upload is retried. |
| **Max Attempts** | The maximum number of times the connector processes the input file. Success is measured based on a successful server acknowledgement. If you set this to 0, the connector retries the file indefinitely. |
| **Receive** | Whether the connector should automatically poll the remote download path for files to download. |
| **Interval** | The interval between automatic download attempts. |
| **Minutes Past the Hour** | The minutes offset for an hourly schedule. Only applicable when the interval setting above is set to *Hourly*. For example, if this value is set to 5, the automation service downloads at 1:05, 2:05, 3:05, etc. |
| **Time** | The time of day that the attempt should occur. Only applicable when the interval setting above is set to *Daily*, *Weekly*, or *Monthly*. |
| **Day** | The day on which the attempt should occur. Only applicable when the interval setting above is set to *Weekly* or *Monthly*. |
| **Minutes** | The number of minutes to wait before attempting the download. Only applicable when the interval setting above is set to *Minute*. |
| **Cron Expression** | A five-position string representing a cron expression that determines when the attempt should occur. Only applicable when the interval setting above is set to *Advanced*. |
### Alerts Tab
### SLAs Tab
### Transactions Tab
This tab lists all messages associated with the connector. Use the search bar to find specific messages, or click the funnel icon to apply a filter. You can filter by time, message direction, and/or status.
Options on this tab vary depending on the connector's [action type](#actions):
* If your connector is a **Trigger**, use the **Receive Files** button to start the flow.
* If your connector is a **Transform** or **Terminal**, use the **Upload Files** button to upload files to the flow.
## Macros
### Examples