> ## Documentation Index
> Fetch the complete documentation index at: https://docs.arc.cdata.com/llms.txt
> Use this file to discover all available pages before exploring further.
# Map an EDI 850 Purchase Order to CSV
> Use CData Arc's mapping tools to transform an X12 850 purchase order into a flat CSV file.
export const siteNameShort = "Arc";
export const siteName = "CData Arc";
## Overview
{siteName} contains powerful data transformation tools that support mapping EDI documents (such as X12, EDIFACT, and so on) to flat file structures like comma-separated values (CSV) files. This guide focuses on mapping an X12 850 document (purchase order) to CSV format. The approach described in this article is also applicable to mapping other EDI documents; however, the specific relationships between mapped values might be different.
This guide begins with an overview of how {siteNameShort} handles EDI mapping, then walks through each step of the flow. See [Sample Documents](#sample-documents) to review the X12 850 input and CSV output documents used in this guide.
### Video Resources
Watch this video for an overview of data transformation in {siteNameShort}.
## EDI Mapping in {siteName}
### Converting To and From XML
{siteNameShort} uses XML as an intermediary format for data transformation and manipulation. The first step in most mapping projects is to convert the source file format (X12 in this case) into XML, and the last step is to convert XML into the destination format (CSV in this case).
Since translating to and from XML is such an important step in data transformation, {siteNameShort} includes many dedicated connectors for translating files to and from XML. This guide uses an [X12 connector](../connectors/x12) and a [CSV connector](../connectors/csv). These connectors automatically convert their file formats into XML. Using these connectors, the source format (an X12 850 purchase order) and the destination format (a CSV file with the desired columns) can be modeled as XML.
### Transforming XML
Once the source and destination formats have been modeled as XML, the task is to convert one XML structure into another. This is accomplished by the [XML Map connector](../connectors/xml-map/xml-map).
The XML Map connector requires sample **Source** and **Destination** template files, which represent the starting and ending XML structures respectively. After these have been specified, the XML Map connector's visual designer is populated with the two XML structures.
In the XML Map connector's visual designer, you can drag and drop elements from the source structure onto elements in the destination structure to create a mapping relationship between them. This mapping step requires an understanding of the source file data so that the appropriate elements are included in the output file.
The XML Map connector includes value formatters, conditional logic, and even custom scripting to manipulate and compute data during the mapping process.
Once you create the mapping relationship, the XML Map connector can automatically convert any files that match the source XML structure into a file with the destination XML structure. In this example, this means that the XML model of an X12 850 document is automatically converted into an XML model of a CSV file. The final step is to use a CSV connector to take this XML model and convert it to an actual CSV file.
### Flattening a Purchase Order
A specific conceptual challenge when mapping an 850 purchase order to CSV is the need to *flatten* the purchase order. A single 850 document can contain multiple orders, and each order can contain different numbers of line items. CSV files, in contrast, have a static number of columns in which to store this data.
Since the number of CSV columns cannot expand to accommodate the varying number of orders in an 850, an 850 cannot be mapped to a single record (row) in a CSV file. Similarly, since the number of CSV columns cannot expand to accommodate the varying number of line items in an order, an order cannot be mapped to a single row in a CSV file. Each row in the CSV must store the data for a single line item in an order, since a single line item can be represented as a static set of values regardless of the number of line items and orders in an 850. Flattening an 850 takes its multi-layered and variable structure and reduces it to a set of static line items.
The XML Map connector uses the concept of a `Foreach` looping relationship to flatten structures during a mapping. In this case, a new CSV row is created *for each* line item in the 850. Establishing this relationship in an XML Map connector is simply a matter of using the visual designer to drag one element (the `PO1` element that represents a line item) onto another element (the element that represents a CSV record). Flattening structures with the XML Map connector is easy, but you must understand the source and destination XML structures so that you can establish the appropriate Foreach relationship.
### Summary
Creating a mapping in {siteNameShort} requires these steps:
* Convert a sample input file (such as an X12 850 document) to XML using the connector specific to the input format (the X12 connector in our example)
* Convert a sample output file (such as a CSV file with the desired columns) to XML using the connector specific to the output format (the CSV connector in our example)
* Use the resulting XML files as the source and destination files for an XML Map connector
* Drag and drop elements in the XML Map connector's visual designer to establish a relationship between the source and destination XML structures
The result is an automated flow that accepts X12 documents as input and returns CSV files as output.
## Creating the Mapping Flow
This section describes the steps required to create a flow in {siteNameShort} to map an example 850 purchase order into a flat CSV file.
### Step 1: The X12 Connector
The first step of this mapping flow is to convert an example source document (an X12 850) into XML.
This is accomplished with the X12 connector, which converts X12 documents into XML and can optionally validate X12 interchange headers during the conversion. In front of the X12 connector is a trigger connector (AS2 in the following example), which receives the X12 850 document and passes it directly to the X12 connector. Your use case might require a different trigger connector, such as SFTP. See [Connector Categories](../connectors/connectors#categories) for details on the types of connectors that might fit your use case.
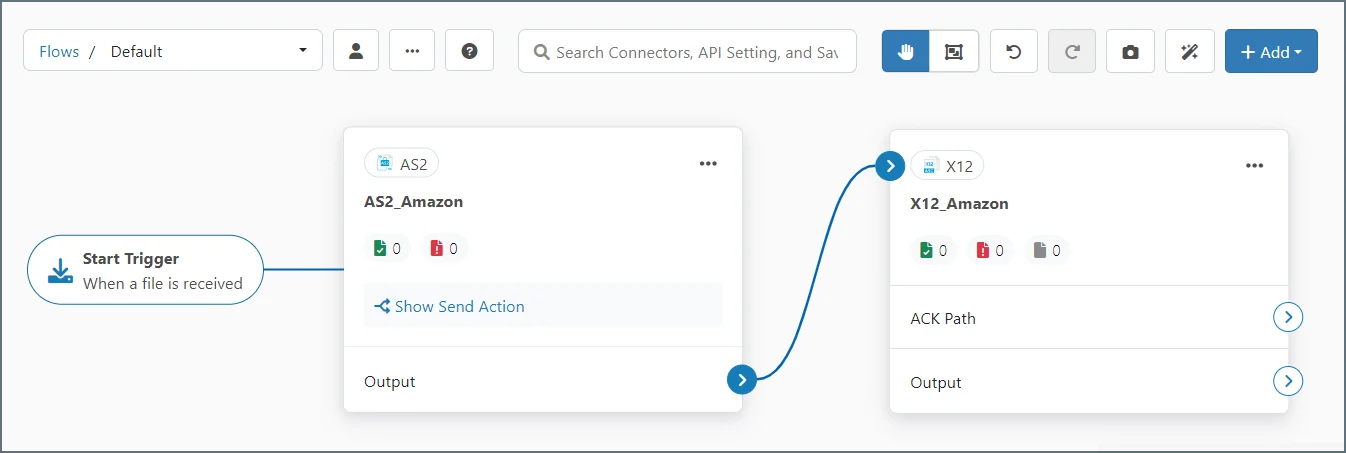
Click **Flows** on the navbar, then add a trigger connector (AS2 in our example) and an X12 connector to the workspace canvas (see [Designing a Flow](../flows/designing-a-flow) for instructions). Best practice is to include the name of the trading partner sending X12 documents in the **Connector Id** fields (Amazon in the following image). Connect the AS2 and X12 connectors.
#### Configuring the X12 Connector
On the X12 connector [Settings tab](../connectors/x12#settings-tab), set the **Translation Type** to `X12-to-XML`. This lets the X12 connector validate X12 interchange headers as it converts the X12 document into XML format (to ensure that the X12 documents were sent to and received by the expected parties).
By default, **Dynamically process partners** is checked. This means that the connector automatically identifies and tracks trading partner relationships from EDI transactions. In this case, no manual partner configuration is required because the connector dynamically manages all partners within your license limit. The connector also fills in interchange and functional group values based on the configured settings. This guide uses the default setting. See [X12 Connector Settings](../connectors/x12#connector-configuration) to learn what is required if you uncheck this.
Validation is not performed if the **Usage Indicator** is set to `T-Test Data`.
No further configuration is necessary for the scope of this guide, but might be required for your specific use case. Review the [X12 documentation](../connectors/x12) for full details.
#### Upload a Test File
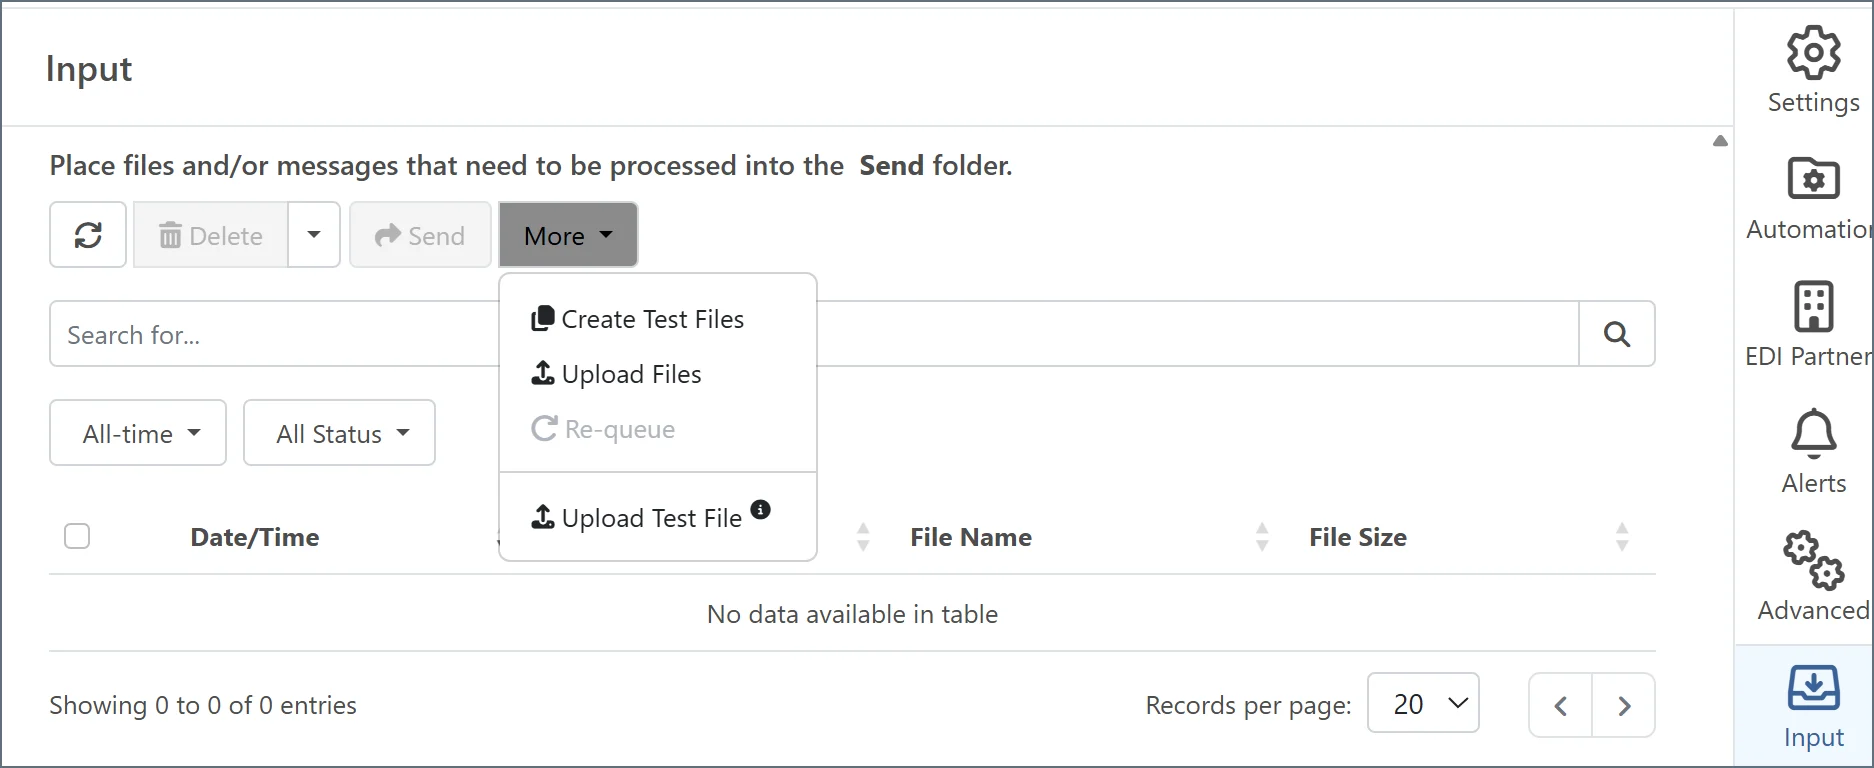
Navigate to the Transactions tab of the X12 connector and click **More > Upload Test File**.
Browse for an example 850 document that contains the X12 segments necessary for the mapping. You might need to contact your trading partner to acquire an example X12 document. The 850 document used to make this guide is [here](#x12-850).
**Upload Test File** tells the X12 connector to save an XML model of the uploaded document internally (instead of pushing the XML to the **Transactions** tab as an output file). This XML model is used later by the XML Map connector.
### Step 2: The CSV Connector
The next step is to convert an example destination document (a CSV file with the appropriate columns) into XML. This is done using the CSV connector, which translates files between XML and CSV.
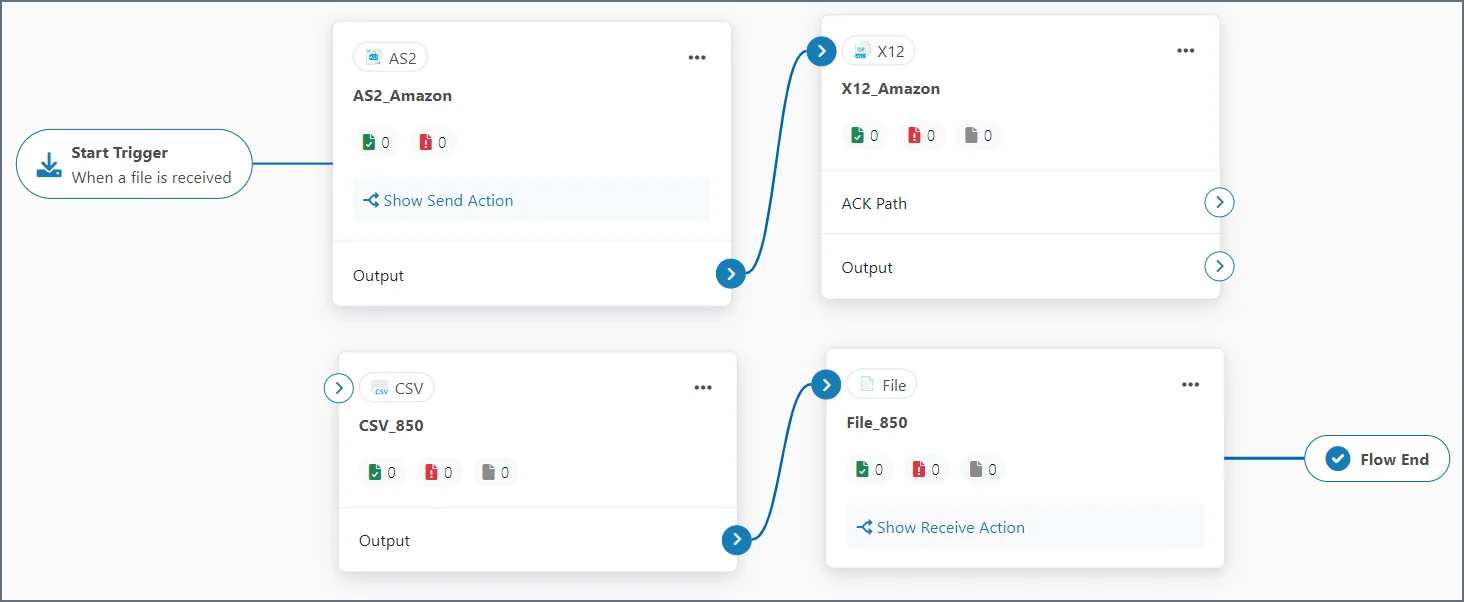
Add an instance of the CSV connector to the flow. Do **not** connect it to the X12 connector. Also add an instance of a terminal connector ([File](../connectors/file) in this example). It serves as the final connector in the flow. Connect the CSV and File connectors.
#### Configuring the CSV Connector
Open the CSV connector [Settings](../connectors/csv#connector-settings) tab. The only CSV connector configuration property required for this mapping flow is **Column headers present**. Enable this when the CSV files produced by the mapping flow should have a row of column header names at the top of the file.
#### Generate or Upload a Sample File
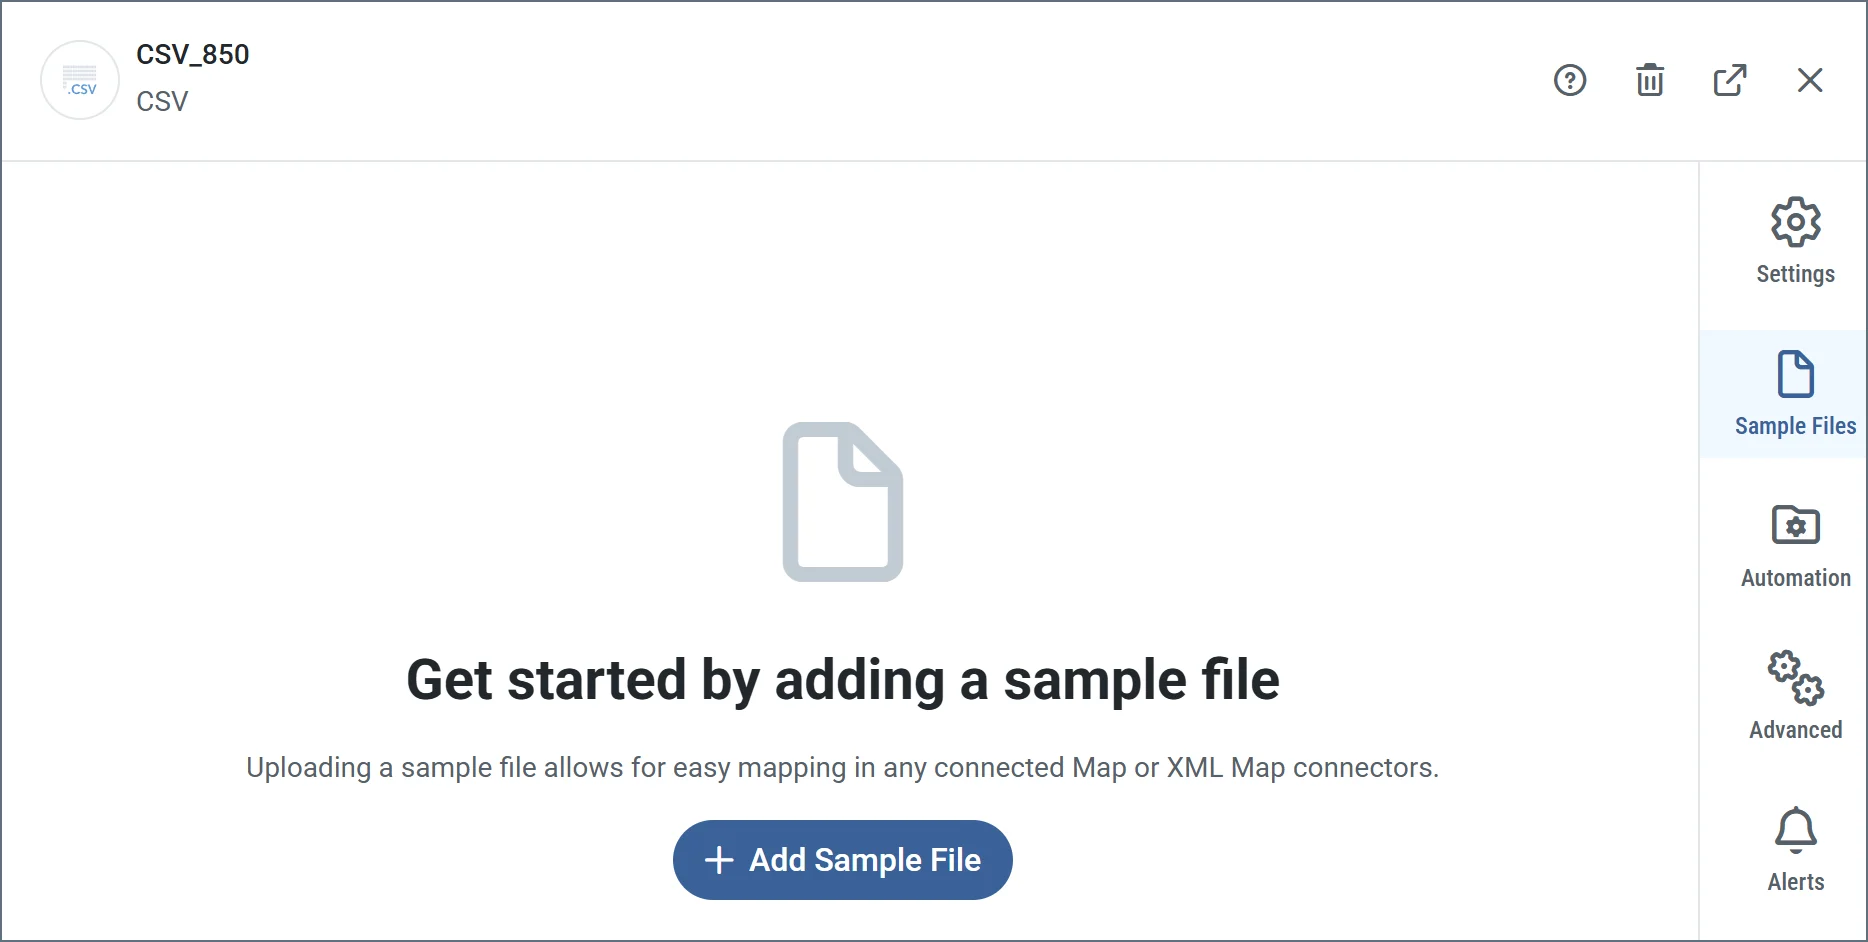
Navigate to the **Sample Files** tab of the CSV connector and click **Add Sample File**. If you already have an example CSV file that contains the appropriate columns (and headers if **Column headers present** is enabled), choose **File Upload** and browse to your file. Alternatively, select **Manually Create** to create a CSV file directly in the application. If you choose **Manually Create**, give your sample file a name. Click **Next**.
If you browsed to an existing file, the **View File** tab is populated with its contents. If you chose to manually create a file, enter your sample data on this tab.
Click **Next**. The **Translate and Preview** displays a preview of your sample data converted to XML. When you are satisfied with your sample, click **Add**.
The CSV file used to make this guide is [here](#csv).
When you upload the test file, the CSV connector saves an XML model of it. This XML model is used in the next step.
### Step 3: The XML Map Connector
Now that the X12 connector and CSV connectors have generated XML models of the source and destination documents, use the XML Map connector to transform one XML structure into the other.
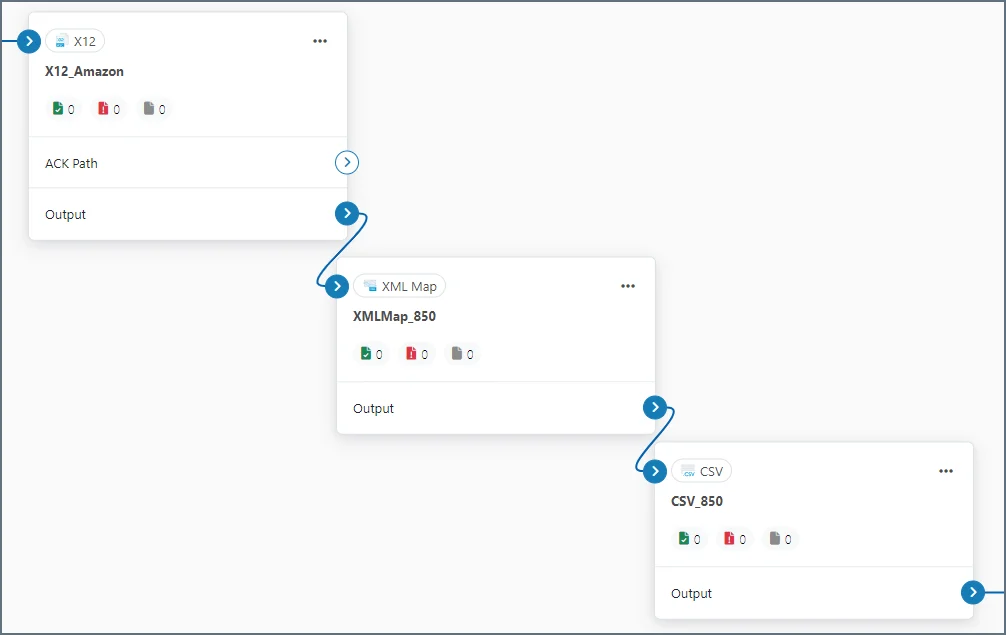
Add an instance of the XML Map connector onto the flow, then connect the X12 connector to the XML Map connector and the XML Map connector to the CSV connector.
#### Configuring the XML Map Connector
On the XML Map connector **XML Map** tab, the connector should pre-populate the **Source** from the X12 connector test file and the **Destination** from the CSV connector sample file.
If they do not display, verify that the test files were appropriately uploaded and that the connectors are connected in the flow canvas. See [Configure the Mapping](../mapping/mapping-config) in the [Mapping](../mapping/mapping) documentation for detailed instructions on how to use the mapping editor.
#### Understanding the XML Structures
Creating the right mapping relationships in the XML Map connector requires understanding how the source and destination structures are represented in XML.
There are two types of XML elements (nodes) in the structures. *Parent* and *Leaf* nodes define the hierarchical structure of XML data, where parent nodes group related elements and leaf nodes represent the actual data values to be mapped. Use the expand and collapse buttons next to a parent node to show or hide its leaves. See [Mapping Nodes](../mapping/mapping-config#mapping-nodes) for more information.
* In the 850 XML, each EDI *loop* and *segment* is a parent node. Each individual EDI *element* is a leaf node.
* In the CSV XML, each direct child of the root *Items* element is called a *record* element: it represents a distinct row in the CSV. Each *record* element is a parent node, and the children of *record* elements are all *column* elements: they each represent a single field or column of a record. Each *column* element is a leaf node.
In the XML Map connector, parent nodes can only be mapped to other parent nodes, and leaf nodes can only be mapped to other leaf nodes. The primary challenge when mapping EDI to CSV is to choose the correct *loop* or *segment* element (from the EDI source) to drag onto the *record* element (in the CSV destination). Then you can drag the EDI *element* nodes onto the *column* nodes to populate the CSV with specific values from the EDI document.
## Creating the Mapping
Once you configure the XML Map connector with the source and destination structures, create the mapping by dragging and dropping nodes in the designer.
Mappings are created in two primary steps:
1. Creating the Foreach looping relationships between parent nodes
2. Mapping values between leaf nodes in the established Foreach loops
See [Mapping Loops](../mapping/mapping-config#mapping-loops) for more details and other examples of working with loops.
### Creating Foreach Loops
Foreach relationships mean that each time an element appears in the source, a new XML structure should be created in the destination. For example, if *ElementA* in the source is mapped to *ElementB* in the destination, each occurrence of *ElementA* in an input file results in an instance of *ElementB* (and all of *ElementB*'s children) in the output file.
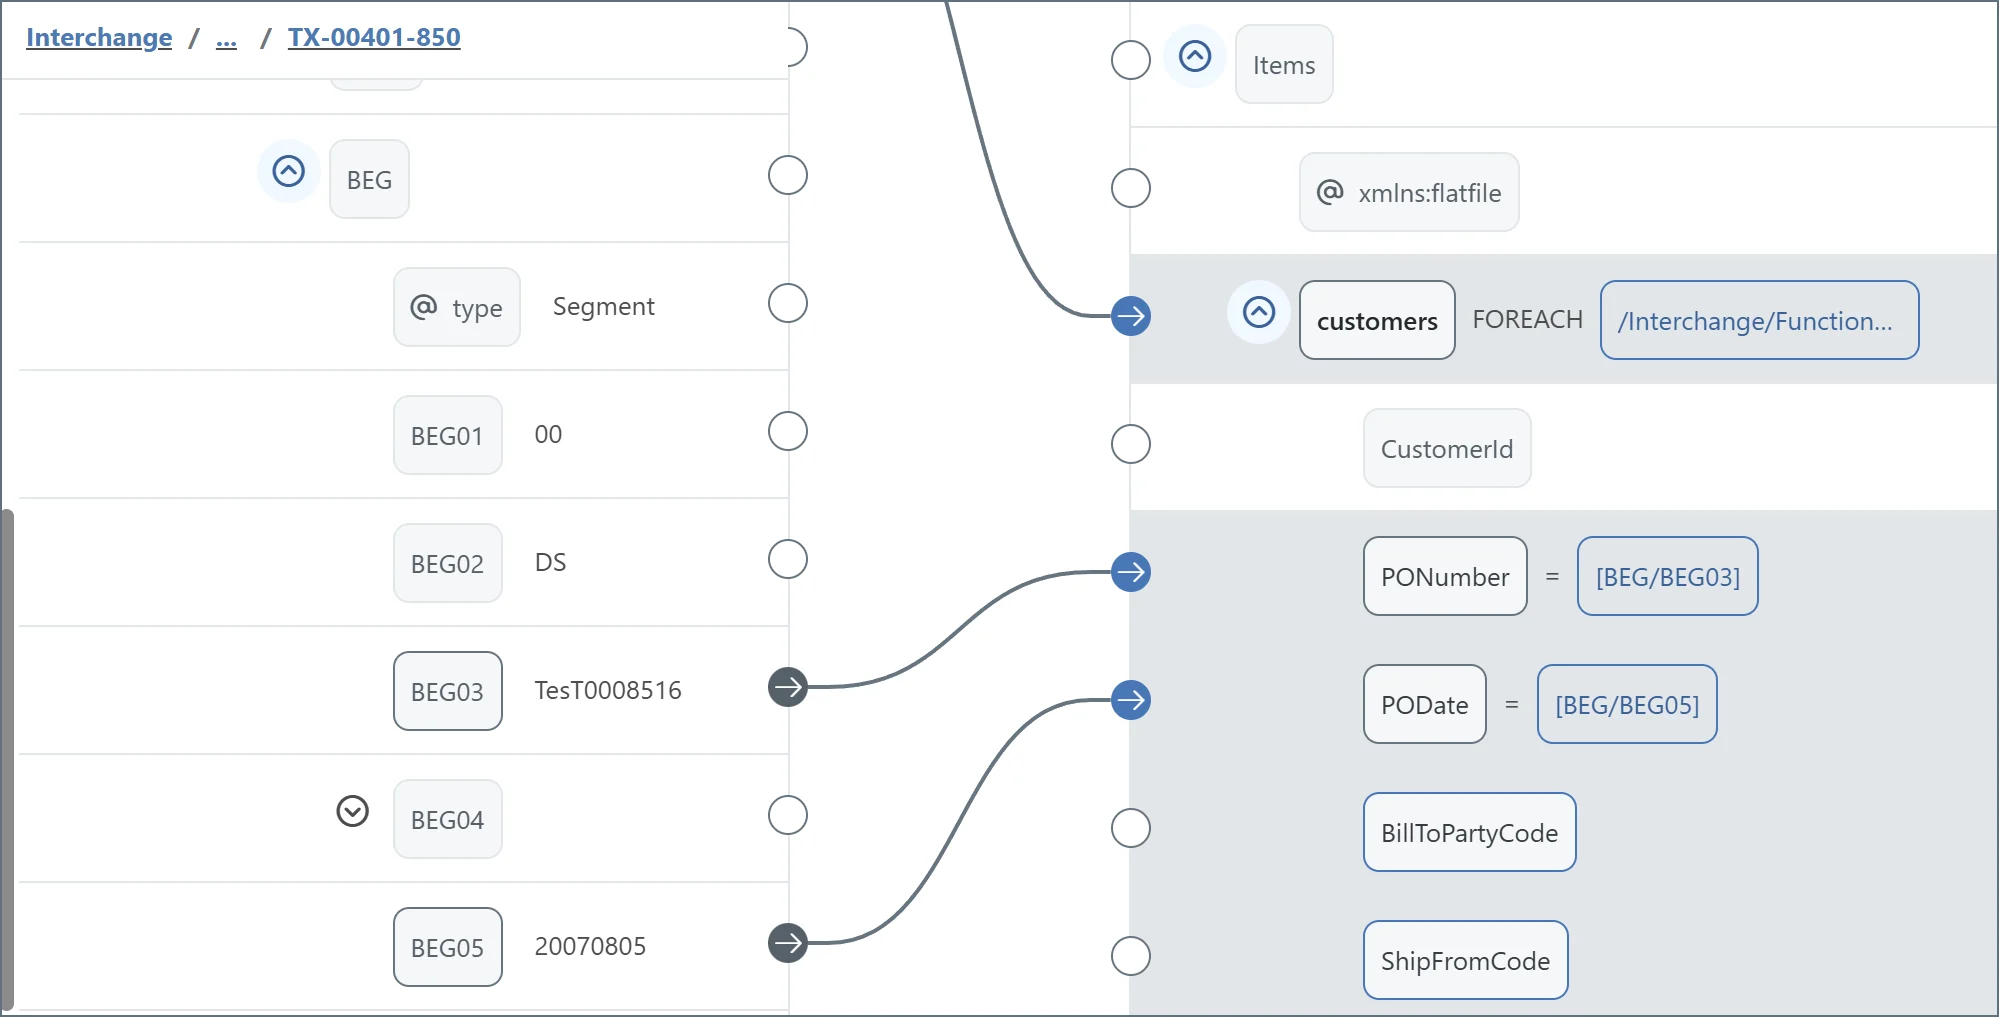
In this case (as described in the [Flattening a Purchase Order](#flattening-a-purchase-order) section), each line item in the source 850 should result in a new record in the destination CSV. To create this relationship, drag the **Source** element that represents a line item onto the **Destination** element that represents a CSV record. In this case, the source element is *TX-00401-850*, and the destination element is *customers*:
As shown in the previous image, the *customers* destination element displays the xpath from the source that maps to it. Every time the XML parser finds an element that matches the xpath in an input file, a new *customers* element is added to the output file (including all of the *customers* element's children, if any).
This Foreach loop is the only loop required for this mapping. Other mapping projects might require multiple loops, nested or otherwise.
### Mapping Leaf Nodes
Once the Foreach relationships have been established, you can map the values from leaf nodes in the loops. Mapping leaf nodes determine the values that populate the XML structures created by Foreach loops.
#### Simple Leaf Node Mappings
When a value from the source should be directly inserted in the resulting output, simply drag a leaf node from the source onto a leaf node in the destination to map the values. For example, the *BEG03* element holds the value for *PONumber*, which corresponds to the *PONumber* attribute in the destination:
The xpaths for these elements are relative to the Foreach xpath.
#### Conditional Mappings with Lookahead Syntax
The 850 document contains multiple *N1Loop1* elements representing a party in the exchange and the role of that party (for example, ship-to party or bill-to party). For each *N1Loop1*, the *N1Loop1/N1/N104* element holds the value that identifies the party (the party name or ID), so these values must be mapped to the output CSV. However, the xpath for each *N104* element is the same regardless of the party's role, so the xpath to the *N104* element is not enough to map the correct values.
The role of the party is held in *N1Loop1/N1/N101*, so the mapping needs to look into the *N101* element before mapping the *N104* element value to the output CSV. In other words, the *BillToPartyCode* needs to be mapped to:
`N1Loop1/N1/N104 WHERE N1Loop1/N1/N101 = 'BT'`
This conditional mapping can be accomplished with `Lookahead` syntax.
First, drag the element containing the value from the source onto the destination element (*BillToPartyCode*):
Then, hover over the mapped *BillToPartyCode* element and click the tablet and pencil icon to open the **Node Value** editor:
Notice that the current mapped xpath is *N1Loop1/N1/N104* and the xpath to look into is *N1Loop1/N1/N101*. Lookahead syntax is specified as follows:
* Find the element in the current xpath that is the closest parent of the element to look into (the *N1* element in this case)
* Specify in square brackets `[ ]` the xpath to the element to look into (`[N101]` in this case)
* Add an equals expression `=` to indicate the value the check this element against (`BT` in this case)
* Escape the square brackets with backslashes so that they are not evaluated as part of the xpath expression
The resulting Lookahead expression is shown below:
Repeat the same process for the rest of the destination elements.
#### Modifying and Calculating with the Node Value Editor
In addition to xpath manipulation, the Node Value editor supports [formatters](../scripting/value-formatters/formatters) that modify or manipulate values during a mapping. The *ItemTotalCost* element needs to be mapped to the total cost for the line item, which is not directly available in a source element but is easily calculated by multiplying the item quantity and the item price.
As a starting point, map an item price to the *ItemTotalCost* element and open the Node Value editor.
You can use the *multiply* formatter to multiply this starting value (the price per item) with the number of items. Formatter syntax works as follows:
* Sequences are contained in square brackets (as is already the case in the current *ItemTotalCost* expression)
* Sequences are evaluated from left to right
* Sequences are delimited by vertical pipe characters (for example, `[value | formatter1() | formatter2() | formatter3()]`)
The *xpath()* syntax that results from dragging a source node onto a destination node is itself a special kind of formatter.
Add a vertical pipe separating character at the right end of the xpath expression (inside the closing square bracket) to create a new space for a formatter. In this space, either manually type in the *multiply()* formatter or navigate to the **Formatters** tab in the Node Value editor, search for 'multiply', and click the appropriate formatter to add it to the expression. In order to multiply the starting value (the item price) with the item quantity, the item quantity value needs to be specified as the parameter to the *multiply* formatter. Since this value needs to be pulled from the input 850, another *xpath* expression is required, with the xpath that corresponds to the item quantity (*PO1/PO2*):
The resulting expression correctly calculates the total line item cost by multiplying the cost-per-item with the item quantity.
After saving the expression, the mapping is complete. Save your changes to the XML Map connector and you have configured the full flow.
## Sample Documents
The following sample data was used to make this guide.
### X12 850
```text theme={null}
ISA*00* *00* *ZZ*AMAZONDS *01*003025392 *160623*1448*U*00401*000000013*0*P*+~
GS*PO*AMAZONDS*ATFDS*20070911*2001*95*X*004010~
ST*850*0003~
BEG*00*DS*TesT0008516**20070805~
CUR*BT*USD~
N1*BT*Amazon.com.kydc,Inc.*92*KYDC~
N1*SF*WHSE*92*WHSE~
N1*ST*Charlie Dinkins~
N3*11254 Main St*Suite 112~
N4*Seattle*WA*98104*US*CC*United States~
TD5**92*UPS_GR_RES****ZZ*RES~
N1*LW*Amber Baker~
N3*123 Anderson Avenue~
N4*Seattle*WA*98103*US~
PO1*1*3*EA*18.04*NT*SK*1617*****BL*1*ZZ*Amazon.com~
PO1*2*2*EA*54.42*NT*SK*4927*****BL*1*ZZ*Amazon.com~
PO1*3*1*EA*18*NT*SK*9876*****BL*1*ZZ*Amazon.com~
CTT*3*6~
SE*15*0003~
GE*1*40~
IEA*1*000000040~
```
### CSV
```csv theme={null}
CustomerId,PONumber,PODate,BillToPartyCode,ShipFromCode,ShipToAddress,ShipToCity,ShipToZIP,LineItemNumber,ItemID,ItemQuantity,ItemPrice,ItemTotalCost
Sir Charles,128F195,20190805,AbRes,W22,2408 Creek St,Springfield,52213,1,BouncyRubberBall,4,2.49,9.96
Lady Jane,128F196,20190805,AbRes,W22,2408 Creek St,Springfield,52213,2,SquishyNerfBall,2,4.29,8.58
```
 #### Configuring the X12 Connector
On the X12 connector [Settings tab](../connectors/x12#settings-tab), set the **Translation Type** to `X12-to-XML`. This lets the X12 connector validate X12 interchange headers as it converts the X12 document into XML format (to ensure that the X12 documents were sent to and received by the expected parties).
By default, **Dynamically process partners** is checked. This means that the connector automatically identifies and tracks trading partner relationships from EDI transactions. In this case, no manual partner configuration is required because the connector dynamically manages all partners within your license limit. The connector also fills in interchange and functional group values based on the configured settings. This guide uses the default setting. See [X12 Connector Settings](../connectors/x12#connector-configuration) to learn what is required if you uncheck this.
#### Configuring the X12 Connector
On the X12 connector [Settings tab](../connectors/x12#settings-tab), set the **Translation Type** to `X12-to-XML`. This lets the X12 connector validate X12 interchange headers as it converts the X12 document into XML format (to ensure that the X12 documents were sent to and received by the expected parties).
By default, **Dynamically process partners** is checked. This means that the connector automatically identifies and tracks trading partner relationships from EDI transactions. In this case, no manual partner configuration is required because the connector dynamically manages all partners within your license limit. The connector also fills in interchange and functional group values based on the configured settings. This guide uses the default setting. See [X12 Connector Settings](../connectors/x12#connector-configuration) to learn what is required if you uncheck this.
 Browse for an example 850 document that contains the X12 segments necessary for the mapping. You might need to contact your trading partner to acquire an example X12 document. The 850 document used to make this guide is [here](#x12-850).
**Upload Test File** tells the X12 connector to save an XML model of the uploaded document internally (instead of pushing the XML to the **Transactions** tab as an output file). This XML model is used later by the XML Map connector.
### Step 2: The CSV Connector
The next step is to convert an example destination document (a CSV file with the appropriate columns) into XML. This is done using the CSV connector, which translates files between XML and CSV.
Add an instance of the CSV connector to the flow. Do **not** connect it to the X12 connector. Also add an instance of a terminal connector ([File](../connectors/file) in this example). It serves as the final connector in the flow. Connect the CSV and File connectors.
Browse for an example 850 document that contains the X12 segments necessary for the mapping. You might need to contact your trading partner to acquire an example X12 document. The 850 document used to make this guide is [here](#x12-850).
**Upload Test File** tells the X12 connector to save an XML model of the uploaded document internally (instead of pushing the XML to the **Transactions** tab as an output file). This XML model is used later by the XML Map connector.
### Step 2: The CSV Connector
The next step is to convert an example destination document (a CSV file with the appropriate columns) into XML. This is done using the CSV connector, which translates files between XML and CSV.
Add an instance of the CSV connector to the flow. Do **not** connect it to the X12 connector. Also add an instance of a terminal connector ([File](../connectors/file) in this example). It serves as the final connector in the flow. Connect the CSV and File connectors.
 #### Configuring the CSV Connector
Open the CSV connector [Settings](../connectors/csv#connector-settings) tab. The only CSV connector configuration property required for this mapping flow is **Column headers present**. Enable this when the CSV files produced by the mapping flow should have a row of column header names at the top of the file.
#### Generate or Upload a Sample File
Navigate to the **Sample Files** tab of the CSV connector and click **Add Sample File**. If you already have an example CSV file that contains the appropriate columns (and headers if **Column headers present** is enabled), choose **File Upload** and browse to your file. Alternatively, select **Manually Create** to create a CSV file directly in the application. If you choose **Manually Create**, give your sample file a name. Click **Next**.
#### Configuring the CSV Connector
Open the CSV connector [Settings](../connectors/csv#connector-settings) tab. The only CSV connector configuration property required for this mapping flow is **Column headers present**. Enable this when the CSV files produced by the mapping flow should have a row of column header names at the top of the file.
#### Generate or Upload a Sample File
Navigate to the **Sample Files** tab of the CSV connector and click **Add Sample File**. If you already have an example CSV file that contains the appropriate columns (and headers if **Column headers present** is enabled), choose **File Upload** and browse to your file. Alternatively, select **Manually Create** to create a CSV file directly in the application. If you choose **Manually Create**, give your sample file a name. Click **Next**.
 If you browsed to an existing file, the **View File** tab is populated with its contents. If you chose to manually create a file, enter your sample data on this tab.
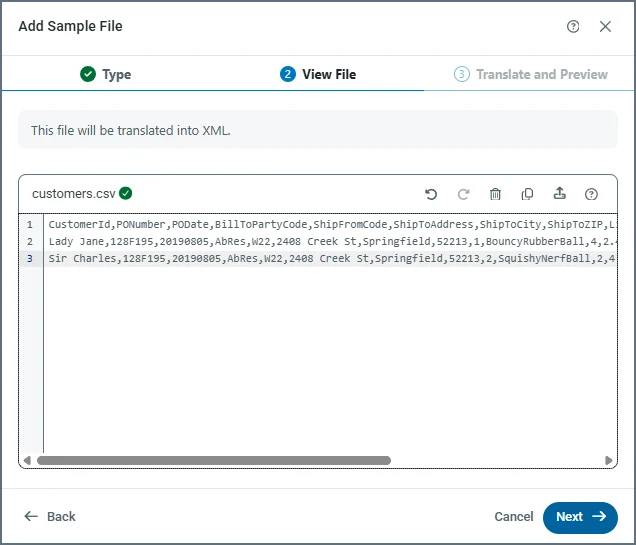 Click **Next**. The **Translate and Preview** displays a preview of your sample data converted to XML. When you are satisfied with your sample, click **Add**.
The CSV file used to make this guide is [here](#csv).
When you upload the test file, the CSV connector saves an XML model of it. This XML model is used in the next step.
### Step 3: The XML Map Connector
Now that the X12 connector and CSV connectors have generated XML models of the source and destination documents, use the XML Map connector to transform one XML structure into the other.
Add an instance of the XML Map connector onto the flow, then connect the X12 connector to the XML Map connector and the XML Map connector to the CSV connector.
Click **Next**. The **Translate and Preview** displays a preview of your sample data converted to XML. When you are satisfied with your sample, click **Add**.
The CSV file used to make this guide is [here](#csv).
When you upload the test file, the CSV connector saves an XML model of it. This XML model is used in the next step.
### Step 3: The XML Map Connector
Now that the X12 connector and CSV connectors have generated XML models of the source and destination documents, use the XML Map connector to transform one XML structure into the other.
Add an instance of the XML Map connector onto the flow, then connect the X12 connector to the XML Map connector and the XML Map connector to the CSV connector.
 #### Configuring the XML Map Connector
On the XML Map connector **XML Map** tab, the connector should pre-populate the **Source** from the X12 connector test file and the **Destination** from the CSV connector sample file.
#### Configuring the XML Map Connector
On the XML Map connector **XML Map** tab, the connector should pre-populate the **Source** from the X12 connector test file and the **Destination** from the CSV connector sample file.
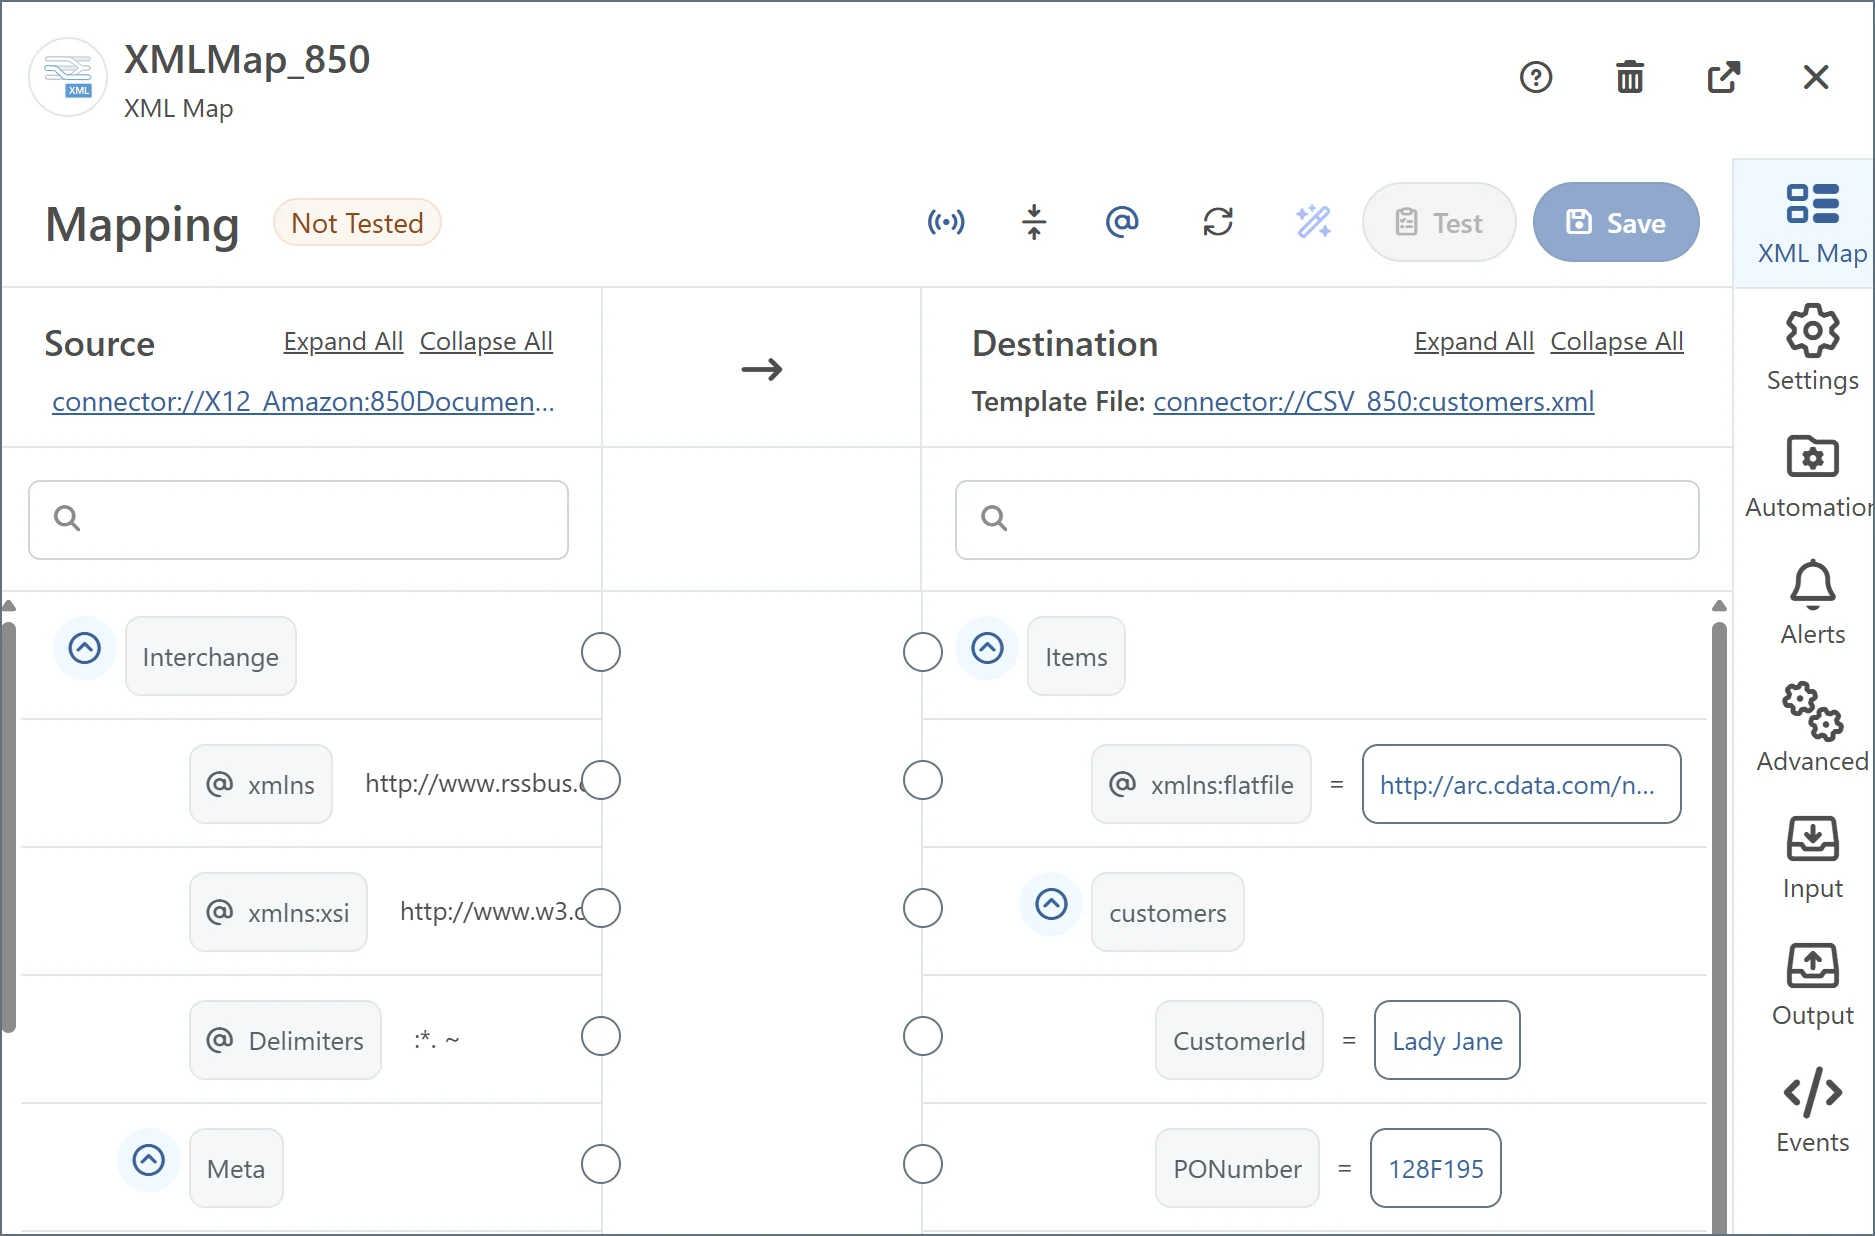 If they do not display, verify that the test files were appropriately uploaded and that the connectors are connected in the flow canvas. See [Configure the Mapping](../mapping/mapping-config) in the [Mapping](../mapping/mapping) documentation for detailed instructions on how to use the mapping editor.
#### Understanding the XML Structures
Creating the right mapping relationships in the XML Map connector requires understanding how the source and destination structures are represented in XML.
There are two types of XML elements (nodes) in the structures. *Parent* and *Leaf* nodes define the hierarchical structure of XML data, where parent nodes group related elements and leaf nodes represent the actual data values to be mapped. Use the expand and collapse buttons next to a parent node to show or hide its leaves. See [Mapping Nodes](../mapping/mapping-config#mapping-nodes) for more information.
* In the 850 XML, each EDI *loop* and *segment* is a parent node. Each individual EDI *element* is a leaf node.
* In the CSV XML, each direct child of the root *Items* element is called a *record* element: it represents a distinct row in the CSV. Each *record* element is a parent node, and the children of *record* elements are all *column* elements: they each represent a single field or column of a record. Each *column* element is a leaf node.
In the XML Map connector, parent nodes can only be mapped to other parent nodes, and leaf nodes can only be mapped to other leaf nodes. The primary challenge when mapping EDI to CSV is to choose the correct *loop* or *segment* element (from the EDI source) to drag onto the *record* element (in the CSV destination). Then you can drag the EDI *element* nodes onto the *column* nodes to populate the CSV with specific values from the EDI document.
## Creating the Mapping
Once you configure the XML Map connector with the source and destination structures, create the mapping by dragging and dropping nodes in the designer.
Mappings are created in two primary steps:
1. Creating the Foreach looping relationships between parent nodes
2. Mapping values between leaf nodes in the established Foreach loops
See [Mapping Loops](../mapping/mapping-config#mapping-loops) for more details and other examples of working with loops.
### Creating Foreach Loops
Foreach relationships mean that each time an element appears in the source, a new XML structure should be created in the destination. For example, if *ElementA* in the source is mapped to *ElementB* in the destination, each occurrence of *ElementA* in an input file results in an instance of *ElementB* (and all of *ElementB*'s children) in the output file.
In this case (as described in the [Flattening a Purchase Order](#flattening-a-purchase-order) section), each line item in the source 850 should result in a new record in the destination CSV. To create this relationship, drag the **Source** element that represents a line item onto the **Destination** element that represents a CSV record. In this case, the source element is *TX-00401-850*, and the destination element is *customers*:
If they do not display, verify that the test files were appropriately uploaded and that the connectors are connected in the flow canvas. See [Configure the Mapping](../mapping/mapping-config) in the [Mapping](../mapping/mapping) documentation for detailed instructions on how to use the mapping editor.
#### Understanding the XML Structures
Creating the right mapping relationships in the XML Map connector requires understanding how the source and destination structures are represented in XML.
There are two types of XML elements (nodes) in the structures. *Parent* and *Leaf* nodes define the hierarchical structure of XML data, where parent nodes group related elements and leaf nodes represent the actual data values to be mapped. Use the expand and collapse buttons next to a parent node to show or hide its leaves. See [Mapping Nodes](../mapping/mapping-config#mapping-nodes) for more information.
* In the 850 XML, each EDI *loop* and *segment* is a parent node. Each individual EDI *element* is a leaf node.
* In the CSV XML, each direct child of the root *Items* element is called a *record* element: it represents a distinct row in the CSV. Each *record* element is a parent node, and the children of *record* elements are all *column* elements: they each represent a single field or column of a record. Each *column* element is a leaf node.
In the XML Map connector, parent nodes can only be mapped to other parent nodes, and leaf nodes can only be mapped to other leaf nodes. The primary challenge when mapping EDI to CSV is to choose the correct *loop* or *segment* element (from the EDI source) to drag onto the *record* element (in the CSV destination). Then you can drag the EDI *element* nodes onto the *column* nodes to populate the CSV with specific values from the EDI document.
## Creating the Mapping
Once you configure the XML Map connector with the source and destination structures, create the mapping by dragging and dropping nodes in the designer.
Mappings are created in two primary steps:
1. Creating the Foreach looping relationships between parent nodes
2. Mapping values between leaf nodes in the established Foreach loops
See [Mapping Loops](../mapping/mapping-config#mapping-loops) for more details and other examples of working with loops.
### Creating Foreach Loops
Foreach relationships mean that each time an element appears in the source, a new XML structure should be created in the destination. For example, if *ElementA* in the source is mapped to *ElementB* in the destination, each occurrence of *ElementA* in an input file results in an instance of *ElementB* (and all of *ElementB*'s children) in the output file.
In this case (as described in the [Flattening a Purchase Order](#flattening-a-purchase-order) section), each line item in the source 850 should result in a new record in the destination CSV. To create this relationship, drag the **Source** element that represents a line item onto the **Destination** element that represents a CSV record. In this case, the source element is *TX-00401-850*, and the destination element is *customers*:
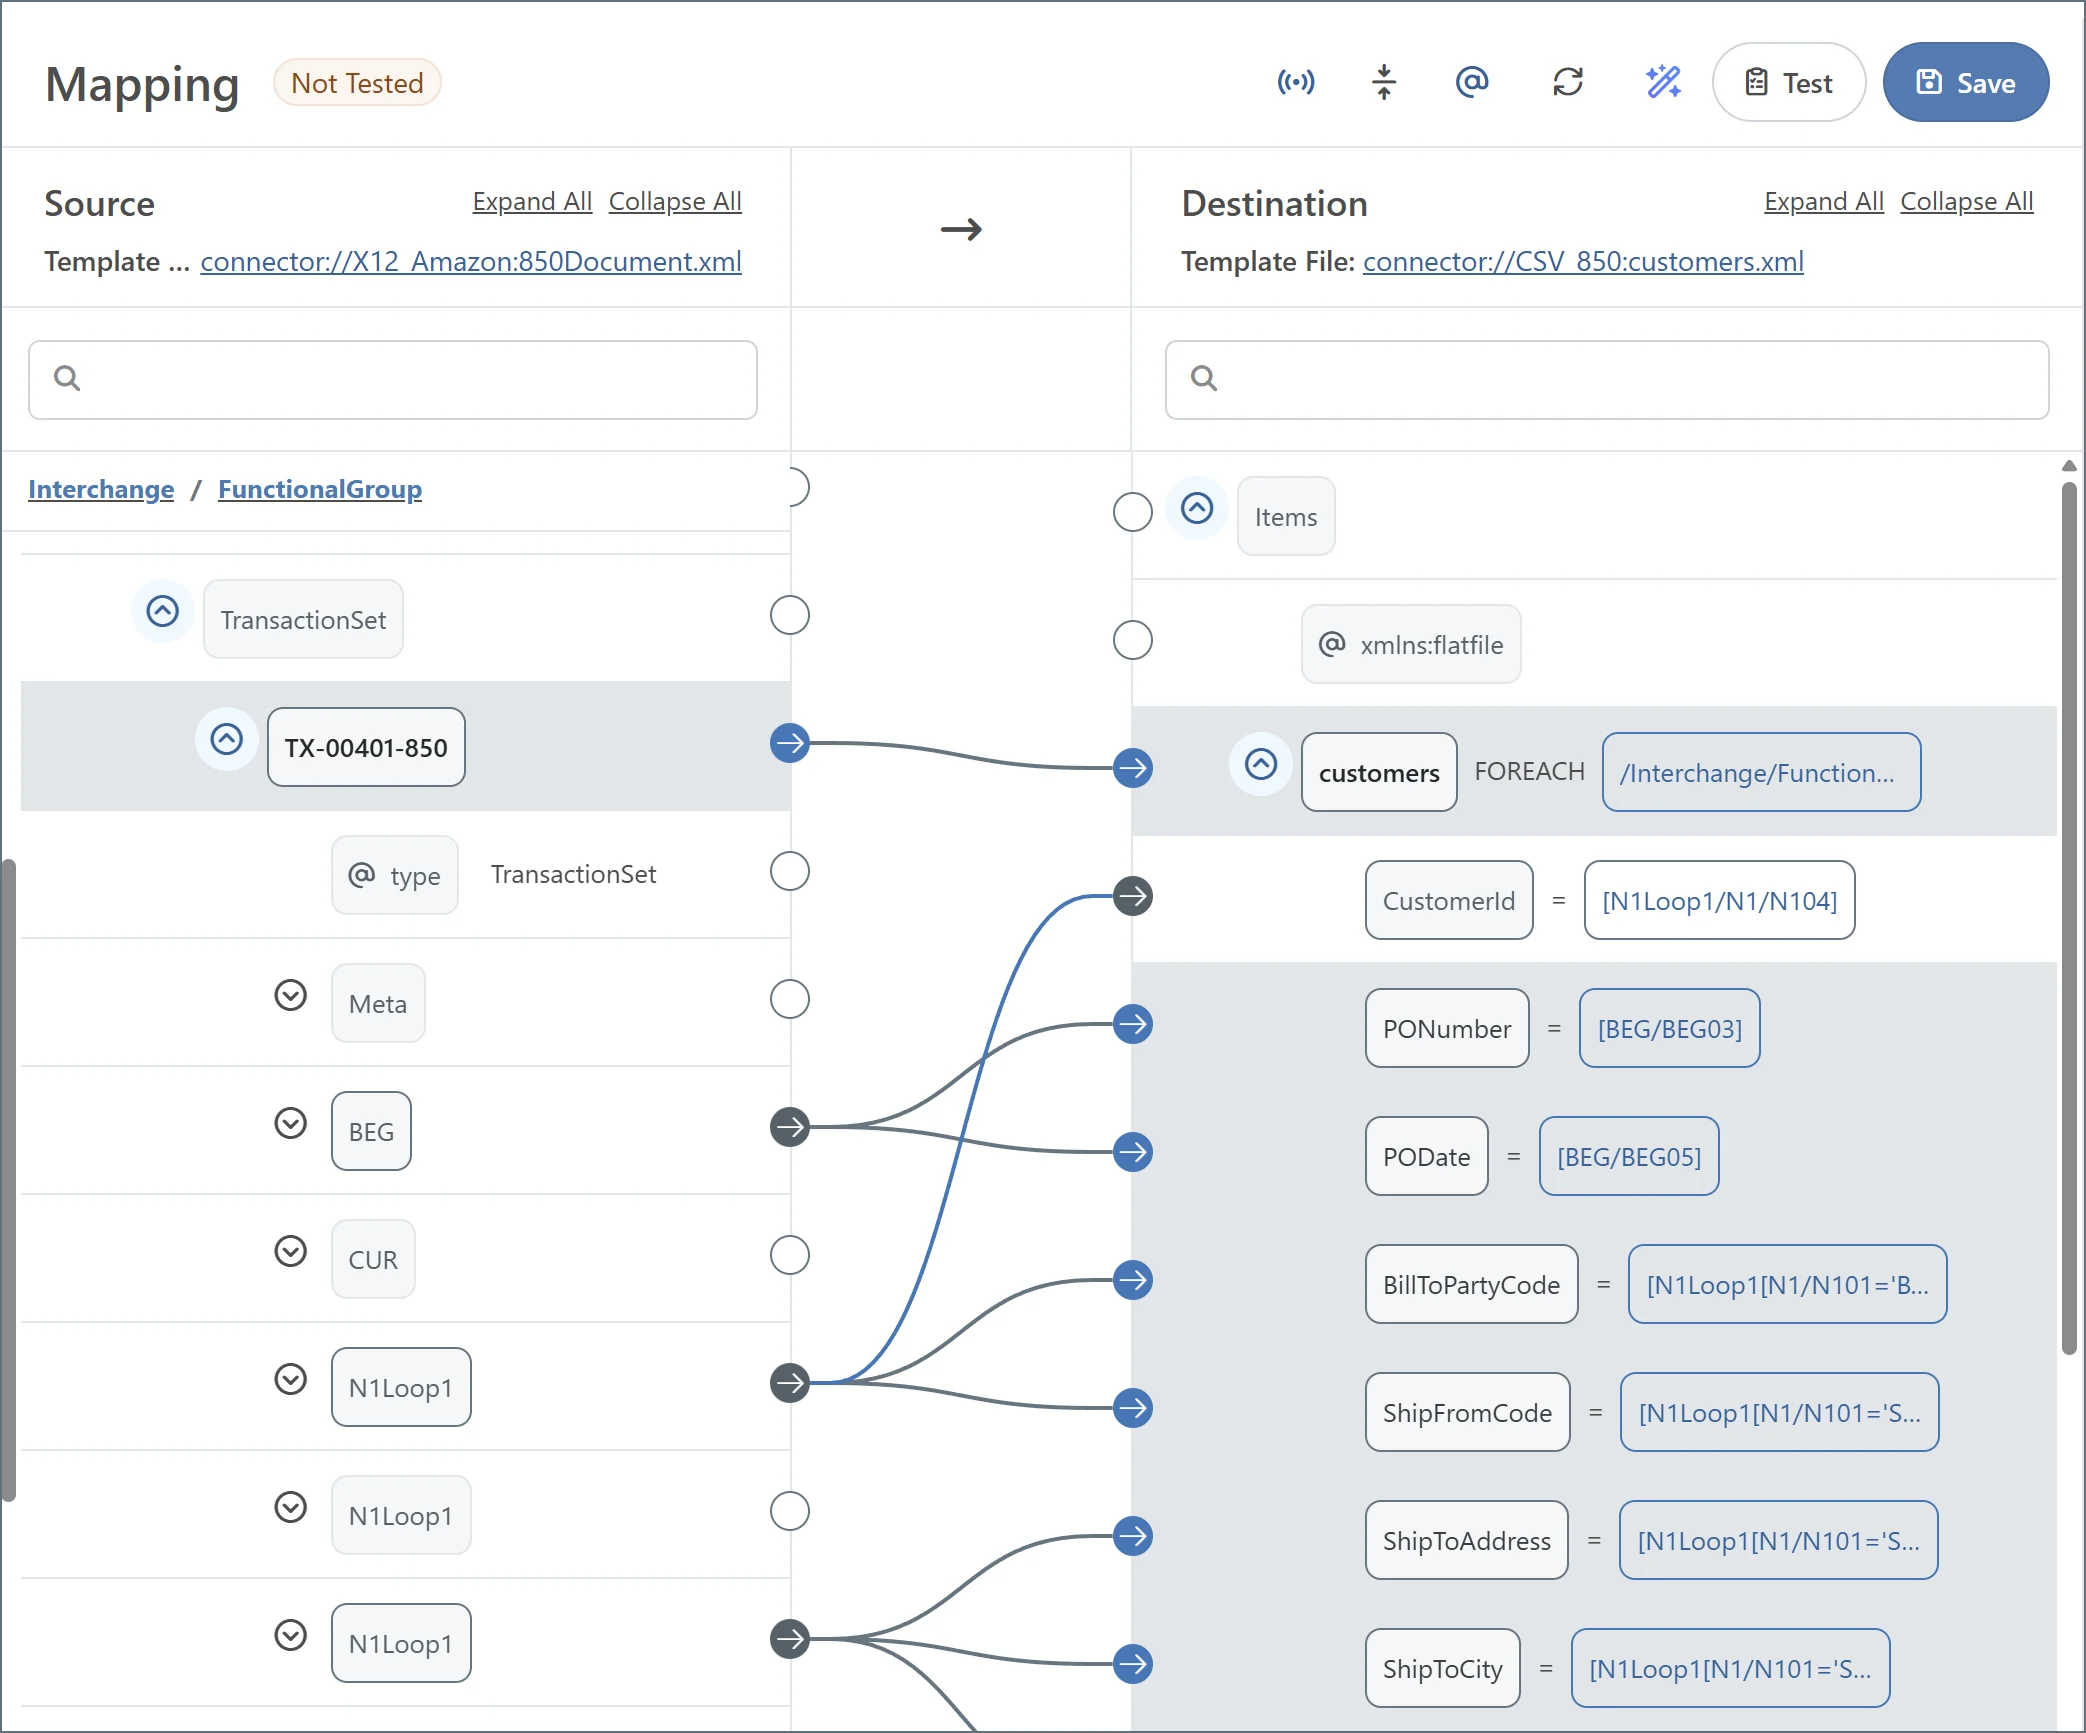 As shown in the previous image, the *customers* destination element displays the xpath from the source that maps to it. Every time the XML parser finds an element that matches the xpath in an input file, a new *customers* element is added to the output file (including all of the *customers* element's children, if any).
This Foreach loop is the only loop required for this mapping. Other mapping projects might require multiple loops, nested or otherwise.
### Mapping Leaf Nodes
Once the Foreach relationships have been established, you can map the values from leaf nodes in the loops. Mapping leaf nodes determine the values that populate the XML structures created by Foreach loops.
#### Simple Leaf Node Mappings
When a value from the source should be directly inserted in the resulting output, simply drag a leaf node from the source onto a leaf node in the destination to map the values. For example, the *BEG03* element holds the value for *PONumber*, which corresponds to the *PONumber* attribute in the destination:
As shown in the previous image, the *customers* destination element displays the xpath from the source that maps to it. Every time the XML parser finds an element that matches the xpath in an input file, a new *customers* element is added to the output file (including all of the *customers* element's children, if any).
This Foreach loop is the only loop required for this mapping. Other mapping projects might require multiple loops, nested or otherwise.
### Mapping Leaf Nodes
Once the Foreach relationships have been established, you can map the values from leaf nodes in the loops. Mapping leaf nodes determine the values that populate the XML structures created by Foreach loops.
#### Simple Leaf Node Mappings
When a value from the source should be directly inserted in the resulting output, simply drag a leaf node from the source onto a leaf node in the destination to map the values. For example, the *BEG03* element holds the value for *PONumber*, which corresponds to the *PONumber* attribute in the destination:
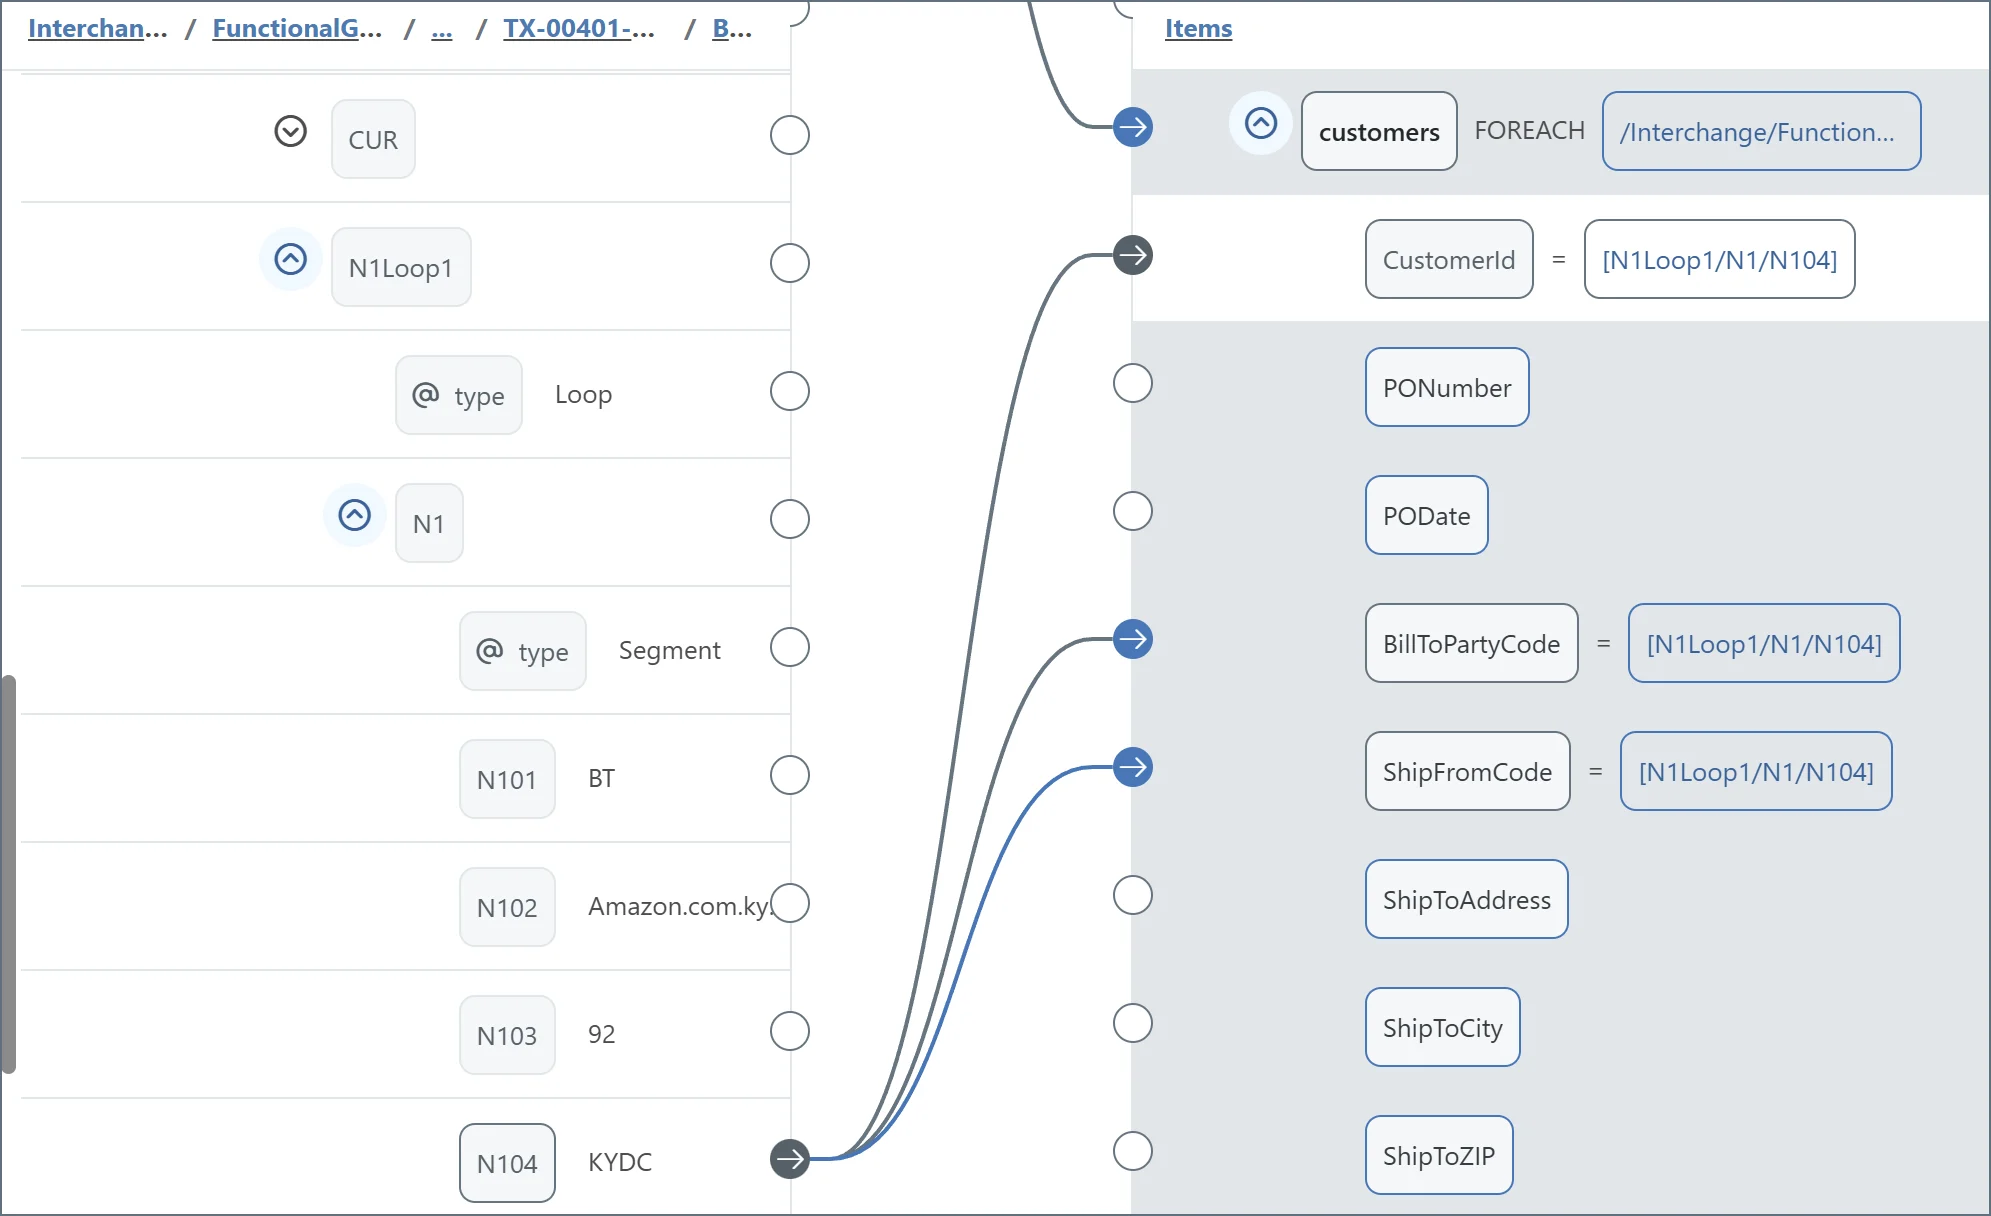 Then, hover over the mapped *BillToPartyCode* element and click the tablet and pencil icon to open the **Node Value** editor:
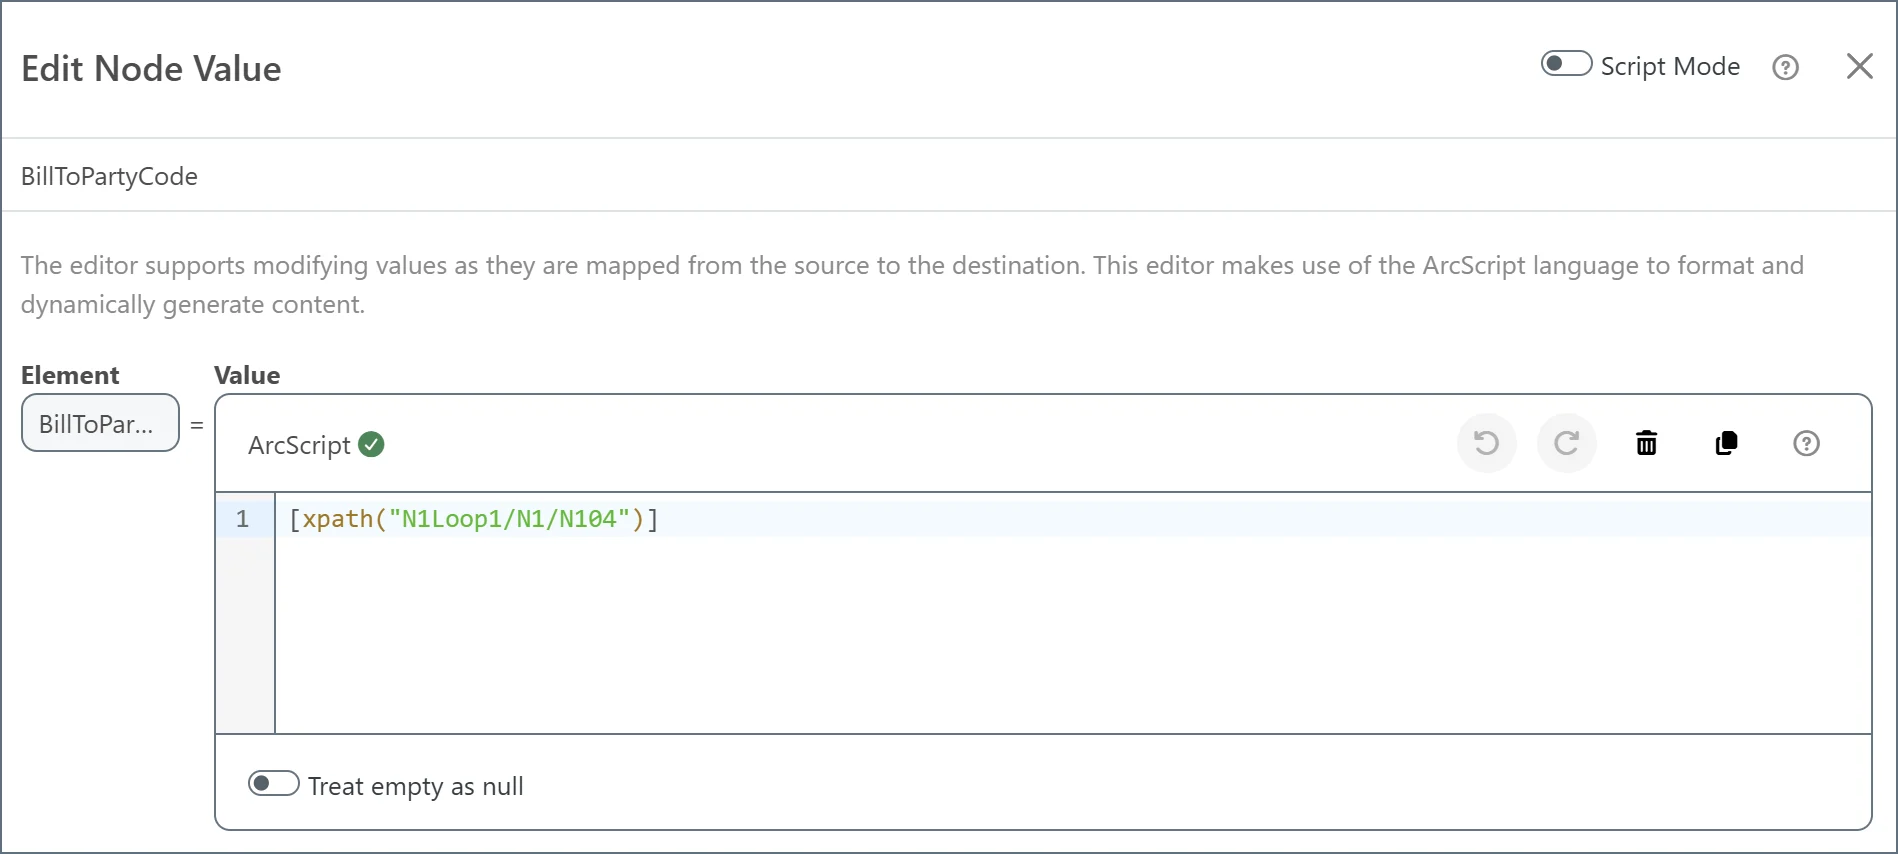 Notice that the current mapped xpath is *N1Loop1/N1/N104* and the xpath to look into is *N1Loop1/N1/N101*. Lookahead syntax is specified as follows:
* Find the element in the current xpath that is the closest parent of the element to look into (the *N1* element in this case)
* Specify in square brackets `[ ]` the xpath to the element to look into (`[N101]` in this case)
* Add an equals expression `=` to indicate the value the check this element against (`BT` in this case)
* Escape the square brackets with backslashes so that they are not evaluated as part of the xpath expression
The resulting Lookahead expression is shown below:
Notice that the current mapped xpath is *N1Loop1/N1/N104* and the xpath to look into is *N1Loop1/N1/N101*. Lookahead syntax is specified as follows:
* Find the element in the current xpath that is the closest parent of the element to look into (the *N1* element in this case)
* Specify in square brackets `[ ]` the xpath to the element to look into (`[N101]` in this case)
* Add an equals expression `=` to indicate the value the check this element against (`BT` in this case)
* Escape the square brackets with backslashes so that they are not evaluated as part of the xpath expression
The resulting Lookahead expression is shown below:
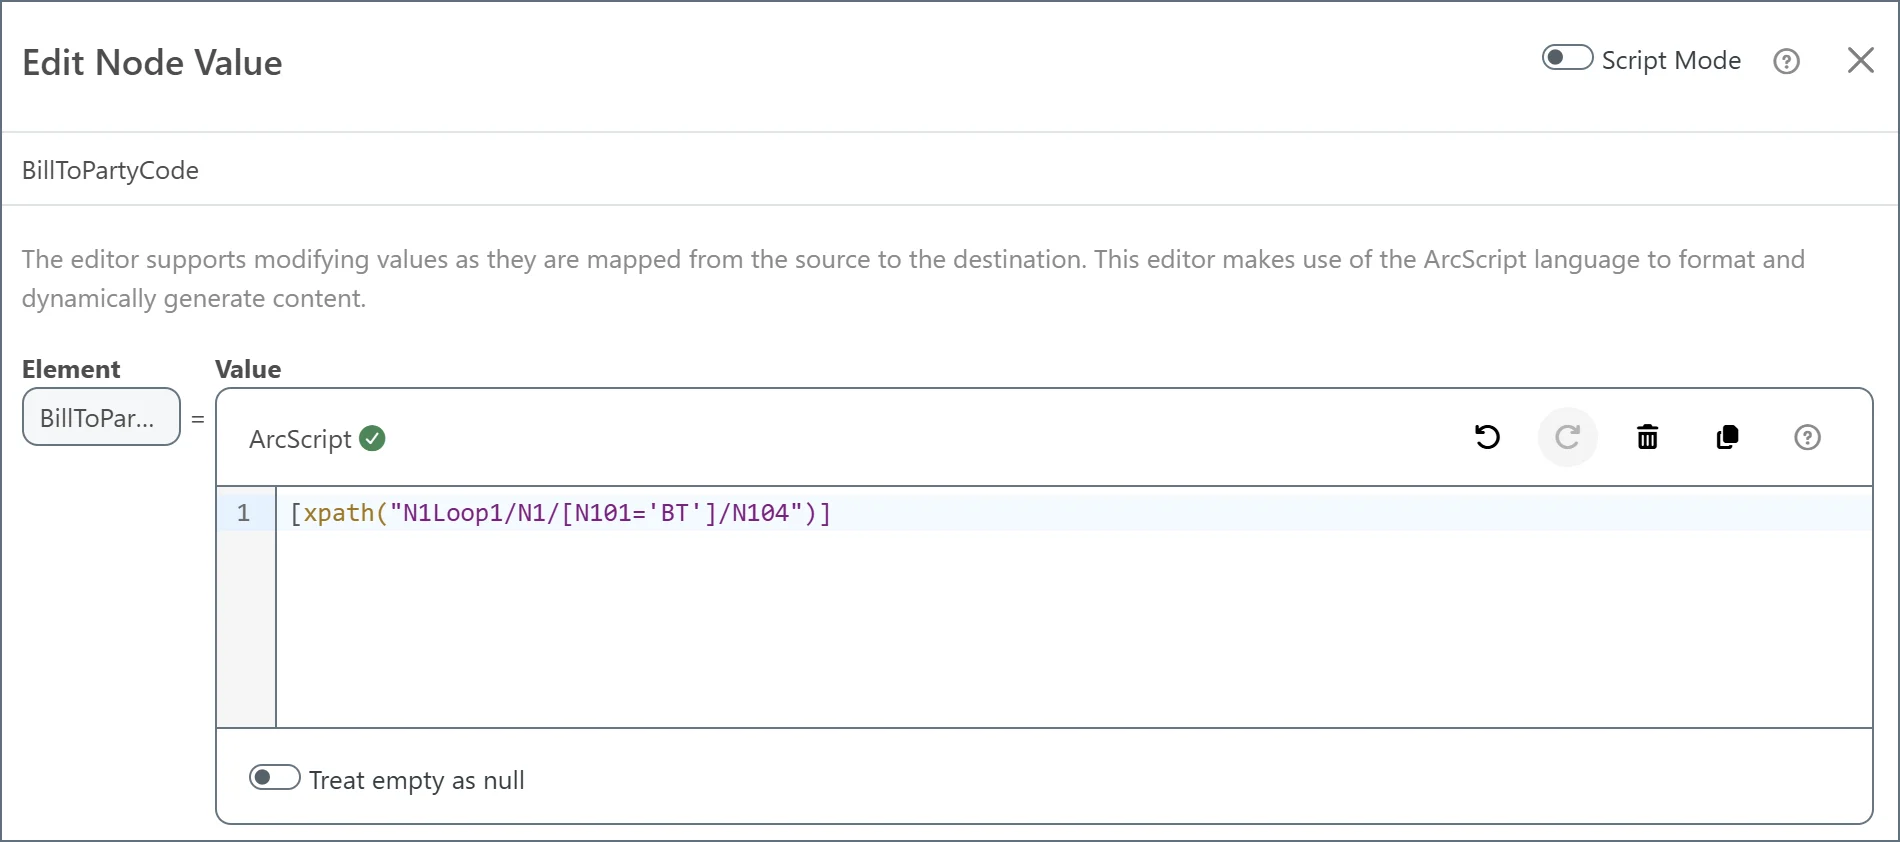 Repeat the same process for the rest of the destination elements.
#### Modifying and Calculating with the Node Value Editor
In addition to xpath manipulation, the Node Value editor supports [formatters](../scripting/value-formatters/formatters) that modify or manipulate values during a mapping. The *ItemTotalCost* element needs to be mapped to the total cost for the line item, which is not directly available in a source element but is easily calculated by multiplying the item quantity and the item price.
As a starting point, map an item price to the *ItemTotalCost* element and open the Node Value editor.
You can use the *multiply* formatter to multiply this starting value (the price per item) with the number of items. Formatter syntax works as follows:
* Sequences are contained in square brackets (as is already the case in the current *ItemTotalCost* expression)
* Sequences are evaluated from left to right
* Sequences are delimited by vertical pipe characters (for example, `[value | formatter1() | formatter2() | formatter3()]`)
Repeat the same process for the rest of the destination elements.
#### Modifying and Calculating with the Node Value Editor
In addition to xpath manipulation, the Node Value editor supports [formatters](../scripting/value-formatters/formatters) that modify or manipulate values during a mapping. The *ItemTotalCost* element needs to be mapped to the total cost for the line item, which is not directly available in a source element but is easily calculated by multiplying the item quantity and the item price.
As a starting point, map an item price to the *ItemTotalCost* element and open the Node Value editor.
You can use the *multiply* formatter to multiply this starting value (the price per item) with the number of items. Formatter syntax works as follows:
* Sequences are contained in square brackets (as is already the case in the current *ItemTotalCost* expression)
* Sequences are evaluated from left to right
* Sequences are delimited by vertical pipe characters (for example, `[value | formatter1() | formatter2() | formatter3()]`)
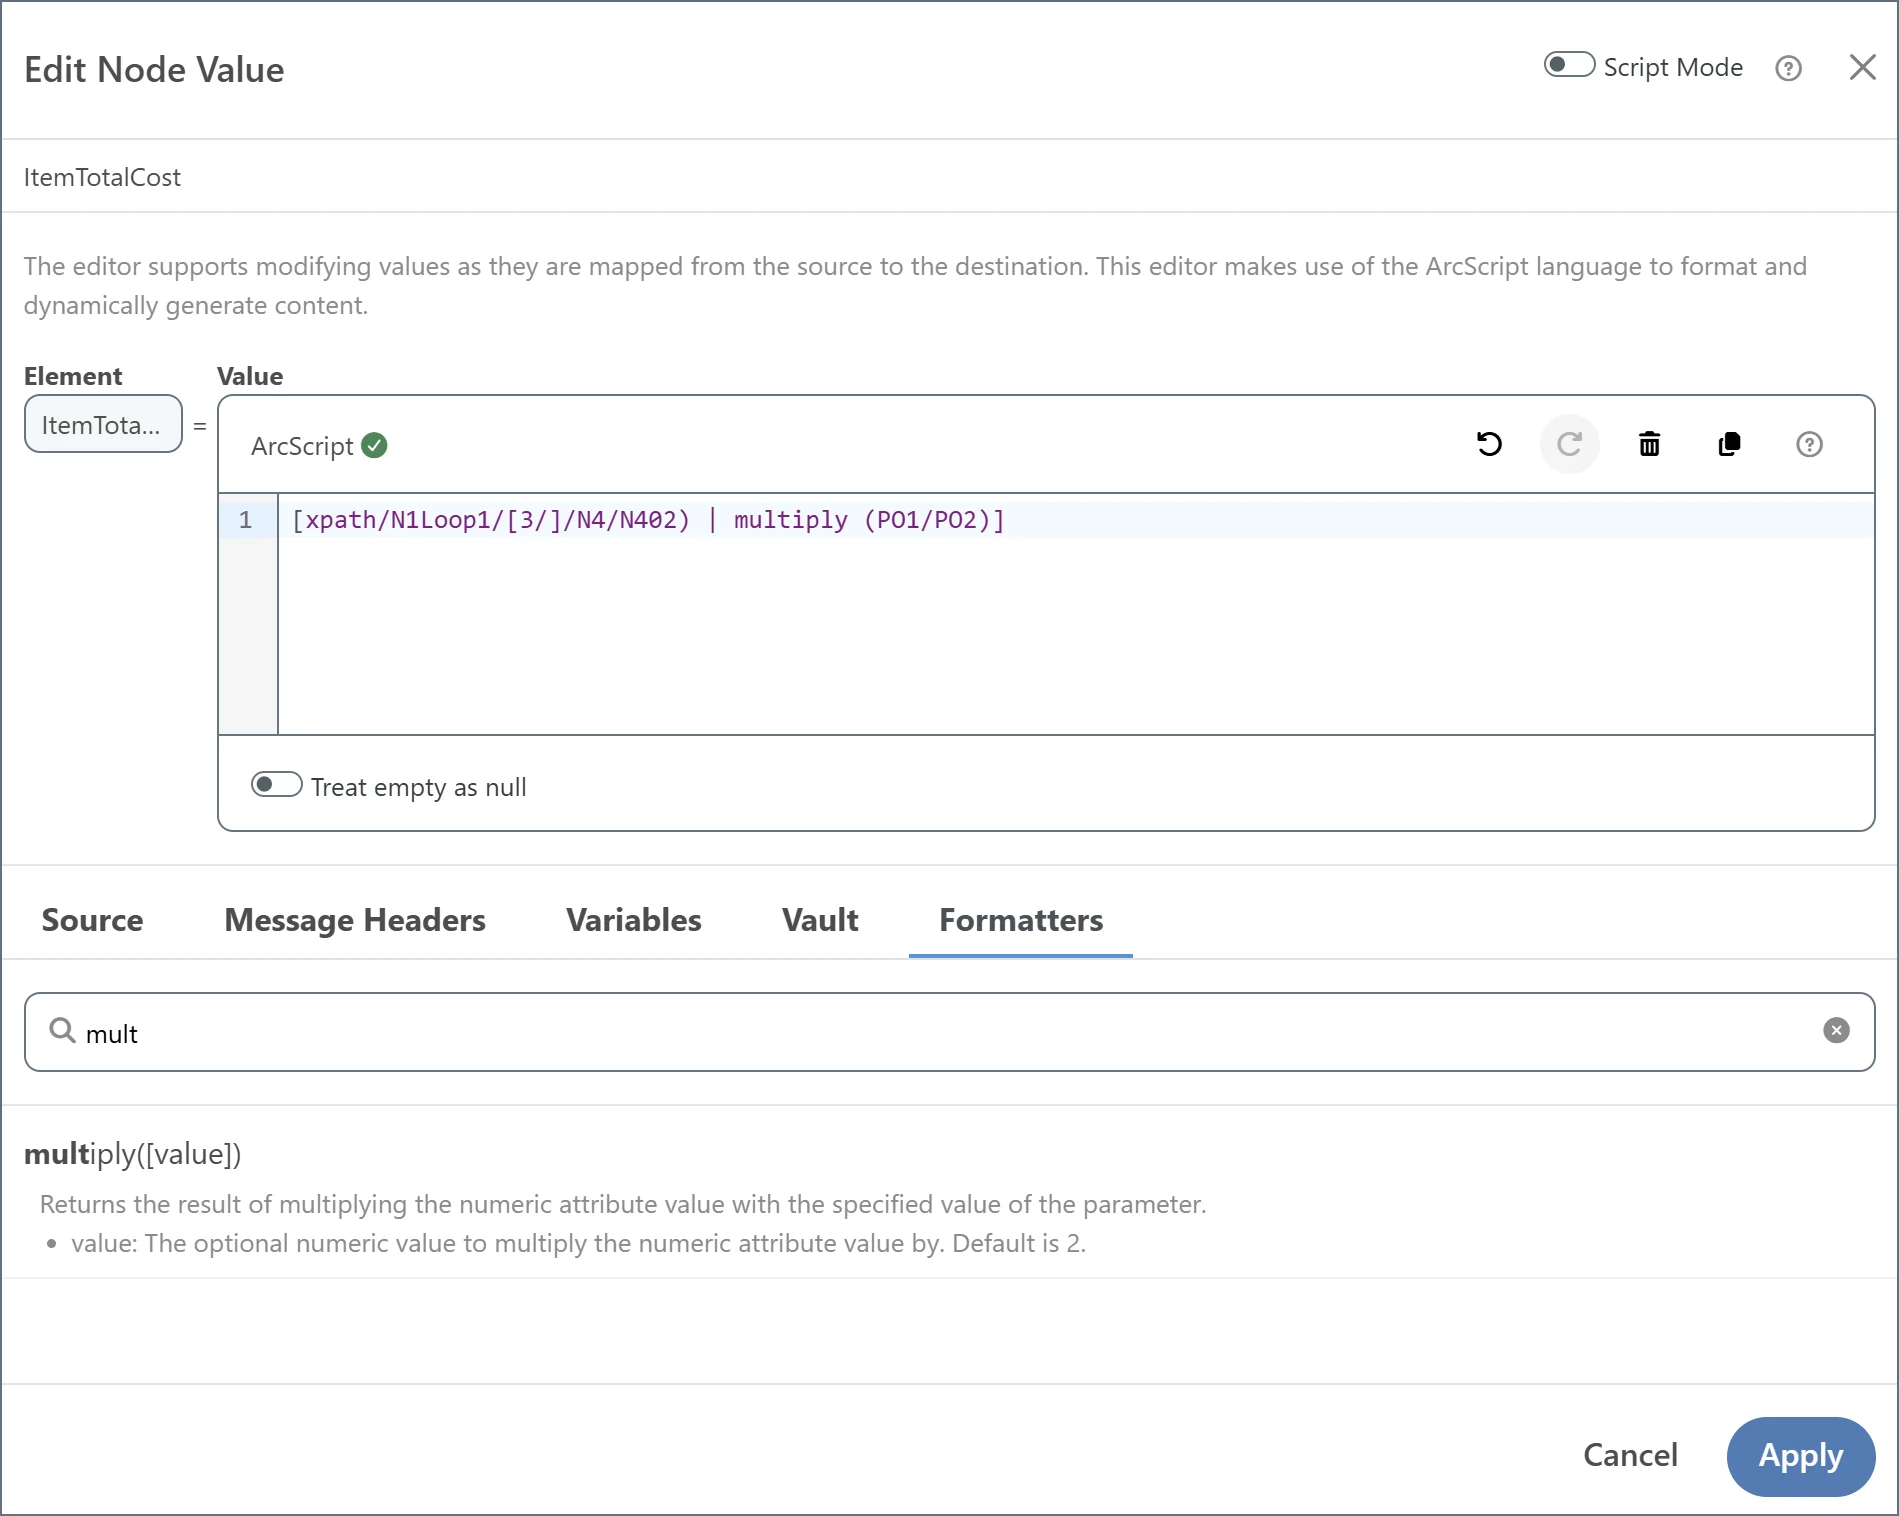 The resulting expression correctly calculates the total line item cost by multiplying the cost-per-item with the item quantity.
After saving the expression, the mapping is complete. Save your changes to the XML Map connector and you have configured the full flow.
## Sample Documents
The following sample data was used to make this guide.
### X12 850
```text theme={null}
ISA*00* *00* *ZZ*AMAZONDS *01*003025392 *160623*1448*U*00401*000000013*0*P*+~
GS*PO*AMAZONDS*ATFDS*20070911*2001*95*X*004010~
ST*850*0003~
BEG*00*DS*TesT0008516**20070805~
CUR*BT*USD~
N1*BT*Amazon.com.kydc,Inc.*92*KYDC~
N1*SF*WHSE*92*WHSE~
N1*ST*Charlie Dinkins~
N3*11254 Main St*Suite 112~
N4*Seattle*WA*98104*US*CC*United States~
TD5**92*UPS_GR_RES****ZZ*RES~
N1*LW*Amber Baker~
N3*123 Anderson Avenue~
N4*Seattle*WA*98103*US~
PO1*1*3*EA*18.04*NT*SK*1617*****BL*1*ZZ*Amazon.com~
PO1*2*2*EA*54.42*NT*SK*4927*****BL*1*ZZ*Amazon.com~
PO1*3*1*EA*18*NT*SK*9876*****BL*1*ZZ*Amazon.com~
CTT*3*6~
SE*15*0003~
GE*1*40~
IEA*1*000000040~
```
### CSV
```csv theme={null}
CustomerId,PONumber,PODate,BillToPartyCode,ShipFromCode,ShipToAddress,ShipToCity,ShipToZIP,LineItemNumber,ItemID,ItemQuantity,ItemPrice,ItemTotalCost
Sir Charles,128F195,20190805,AbRes,W22,2408 Creek St,Springfield,52213,1,BouncyRubberBall,4,2.49,9.96
Lady Jane,128F196,20190805,AbRes,W22,2408 Creek St,Springfield,52213,2,SquishyNerfBall,2,4.29,8.58
```
The resulting expression correctly calculates the total line item cost by multiplying the cost-per-item with the item quantity.
After saving the expression, the mapping is complete. Save your changes to the XML Map connector and you have configured the full flow.
## Sample Documents
The following sample data was used to make this guide.
### X12 850
```text theme={null}
ISA*00* *00* *ZZ*AMAZONDS *01*003025392 *160623*1448*U*00401*000000013*0*P*+~
GS*PO*AMAZONDS*ATFDS*20070911*2001*95*X*004010~
ST*850*0003~
BEG*00*DS*TesT0008516**20070805~
CUR*BT*USD~
N1*BT*Amazon.com.kydc,Inc.*92*KYDC~
N1*SF*WHSE*92*WHSE~
N1*ST*Charlie Dinkins~
N3*11254 Main St*Suite 112~
N4*Seattle*WA*98104*US*CC*United States~
TD5**92*UPS_GR_RES****ZZ*RES~
N1*LW*Amber Baker~
N3*123 Anderson Avenue~
N4*Seattle*WA*98103*US~
PO1*1*3*EA*18.04*NT*SK*1617*****BL*1*ZZ*Amazon.com~
PO1*2*2*EA*54.42*NT*SK*4927*****BL*1*ZZ*Amazon.com~
PO1*3*1*EA*18*NT*SK*9876*****BL*1*ZZ*Amazon.com~
CTT*3*6~
SE*15*0003~
GE*1*40~
IEA*1*000000040~
```
### CSV
```csv theme={null}
CustomerId,PONumber,PODate,BillToPartyCode,ShipFromCode,ShipToAddress,ShipToCity,ShipToZIP,LineItemNumber,ItemID,ItemQuantity,ItemPrice,ItemTotalCost
Sir Charles,128F195,20190805,AbRes,W22,2408 Creek St,Springfield,52213,1,BouncyRubberBall,4,2.49,9.96
Lady Jane,128F196,20190805,AbRes,W22,2408 Creek St,Springfield,52213,2,SquishyNerfBall,2,4.29,8.58
```