> ## Documentation Index
> Fetch the complete documentation index at: https://docs.arc.cdata.com/llms.txt
> Use this file to discover all available pages before exploring further.
# EDI Quick-Start with Excel
> Convert EDI documents to styled Excel spreadsheets and generate EDI from Excel using CData Arc's built-in templates.
export const siteNameShort = "Arc";
export const siteName = "CData Arc";
One of the fastest ways to get started with EDI integration is to visualize EDI documents in Excel spreadsheets. This EDI-to-Excel flow might be the precursor for a more complex EDI integration, or it might be a long-term solution for handling EDI documents in a familiar environment.
The {siteName} Excel connector comes with built-in templates for rendering EDI documents as styled Excel sheets, and for converting these Excel sheets into an EDI document. This guide explains how to quickly get started with EDI flows that use these templates and do not require any custom mappings or custom logic.
{siteNameShort} also includes powerful mapping tools to convert EDI data into many different formats. Use the following two *How-To* guides as references for more complex EDI mapping projects:
* [Map EDI to CSV](./edi850-csv)
* [Map MySQL Output to EDI](./mysql-edi810)
## Overview
This guide covers:
* Converting incoming EDI files into a styled Excel spreadsheet
* Generating new EDI documents by inserting data into Excel cells
This section contains a brief overview of the concepts involved, and the following sections walk through the process of creating a {siteNameShort} flow that accomplishes an EDI-Excel translation in both directions.
### Video Resources
Watch this short video for an introduction to how you can visualize EDI data in Excel using {siteNameShort}.
### EDI to Excel
The [Excel connector](../connectors/excel) comes pre-configured with a template Excel file that generates styled and formatted Excel sheets out of EDI XML. This template file is what allows EDI documents to be rendered in Excel without any custom configuration or mapping.
The Excel connector also supports generating test EDI XML files to immediately convert into a styled Excel sheet. The fastest way to get started visualizing EDI in Excel is to create a test Excel sheet using these two features:
* On the connector's **Settings** tab, set **Translation Type** to **Template**, then choose EDI\_XML\_to\_XLSX\_styled\_template.xlsx as the **Template File**
* On the **Transactions** tab, use **More > Create Test Files** to create two test files
* On the **Transactions** tab, click the link to the .xlsx files generated by the connector
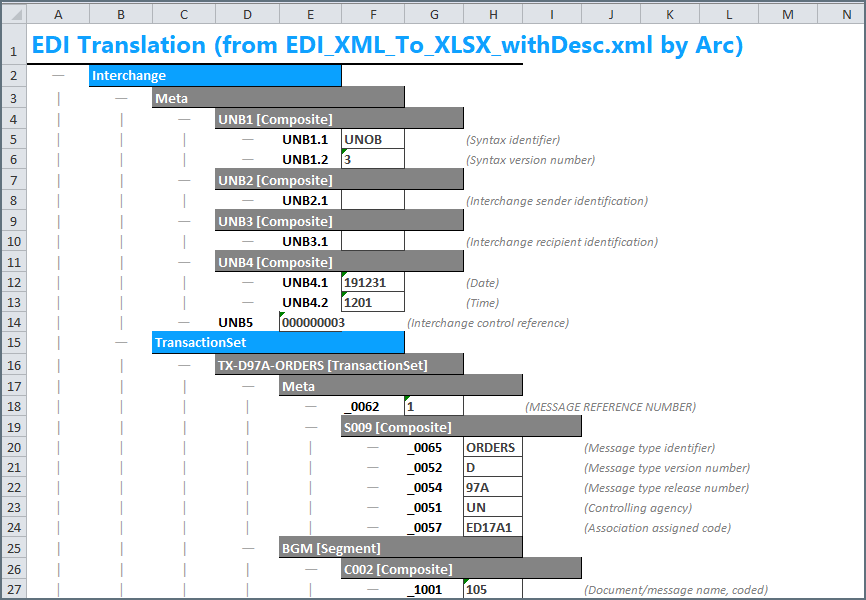
You cannot preview binary message content in {siteNameShort}, so click the download button on the message that appears, then open the files in Excel. The output should look similar to this:
The **Create Test Files** option is helpful for getting started quickly. However, it is often more useful to generate a styled Excel sheet from actual production EDI data rather than the test files included with the connector. To accomplish this, keep the **Template File** set to the EDI\_XML\_to\_XLSX\_styled\_template.xlsx file, but follow these additional steps to generate more relevant input files.
First, you need to convert sample EDI data to XML, because {siteNameShort} uses XML as the intermediary format for manipulating and transforming data. Converting a sample EDI document into XML requires an EDI connector that matches the type of EDI document you are converting (for example, the [X12](../connectors/x12) connector is for X12 documents and the [EDIFACT](../connectors/edifact) connector is for EDIFACT documents). In addition to converting EDI to and from XML, these connectors also validate the structure of the EDI document and can optionally validate the EDI interchange headers.
Once the EDI document has been converted to XML, upload it to the **Transactions** tab of the Excel connector. Remember, keep the template file set to EDI\_XML\_to\_XLSX\_styled\_template.xlsx, which converts the XML into a styled Excel sheet. You can view the converted file by downloading it from the **Transactions** tab.
See [Create an EDI to Excel Flow](#create-an-edi-to-excel-flow) for details on how to create a {siteNameShort} flow to generate Excel sheets out of custom EDI data.
### Excel to EDI
As mentioned above, the Excel connector includes a template file that converts EDI XML into a styled Excel spreadsheet. The connector also includes a template file that converts Excel spreadsheets in this style back into XML. This means that custom EDI data can be entered into the styled spreadsheet, converted to XML, then converted to an EDI document.
This can be an easy way to convert data into EDI; the relevant data is inserted into the appropriate Excel sheet and {siteNameShort} uses this to produce the EDI document.
Since the data should be entered into a styled Excel sheet that matches the Excel connector's template, the first step is to generate an Excel sheet in the appropriate format. The full process for generating EDI documents from an Excel sheet follows:
1. Begin with a sample EDI document
2. Convert the sample EDI document to XML (using something like an X12 or EDIFACT connector)
3. Convert the resulting XML to an Excel sheet using the template file included with the Excel connector (EDI\_XML\_to\_XLSX\_styled\_template.xlsx)
4. Save the generated Excel sheet with sample data (for example, sample\_excel.xlsx)
5. Replace the data in sample\_excel.xlsx with production data
6. Use the Excel connector's EDI\_XLSX\_to\_XML\_template.xml template file to convert the production spreadsheet back into XML
7. Convert the resulting XML into an EDI document (again using something like an X12 or EDIFACT connector)
8. For future EDI documents, reload the sample\_excel.xlsx file and repeat steps 5-7
The following sections detail how to create {siteNameShort} flows to convert EDI into Excel and vice versa.
## Create an EDI to Excel Flow
As mentioned in [EDI to Excel](#edi-to-excel), the first step in translating EDI into Excel is to convert the EDI into XML.
### Step 1: EDI Connector
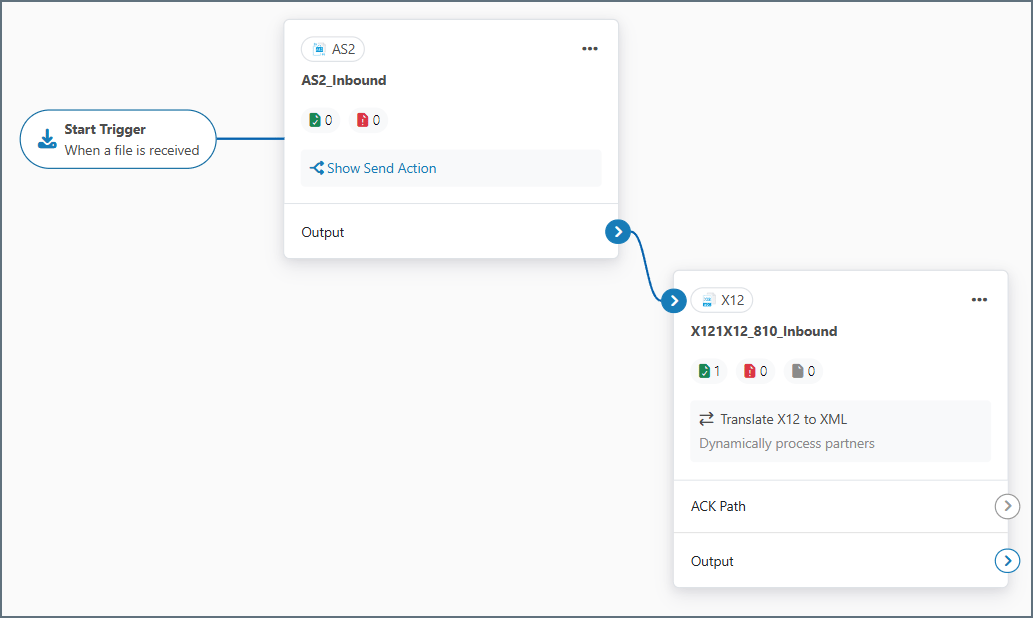
Converting an EDI document into XML requires a connector for the specific EDI document type ([X12](../connectors/x12), [EDIFACT](../connectors/edifact), [EANCOM](../connectors/eancom), and so on). This guide uses an X12 810 (invoice) as the EDI document. In front of the X12 connector is a trigger connector ([AS2](../connectors/as2) in the following example), which receives the X12 810 document and passes it directly to the X12 connector. However, your use case might require a different trigger connector, such as [SFTP](../connectors/sftp). See [Connector Categories](../connectors/connectors#categories) for more information on the types of connectors that might fit your use case.
In the [Interchange Settings](../connectors/x12#interchange-settings) section of the **Settings** tab of the X12 connector, set **Usage Indicator** to **T-Test Data**. This disables interchange validation and makes the process of generating a sample document easier (the corresponding field in EDIFACT-based connectors is **Test Indicator**, which should be enabled to replicate this behavior).
On the **Advanced** tab of the X12 connector, use the **Generate Description As** setting to determine whether descriptions of each EDI element should be generated in the resulting spreadsheet. The default value for this setting is **XML Comment**, and XML comments are *not* read by the Excel template, so descriptions do not appear in the styled Excel sheet. Change this setting to **Element Attribute** to have the template parse out the description values and include them in the resulting Excel sheet.
### Step 2: Excel Connector
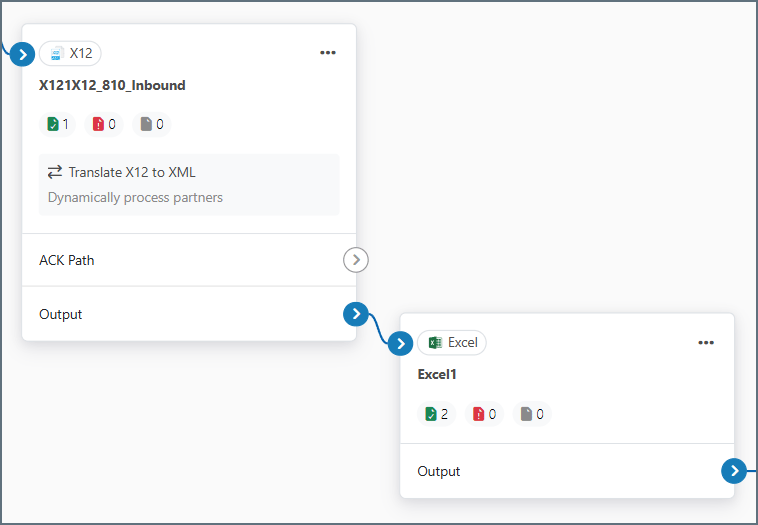
Next, connect the X12 connector to an Excel connector so that the XML files are passed along to the Excel connector.
Set the Excel **Template File** on the **Settings** tab to EDI\_XML\_to\_XLSX\_styled\_template.xlsx.
Add an instance of a terminal connector (not shown in the previous image) to serve as the final connector in the flow. A common terminal connector for this use case is a [File](../connectors/file) connector, which allows you to drop off the finished files to a path on disk. See [Connector Categories](../connectors/connectors#categories) for more information on the types of connectors that might fit your use case.
### Step 3: Testing the EDI to Excel Flow
Now you can send a sample EDI file through the flow. Generate a sample 810 document by clicking **More > Create Test Files** on the X12 connector **Transactions** tab.
You can generate sample 810, 850, 855, and 856 documents in the X12 connector. If you need other document types, you must upload them from somewhere else.
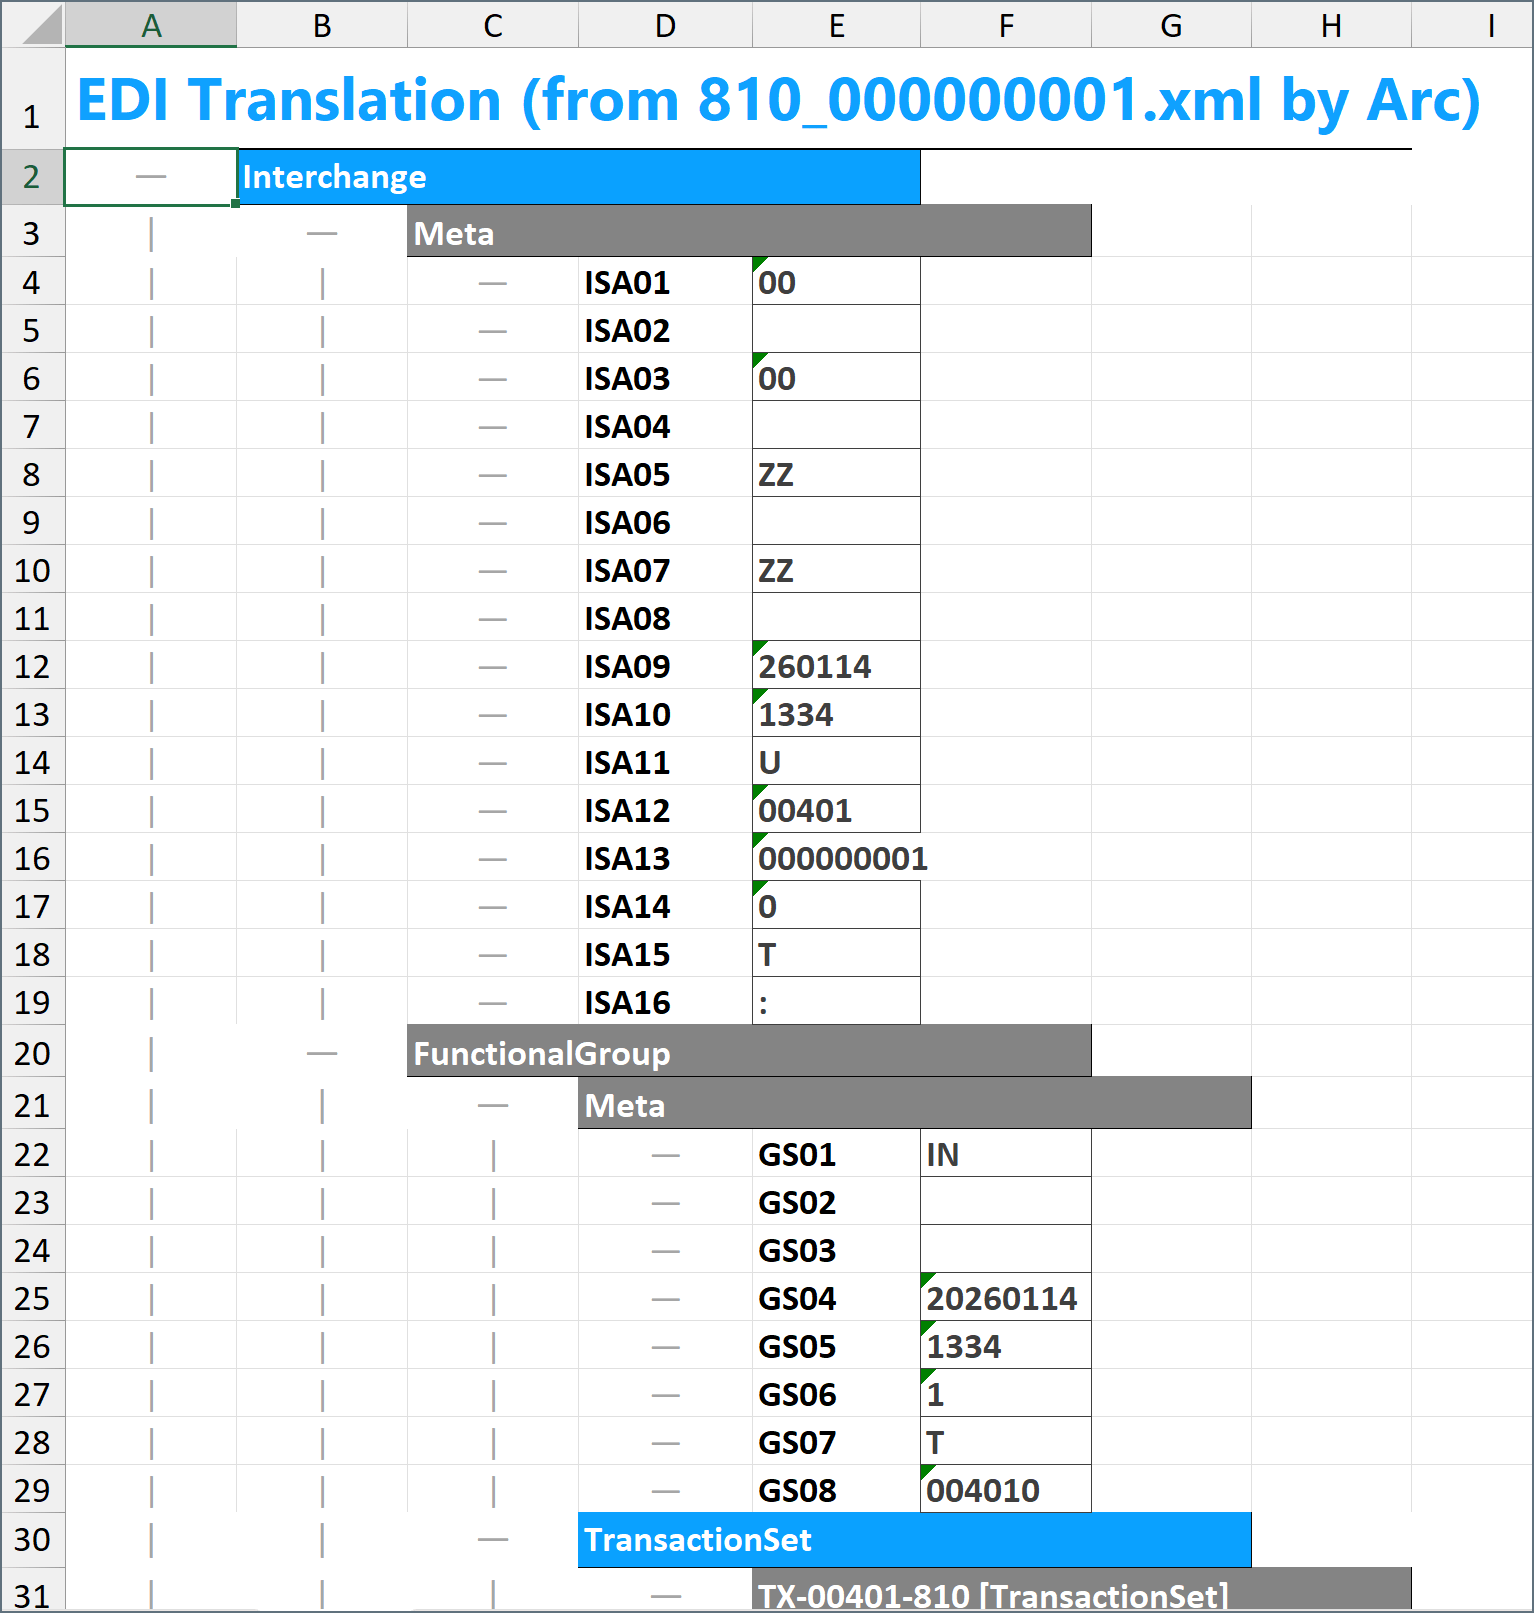
After you send the sample document through the flow, the output of the Excel connector should look similar to this:
You can now convert any standard X12 document to an Excel sheet styled like the image above by inputting the document into the start of this flow.
## Create an Excel to EDI Flow
As described in [Excel to EDI](#excel-to-edi), the first step in creating an Excel to EDI flow is to generate a sample Excel sheet. To generate this sheet, follow the steps in [Create an EDI to Excel Flow](#create-an-edi-to-excel-flow). The styled Excel sheet resulting from this flow functions as the sample Excel sheet. The following steps illustrate creating an X12 810 invoice file from an Excel sheet.
If you need multiple types of EDI documents (for example, an 810 invoice *and* an 850 purchase order), you need to create a sample Excel sheet for each document type.
After you generate the sample Excel sheet, you can configure the Excel-to-EDI flow. This flow is separate from but similar to the one described above.
### Step 1: Excel Connector
First, add an Excel connector to the flow. In front of the Excel connector is a trigger connector (File in the following example). Your use case might require a different trigger connector, such as SFTP. See [Connector Categories](../connectors/connectors#categories) for more information on the connector types.
On the Excel connector's **Settings** tab, set the **Template File** to EDI\_XLSX\_to\_XML\_template.xml.
### Step 2: EDI Connector
Next, connect the Excel connector to an X12 connector (other EDI flows might use EDIFACT or EANCOM connectors):
On the **Settings** tab, set the **Translation Type** to **XML to X12**. See the [X12 documentation](../connectors/x12) for more information. The X12 connector in this example is designed to be connected directly to a terminal connector. [AS2](../connectors/as2) is commonly used, but you can use other [MFT connectors](../connectors/mft-connectors) as well.
### Step 3: Testing the Excel to EDI Flow
Once this flow is configured, Excel documents that match the format of the sample Excel sheet can be passed through the flow to generate EDI documents. You can run a quick test by uploading the sample Excel sheet to the Excel connector. On the Excel connector **Transactions** tab, select **More > Upload Files** and browse to the sample sheet.
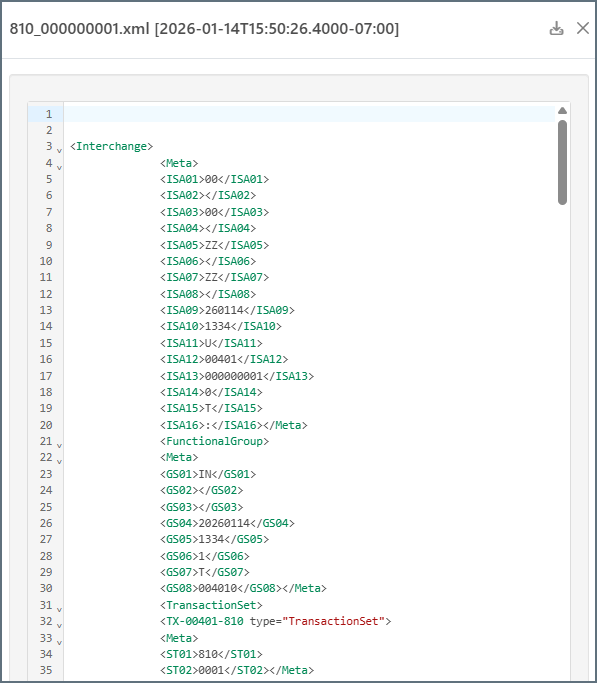
The Excel connector generates XML representing the EDI document. The following is a portion of the X12 810 document in XML:
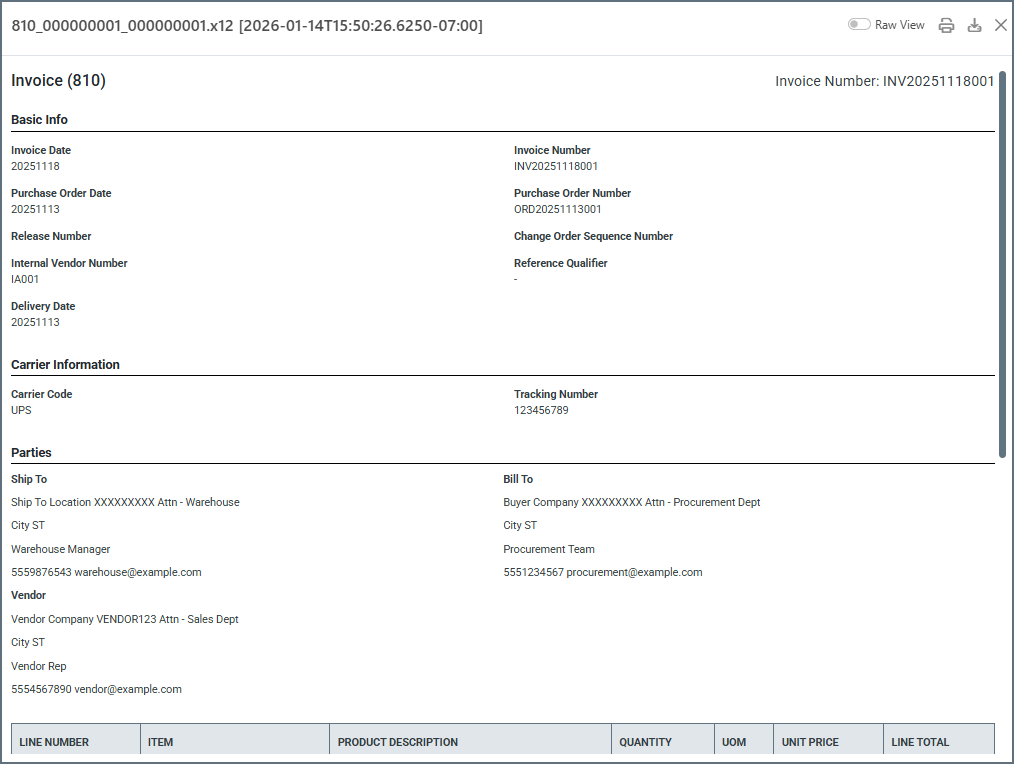
The X12 connector converts this XML into EDI format and applies interchange headers according to the **Interchange Settings** in the X12 connector. The final output should look similar to this (by default it opens in Print View, but you can use the **Raw View** toggle to see the raw data):
After you confirm that the flow converts the sample Excel sheet to your desired EDI format, you can replace the specific values in the Excel sheet with actual production data, and use the same flow to convert the production data to EDI.
#### Adjusting the Sample Excel Sheet
Some EDI documents require adding or removing rows from the sample Excel sheet. For example, an EDI purchase order might have varying numbers of line items (PO1 loops) that do not always match the number of line items (PO1 loops) in the sample Excel sheet.
In this situation, insert rows into the Excel sheet if you need more loops, or delete rows from the Excel sheet if you need fewer loops. This ensures that the spreadsheet structure matches the EDI document structure.
Since some EDI loops might need to be predictably added or removed, best practice is to start with a sample EDI document that contains *more* of the possible segments and loop repetitions, because removing rows from the sample Excel sheet is typically easier than adding new rows.
 The **Create Test Files** option is helpful for getting started quickly. However, it is often more useful to generate a styled Excel sheet from actual production EDI data rather than the test files included with the connector. To accomplish this, keep the **Template File** set to the EDI\_XML\_to\_XLSX\_styled\_template.xlsx file, but follow these additional steps to generate more relevant input files.
First, you need to convert sample EDI data to XML, because {siteNameShort} uses XML as the intermediary format for manipulating and transforming data. Converting a sample EDI document into XML requires an EDI connector that matches the type of EDI document you are converting (for example, the [X12](../connectors/x12) connector is for X12 documents and the [EDIFACT](../connectors/edifact) connector is for EDIFACT documents). In addition to converting EDI to and from XML, these connectors also validate the structure of the EDI document and can optionally validate the EDI interchange headers.
Once the EDI document has been converted to XML, upload it to the **Transactions** tab of the Excel connector. Remember, keep the template file set to EDI\_XML\_to\_XLSX\_styled\_template.xlsx, which converts the XML into a styled Excel sheet. You can view the converted file by downloading it from the **Transactions** tab.
See [Create an EDI to Excel Flow](#create-an-edi-to-excel-flow) for details on how to create a {siteNameShort} flow to generate Excel sheets out of custom EDI data.
### Excel to EDI
As mentioned above, the Excel connector includes a template file that converts EDI XML into a styled Excel spreadsheet. The connector also includes a template file that converts Excel spreadsheets in this style back into XML. This means that custom EDI data can be entered into the styled spreadsheet, converted to XML, then converted to an EDI document.
This can be an easy way to convert data into EDI; the relevant data is inserted into the appropriate Excel sheet and {siteNameShort} uses this to produce the EDI document.
Since the data should be entered into a styled Excel sheet that matches the Excel connector's template, the first step is to generate an Excel sheet in the appropriate format. The full process for generating EDI documents from an Excel sheet follows:
1. Begin with a sample EDI document
2. Convert the sample EDI document to XML (using something like an X12 or EDIFACT connector)
3. Convert the resulting XML to an Excel sheet using the template file included with the Excel connector (EDI\_XML\_to\_XLSX\_styled\_template.xlsx)
4. Save the generated Excel sheet with sample data (for example, sample\_excel.xlsx)
5. Replace the data in sample\_excel.xlsx with production data
6. Use the Excel connector's EDI\_XLSX\_to\_XML\_template.xml template file to convert the production spreadsheet back into XML
7. Convert the resulting XML into an EDI document (again using something like an X12 or EDIFACT connector)
8. For future EDI documents, reload the sample\_excel.xlsx file and repeat steps 5-7
The following sections detail how to create {siteNameShort} flows to convert EDI into Excel and vice versa.
## Create an EDI to Excel Flow
As mentioned in [EDI to Excel](#edi-to-excel), the first step in translating EDI into Excel is to convert the EDI into XML.
### Step 1: EDI Connector
Converting an EDI document into XML requires a connector for the specific EDI document type ([X12](../connectors/x12), [EDIFACT](../connectors/edifact), [EANCOM](../connectors/eancom), and so on). This guide uses an X12 810 (invoice) as the EDI document. In front of the X12 connector is a trigger connector ([AS2](../connectors/as2) in the following example), which receives the X12 810 document and passes it directly to the X12 connector. However, your use case might require a different trigger connector, such as [SFTP](../connectors/sftp). See [Connector Categories](../connectors/connectors#categories) for more information on the types of connectors that might fit your use case.
The **Create Test Files** option is helpful for getting started quickly. However, it is often more useful to generate a styled Excel sheet from actual production EDI data rather than the test files included with the connector. To accomplish this, keep the **Template File** set to the EDI\_XML\_to\_XLSX\_styled\_template.xlsx file, but follow these additional steps to generate more relevant input files.
First, you need to convert sample EDI data to XML, because {siteNameShort} uses XML as the intermediary format for manipulating and transforming data. Converting a sample EDI document into XML requires an EDI connector that matches the type of EDI document you are converting (for example, the [X12](../connectors/x12) connector is for X12 documents and the [EDIFACT](../connectors/edifact) connector is for EDIFACT documents). In addition to converting EDI to and from XML, these connectors also validate the structure of the EDI document and can optionally validate the EDI interchange headers.
Once the EDI document has been converted to XML, upload it to the **Transactions** tab of the Excel connector. Remember, keep the template file set to EDI\_XML\_to\_XLSX\_styled\_template.xlsx, which converts the XML into a styled Excel sheet. You can view the converted file by downloading it from the **Transactions** tab.
See [Create an EDI to Excel Flow](#create-an-edi-to-excel-flow) for details on how to create a {siteNameShort} flow to generate Excel sheets out of custom EDI data.
### Excel to EDI
As mentioned above, the Excel connector includes a template file that converts EDI XML into a styled Excel spreadsheet. The connector also includes a template file that converts Excel spreadsheets in this style back into XML. This means that custom EDI data can be entered into the styled spreadsheet, converted to XML, then converted to an EDI document.
This can be an easy way to convert data into EDI; the relevant data is inserted into the appropriate Excel sheet and {siteNameShort} uses this to produce the EDI document.
Since the data should be entered into a styled Excel sheet that matches the Excel connector's template, the first step is to generate an Excel sheet in the appropriate format. The full process for generating EDI documents from an Excel sheet follows:
1. Begin with a sample EDI document
2. Convert the sample EDI document to XML (using something like an X12 or EDIFACT connector)
3. Convert the resulting XML to an Excel sheet using the template file included with the Excel connector (EDI\_XML\_to\_XLSX\_styled\_template.xlsx)
4. Save the generated Excel sheet with sample data (for example, sample\_excel.xlsx)
5. Replace the data in sample\_excel.xlsx with production data
6. Use the Excel connector's EDI\_XLSX\_to\_XML\_template.xml template file to convert the production spreadsheet back into XML
7. Convert the resulting XML into an EDI document (again using something like an X12 or EDIFACT connector)
8. For future EDI documents, reload the sample\_excel.xlsx file and repeat steps 5-7
The following sections detail how to create {siteNameShort} flows to convert EDI into Excel and vice versa.
## Create an EDI to Excel Flow
As mentioned in [EDI to Excel](#edi-to-excel), the first step in translating EDI into Excel is to convert the EDI into XML.
### Step 1: EDI Connector
Converting an EDI document into XML requires a connector for the specific EDI document type ([X12](../connectors/x12), [EDIFACT](../connectors/edifact), [EANCOM](../connectors/eancom), and so on). This guide uses an X12 810 (invoice) as the EDI document. In front of the X12 connector is a trigger connector ([AS2](../connectors/as2) in the following example), which receives the X12 810 document and passes it directly to the X12 connector. However, your use case might require a different trigger connector, such as [SFTP](../connectors/sftp). See [Connector Categories](../connectors/connectors#categories) for more information on the types of connectors that might fit your use case.
 In the [Interchange Settings](../connectors/x12#interchange-settings) section of the **Settings** tab of the X12 connector, set **Usage Indicator** to **T-Test Data**. This disables interchange validation and makes the process of generating a sample document easier (the corresponding field in EDIFACT-based connectors is **Test Indicator**, which should be enabled to replicate this behavior).
On the **Advanced** tab of the X12 connector, use the **Generate Description As** setting to determine whether descriptions of each EDI element should be generated in the resulting spreadsheet. The default value for this setting is **XML Comment**, and XML comments are *not* read by the Excel template, so descriptions do not appear in the styled Excel sheet. Change this setting to **Element Attribute** to have the template parse out the description values and include them in the resulting Excel sheet.
### Step 2: Excel Connector
Next, connect the X12 connector to an Excel connector so that the XML files are passed along to the Excel connector.
In the [Interchange Settings](../connectors/x12#interchange-settings) section of the **Settings** tab of the X12 connector, set **Usage Indicator** to **T-Test Data**. This disables interchange validation and makes the process of generating a sample document easier (the corresponding field in EDIFACT-based connectors is **Test Indicator**, which should be enabled to replicate this behavior).
On the **Advanced** tab of the X12 connector, use the **Generate Description As** setting to determine whether descriptions of each EDI element should be generated in the resulting spreadsheet. The default value for this setting is **XML Comment**, and XML comments are *not* read by the Excel template, so descriptions do not appear in the styled Excel sheet. Change this setting to **Element Attribute** to have the template parse out the description values and include them in the resulting Excel sheet.
### Step 2: Excel Connector
Next, connect the X12 connector to an Excel connector so that the XML files are passed along to the Excel connector.
 Set the Excel **Template File** on the **Settings** tab to EDI\_XML\_to\_XLSX\_styled\_template.xlsx.
Add an instance of a terminal connector (not shown in the previous image) to serve as the final connector in the flow. A common terminal connector for this use case is a [File](../connectors/file) connector, which allows you to drop off the finished files to a path on disk. See [Connector Categories](../connectors/connectors#categories) for more information on the types of connectors that might fit your use case.
### Step 3: Testing the EDI to Excel Flow
Now you can send a sample EDI file through the flow. Generate a sample 810 document by clicking **More > Create Test Files** on the X12 connector **Transactions** tab.
Set the Excel **Template File** on the **Settings** tab to EDI\_XML\_to\_XLSX\_styled\_template.xlsx.
Add an instance of a terminal connector (not shown in the previous image) to serve as the final connector in the flow. A common terminal connector for this use case is a [File](../connectors/file) connector, which allows you to drop off the finished files to a path on disk. See [Connector Categories](../connectors/connectors#categories) for more information on the types of connectors that might fit your use case.
### Step 3: Testing the EDI to Excel Flow
Now you can send a sample EDI file through the flow. Generate a sample 810 document by clicking **More > Create Test Files** on the X12 connector **Transactions** tab.
 You can now convert any standard X12 document to an Excel sheet styled like the image above by inputting the document into the start of this flow.
## Create an Excel to EDI Flow
As described in [Excel to EDI](#excel-to-edi), the first step in creating an Excel to EDI flow is to generate a sample Excel sheet. To generate this sheet, follow the steps in [Create an EDI to Excel Flow](#create-an-edi-to-excel-flow). The styled Excel sheet resulting from this flow functions as the sample Excel sheet. The following steps illustrate creating an X12 810 invoice file from an Excel sheet.
You can now convert any standard X12 document to an Excel sheet styled like the image above by inputting the document into the start of this flow.
## Create an Excel to EDI Flow
As described in [Excel to EDI](#excel-to-edi), the first step in creating an Excel to EDI flow is to generate a sample Excel sheet. To generate this sheet, follow the steps in [Create an EDI to Excel Flow](#create-an-edi-to-excel-flow). The styled Excel sheet resulting from this flow functions as the sample Excel sheet. The following steps illustrate creating an X12 810 invoice file from an Excel sheet.
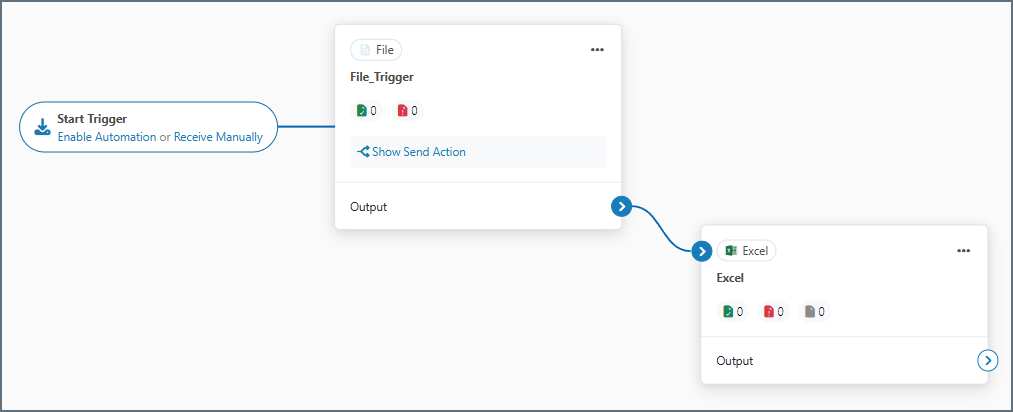 On the Excel connector's **Settings** tab, set the **Template File** to EDI\_XLSX\_to\_XML\_template.xml.
### Step 2: EDI Connector
Next, connect the Excel connector to an X12 connector (other EDI flows might use EDIFACT or EANCOM connectors):
On the Excel connector's **Settings** tab, set the **Template File** to EDI\_XLSX\_to\_XML\_template.xml.
### Step 2: EDI Connector
Next, connect the Excel connector to an X12 connector (other EDI flows might use EDIFACT or EANCOM connectors):
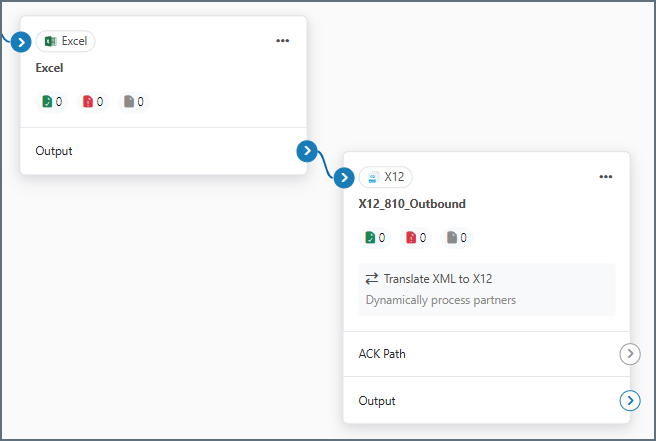 On the **Settings** tab, set the **Translation Type** to **XML to X12**. See the [X12 documentation](../connectors/x12) for more information. The X12 connector in this example is designed to be connected directly to a terminal connector. [AS2](../connectors/as2) is commonly used, but you can use other [MFT connectors](../connectors/mft-connectors) as well.
### Step 3: Testing the Excel to EDI Flow
Once this flow is configured, Excel documents that match the format of the sample Excel sheet can be passed through the flow to generate EDI documents. You can run a quick test by uploading the sample Excel sheet to the Excel connector. On the Excel connector **Transactions** tab, select **More > Upload Files** and browse to the sample sheet.
The Excel connector generates XML representing the EDI document. The following is a portion of the X12 810 document in XML:
On the **Settings** tab, set the **Translation Type** to **XML to X12**. See the [X12 documentation](../connectors/x12) for more information. The X12 connector in this example is designed to be connected directly to a terminal connector. [AS2](../connectors/as2) is commonly used, but you can use other [MFT connectors](../connectors/mft-connectors) as well.
### Step 3: Testing the Excel to EDI Flow
Once this flow is configured, Excel documents that match the format of the sample Excel sheet can be passed through the flow to generate EDI documents. You can run a quick test by uploading the sample Excel sheet to the Excel connector. On the Excel connector **Transactions** tab, select **More > Upload Files** and browse to the sample sheet.
The Excel connector generates XML representing the EDI document. The following is a portion of the X12 810 document in XML:
 The X12 connector converts this XML into EDI format and applies interchange headers according to the **Interchange Settings** in the X12 connector. The final output should look similar to this (by default it opens in Print View, but you can use the **Raw View** toggle to see the raw data):
 After you confirm that the flow converts the sample Excel sheet to your desired EDI format, you can replace the specific values in the Excel sheet with actual production data, and use the same flow to convert the production data to EDI.
#### Adjusting the Sample Excel Sheet
Some EDI documents require adding or removing rows from the sample Excel sheet. For example, an EDI purchase order might have varying numbers of line items (PO1 loops) that do not always match the number of line items (PO1 loops) in the sample Excel sheet.
In this situation, insert rows into the Excel sheet if you need more loops, or delete rows from the Excel sheet if you need fewer loops. This ensures that the spreadsheet structure matches the EDI document structure.
Since some EDI loops might need to be predictably added or removed, best practice is to start with a sample EDI document that contains *more* of the possible segments and loop repetitions, because removing rows from the sample Excel sheet is typically easier than adding new rows.
After you confirm that the flow converts the sample Excel sheet to your desired EDI format, you can replace the specific values in the Excel sheet with actual production data, and use the same flow to convert the production data to EDI.
#### Adjusting the Sample Excel Sheet
Some EDI documents require adding or removing rows from the sample Excel sheet. For example, an EDI purchase order might have varying numbers of line items (PO1 loops) that do not always match the number of line items (PO1 loops) in the sample Excel sheet.
In this situation, insert rows into the Excel sheet if you need more loops, or delete rows from the Excel sheet if you need fewer loops. This ensures that the spreadsheet structure matches the EDI document structure.
Since some EDI loops might need to be predictably added or removed, best practice is to start with a sample EDI document that contains *more* of the possible segments and loop repetitions, because removing rows from the sample Excel sheet is typically easier than adding new rows.