> ## Documentation Index
> Fetch the complete documentation index at: https://docs.arc.cdata.com/llms.txt
> Use this file to discover all available pages before exploring further.
# GISB Connector
> Configuration and usage guide for the CData Arc GISB connector, which supports sending and receiving messages using the Gas Industry Standards Board (GISB) protocol.
export const TlsClientAuthentication = () => <>
Settings related to client authentication when two-way TLS authentication is required.
| Setting | Description |
|---|
| Private Certificate |
The private certificate presented during TLS client authentication. |
| Certificate Password |
The password required to access the TLS client certificate. |
;
export const CommonProxySettings = () => <>
These are a collection of settings that identify and authenticate to the proxy through which the connection should be routed. By default, this section uses the global settings on the Proxy Settings portion of the Security Settings page. Clear the checkbox to supply settings specific to your connector.
| Setting | Description |
|---|
| Proxy Type |
The protocol used by a proxy-based firewall. |
| Proxy Host |
The name or IP address of a proxy-based firewall. |
| Proxy Port |
The TCP port for a proxy-based firewall. |
| Proxy User |
The user name to use to authenticate with a proxy-based firewall. |
| Proxy Password |
A password used to authenticate to a proxy-based firewall. |
| Authentication Scheme |
Leave the default None or choose from one of the following authentication schemes: Basic, Digest, Proprietary, or NTLM. |
;
export const SlasTab = ({siteName = "CData Arc"}) => <>
Settings related to configuring Service Level Agreements (SLAs).
SLAs enable you to configure the volume you expect connectors in your flow to send or receive, and to set the time frame in which you expect that volume to be met. {siteName} sends emails to warn the user when an SLA is not met, and marks the SLA as At Risk, which means that if the SLA is not met soon, it will be marked as Violated. This gives the user an opportunity to step in and determine the reasons the SLA is not being met, and to take appropriate actions. If the SLA is still not met at the end of the at-risk time period, the SLA is marked as violated, and the user is notified again.
To define an SLA, toggle Expected Volume on, then click the Settings tab.
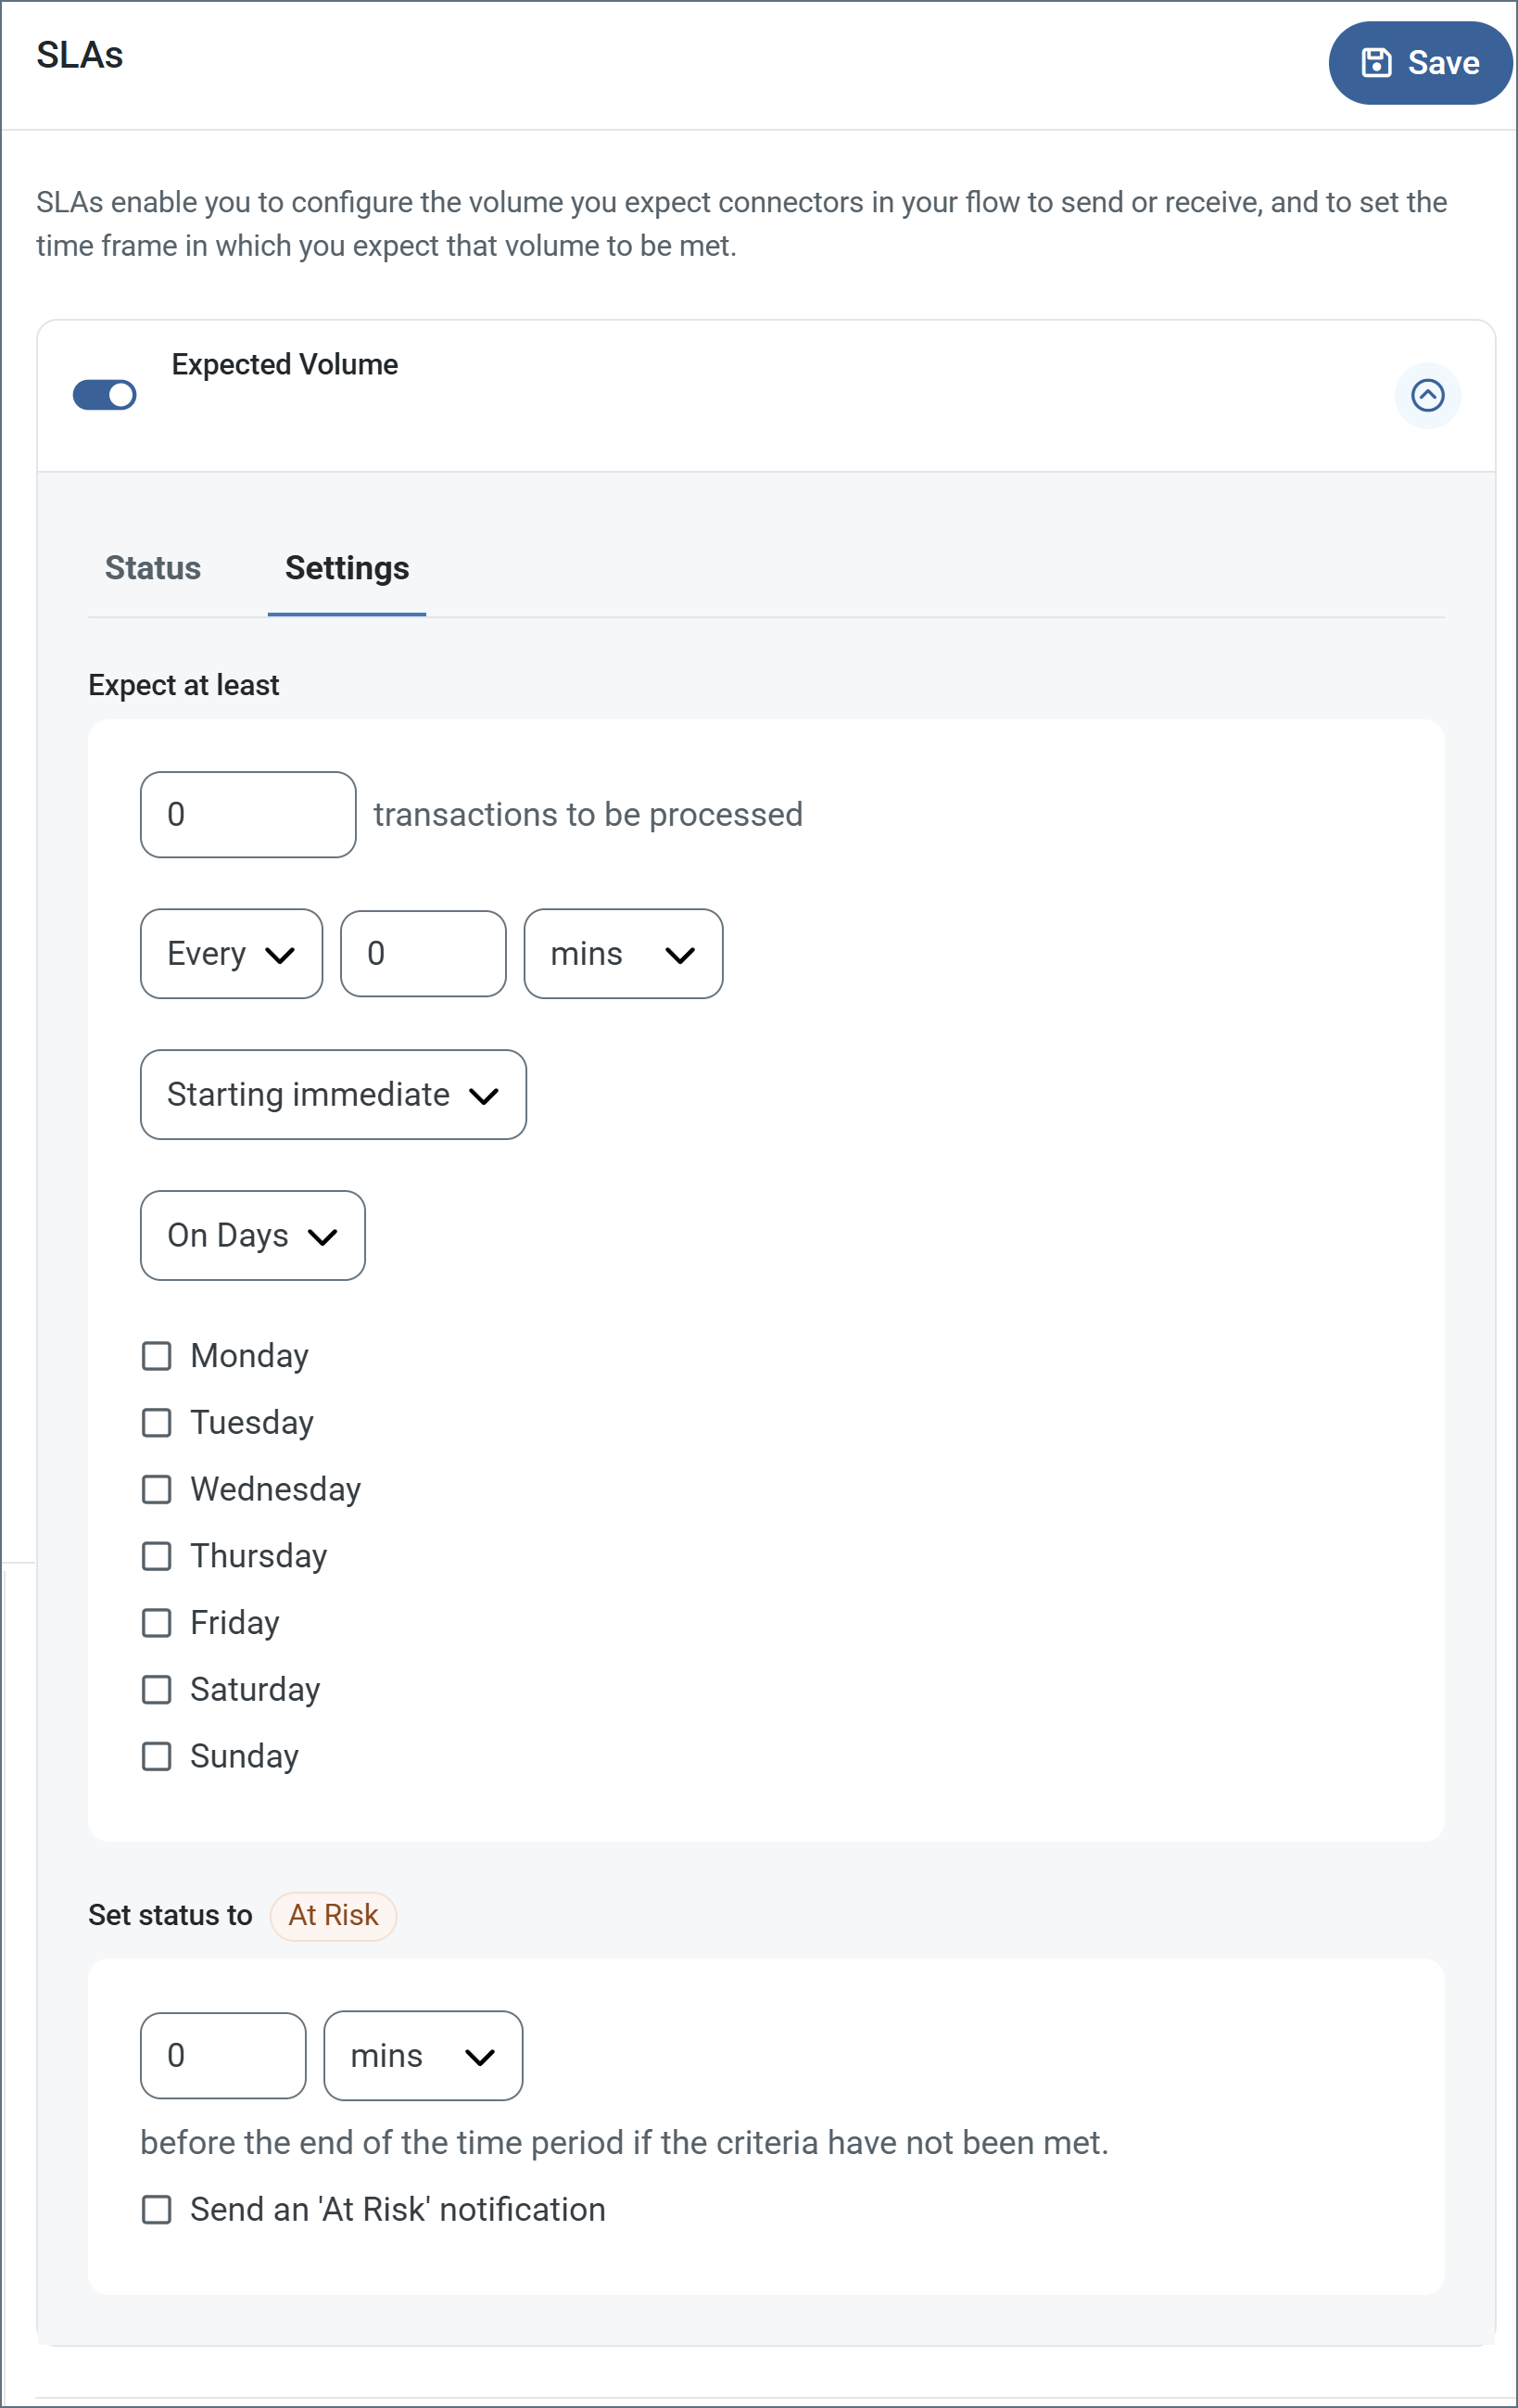
- If your connector has separate send and receive actions, use the radio buttons to specify which direction the SLA pertains to.
- In the Expect at least portion of the window:
- Set the minimum number of transactions you expect to be processed (the volume)
- Use the Every fields to specify the time frame
- Indicate when the SLA should go into effect. If you choose Starting on, complete the date and time fields.
- Check the boxes for the days of the week that you want the SLA to be in effect. Use the dropdown to choose Everyday if necessary.
- In the Set status to 'At Risk' portion of the window, specify when the SLA should be marked as at risk.
- By default, notifications are not sent until an SLA is in violation. To change that, check Send an 'At Risk' notification.
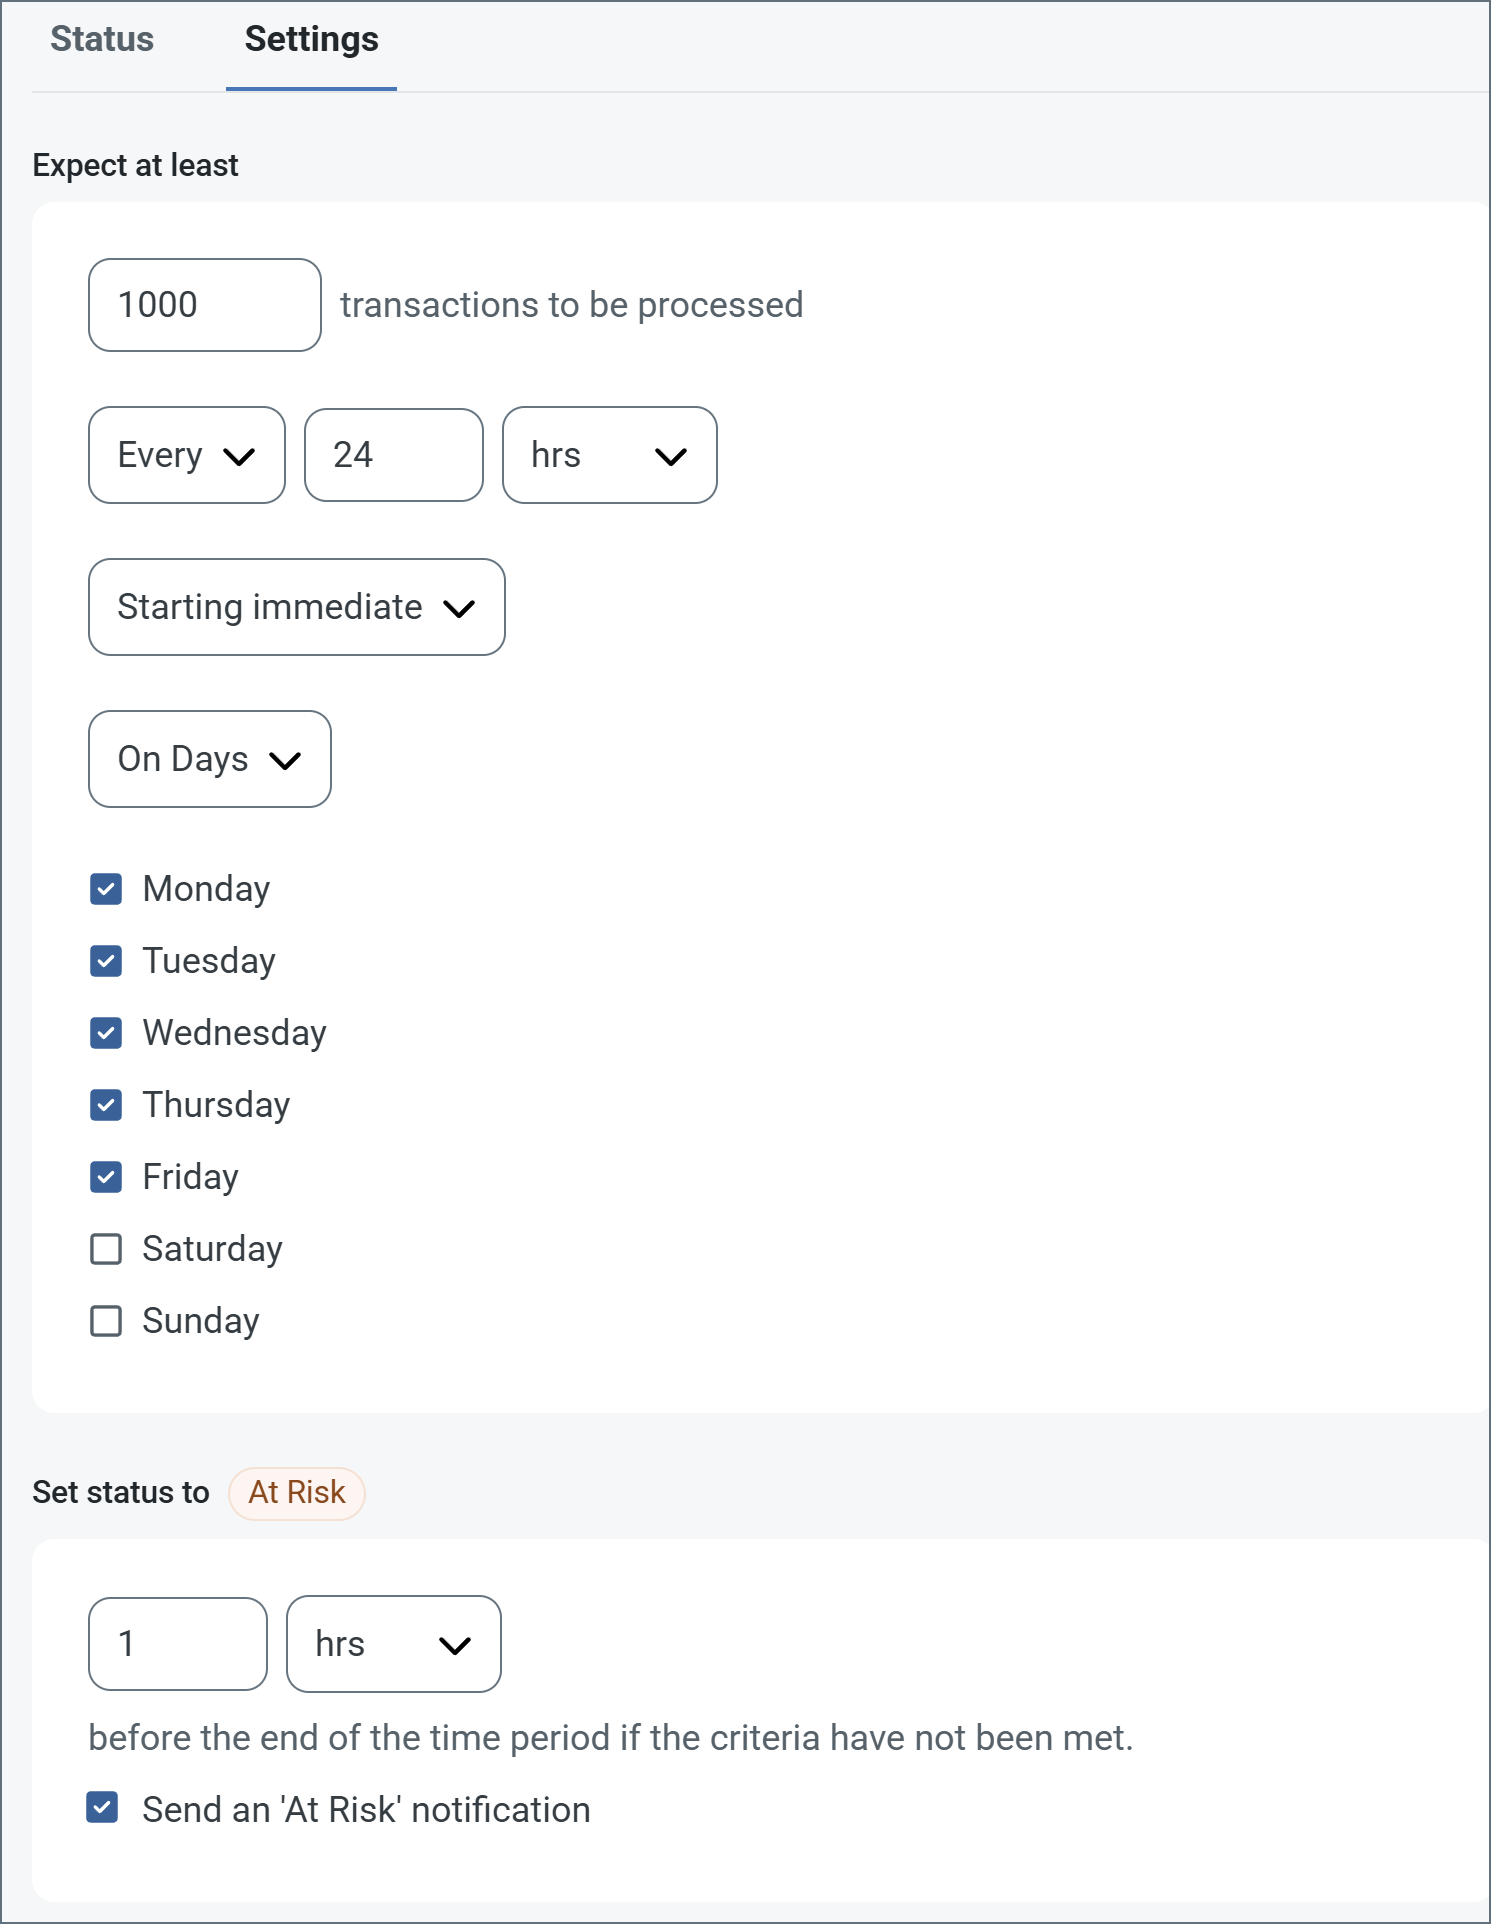
The following example shows an SLA configured for a connector that expects to receive 1000 files every day Monday-Friday. An at-risk notification is sent 1 hour before the end of the time period if the 1000 files have not been received.
 You can turn off SLA alerts if necessary. This can be useful during maintenance windows. Click Settings on the navbar, then navigate to Alerts > General Alerts. Click the tablet and pencil icon to edit, and uncheck the SLA Alerts setting.
;
export const AlertsTab = ({siteNameShort = "Arc"}) => <>
You can turn off SLA alerts if necessary. This can be useful during maintenance windows. Click Settings on the navbar, then navigate to Alerts > General Alerts. Click the tablet and pencil icon to edit, and uncheck the SLA Alerts setting.
;
export const AlertsTab = ({siteNameShort = "Arc"}) => <>
Settings related to configuring alerts.
Before you can execute Service Level Agreements (SLAs), you need to set up email alerts for notifications. By default, {siteNameShort} uses the global settings on the Alerts tab. To use other settings for this connector, toggle Override global setting on.
By default, error alerts are enabled, which means that emails are sent whenever there is an error. To turn them off, uncheck the Enable checkbox.
Enter a Subject (mandatory). Check Allow {siteNameShort}Script in Subject to use {siteNameShort}Script in the Subject field. When you select this, the {siteNameShort}Script Editor button appears ( ).
).
Optionally, enter a comma-separated list of Recipient emails.
;
export const MiscConnector = () => <>
Miscellaneous settings are for specific use cases.
| Setting |
Description |
| Other Settings |
Enables you to configure hidden connector settings in a semicolon-separated list (for example, setting1=value1;setting2=value2). Normal connector use cases and functionality should not require the use of these settings. |
;
export const Logging = () => <>
Settings that govern the creation and storage of logs.
| Setting |
Description |
| Log Level |
The verbosity of logs generated by the connector. When you request support, set this to Debug. |
| Log Subfolder Scheme |
Instructs the connector to group files in the Logs folder according to the selected interval. The Weekly option (which is the default) instructs the connector to create a new subfolder each week and store all logs for the week in that folder. Leaving this setting blank tells the connector to save all logs directly in the Logs folder. For connectors that process many transactions, using subfolders helps keep logs organized and improves performance. |
| Log Messages |
Check this to have the log entry for a processed file include a copy of the file itself. If you disable this, you might not be able to download a copy of the file from the Transactions tab. |
;
export const MacrosExamples = ({extraMacros = []}) => <>
Some macros, such as %Ext% and %ShortDate%, do not require an argument, but others do. All
macros that take an argument use the following syntax: %Macro:argument%
Here are some examples of the macros that take an argument:
- %Header:headername%: Where
headername is the name of a header on a message.
- %Header:mycustomheader% resolves to the value of the
mycustomheader header set on the input message.
- %Header:ponum% resolves to the value of the
ponum header set on the input message.
- %RegexFilename:pattern%: Where
pattern is a regex pattern. For example, %RegexFilename:^([\w][A-Za-z]+)% matches and resolves to the first word in the filename and is case insensitive (test_file.xml resolves to test).
- %Vault:vaultitem%: Where
vaultitem is the name of an item in the vault. For example, %Vault:companyname% resolves to the value of the companyname item stored in the vault.
- %DateFormat:format%: Where
format is an accepted date format (see Sample Date Formats for details). For example, %DateFormat:yyyy-MM-dd-HH-mm-ss-fff% resolves to the date and timestamp on the file.
{extraMacros.filter(item => item.example).map(item => - {item.example}
)}
You can also create more sophisticated macros, as shown in the following examples:
- Combining multiple macros in one filename:
%DateFormat:yyyy-MM-dd-HH-mm-ss-fff%%EXT%
- Including text outside of the macro:
MyFile_%DateFormat:yyyy-MM-dd-HH-mm-ss-fff%
- Including text within the macro:
%DateFormat:'DateProcessed-'yyyy-MM-dd_'TimeProcessed-'HH-mm-ss%
;
export const MacrosTable = ({siteName = "CData Arc", extraMacros = []}) => <>
Using macros in file naming strategies can enhance organizational efficiency and contextual
understanding of data. By incorporating macros into filenames, you can dynamically include
relevant information such as identifiers, timestamps, and header information, providing
valuable context to each file.
{siteName} supports these macros, which all use the following syntax: %Macro%.
| Macro | Description |
|---|
| ConnectorID | Evaluates to the ConnectorID of the connector. |
| ConnectorName | Evaluates to the name of the connector. Enables you to include the connection name in file names or paths: for example, to tag backup files by which database connection produced them. |
| Ext | Evaluates to the file extension of the file currently being processed by the connector. |
| Filename | Evaluates to the filename (extension included) of the file currently being processed by the connector. |
| FilenameNoExt | Evaluates to the filename (without the extension) of the file currently being processed by the connector. |
| MessageId | Evaluates to the MessageId of the message being output by the connector. |
| RegexFilename:pattern | Applies a RegEx pattern to the filename of the file currently being processed by the connector. |
| Header:headername | Evaluates to the value of a targeted header (headername) on the current message being processed by the connector. |
| LongDate | Evaluates to the current datetime of the system in long-handed format (for example, Wednesday, January 24, 2024). |
| ShortDate | Evaluates to the current datetime of the system in a yyyy-MM-dd format (for example, 2024-01-24). |
| DateFormat:format | Evaluates to the current datetime of the system in the specified format (format). See Sample Date Formats for the available datetime formats. |
| Vault:vaultitem | Evaluates to the value of the specified vault item. |
{extraMacros.map(item =>
| {item.name} |
{item.description} |
)}
;
export const Performance = () => <>
Settings related to the allocation of resources to the connector.
| Setting |
Description |
| Max Workers |
The maximum number of worker threads consumed from the threadpool to process files on this connector. If set, this overrides the default setting on the Performance Settings portion of the Advanced Settings page. |
| Max Files |
The maximum number of files sent by each thread assigned to the connector. If set, this overrides the default setting on the Performance Settings portion of the Advanced Settings page. |
;
export const siteNameShort = "Arc";
export const siteName = "CData Arc";
GISB connectors support sending and receiving messages using the Gas Industry Standards Board (GISB) protocol.
## Key Capabilities
* GISB protocol support for energy sector B2B communications
* Digital signature and encryption capabilities with key management
* Receipt processing and acknowledgment handling for reliable delivery
* Support for multiple GISB versions with configurable protocol options
## Overview
A GISB connection is configured in two places. Configure the GISB [Profiles](../getting-started/administration/profiles) page with a local GISB identifier, personal key, and other information that is global across all GISB connections. Then configure individual GISB connectors with connection settings specific to a single trading partner. When a GISB connector processes an input file, it is packaged and sent to the specified trading partner.
When {siteNameShort} receives a file over GISB, it attempts to route the file to a specific GISB connector. The application uses the GISB identifiers in the message to determine which GISB connector should receive the file. When a file is routed to a GISB connector, that file is placed on the connector's **Transactions** tab, or is passed along to the next connector in the flow.
## Profile Configuration
The GISB profile must be configured before connections can be established with individual GISB connectors. Click **Profiles > GISB** on the navbar.
### GISB Profile Tab
#### Personal Id
*Settings for identifying the local profile.*
| Setting | Description |
| ------------------- | ------------------------------------------------------------------------------------------------------------------------------------------------------------------------------------------------------------------------------------- |
| **GISB Identifier** | Your GISB identifier. Messages sent by {siteNameShort} include this value as the `GISB-From` header. Incoming messages must have this value as the `GISB-To` header to be successfully received. GISB Identifiers are case-sensitive. |
#### Personal Key
*Settings related to the private decryption and signature certificate.*
| Setting | Description |
| -------------- | ----------------------------------------------------------------------------- |
| **Secret Key** | The key that is used to decrypt incoming messages and sign outgoing messages. |
| **Passphrase** | The password required to access the local secret key. |
#### Application URLs
*Settings and displayed values related to accessing {siteNameShort} from the public web.*
| Setting | Description |
| ----------------- | ------------------------------------------------------------------------------------------------------------------- |
| **Receiving URL** | The URL at which {siteNameShort} listens for incoming GISB messages. Share this URL with all your trading partners. |
#### Miscellaneous
## Connector Configuration
This section contains all of the configurable connector properties.
### Settings Tab
#### Trading Partner Info
*Settings for identifying and connecting to a specific trading partner.*
| Setting | Description |
| ------------------------- | ------------------------------------------------------------------------------------------------------------------------------------------------------------------------------------- |
| **Connector Id** | The static, unique identifier for the connector. |
| **Connector Type** | Displays the connector name and a description of what it does. |
| **Connector Description** | An optional field to provide a free-form description of the connector and its role in the flow. |
| **GISB Identifier** | The identifier specific to the target trading partner. This value is included in outgoing messages, and it is also used to route incoming messages to the appropriate GISB connector. |
| **Partner URL** | The trading partner's public endpoint where outgoing messages should be sent. |
| **GISB Version** | The protocol version of the GISB client. |
#### Connection Info
*Settings related to connection parameters for the specified trading partner.*
| Setting | Description |
| ---------------------------- | -------------------------------------------------------------------------------------------------------------------------------------------------------------------------- |
| **Send Message Security** | Whether to sign and/or encrypt outgoing messages. CData strongly recommends that you use signatures and encryption. |
| **Receive Message Security** | Whether to require that signatures and encryption are present for incoming messages. An error is thrown if a received message does not have a required security parameter. |
| **Client Timeout** | The length of time (in seconds) the connector waits for a connection response before throwing a timeout error. |
#### Receipts
*Settings related to sending and requesting message receipts.*
| Setting | Description |
| ------------ | ---------------------------------------------------------------------------------------------------------------- |
| **Security** | Whether receipts should include a signature block verifying the message integrity and identity of the recipient. |
#### Trading Partner Keys/Certificates
*Settings related to the public certificates provided by the trading partner.*
| Setting | Description |
| ----------------------------- | ---------------------------------------------------------------------------------------------------------------------------------------------------------------------------------------------------------------------------------------------------------------------------------------------------------------------------------------------------------------------------------------------------------------------- |
| **Recipient Key Certificate** | The public key used for encryption and signature verification. Use the **Import Key** button, then browse to the key to import. |
| **TLS Server Certificate** | The public certificate used to verify the identity of a TLS/SSL server. This is only necessary if the partner's GISB system requires HTTPS instead of HTTP. If the trading partner does not provide a TLS server certificate, you can leave this setting blank to allow the underlying OS/JVM to perform certificate validation, or set it to `Any Certificate` to unconditionally trust the target server's identity. |
### Advanced Tab
#### Alternate Local Profile
*Settings that override the GISB configuration on the Profiles page for this specific GISB connector. Setting an alternate local profile allows the use of different local keys and identifiers for individual trading partners.*
| Setting | Description |
| ------------------------- | ----------------------------------------------------------------------------- |
| **Local GISB Identifier** | Your GISB identifier. |
| **Secret Key** | The key that is used to decrypt incoming messages and sign outgoing messages. |
| **Passphrase** | The password required to access the local secret key. |
#### TLS Client Authentication
#### HTTP Authentication
*Settings related to HTTP client authentication.*
| Setting | Description |
| ---------------------------- | ------------------------------------------------------------------------------------------------------------------------------------------------------------------------------------------------------ |
| **HTTP Authentication** | Whether to use client HTTP authentication. |
| **HTTP Authentication Type** | Whether to provide HTTP authentication credentials in an encrypted format (Digest) or in plain text (Basic). Only use Basic authentication if the connection is an HTTPS connection (instead of HTTP). |
| **User** | The user credential for HTTP client authentication. |
| **Password** | The password credential for HTTP client authentication. |
#### Proxy Settings
#### Advanced Settings
*Settings not included in the previous categories.*
| Setting | Description |
| ------------------------- | ---------------------------------------------------------------------------------------------------------------------------------------------------------------------------------------------------------------------------------------------------------------------------------------------------------------------------------------------------------------------------- |
| **Compression Method** | The algorithm to use when compressing outgoing payloads. |
| **EDI Type** | The type of EDI message to use. The default is X12. |
| **Encrypting Algorithm** | The algorithm to use when encrypting outgoing messages. |
| **Fold Headers** | Check this to have the connector fold the headers if the headers are over a certain length. |
| **Packet Type** | Check this to have the connector read the features from the **Recipient Key Certificate** to determine if the older packet type is required. If the key requires the older packet type, it is used. |
| **Sign and Encrypt** | Check this to have the connector perform signing and encryption in the same step. |
| **Signing Algorithm** | The algorithm to use when signing outgoing messages. |
| **TLS Enabled Protocols** | The list of TLS/SSL protocols supported when establishing outgoing connections. Best practice is to only use TLS protocols. SSL v2 and SSL v3 are considered vulnerable and should only be used if your partner does not support higher versions. Keep in mind that TLS v1.3 is not universally adopted, and might be refused if the destination server does not support it. |
| **Temp File** | Check this to have the connector write data to be processed to a temp file, then move the temp file into processing after it has been fully written. |
| **Local File Scheme** | A scheme for assigning filenames to messages that are output by the connector. You can use macros in your filenames dynamically to include information such as identifiers and timestamps. For more information, see [Macros](#macros). |
| **Processing Delay** | The amount of time (in seconds) by which the processing of files placed in the **Transactions** tab is delayed. This is a legacy setting. Best practice is to [use a File connector](../flows/designing-a-flow#interacting-with-the-local-file-system) to manage local file systems instead of this setting. |
#### Logging
#### Miscellaneous
### Automation Tab
#### Automation Settings
*Settings related to the automatic processing of files by the connector.*
| Setting | Description |
| ------------------ | ----------------------------------------------------------------------------------------------------------------------------------------------------------------------------------------------------------------------------------------------------------- |
| **Send** | Whether files arriving at the connector are automatically sent as GISB messages. |
| **Retry Interval** | The amount of time before a failed send is retried. A retry is triggered when the server does not respond to a send attempt, or responds negatively to communicate that the file was not received. |
| **Max Attempts** | The maximum number of times the connector processes the input file. Success is based on a successful server acknowledgement and validation of the receipt (when requested synchronously). If this is set to 0, the connector retries the file indefinitely. |
#### Performance
### Alerts Tab
### SLAs Tab
## Partner Setup
Trading partners must share the connection details that are required when configuring a new GISB connector. At a minimum, these details must include:
* GISB Identifier
* Partner URL
* Recipient Key Certificate
## Send and Receive Files
Once the GISB profile and partner-specific GISB connectors are configured, files can be securely sent and received.
### Send Files
In a GISB connector, the **Transactions** tab displays the files to be sent to the target trading partner. If **Send** is enabled on the [Automation](#automation-tab) tab, files that reach this tab are automatically packaged and sent. Access the log files for all transmissions by expanding the row associated with the transmitted file.
The **Create Test Files** button lets you generate a simple series of test files to send to the trading partner.
### Receive Files
In a GISB connector, the **Transactions** tab displays the files that have been received by the application and routed to the connector (based on the GISB identifiers present in the incoming GISB message). Expand each file row to display a list of available logs for the transmission.
These files are available on the connector **Transactions** tab. If the connector is connected to other connectors in the flow, files are automatically moved from the **Transactions** tab of the GISB connector to the **Transactions** tab of the next connector in the flow.
## Macros
### Examples