> ## Documentation Index
> Fetch the complete documentation index at: https://docs.arc.cdata.com/llms.txt
> Use this file to discover all available pages before exploring further.
# Managing Partners
> Configure trading partner workflows including MFT connectors, EDI translation, and document assignments in the CData Arc TPMC.
export const siteNameShort = "Arc";
The **Partners** tab contains a list of all trading partners you have defined, the file transfer protocol used by that partner, the EDI standard, the number of documents and a count of incoming and outgoing messages.
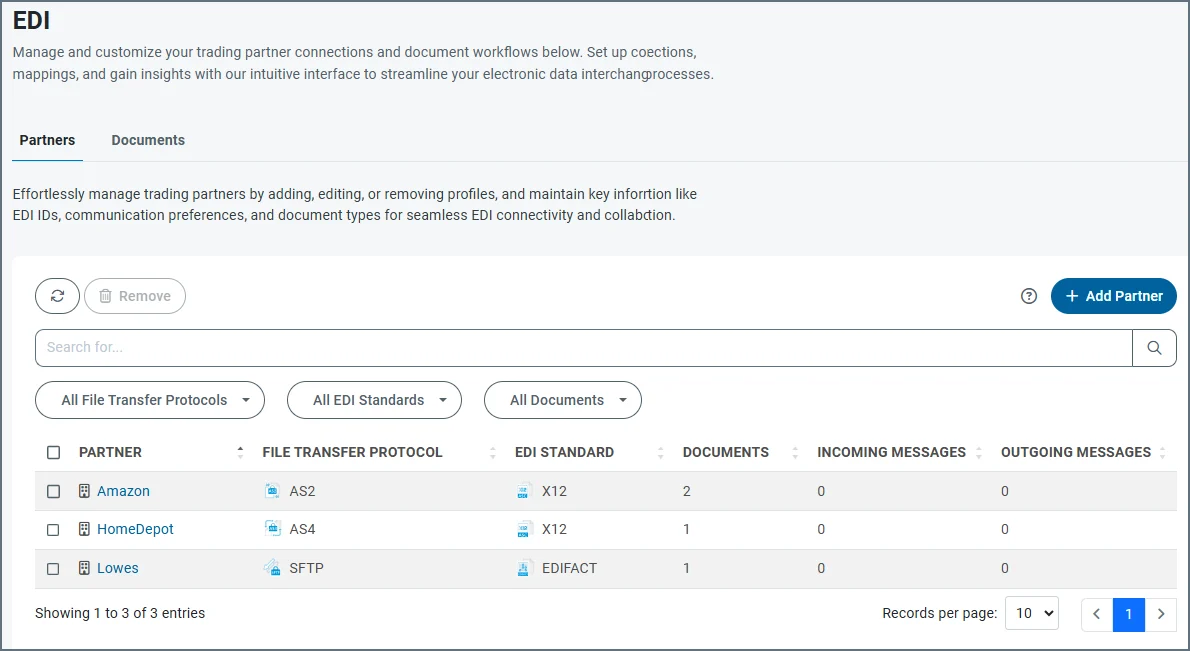 Click **Add Partner** to configure a new partner. Supply a **Partner Name** and click **Add Partner** to be taken to the new partner's **Workflows** tab.
## Configure a Partner Workflow
The following image of a fully configured partner workflow has been annotated to explain each element in the workflow. Each number corresponds to a description below.
Click **Add Partner** to configure a new partner. Supply a **Partner Name** and click **Add Partner** to be taken to the new partner's **Workflows** tab.
## Configure a Partner Workflow
The following image of a fully configured partner workflow has been annotated to explain each element in the workflow. Each number corresponds to a description below.
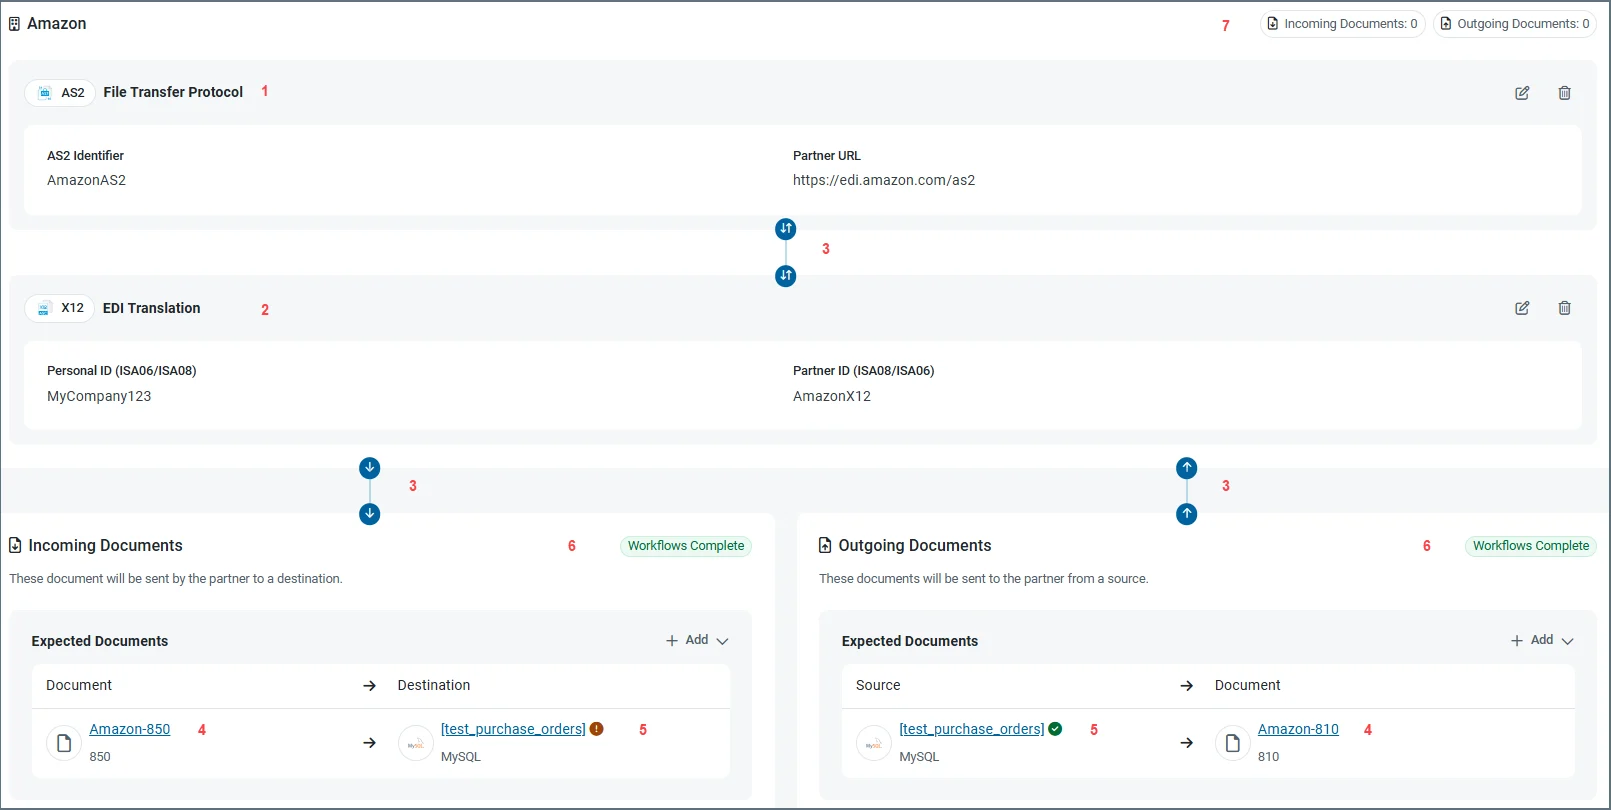 1. The MFT connector that handles incoming and outgoing file transfers.
2. The EDI connector that translates documents to and from XML.
3. Arrows indicating the direction of data flow. Two arrows indicate that the flow is bidirectional.
4. The defined document that you exchange with your partner. Clicking the document name takes you to that document's workflow in the **Documents** tab.
5. The table in the application connector where data is upserted to or selected from. Icons indicate whether the mapping has been tested. The checkmark indicates test success, and the exclamation mark indicates that the mapping hasn't been tested or that an error has occurred during testing.
6. Status of all the document workflow definitions. For example, if a workflow for a document is incomplete, the message reflects that, and that document is highlighted in orange.
7. Count of incoming and outgoing documents processed.
### Configure File Transfer Protocol
When you add a new partner, you need to configure the connector to use for both incoming and outgoing file transfers. Click **Add Connector**, then select from the list of available [MFT connectors](../connectors/mft-connectors). When you click **Add**, the connector configuration pane opens. For details on the configuration options, click the question mark icon to open the documentation for your MFT connector. When you are finished, click **Save**.
If you need to change the MFT connector type later, you must delete the existing connector, then add a new one. However, you can edit the current configuration options at any time by clicking the tablet and pencil icon.
### Configure EDI Translation
The next step is to configure the connector to use to translate partner documents into XML so they can be used in {siteNameShort}. Click **Add Connector**, then select from the list of available [EDI connectors](../connectors/edi-connectors). When you click **Add**, the connector configuration pane opens. For details on the configuration options, click the question mark icon to open the documentation for your EDI connector. When you are finished, click **Save**.
If you need to change the EDI connector type later, you must delete the existing connector, then add a new one. However, you can edit the current configuration options at any time by clicking the tablet and pencil icon. If you change the EDI version of the connector, you are notified that all documents configured for the current partner will be removed.
### Select or Add Documents
Once you have configured the MFT and EDI connectors, you can add documents to the workflow. Use the **Add Existing** or **Add New** buttons to continue.
* Choose **Add Existing** to select from existing documents that use the same EDI connector for translation. Use the checkboxes to choose your document(s), then click **Add Documents**.
* Choose **Add New** to create a new document on the fly. Choose the schema version for your EDI document, use the checkboxes to select from the list of available documents, then click **Add Documents**.
The new documents appear in the list of incoming or outgoing documents with a status of **Incomplete**. Use the **Add Workflow** link to add a workflow for each one. See [Add Document Workflow](./edi-mapping#add-document-workflow) for detailed instructions.
You can also add documents from the **Documents** tab. See [Managing Documents](./edi-documents-tab) for more information.
### Add Workflow
When you add documents from the partner **Workflows** tab and click the **Add Workflow** link, {siteNameShort} prefills the document workflow information on the **Add Document Workflow** screen based on the MFT and EDI settings for the partner. You can change the **Name**, but all other fields are fixed. See [Add Document Workflow](./edi-mapping#add-document-workflow) for detailed instructions on defining the workflow.
1. The MFT connector that handles incoming and outgoing file transfers.
2. The EDI connector that translates documents to and from XML.
3. Arrows indicating the direction of data flow. Two arrows indicate that the flow is bidirectional.
4. The defined document that you exchange with your partner. Clicking the document name takes you to that document's workflow in the **Documents** tab.
5. The table in the application connector where data is upserted to or selected from. Icons indicate whether the mapping has been tested. The checkmark indicates test success, and the exclamation mark indicates that the mapping hasn't been tested or that an error has occurred during testing.
6. Status of all the document workflow definitions. For example, if a workflow for a document is incomplete, the message reflects that, and that document is highlighted in orange.
7. Count of incoming and outgoing documents processed.
### Configure File Transfer Protocol
When you add a new partner, you need to configure the connector to use for both incoming and outgoing file transfers. Click **Add Connector**, then select from the list of available [MFT connectors](../connectors/mft-connectors). When you click **Add**, the connector configuration pane opens. For details on the configuration options, click the question mark icon to open the documentation for your MFT connector. When you are finished, click **Save**.
If you need to change the MFT connector type later, you must delete the existing connector, then add a new one. However, you can edit the current configuration options at any time by clicking the tablet and pencil icon.
### Configure EDI Translation
The next step is to configure the connector to use to translate partner documents into XML so they can be used in {siteNameShort}. Click **Add Connector**, then select from the list of available [EDI connectors](../connectors/edi-connectors). When you click **Add**, the connector configuration pane opens. For details on the configuration options, click the question mark icon to open the documentation for your EDI connector. When you are finished, click **Save**.
If you need to change the EDI connector type later, you must delete the existing connector, then add a new one. However, you can edit the current configuration options at any time by clicking the tablet and pencil icon. If you change the EDI version of the connector, you are notified that all documents configured for the current partner will be removed.
### Select or Add Documents
Once you have configured the MFT and EDI connectors, you can add documents to the workflow. Use the **Add Existing** or **Add New** buttons to continue.
* Choose **Add Existing** to select from existing documents that use the same EDI connector for translation. Use the checkboxes to choose your document(s), then click **Add Documents**.
* Choose **Add New** to create a new document on the fly. Choose the schema version for your EDI document, use the checkboxes to select from the list of available documents, then click **Add Documents**.
The new documents appear in the list of incoming or outgoing documents with a status of **Incomplete**. Use the **Add Workflow** link to add a workflow for each one. See [Add Document Workflow](./edi-mapping#add-document-workflow) for detailed instructions.
You can also add documents from the **Documents** tab. See [Managing Documents](./edi-documents-tab) for more information.
### Add Workflow
When you add documents from the partner **Workflows** tab and click the **Add Workflow** link, {siteNameShort} prefills the document workflow information on the **Add Document Workflow** screen based on the MFT and EDI settings for the partner. You can change the **Name**, but all other fields are fixed. See [Add Document Workflow](./edi-mapping#add-document-workflow) for detailed instructions on defining the workflow.