> ## Documentation Index
> Fetch the complete documentation index at: https://docs.arc.cdata.com/llms.txt
> Use this file to discover all available pages before exploring further.
# User Management and Roles
> How to create and manage users, roles, and permissions in CData Arc.
export const siteNameShort = "Arc";
export const siteName = "CData Arc";
The first time you launch {siteName}, you are prompted to create the first application user by setting a username and password. The first user defaults to the [Admin role](#admin-role), as defined below.
## Users
To create and manage additional users, navigate to the [Settings page](./settings-page), then the **Users** tab. This tab includes a table of all users, and includes information about their roles, their status, whether they are temporary users, their [two-factor authentication (2FA)](../2fa) status, and more.
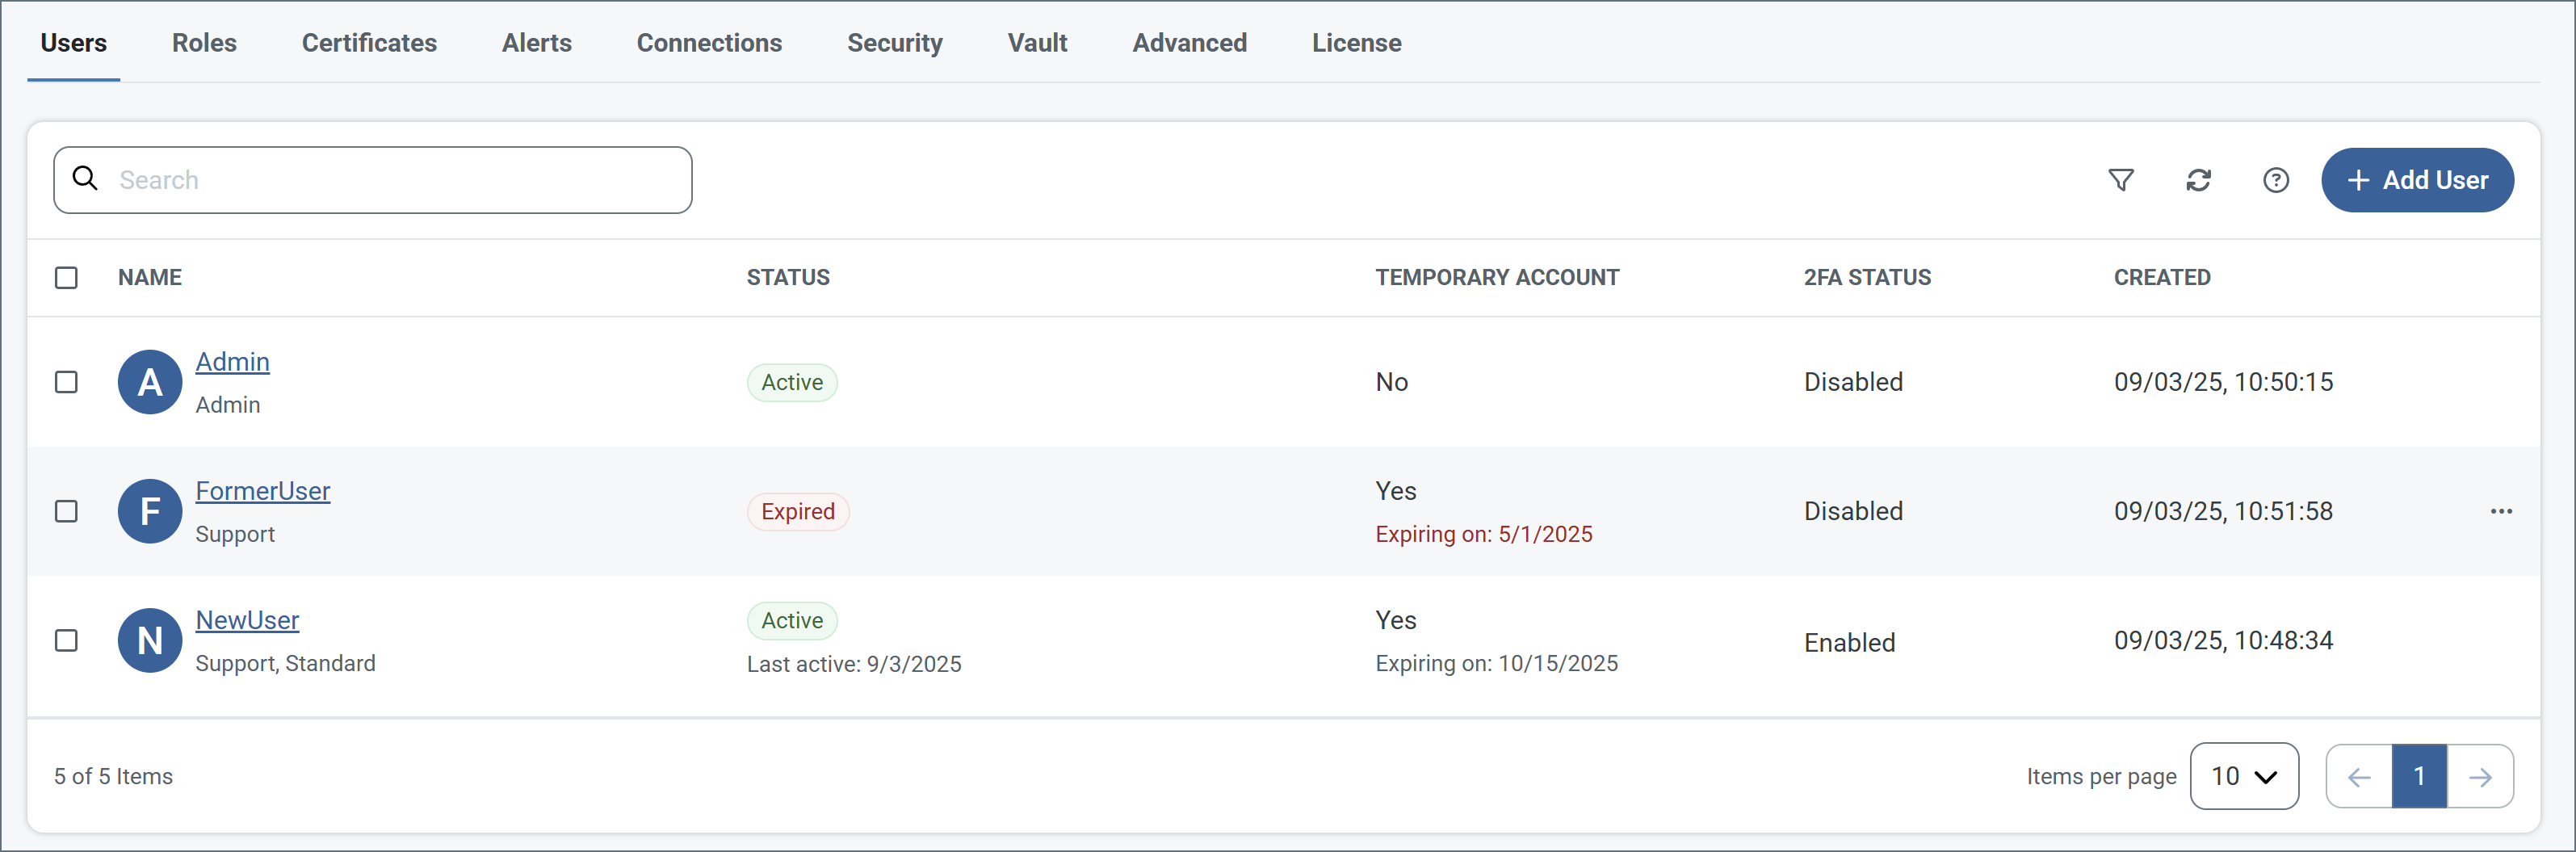 If you use AD/LDAP to manage user credentials, user names must be in the format `domain\username`.
Members of the Admin role can create, delete, and modify users on this tab. Admin is the only role with permission to manage other users.
### Add or Edit Users
To add a user, click **Add User**. To edit an existing user, hover over their row in the table, click the ellipses, then choose **Edit**. The following image shows adding a new user to the application.
If you use AD/LDAP to manage user credentials, user names must be in the format `domain\username`.
Members of the Admin role can create, delete, and modify users on this tab. Admin is the only role with permission to manage other users.
### Add or Edit Users
To add a user, click **Add User**. To edit an existing user, hover over their row in the table, click the ellipses, then choose **Edit**. The following image shows adding a new user to the application.
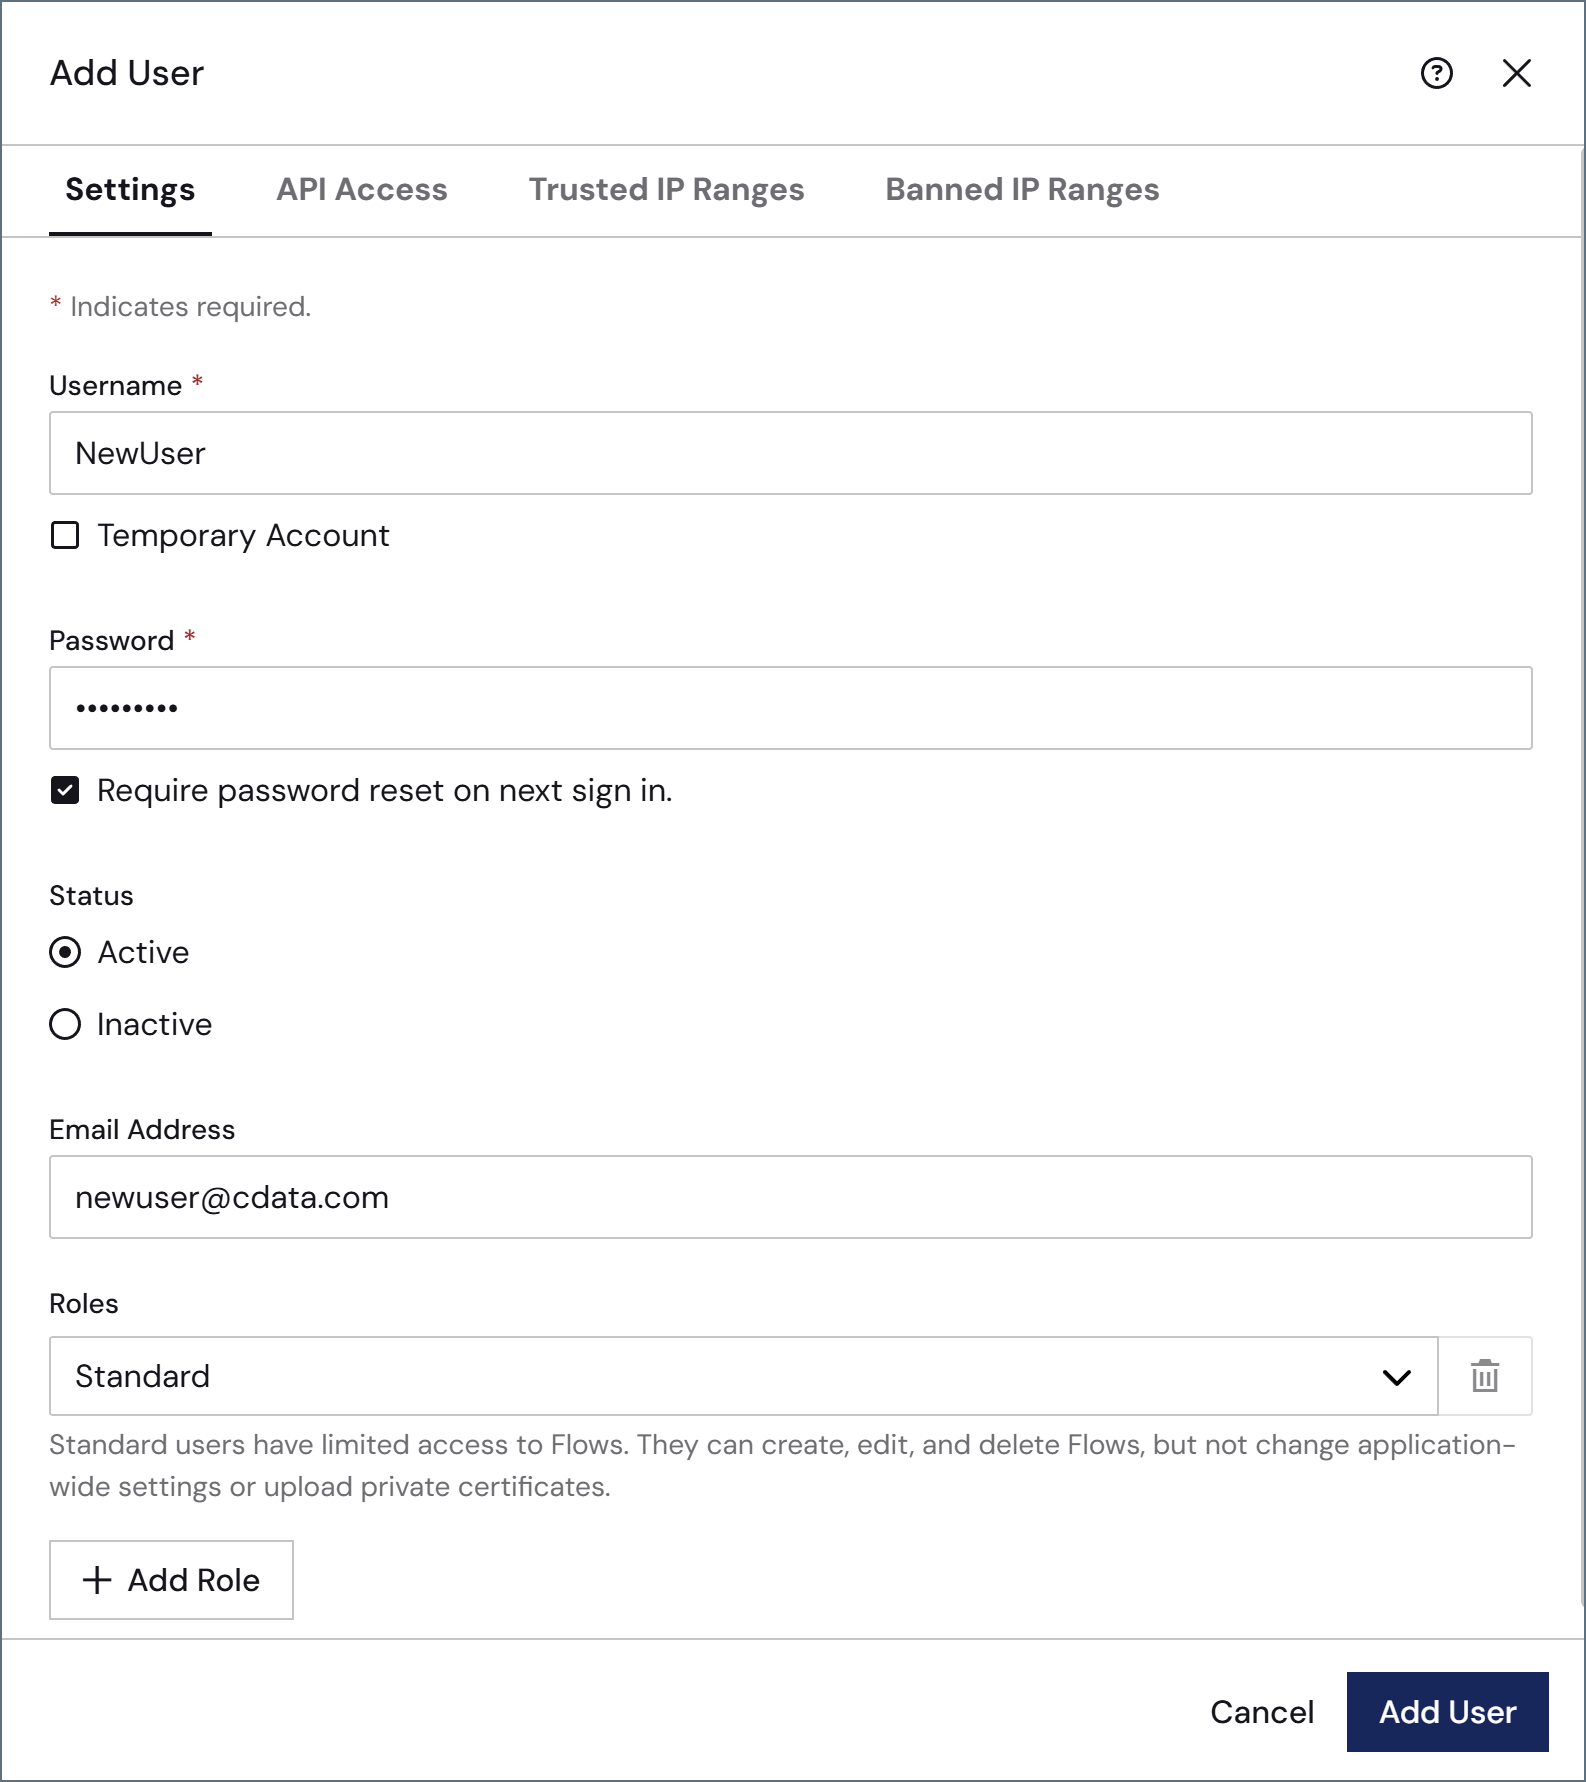 Complete the following fields:
| Field | Description |
| --------------------- | -------------------------------------------------------------------------------------------------------------------------------------------------------------------------------------------------------- |
| **Username** | Enter a username. This field cannot be changed once you save the user. |
| **Temporary Account** | If the user should only have temporary access, check this and supply an **Expiration Date** (not pictured). |
| **Password** | Enter a password. Ensure that it meets the requirements in [Sign In Settings](./sign-in-settings). Check **Require password reset on next sign in** to force the user to change their password on login. |
| **Status** | Indicate whether the user is active or inactive. |
| **Email Address** | Best practice is to provide an email address for each user so that they can [reset their passwords](#password-resets) when necessary. |
| **Roles** | Select the [user roles](#user-roles) to assign the user. |
To give the new user [Admin API](#admin-api-access) and/or OAuth access, click the **API Access** tab.
Complete the following fields:
| Field | Description |
| --------------------- | -------------------------------------------------------------------------------------------------------------------------------------------------------------------------------------------------------- |
| **Username** | Enter a username. This field cannot be changed once you save the user. |
| **Temporary Account** | If the user should only have temporary access, check this and supply an **Expiration Date** (not pictured). |
| **Password** | Enter a password. Ensure that it meets the requirements in [Sign In Settings](./sign-in-settings). Check **Require password reset on next sign in** to force the user to change their password on login. |
| **Status** | Indicate whether the user is active or inactive. |
| **Email Address** | Best practice is to provide an email address for each user so that they can [reset their passwords](#password-resets) when necessary. |
| **Roles** | Select the [user roles](#user-roles) to assign the user. |
To give the new user [Admin API](#admin-api-access) and/or OAuth access, click the **API Access** tab.
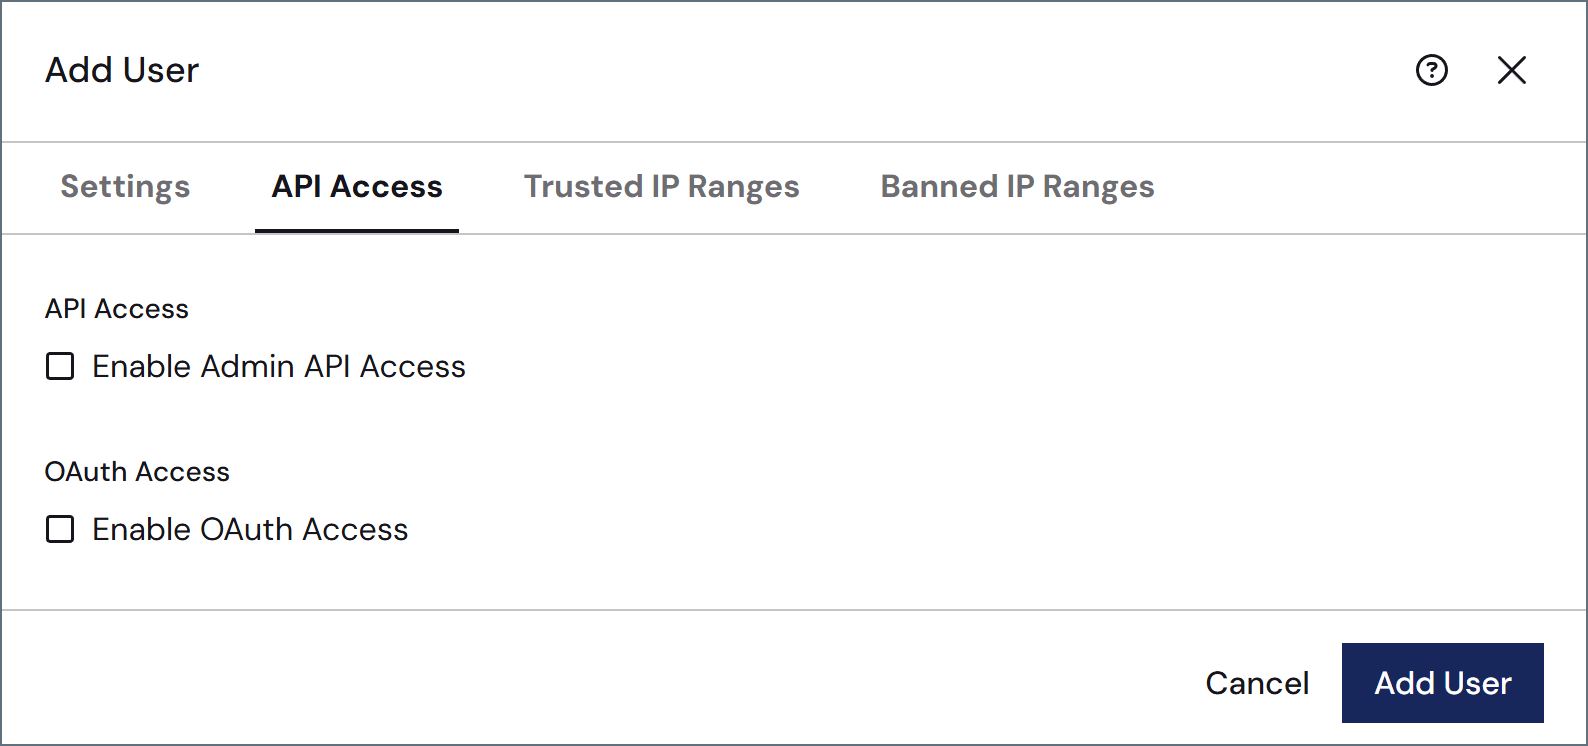 | Field | Description |
| ------------------------------- | --------------------------------------------------------------------------------------------------------------------------------------------------------------------------------------------------------------------------------------------------------------------------------------------------------------------------------------------------------------- |
| **API Access** | Check **Enable Admin API Access** to grant the user an authtoken that can be used to access the Admin API. See [Admin API Access](#admin-api-access) for details. When you enable API access, the rest of the fields in this table appear. |
| **Token Expiration (days)** | The number of days before the token expires. Check **No Expiration** if you do not want the token to expire. |
| **Authtoken** | The system-generated authtoken. Make sure to copy it to a safe location before saving the user, because it is not shown again. |
| **Maximum Requests per Hour** | Uncheck **Unlimited Requests** to set a limit on the maximum requests per hour for this user. |
| **Maximum Concurrent Requests** | Uncheck **Unlimited Requests** to set a limit on the maximum number of requests that can be sent simultaneously. |
| **Enable OAuth Access** | Check **Enable OAuth Access** to grant the user credentials that can be used to secure public API endpoints for the [Admin API](./admin-api-settings). OAuth 2.0 provides a structured authentication flow for clients that need to manage token lifecycles or integrate with external applications. When you enable OAuth access, the following fields appear: |
| **Grant Type** | The OAuth 2.0 grant type that determines how the client application obtains an access token. **Client Credentials** is currently the only option. |
| **Client Id** | The system-generated client Id token. |
| **Client Secret** | The system-generated client secret. Make sure to copy it to a safe location before saving the user, because it is not shown again. |
| **Access URL** | The endpoint URL used by the client application to request an access token using the configured credentials. |
To add trusted or banned IP ranges specific to this user, click the **Trusted IP Ranges** or **Banned IP Ranges** tabs to add the ranges. You can provide single IP addresses, simple ranges (such as `203.0.113.*` or `203.0.113.1-255`), or Classless Inter-Domain Routing (CIDR) ranges. These tabs also display the global trusted and banned ranges that have been defined on the [Network Access](./network-access) portion of the **Settings > Security** page.
### Single Sign-On
{siteNameShort} supports single sign-on (SSO) via identity providers that implement the OpenID standard. For more information, including specific guidance for Azure AD, see [Single Sign-On](./single-sign-on).
### Admin API Access
Each user is granted an authtoken that can be used to access the [Admin API](./admin-api-settings). For more information on authenticating against the Admin API, see [Admin API Authentication](../../../admin-api/admin-api-authentication).
The specific actions that a user can perform using the Admin API mirror the actions that the same user can perform using the UI. For example, a user that cannot delete connectors in the UI cannot use the Admin API to delete connectors. To perform any action using the Admin API, use an authtoken from an Admin user when invoking the API.
### Password Resets
Every user can have an email address associated with their account. This way, if they need to reset their password, they can click the **Forgot password** link to have a reset link emailed to them. Every password reset that is sent adds a row to the [application log](../activity#application-logs).
Users who do not have an email associated with their account must contact an administrator to have their password reset, so it is best practice for administrators to associate an email with each user account.
If all admin users are locked out of {siteNameShort}, the embedded web servers in each edition provide the ability to reset their password to regain access to the application. This requires administrative access to the installation, and should only be used if there is no user with access available.
For example, in the [Cross-Platform edition](../../installation/cross-platform-edition):
```
java -jar arc.jar -ResetPassword -User -Password -AppDirectory
```
In the [.NET edition](../../installation/windows-edition):
```
CData.Arc.exe -ResetPassword -User -Password -AppDirectory
```
## User Roles
The **Roles** tab displays a table of all roles defined in the application, along with the associated workspaces and a link to all users who can assume each role. Roles enable you to restrict users to only performing certain actions in certain workspaces. The roles assigned to a user affect everything that they see in {siteNameShort}, including but not limited to:
* [Workspaces](../../../flows/workspaces)
* [Reports](../reports)
* [Dashboard data](../dashboard)
* [Logs](../activity)
Every installation of {siteNameShort} includes three built-in roles:
* [Admin](#admin-role)
* [Standard](#standard-role)
* [Support](#support-role)
These are global roles that cannot be edited or deleted. They apply to all workspaces. However, you can define [custom roles](#custom-roles) which limit each user's permissions. Custom roles are made up of *policies*, which provide the most granular control over exactly what users can see or do in {siteNameShort}. Custom roles also identify which workspace(s) users can see and interact with.
The following sections describe each built-in role, explain how to define new policies and roles, and provide an example policy. Use the [comparison table](#user-roles-comparison-table) for help building your own policies and roles.
### Admin Role
The **Admin** role provides full control over the application. An admin can create new [flows](../../../flows), delete existing flows, change [Profile](../profiles) settings, and perform every other operation supported by the console.
In addition, only admins can view the [Audit Log](../activity#audit-logs), which records all changes made by any user in the application in a [tamper-evident manner](../activity#tamper-evident-logging).
### Standard Role
Members of the **Standard** role can create, edit, and delete connectors and flows. However, they cannot change any application-wide settings, such as those exposed in the [Profile](../profiles) page.
Standard users can upload new files into flows, and can upload public certificates for use by connectors. They cannot upload private certificates that are set in a Profile.
### Support Role
The **Support** role is a read-only role; members of this role cannot create or delete flows, or change application settings. **Support** users *can* send files through existing flows using the *Send* operation, but cannot upload new files (in other words, they can only process files already present in the **Transactions** tab of a connector).
### Custom Roles
Custom roles give you more granular control over what each user can see or do in {siteNameShort}. Custom roles are defined by creating policies, which specify the exact permissions members of that role have, as well as which certificate permissions they have. Custom roles also identify which workspace(s) and certificate(s) users can see and interact with.
#### Creating Roles and Policies
1. To create a custom role, navigate to the [Settings page](./settings-page), then the **Roles** tab.
2. Click **Add Role**. Give the role a meaningful name and description, then click **Add Role**.
3. To define the policy, click **Add Policy**.
4. Use the toggles next to **Workspace Permissions** and **Certificate Permissions** to edit the sections you need for your policy.
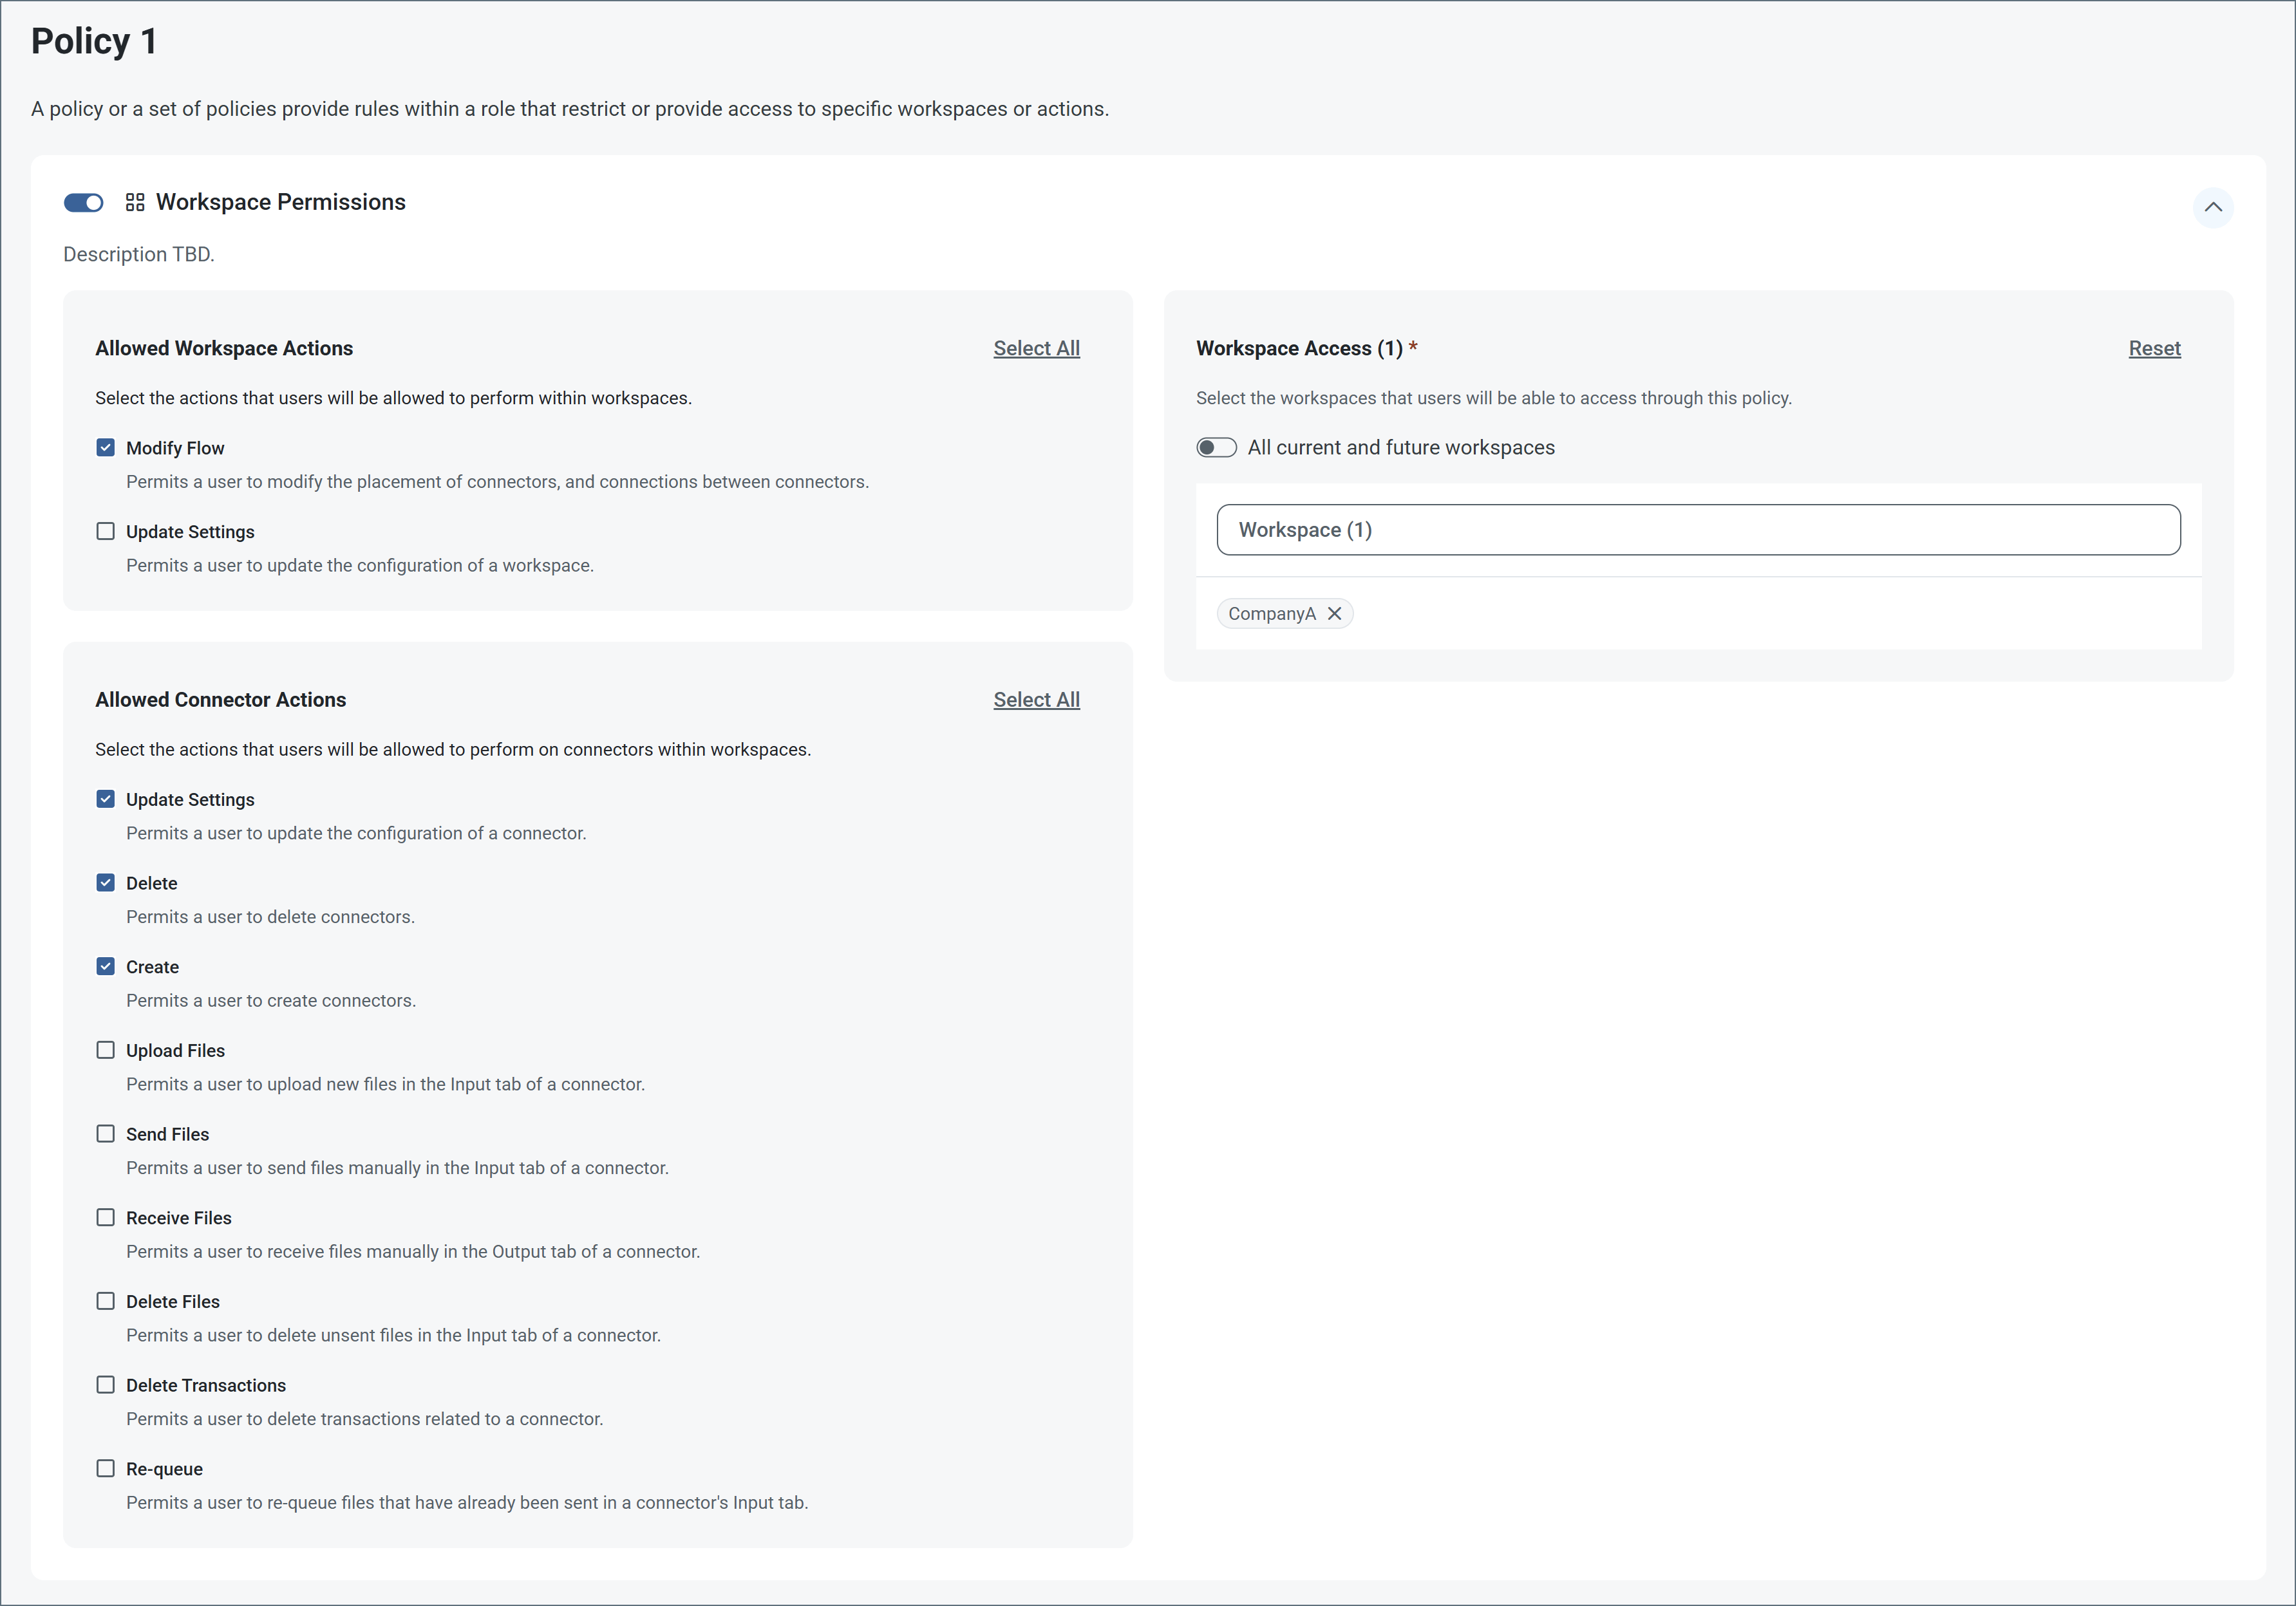
5. Check the checkboxes next to the policy **Allowed Workspace Actions** and **Allowed Connector Actions** permissions you want to assign, then use the **All Workspaces** dropdown to assign the policy to one or more workspaces. To assign it to all workspaces, use the **All current and future workspaces** toggle. The following image shows **Policy 1** with completed **Workspace** and **Connector** permissions.
| Field | Description |
| ------------------------------- | --------------------------------------------------------------------------------------------------------------------------------------------------------------------------------------------------------------------------------------------------------------------------------------------------------------------------------------------------------------- |
| **API Access** | Check **Enable Admin API Access** to grant the user an authtoken that can be used to access the Admin API. See [Admin API Access](#admin-api-access) for details. When you enable API access, the rest of the fields in this table appear. |
| **Token Expiration (days)** | The number of days before the token expires. Check **No Expiration** if you do not want the token to expire. |
| **Authtoken** | The system-generated authtoken. Make sure to copy it to a safe location before saving the user, because it is not shown again. |
| **Maximum Requests per Hour** | Uncheck **Unlimited Requests** to set a limit on the maximum requests per hour for this user. |
| **Maximum Concurrent Requests** | Uncheck **Unlimited Requests** to set a limit on the maximum number of requests that can be sent simultaneously. |
| **Enable OAuth Access** | Check **Enable OAuth Access** to grant the user credentials that can be used to secure public API endpoints for the [Admin API](./admin-api-settings). OAuth 2.0 provides a structured authentication flow for clients that need to manage token lifecycles or integrate with external applications. When you enable OAuth access, the following fields appear: |
| **Grant Type** | The OAuth 2.0 grant type that determines how the client application obtains an access token. **Client Credentials** is currently the only option. |
| **Client Id** | The system-generated client Id token. |
| **Client Secret** | The system-generated client secret. Make sure to copy it to a safe location before saving the user, because it is not shown again. |
| **Access URL** | The endpoint URL used by the client application to request an access token using the configured credentials. |
To add trusted or banned IP ranges specific to this user, click the **Trusted IP Ranges** or **Banned IP Ranges** tabs to add the ranges. You can provide single IP addresses, simple ranges (such as `203.0.113.*` or `203.0.113.1-255`), or Classless Inter-Domain Routing (CIDR) ranges. These tabs also display the global trusted and banned ranges that have been defined on the [Network Access](./network-access) portion of the **Settings > Security** page.
### Single Sign-On
{siteNameShort} supports single sign-on (SSO) via identity providers that implement the OpenID standard. For more information, including specific guidance for Azure AD, see [Single Sign-On](./single-sign-on).
### Admin API Access
Each user is granted an authtoken that can be used to access the [Admin API](./admin-api-settings). For more information on authenticating against the Admin API, see [Admin API Authentication](../../../admin-api/admin-api-authentication).
The specific actions that a user can perform using the Admin API mirror the actions that the same user can perform using the UI. For example, a user that cannot delete connectors in the UI cannot use the Admin API to delete connectors. To perform any action using the Admin API, use an authtoken from an Admin user when invoking the API.
### Password Resets
Every user can have an email address associated with their account. This way, if they need to reset their password, they can click the **Forgot password** link to have a reset link emailed to them. Every password reset that is sent adds a row to the [application log](../activity#application-logs).
Users who do not have an email associated with their account must contact an administrator to have their password reset, so it is best practice for administrators to associate an email with each user account.
If all admin users are locked out of {siteNameShort}, the embedded web servers in each edition provide the ability to reset their password to regain access to the application. This requires administrative access to the installation, and should only be used if there is no user with access available.
For example, in the [Cross-Platform edition](../../installation/cross-platform-edition):
```
java -jar arc.jar -ResetPassword -User -Password -AppDirectory
```
In the [.NET edition](../../installation/windows-edition):
```
CData.Arc.exe -ResetPassword -User -Password -AppDirectory
```
## User Roles
The **Roles** tab displays a table of all roles defined in the application, along with the associated workspaces and a link to all users who can assume each role. Roles enable you to restrict users to only performing certain actions in certain workspaces. The roles assigned to a user affect everything that they see in {siteNameShort}, including but not limited to:
* [Workspaces](../../../flows/workspaces)
* [Reports](../reports)
* [Dashboard data](../dashboard)
* [Logs](../activity)
Every installation of {siteNameShort} includes three built-in roles:
* [Admin](#admin-role)
* [Standard](#standard-role)
* [Support](#support-role)
These are global roles that cannot be edited or deleted. They apply to all workspaces. However, you can define [custom roles](#custom-roles) which limit each user's permissions. Custom roles are made up of *policies*, which provide the most granular control over exactly what users can see or do in {siteNameShort}. Custom roles also identify which workspace(s) users can see and interact with.
The following sections describe each built-in role, explain how to define new policies and roles, and provide an example policy. Use the [comparison table](#user-roles-comparison-table) for help building your own policies and roles.
### Admin Role
The **Admin** role provides full control over the application. An admin can create new [flows](../../../flows), delete existing flows, change [Profile](../profiles) settings, and perform every other operation supported by the console.
In addition, only admins can view the [Audit Log](../activity#audit-logs), which records all changes made by any user in the application in a [tamper-evident manner](../activity#tamper-evident-logging).
### Standard Role
Members of the **Standard** role can create, edit, and delete connectors and flows. However, they cannot change any application-wide settings, such as those exposed in the [Profile](../profiles) page.
Standard users can upload new files into flows, and can upload public certificates for use by connectors. They cannot upload private certificates that are set in a Profile.
### Support Role
The **Support** role is a read-only role; members of this role cannot create or delete flows, or change application settings. **Support** users *can* send files through existing flows using the *Send* operation, but cannot upload new files (in other words, they can only process files already present in the **Transactions** tab of a connector).
### Custom Roles
Custom roles give you more granular control over what each user can see or do in {siteNameShort}. Custom roles are defined by creating policies, which specify the exact permissions members of that role have, as well as which certificate permissions they have. Custom roles also identify which workspace(s) and certificate(s) users can see and interact with.
#### Creating Roles and Policies
1. To create a custom role, navigate to the [Settings page](./settings-page), then the **Roles** tab.
2. Click **Add Role**. Give the role a meaningful name and description, then click **Add Role**.
3. To define the policy, click **Add Policy**.
4. Use the toggles next to **Workspace Permissions** and **Certificate Permissions** to edit the sections you need for your policy.
5. Check the checkboxes next to the policy **Allowed Workspace Actions** and **Allowed Connector Actions** permissions you want to assign, then use the **All Workspaces** dropdown to assign the policy to one or more workspaces. To assign it to all workspaces, use the **All current and future workspaces** toggle. The following image shows **Policy 1** with completed **Workspace** and **Connector** permissions.
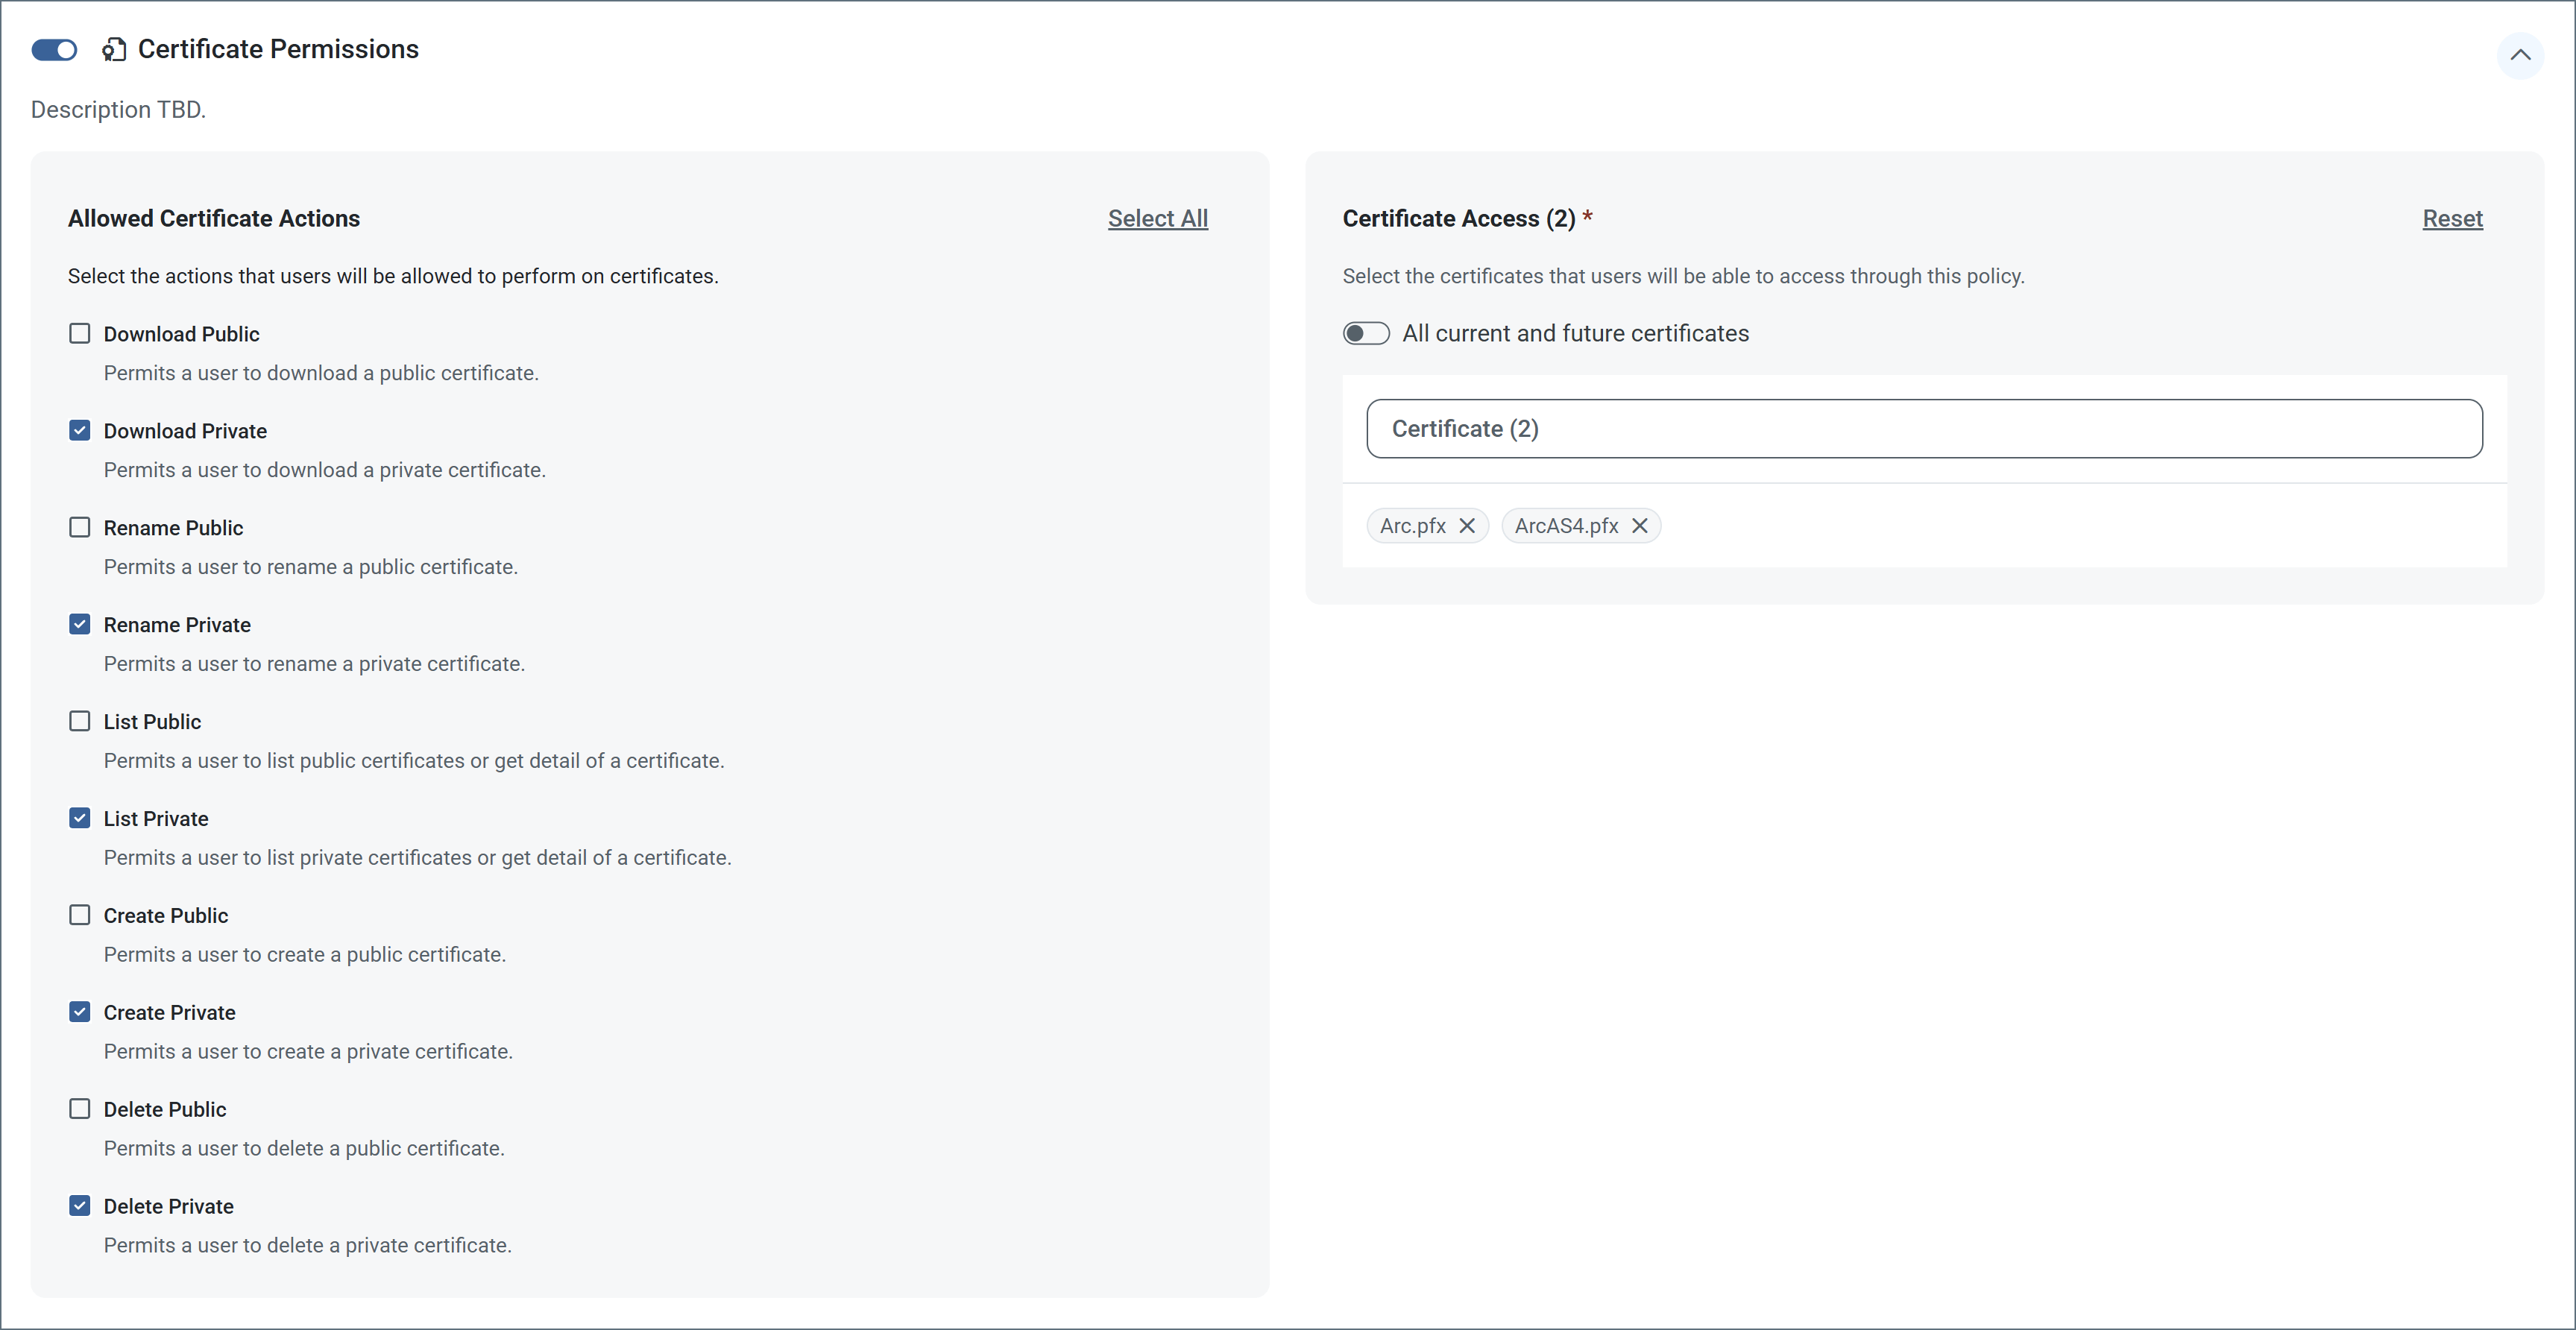
 6. Similarly, the **Certificate Permissions** section of the page gives you control over what users can do with public and private certificates. Check the checkboxes next to the policy certificate permissions you want to assign, then click the **Select Certificates** link to assign the policy to one or more certificates.
 7. To add another policy, click **Add Policy** and repeat the previous steps.
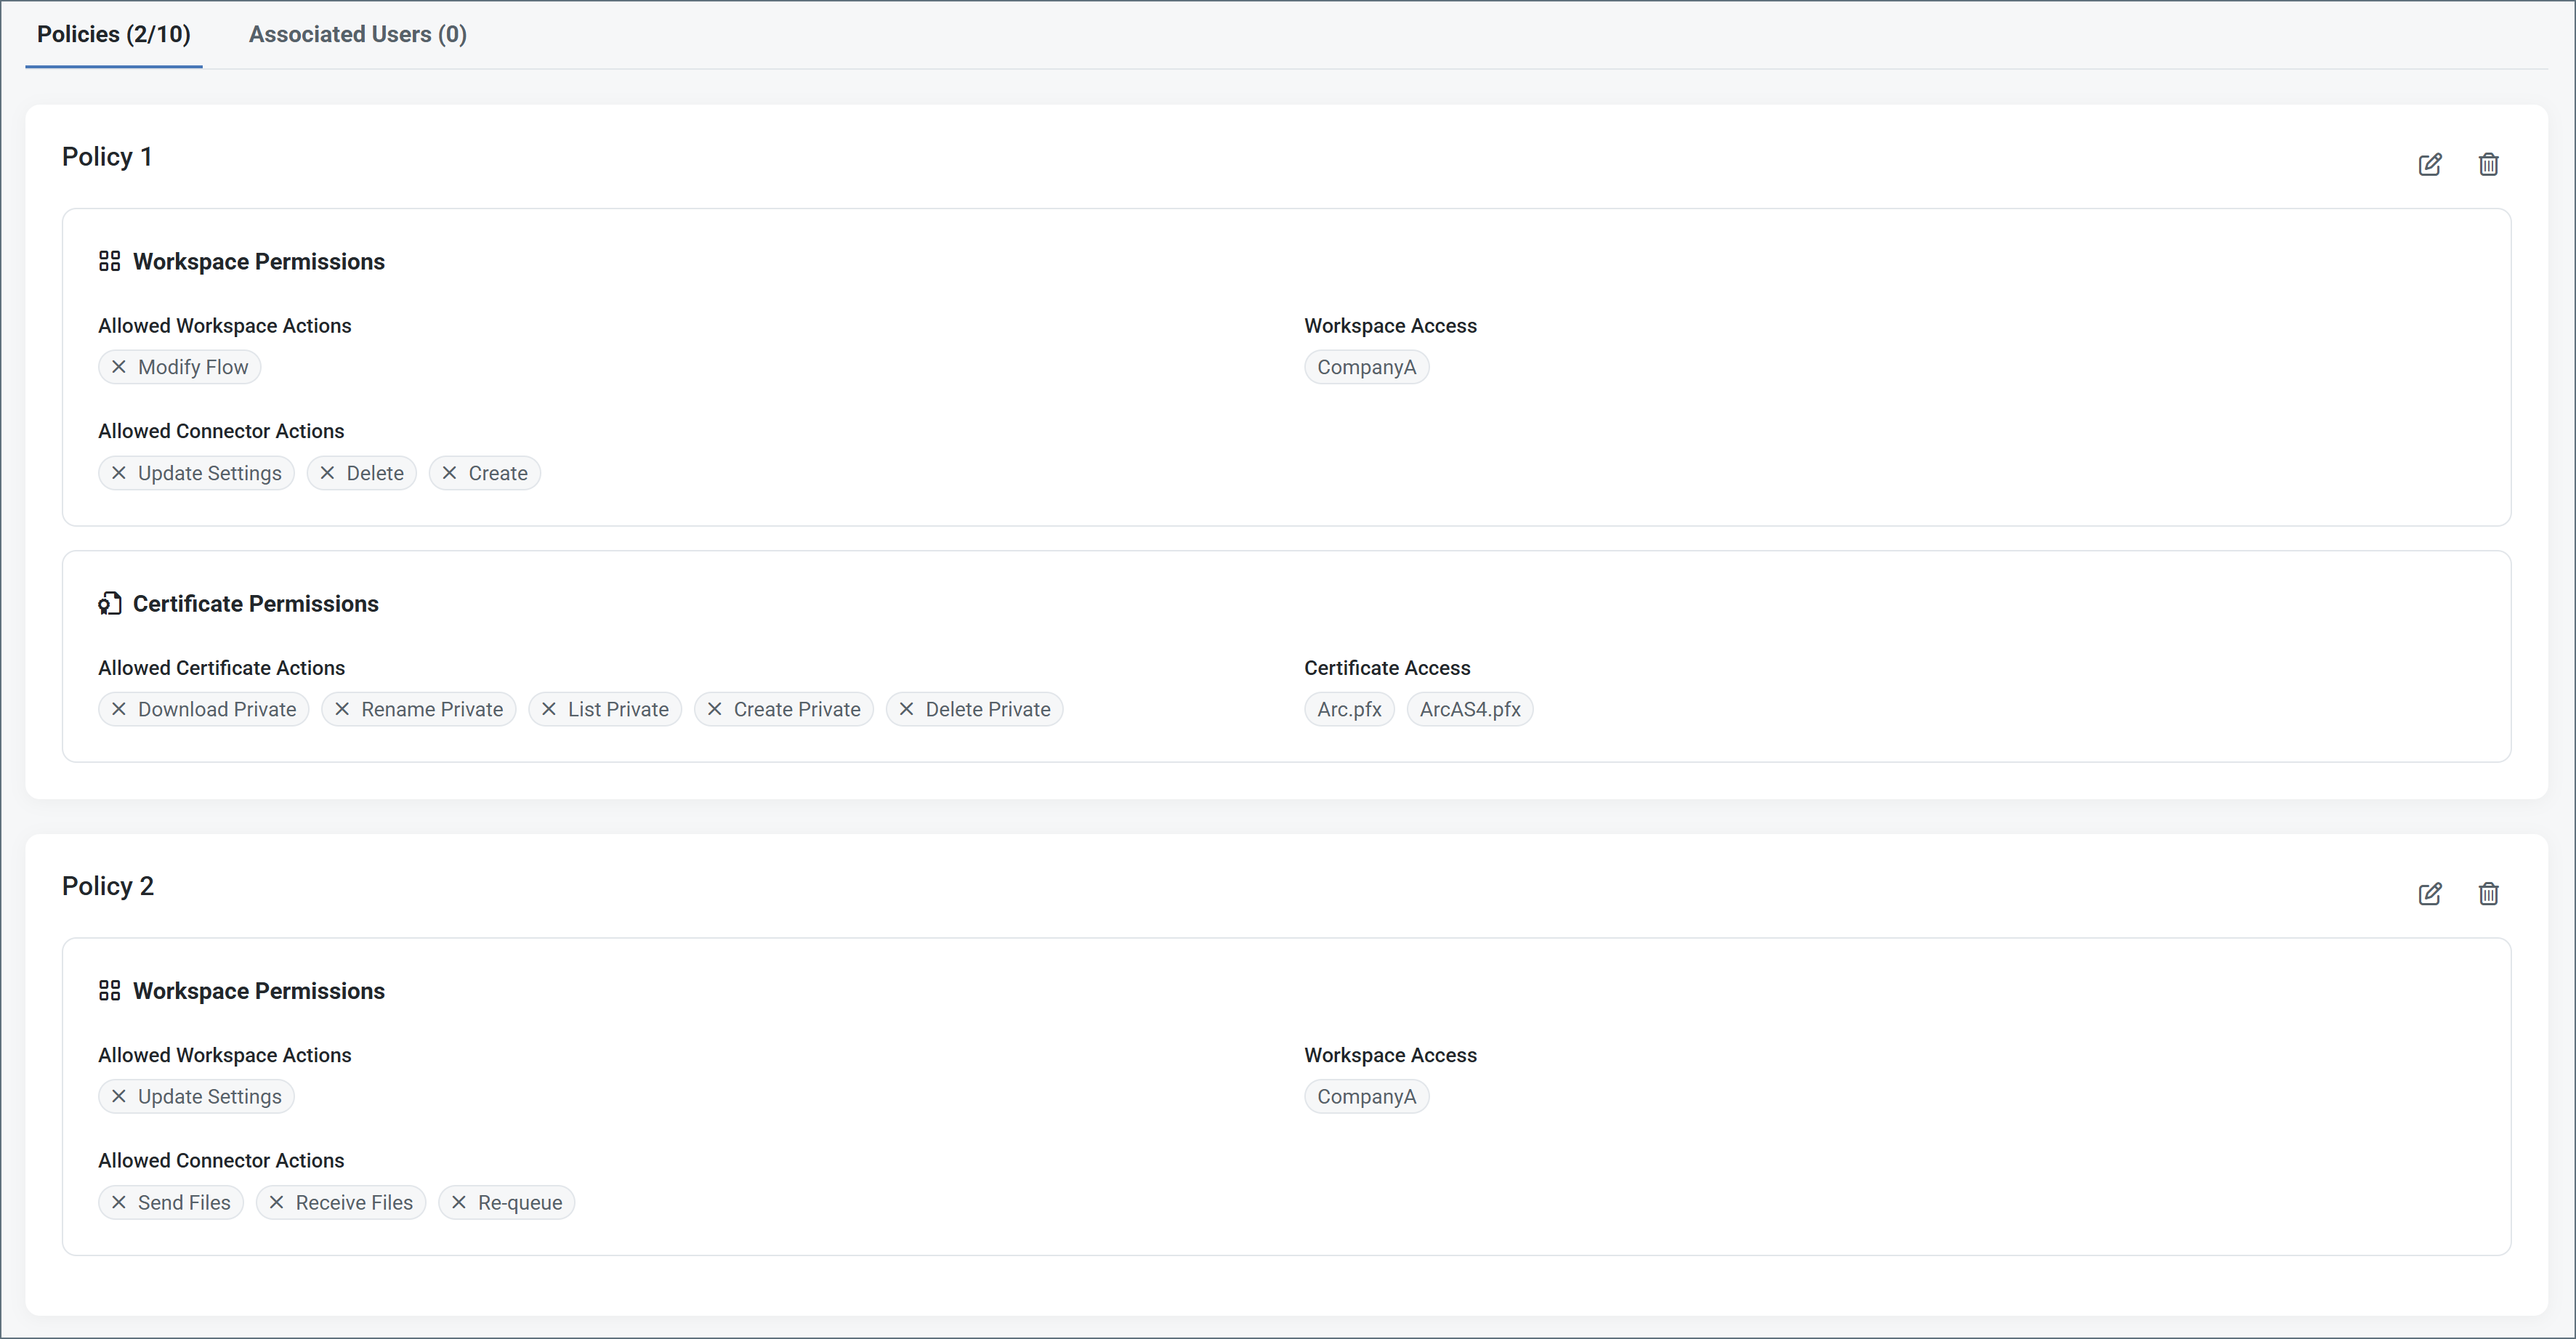
8. When you are finished, click **Save**. The following image shows a role with two policies.
7. To add another policy, click **Add Policy** and repeat the previous steps.
8. When you are finished, click **Save**. The following image shows a role with two policies.
 #### Associating Users with Roles
1. To add users to the role, click the **Associated Users** tab.
2. Click **Add Users**, then select the user(s) who can assume this role.
3. When you are finished, click **Add Users**.
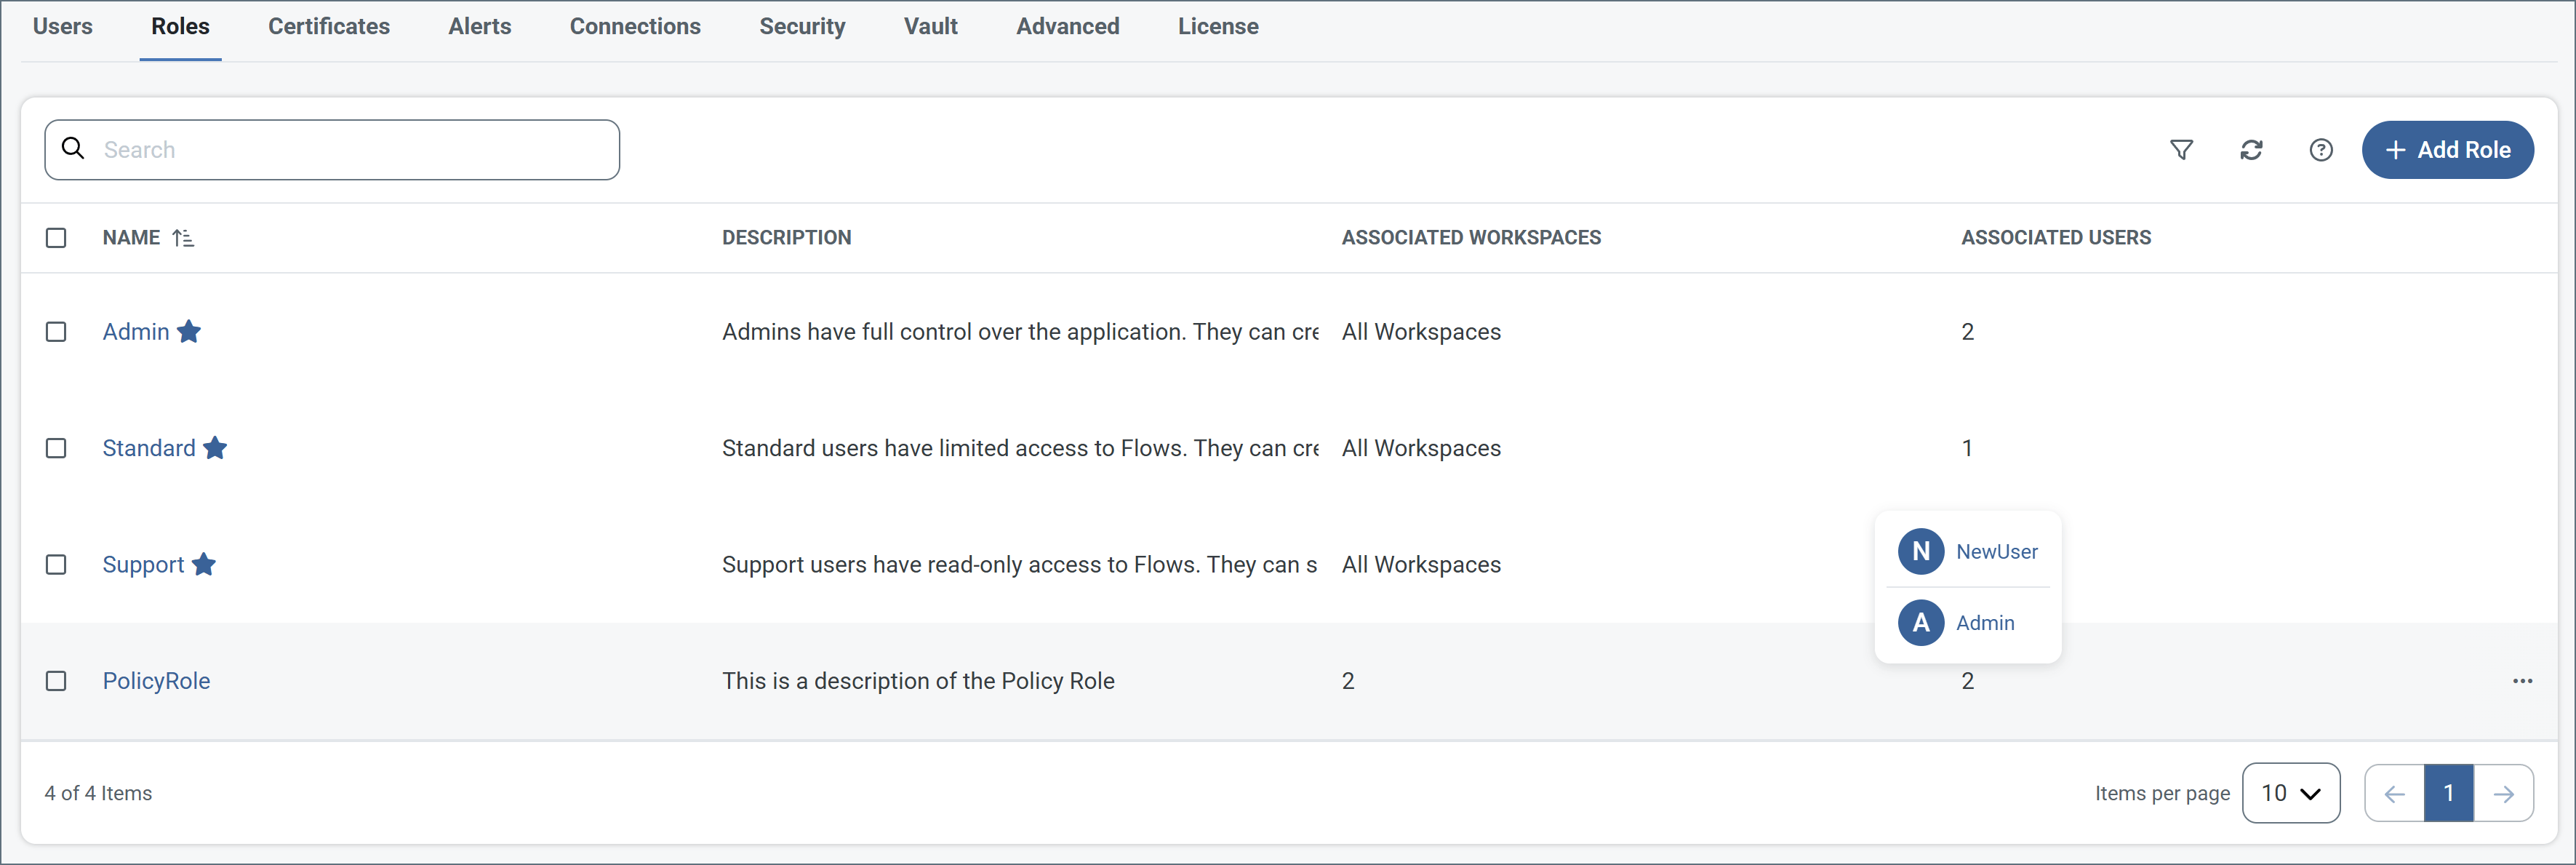
4. Use the **Roles** tab to view summary information for each role, including the associated workspaces and users. Hover over the counts to see details.
#### Associating Users with Roles
1. To add users to the role, click the **Associated Users** tab.
2. Click **Add Users**, then select the user(s) who can assume this role.
3. When you are finished, click **Add Users**.
4. Use the **Roles** tab to view summary information for each role, including the associated workspaces and users. Hover over the counts to see details.
 If a certificate policy includes access to a specific subset of certificates, a user who is governed by that policy can create a new certificate but they cannot view or list it in a connector after its creation. This is because the new certificate is not one of the subset of certificates in the policy.
#### Role and Policy Example
Imagine a scenario where your company has a group of EDI developers. The company has multiple trading partners; we will use two trading partners and two developers for this example.
The trading partner flows are broken up into two separate workspaces: PartnerA and PartnerB. Each EDI developer (DevA and DevB) works primarily in their corresponding workspace (DevA = PartnerA), but they also need to be able to view or send files as necessary in the PartnerB workspace. To manage this, you can create the DevA user, create a custom role for DevA, and assign two policies to the role, as shown in the following image.
If a certificate policy includes access to a specific subset of certificates, a user who is governed by that policy can create a new certificate but they cannot view or list it in a connector after its creation. This is because the new certificate is not one of the subset of certificates in the policy.
#### Role and Policy Example
Imagine a scenario where your company has a group of EDI developers. The company has multiple trading partners; we will use two trading partners and two developers for this example.
The trading partner flows are broken up into two separate workspaces: PartnerA and PartnerB. Each EDI developer (DevA and DevB) works primarily in their corresponding workspace (DevA = PartnerA), but they also need to be able to view or send files as necessary in the PartnerB workspace. To manage this, you can create the DevA user, create a custom role for DevA, and assign two policies to the role, as shown in the following image.
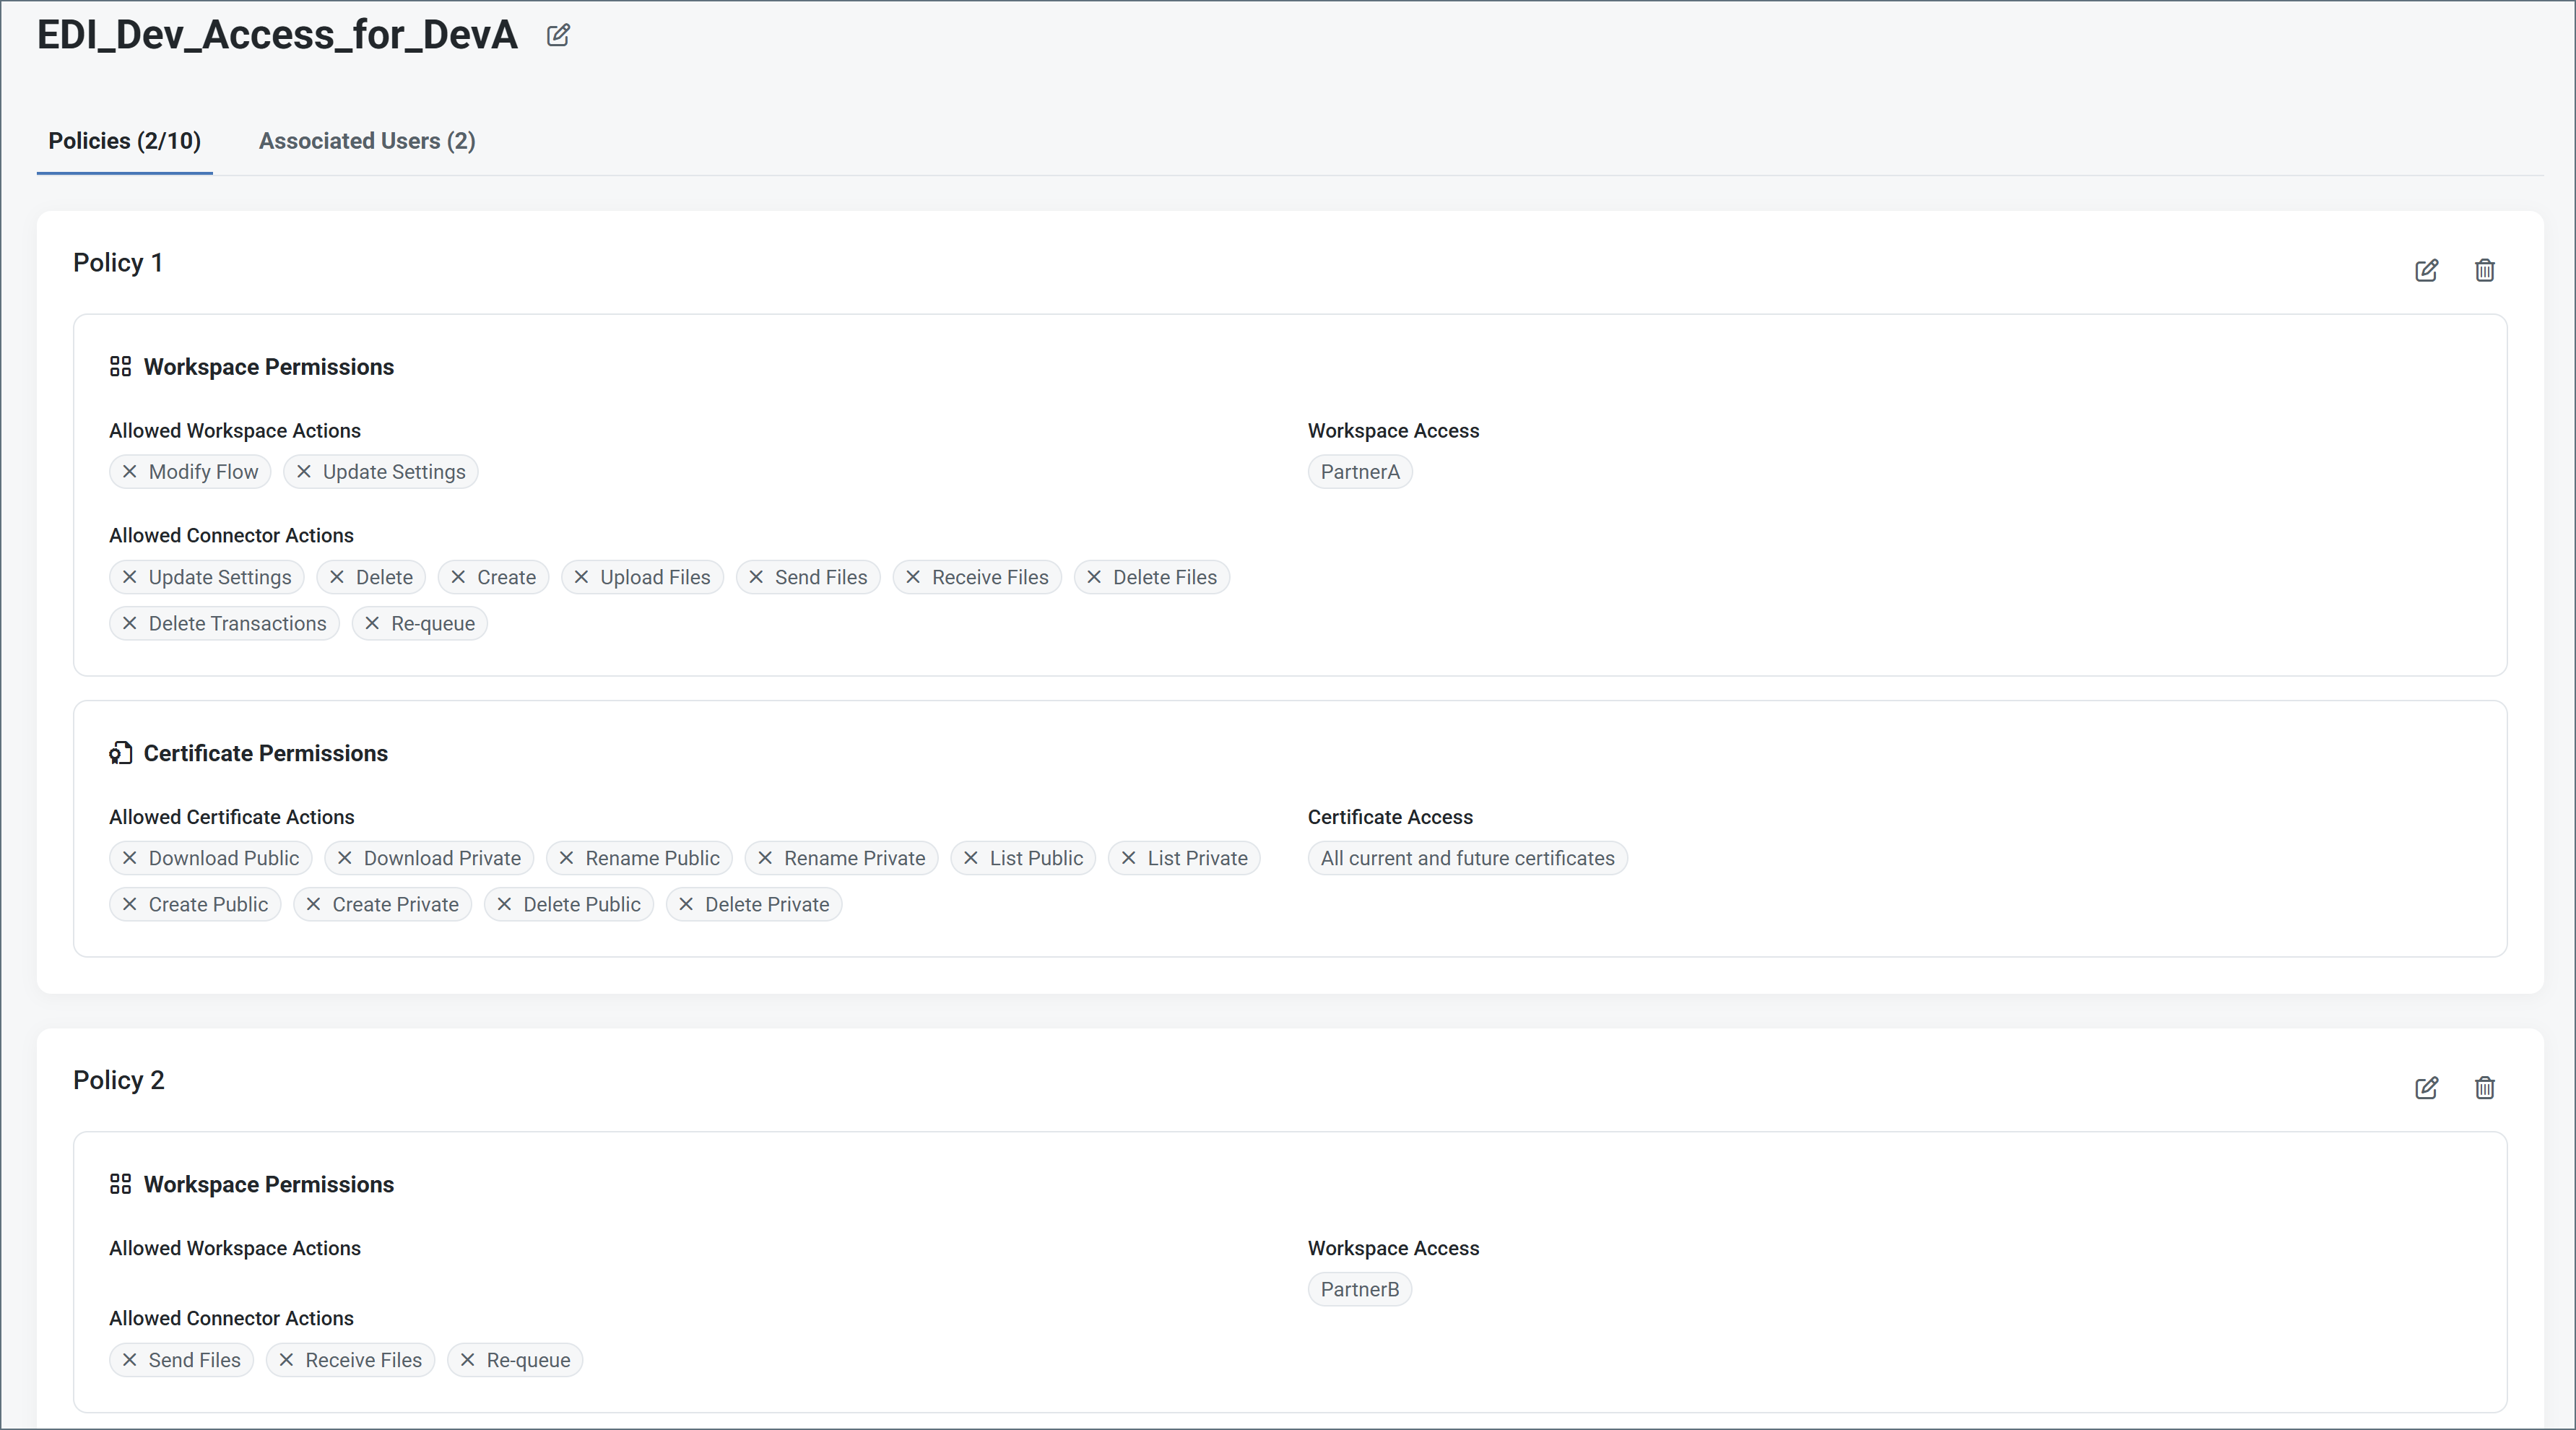 * Policy1 gives DevA full access to the PartnerA workspace.
* Policy2 gives DevA limited access to the PartnerB workspace, allowing them to view and send files, but not create or delete connectors, or modify flows or settings.
### User Roles Comparison Table
This table describes the functionality available in all types of roles.
| Action | Admin | Standard | Support | Custom |
| ----------------------------------------------------- | :---: | :------: | :-----: | :----: |
| Modify Flows | ✔ | ✔ | | ✔ |
| Update Settings | ✔ | ✔ | | ✔ |
| Delete Connectors | ✔ | ✔ | | ✔ |
| Create Connectors | ✔ | ✔ | | ✔ |
| Upload Files | ✔ | ✔ | | ✔ |
| Send Files | ✔ | ✔ | ✔ | ✔ |
| Receive Files (on a connector's **Transactions** tab) | ✔ | ✔ | ✔ | ✔ |
| Delete Files | ✔ | ✔ | | ✔ |
| Delete Transactions | ✔ | ✔ | | ✔ |
| Re-queue | ✔ | ✔ | ✔ | ✔ |
| View Connectors and Flows | ✔ | ✔ | ✔ | ✔ [^1] |
| View Application and Transaction Logs | ✔ | ✔ | ✔ | ✔ [^1] |
| Upload Private Certificate Files to the Profile | ✔ | | | |
| Change Profile Settings | ✔ | | | |
| View Audit Logs | ✔ | | | |
| Add and Manage Users | ✔ | | | |
[^1]: You must have access to the workspace to perform this action.
* Policy1 gives DevA full access to the PartnerA workspace.
* Policy2 gives DevA limited access to the PartnerB workspace, allowing them to view and send files, but not create or delete connectors, or modify flows or settings.
### User Roles Comparison Table
This table describes the functionality available in all types of roles.
| Action | Admin | Standard | Support | Custom |
| ----------------------------------------------------- | :---: | :------: | :-----: | :----: |
| Modify Flows | ✔ | ✔ | | ✔ |
| Update Settings | ✔ | ✔ | | ✔ |
| Delete Connectors | ✔ | ✔ | | ✔ |
| Create Connectors | ✔ | ✔ | | ✔ |
| Upload Files | ✔ | ✔ | | ✔ |
| Send Files | ✔ | ✔ | ✔ | ✔ |
| Receive Files (on a connector's **Transactions** tab) | ✔ | ✔ | ✔ | ✔ |
| Delete Files | ✔ | ✔ | | ✔ |
| Delete Transactions | ✔ | ✔ | | ✔ |
| Re-queue | ✔ | ✔ | ✔ | ✔ |
| View Connectors and Flows | ✔ | ✔ | ✔ | ✔ [^1] |
| View Application and Transaction Logs | ✔ | ✔ | ✔ | ✔ [^1] |
| Upload Private Certificate Files to the Profile | ✔ | | | |
| Change Profile Settings | ✔ | | | |
| View Audit Logs | ✔ | | | |
| Add and Manage Users | ✔ | | | |
[^1]: You must have access to the workspace to perform this action.