> ## Documentation Index
> Fetch the complete documentation index at: https://docs.arc.cdata.com/llms.txt
> Use this file to discover all available pages before exploring further.
# Square Lookup
> Retrieve values from Square and insert them into an Arc message in the flow.
export const DbasaLookupTestLookup = ({datasource = "the data source"}) =>
Use the Test Lookup button to check your configuration and see the result
without having to process files manually. Use the Save Sample Data button to
save the output as a sample for mapping later in the flow.
;
export const DbasaLookupAdvanced = ({datasource = "the data source"}) => <>
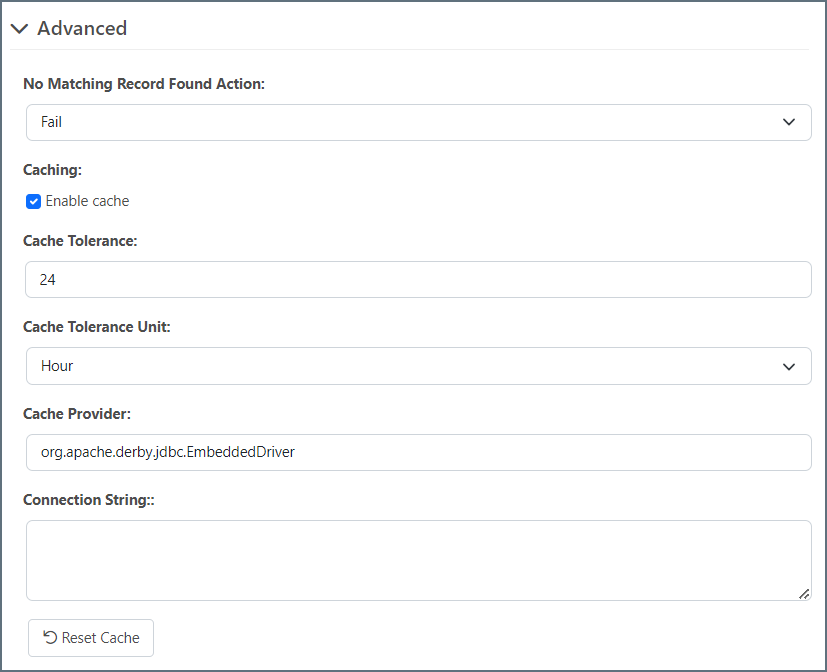
- Use No Matching Record Found Action to specify what should happen if no record is found that matches the query.
-
The {datasource} connector can perform Lookup queries against a local cache instead of
querying {datasource} directly for each Lookup. This can improve query performance,
especially with larger databases. To enable this, check Enable cache and
configure the rest of the fields.
- Cache Tolerance: Controls how often the connector issues a query to the data source to refresh the cache.
- Cache Tolerance Unit: The Cache Tolerance unit. Choose Minute, Hour, or Day.
- Cache Provider: Choose which driver to use to facilitate the connection to the cache database.
- Connection String: When set, the connector uses the database specified here for caching.
- If a query returns no results from the cache, the connector queries {datasource} directly.
- If your query statement contains a
limit, offset, or groupby parameter, the cache function does not work. These queries go directly to {datasource}.
;
export const DbasaLookupQueryMode = ({datasource = "the data source"}) => <>
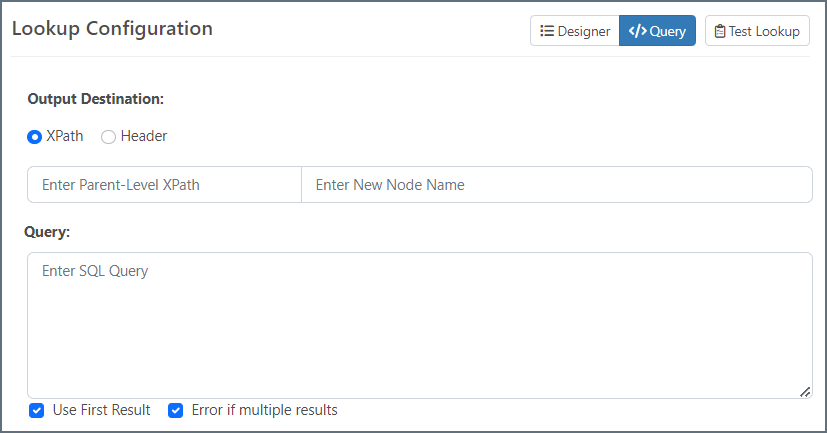
Follow the steps below to use the Query mode to configure a Lookup action for the {datasource} connector.
-
Output Destination: select XPath to insert the query response values into an XML file or Header to insert the query response value into a message header.
- XPath: When you choose XPath, the destination is in two parts. The Parent-Level XPath should already exist in the XML document. The New Node Name is the name of the node that is injected into the XML document to hold the result of the lookup. Each column in the query has its own XML element (leaf level) in the XML element provided here.
- Header: When you choose Header, the connector adds one header to the output message for each column in the query. The values are comma-separated for each record that is returned from the database.
- In Query, enter the SQL query to retrieve data from {datasource} tables.
- XPath: Format the path as
{'${XPATH:/path/to/element}'}. For example, {'SELECT CustomerID FROM Customers WHERE CustomerName = ${XPATH:/Items/Invoices/Customer}'}.
- Header: Format the path as
{'${HEADER:HeaderName}'}.
- The two checkboxes let you configure what should happen when the query returns multiple results.
- Check Use First Result to always use the first result.
- Check Error if multiple results to see an error when multiple results are returned.
;
export const DbasaLookupFilters = () => <>
You can build complex filters by defining individual filters and/or groups of filters. For
readability, expand the Filters section by clicking the expander icon  on the
right side of the bar.
on the
right side of the bar.
To add a filter, click Add Filter or Add Group.
When you build your filters, use the dropdowns to make your selections and choose your
operator. Then specify the value to filter by. You can choose from the following:
- Message Header
- Input XML
- Static Value
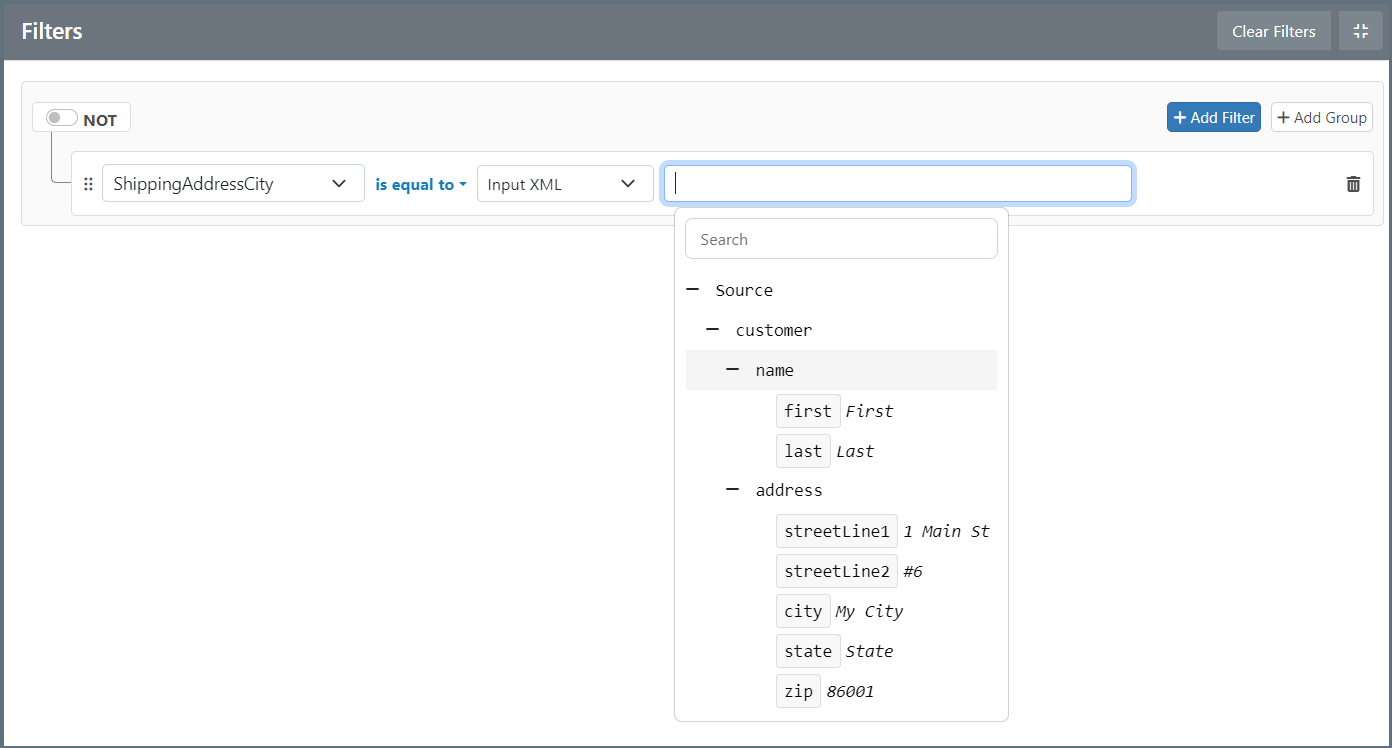
When you select Input XML for a filter, if you have uploaded a sample file, the editor displays
a tree representation of the document so you can easily find the XPath you need, as shown in
the image below.
You can reorder filters and groups. Click the handle  and drag the object to a new location.
;
export const DbasaLookupDesignerMode = ({datasource = "the data source"}) => <>
Follow the steps below to use the Designer to configure a Lookup action for the {datasource} connector.
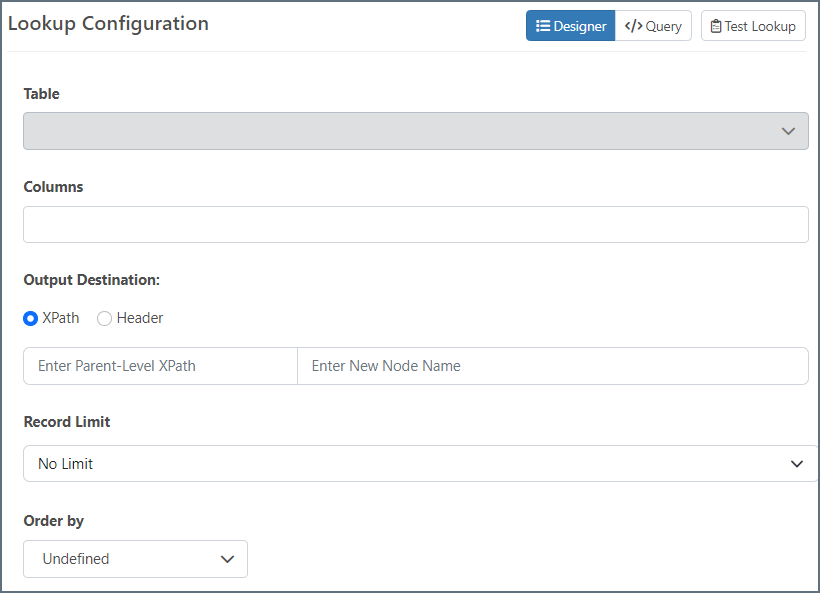
- Use the Table drop-down to select the table to include.
- Choose the set of Columns that you want to include from the table.
-
Output Destination: select XPath to insert the query response values into an XML file or Header to insert the query response value into a message header.
- XPath: When you choose XPath, the destination is in two parts. The Parent-Level XPath should already exist in the XML document. The New Node Name is the name of the node that is injected into the XML document to hold the result of the lookup. Each column in the query has its own XML element (leaf level) in the XML element provided here.
- Header: When you choose Header, the connector adds one header to the output message for each column in the query. The values are comma-separated for each record that is returned from the database.
- Use Record Limit to specify what should happen when the query returns multiple results.
- If you choose Use First Result from the dropdown, you can use the Error if multiple results to see an error when multiple results are returned.
- If you choose Custom Limit, you must specify the limit in the field that appears.
- Use Order by to choose which column to order the results by.
- The Filters section lets you create filters to build the query WHERE clause, including references to headers or XML from the input file.
;
export const DbasaLookupConfiguration = () =>
Use this section to define the table and columns to include in your query.{' '}
Designer Mode helps you pick the table and columns you want to
target with your query, instead of requiring you to build the query free form. However, you can
use Query Mode if you prefer to write your query from scratch.
;
export const DbasaLookupIntro = ({datasource = "the data source", siteName = "CData Arc", siteNameShort = "Arc"}) => <>
The Lookup action retrieves values from {datasource} and inserts those values into an existing
Arc message in the flow.
- In the {siteName} flow, drag an arrow from the connector that will provide input to the {datasource} connector.
- Optionally, choose a Sample File. A sample file is recommended because it allows the connector to provide more context about the file structure and helps you build filter conditions.
- Once you have completed the configuration steps below, in the {siteNameShort} flow, drag an arrow from the {datasource} connector to the connector where you want your resulting XML or Header data to go.
;
## Lookup Configuration
### Designer Mode
### Filters
### Query Mode
## Advanced
## Test Lookup