> ## Documentation Index
> Fetch the complete documentation index at: https://docs.arc.cdata.com/llms.txt
> Use this file to discover all available pages before exploring further.
# .NET Edition
> How to host CData Arc using the embedded server or IIS on Windows, including TLS/SSL, Windows Authentication, and application configuration.
export const versionMajor = "26";
export const companyName = "CData";
export const siteNameShort = "Arc";
export const siteName = "CData Arc";
The .NET edition of {siteName} includes a stand-alone embedded web server and can also be hosted in IIS. This topic describes various options for hosting the application in Windows.
If you do not have experience with IIS, {companyName} recommends you use the embedded server. The embedded server is automatically deployed at installation and provides a simple interface for server-level administration tasks such as configuring logging, running the application as a service, and enabling TLS/SSL.
## Using the Embedded Server
This section shows how to configure the stand-alone, embedded Web server, including how to host SSL/TLS connections and configure the [Cloud Gateway](#cloud-gateway), a reverse SSH tunnel.
When hosted on the embedded server, the application can be run as a Windows service:
1. Right-click the {siteName} icon in the taskbar and click **Server Options**.
2. Select **Run as a Windows Service**.
3. Save your changes.
If you need to install {companyName} drivers on the [Connections](../administration/settings/connections) **Settings** tab, and you encounter a permission error during the installation, grant `write` permission to `www\Web.Config` and `www\bin` for the Arc service account (Network Service by default).
### Host TLS/SSL Connections (Embedded Server)
You can require TLS as well as offer services in plain text. This section shows how to host TLS/SSL connections in the embedded server included with the Windows edition of the application. To deploy TLS/SSL for the Java edition, refer to the documentation for the Java servlet you are using to host the application.
1. Right-click the icon for the application in the Windows system tray and click **Server Options**.
2. On the Web Server tab, select **Enable TLS** and select a port that you want to listen on for TLS connections.
3. Click the button next to the **TLS Server Certificate** box to select a private key certificate. The certificate with private key must be installed to the Local Computer certificate store. If there are no certificates available that match that criteria, click **Create New Certificate** to create a simple certificate for this purpose.
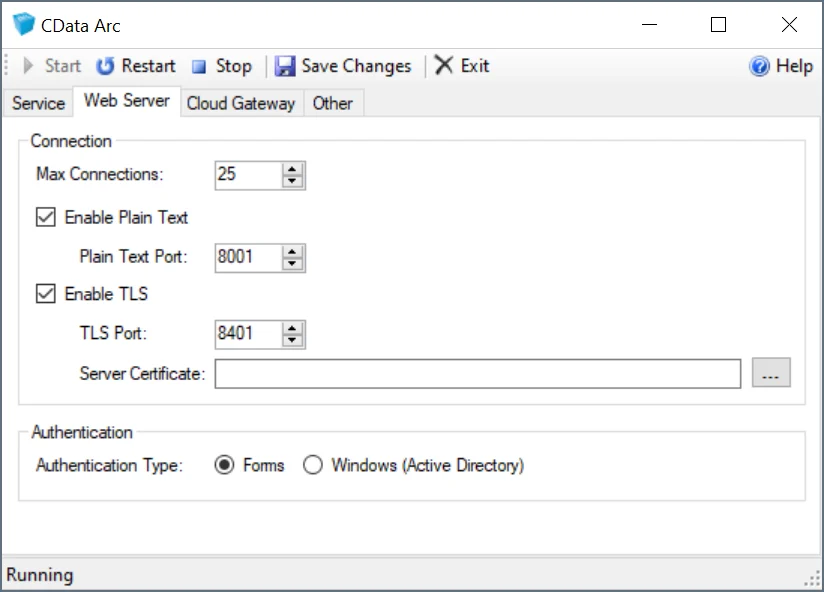 The server restarts and begins serving TLS requests after you save your changes.
#### Manage Personal Certificates
The certificates available in the certificate selection dialog are located in the Personal certificate store for the local computer. To add a certificate to the Windows store:
1. Type **mmc** from the Run menu to launch Microsoft Management Console.
2. Click **File > Add/Remove Snap-In**.
3. Select **Certificates** from the Available snap-ins table and click **Add**.
The server restarts and begins serving TLS requests after you save your changes.
#### Manage Personal Certificates
The certificates available in the certificate selection dialog are located in the Personal certificate store for the local computer. To add a certificate to the Windows store:
1. Type **mmc** from the Run menu to launch Microsoft Management Console.
2. Click **File > Add/Remove Snap-In**.
3. Select **Certificates** from the Available snap-ins table and click **Add**.
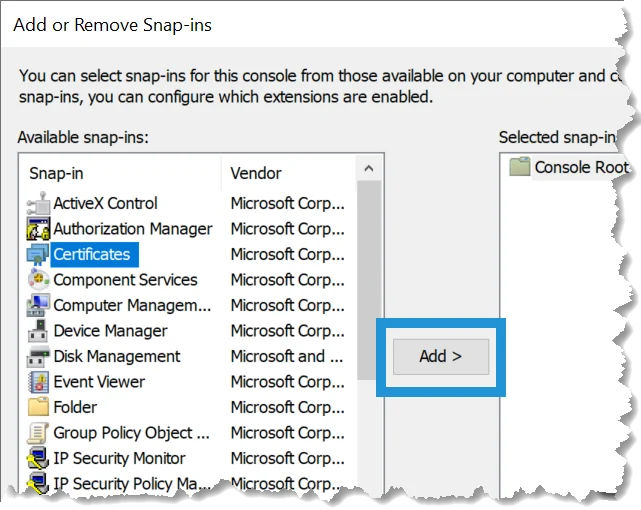 4. Select **Computer Account > Local Computer**.
5. After adding the snap-in, click **Certificates (Local Computer) > Personal > Certificates** to display the available certificates. The certificates for which a private key is available have a key icon superimposed over the certificate icon.
6. To import a certificate from the local disk into this store, click **Action > All Tasks > Import**. After completing the import wizard, the certificates are available in the application certificate selection dialog.
### Cloud Gateway
The Cloud Gateway provides a simple way to expose the application to the internet without the need for firewall changes. As long as a publicly accessible SSH server is available, {siteNameShort} can be accessed via a port on the publicly accessible SSH server by leveraging an SSH reverse tunnel.
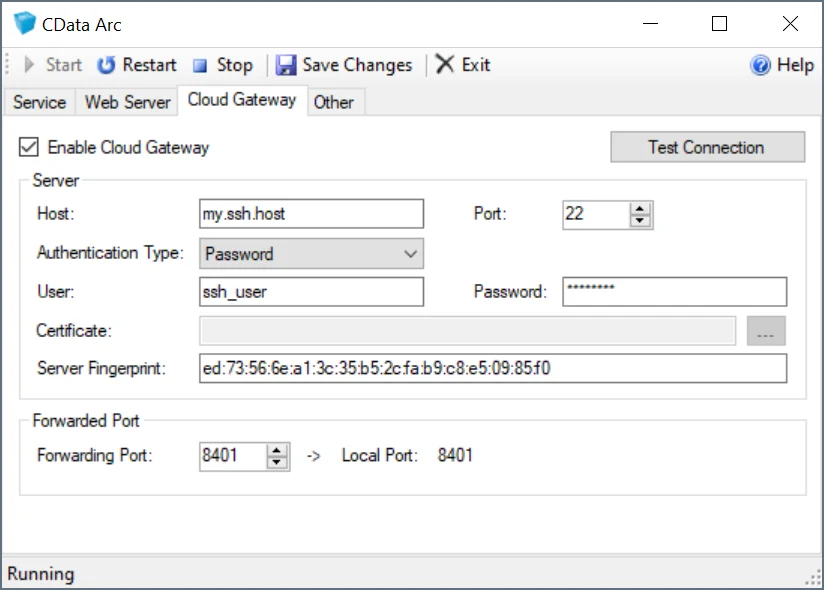
To leverage this functionality, right-click the application icon in the system tray and select **Server Options**. Navigate to the **Cloud Gateway** tab, as shown below, and enter the following information:
4. Select **Computer Account > Local Computer**.
5. After adding the snap-in, click **Certificates (Local Computer) > Personal > Certificates** to display the available certificates. The certificates for which a private key is available have a key icon superimposed over the certificate icon.
6. To import a certificate from the local disk into this store, click **Action > All Tasks > Import**. After completing the import wizard, the certificates are available in the application certificate selection dialog.
### Cloud Gateway
The Cloud Gateway provides a simple way to expose the application to the internet without the need for firewall changes. As long as a publicly accessible SSH server is available, {siteNameShort} can be accessed via a port on the publicly accessible SSH server by leveraging an SSH reverse tunnel.
To leverage this functionality, right-click the application icon in the system tray and select **Server Options**. Navigate to the **Cloud Gateway** tab, as shown below, and enter the following information:
 | Setting | Description |
| ----------------------- | ---------------------------------------------------------------------------------------------------------------------------- |
| **Host** | The SSH server that {siteNameShort} connects to. |
| **Port** | The port on which the SSH host is listening for connections. Most SSH servers listen on port 22, which is the default value. |
| **Authentication Type** | The type of authentication to use. {siteNameShort} supports Password, Public Key, Multi-Factor, and Keyboard Interactive. |
| **User** | The username {siteNameShort} uses to authenticate to the SSH server. |
| **Password** | The password used to authenticate, if required by the selected **Authentication Type**. |
| **Certificate** | The certificate {siteNameShort} uses to authenticate to the SSH server when using Public Key authentication. |
| **Server Fingerprint** | The SSH host key fingerprint of the SSH server. This value is read-only and purely informational. |
| **Forwarding Port** | The port that the publicly available SSH server listens on for connections to forward to {siteNameShort}. |
In addition, you might need to change the configuration of your SSH Server to allow port forwarding. Default SSH server configuration might not always enable port forwarding to non-localhost addresses. For example, if you are connecting to an OpenSSH server, the **GatewayPorts** property must be set to **yes** or **clientspecified** in the SSH server configuration file.
After you enter this information, click **Test Connection** to test the connection to the SSH server to verify the supplied information. If successful, once the application is restarted, {siteNameShort} is accessible via the **Forwarding Port** on the SSH host. For example, if you specify the SSH server *my.ssh.host* with a **Forwarding Port** of 8401, entering `https://my.ssh.host:8401` in a browser causes the communication to be forwarded to the local machine where {siteNameShort} is running, allowing public access even though it is not directly accessible.
### Windows Authentication
By default, the embedded web server uses ASP.NET's forms-based authentication, which requires that a username/password combination be entered into a webform (a login portal) to grant access to the administration console. {siteNameShort} also supports Windows Authentication to grant application access to specific Windows users or security groups.
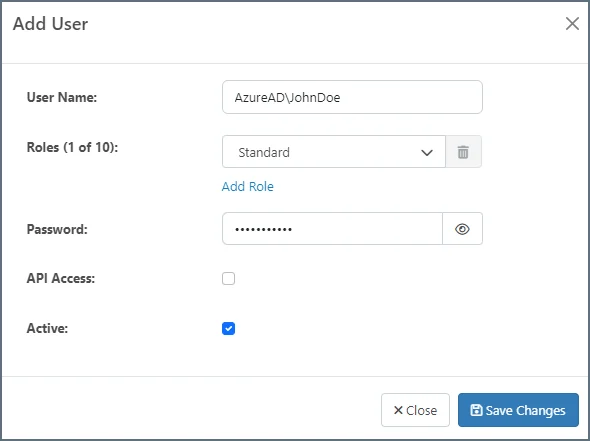
Before enabling Windows Authentication on the embedded web server, you should add all [Users](../administration/settings/user-roles#users) who need access to {siteNameShort} to the {siteNameShort} application. All Windows AD {siteNameShort} user names must use the following syntax: *DOMAIN\Username*. The syntax is shown in the following image.
| Setting | Description |
| ----------------------- | ---------------------------------------------------------------------------------------------------------------------------- |
| **Host** | The SSH server that {siteNameShort} connects to. |
| **Port** | The port on which the SSH host is listening for connections. Most SSH servers listen on port 22, which is the default value. |
| **Authentication Type** | The type of authentication to use. {siteNameShort} supports Password, Public Key, Multi-Factor, and Keyboard Interactive. |
| **User** | The username {siteNameShort} uses to authenticate to the SSH server. |
| **Password** | The password used to authenticate, if required by the selected **Authentication Type**. |
| **Certificate** | The certificate {siteNameShort} uses to authenticate to the SSH server when using Public Key authentication. |
| **Server Fingerprint** | The SSH host key fingerprint of the SSH server. This value is read-only and purely informational. |
| **Forwarding Port** | The port that the publicly available SSH server listens on for connections to forward to {siteNameShort}. |
In addition, you might need to change the configuration of your SSH Server to allow port forwarding. Default SSH server configuration might not always enable port forwarding to non-localhost addresses. For example, if you are connecting to an OpenSSH server, the **GatewayPorts** property must be set to **yes** or **clientspecified** in the SSH server configuration file.
After you enter this information, click **Test Connection** to test the connection to the SSH server to verify the supplied information. If successful, once the application is restarted, {siteNameShort} is accessible via the **Forwarding Port** on the SSH host. For example, if you specify the SSH server *my.ssh.host* with a **Forwarding Port** of 8401, entering `https://my.ssh.host:8401` in a browser causes the communication to be forwarded to the local machine where {siteNameShort} is running, allowing public access even though it is not directly accessible.
### Windows Authentication
By default, the embedded web server uses ASP.NET's forms-based authentication, which requires that a username/password combination be entered into a webform (a login portal) to grant access to the administration console. {siteNameShort} also supports Windows Authentication to grant application access to specific Windows users or security groups.
Before enabling Windows Authentication on the embedded web server, you should add all [Users](../administration/settings/user-roles#users) who need access to {siteNameShort} to the {siteNameShort} application. All Windows AD {siteNameShort} user names must use the following syntax: *DOMAIN\Username*. The syntax is shown in the following image.
 You must add users individually, because an entire group cannot be granted access to the application.
Next, to enable Windows Authentication, open the embedded web server configuration UI (right-click the {siteNameShort} icon in the system tray and select **Server Options**), then toggle the **Authentication Type** field under the **Web Server** tab. Click **Save Changes**. This restarts the web server and the application.
You must add users individually, because an entire group cannot be granted access to the application.
Next, to enable Windows Authentication, open the embedded web server configuration UI (right-click the {siteNameShort} icon in the system tray and select **Server Options**), then toggle the **Authentication Type** field under the **Web Server** tab. Click **Save Changes**. This restarts the web server and the application.
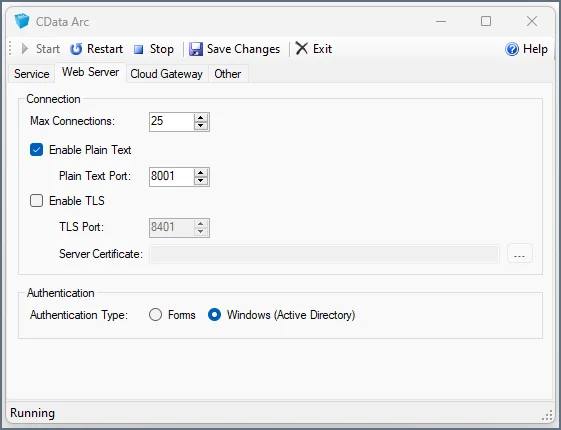 From then on, when Windows AD users who have been added to {siteNameShort} log onto their machines and navigate to {siteNameShort} in the browser, they are automatically logged in.
## Using IIS
{siteNameShort} supports IIS 10, and the [System Requirements](./installation-configuration#system-requirements) specify that your machine must be running Windows 10 or Windows Server 2016 or higher. If you run into difficulties setting up IIS, see the [Troubleshooting IIS](#troubleshooting-iis) section. If you still have questions, contact our support team for further assistance.
#### Create a New Web Application
This example uses the default website.
To host the application on your website:
1. In the IIS Manager, expand the node for your server in the **Connections** panel.
2. Expand the Sites node, right-click your website, and click **Add Application**.
3. In the **Add Application** dialog that is displayed, enter the following information:
| Setting | Description |
| -------------------- | --------------------------------------------------------------------------------------------------------------------------------------------------- |
| **Alias** | The name for the application. For example, `arc`. |
| **Application Pool** | The application pool associated with the application. This example uses `DefaultAppPool`. |
| **Physical Path** | The path to the www directory, in the directory where the application is installed. The default location is `C:\Program Files\CData\CData Arc\www`. |
#### Configure Directory Permissions
The application must have full access to the {siteNameShort} application directory for full functionality.
In ArcESB 2021 and earlier, the application directory and the installation directory were the same: `C:\Program Files\ArcESB\` by default. If you upgraded from a previous version of {siteNameShort} to {siteNameShort} 20{versionMajor}, this is likely still your application directory.
In {siteNameShort} 2021, the application directory was split from the install directory. The installation directory is now `C:\Program Files\CData\CData Arc`. The application directory is now `C:\ProgramData\CData\Arc\`.
The application directory contains the following folders:
* connectors
* data
* db
* locks
* logs
* schemas
* workspaces
The install directory contains:
* Program executables (`CData.Arc.exe` and `arc.exe`) and configuration files
* the `www` folder and subfolders
* the `www_services` folder and subfolders
To set permissions, locate the application directory for your {siteNameShort} installation and follow these steps:
1. Right-click the folder and click **Properties**. On the Security tab, click **Edit > Add**.
2. In the **Enter the object names to select** box, enter the following, substituting the name of the application pool: `IIS AppPool\[your-application-pool]`. For example, `IIS AppPool\DefaultAppPool`.
3. Ensure that the application pool has the following permissions:
* Read
* Write
* Modify
* Read & Execute
* List Folder Contents
You can also use the command line to allow access to the application pool. For example: `icacls "" /grant "IIS APPPOOL\DefaultAppPool":(OI)(M)`
#### Configure Server Permissions
If you are using sftpserver or ftpserver, you must ensure that the application pool has the correct permissions set to the root directory that you have configured for the server. If you created the root directory as a child of the application directory path, setting permissions on the parent application directory and its subfolders should be sufficient.
#### Prevent Application Processes from Unloading
IIS can shut down a web application for several reasons, including when an idle timeout is exceeded, or when it deems the application pool's resource usage is too high. This might prevent background tasks from running in your application. Ensure that the application stays running by modifying the following settings:
1. Enable the optional Application Initialization feature.
In Windows Server 2016, open **Server Manager** and click **Dashboard > Quick Start > Add Roles and Features**. The **Add Roles and Features** wizard opens. In the Server Roles step, click **Web Server (IIS) > Web Server > Application Development > Application Initialization**.
In Windows 10, open the **Control Panel** and click **Programs and Features > Turn Windows Features On or Off**. Click **Internet Information Services > World Wide Web Services > Application Development Features > Application Initialization**.
2. In the IIS Manager, click **Application Pools** in the **Connections** panel.
3. In the workspace, right-click the application pool and click **Advanced Settings**.
4. In the General settings, set **Start Mode** to **AlwaysRunning**.
5. In the Process Model settings, set **Idle Timeout** to **0**.
6. In the CPU section, set **LimitInterval** to **0**.
7. In the Recycling section, set **Regular Time Interval** to **0**.
8. In the Generate Recycle Event Log Entry node, under the Recycling section, set **Regular Time Interval** to **False**. Click the **OK** button.
9. Back in IIS Manager, right-click on your website and click **Manage Website > Advanced Settings**.
10. In the General settings, set **Preload Enabled** to **True**, then click **OK**. This ensures that the application starts up immediately after a recycle.
#### Configure ASP.NET App Pool Recycling
IIS recycles regularly so that it can clean up the ASP.NET app pool processes. You can schedule recycling during off-peak hours instead by navigating to the Recycling section, setting **Specific Time** to **True**, and entering the times to recycle in the format hh:mm:ss.
#### Preloading Applications
IIS's preloading feature improves performance by allowing the application to run prior to a user connecting. To enable this feature, right-click the web application associated with {siteNameShort} in the **Connections** pane and select **Manage Application > Advanced Settings**. In the PreloadEnabled menu, select **True**.
When PreloadEnabled is set to **True**, IIS simulates a user request to the default page of the website or virtual directory so that the application initializes.
#### Confirm Settings
To open the application, navigate to `http://localhost/arc`. If you get any errors, see [Troubleshooting IIS](#troubleshooting-iis).
#### Host TLS/SSL Connections (IIS)
You can use TLS/SSL to protect the confidentiality of your business-critical and mission-critical communications with trading partners. The following steps assume you already have a certificate you can use to enable TLS/SSL on your server.
1. In IIS Manager, click your website's node from the **Connections** pane.
2. Click **Bindings** on the **Actions** pane.
3. Click **Add** and select **HTTPS**.
4. Choose the server certificate.
5. If you want to require TLS/SSL, double-click the SSL/TLS Settings icon in the workspace with your website's node still selected. Select **Require SSL/TLS** and click **Apply** in the Actions pane.
### Windows Authentication
Configuring {siteNameShort} to use Windows Authentication when {siteNameShort} is hosted in IIS is similar to the configuration required to use the .NET [embedded web server](#using-the-embedded-server). However, instead of making changes inside the embedded web server, you make the necessary changes inside IIS.
To set up Windows Authentication when {siteNameShort} is hosted in IIS, follow these steps:
1. Log into {siteNameShort} and add all Windows AD [Users](../administration/settings/user-roles#users) who need access to {siteNameShort} to the application. Windows AD {siteNameShort} user names must use the following syntax: *DOMAIN\Username*.
You must add users individually, because an entire group cannot be granted access to the application.
2. Open IIS to stop the site that is configured for {siteNameShort}. Right-click on the site and select **Manage Website > Stop**.
3. Click the {siteNameShort} site to open the **Home** page. Select **Authentication** under the **IIS** section.
From then on, when Windows AD users who have been added to {siteNameShort} log onto their machines and navigate to {siteNameShort} in the browser, they are automatically logged in.
## Using IIS
{siteNameShort} supports IIS 10, and the [System Requirements](./installation-configuration#system-requirements) specify that your machine must be running Windows 10 or Windows Server 2016 or higher. If you run into difficulties setting up IIS, see the [Troubleshooting IIS](#troubleshooting-iis) section. If you still have questions, contact our support team for further assistance.
#### Create a New Web Application
This example uses the default website.
To host the application on your website:
1. In the IIS Manager, expand the node for your server in the **Connections** panel.
2. Expand the Sites node, right-click your website, and click **Add Application**.
3. In the **Add Application** dialog that is displayed, enter the following information:
| Setting | Description |
| -------------------- | --------------------------------------------------------------------------------------------------------------------------------------------------- |
| **Alias** | The name for the application. For example, `arc`. |
| **Application Pool** | The application pool associated with the application. This example uses `DefaultAppPool`. |
| **Physical Path** | The path to the www directory, in the directory where the application is installed. The default location is `C:\Program Files\CData\CData Arc\www`. |
#### Configure Directory Permissions
The application must have full access to the {siteNameShort} application directory for full functionality.
In ArcESB 2021 and earlier, the application directory and the installation directory were the same: `C:\Program Files\ArcESB\` by default. If you upgraded from a previous version of {siteNameShort} to {siteNameShort} 20{versionMajor}, this is likely still your application directory.
In {siteNameShort} 2021, the application directory was split from the install directory. The installation directory is now `C:\Program Files\CData\CData Arc`. The application directory is now `C:\ProgramData\CData\Arc\`.
The application directory contains the following folders:
* connectors
* data
* db
* locks
* logs
* schemas
* workspaces
The install directory contains:
* Program executables (`CData.Arc.exe` and `arc.exe`) and configuration files
* the `www` folder and subfolders
* the `www_services` folder and subfolders
To set permissions, locate the application directory for your {siteNameShort} installation and follow these steps:
1. Right-click the folder and click **Properties**. On the Security tab, click **Edit > Add**.
2. In the **Enter the object names to select** box, enter the following, substituting the name of the application pool: `IIS AppPool\[your-application-pool]`. For example, `IIS AppPool\DefaultAppPool`.
3. Ensure that the application pool has the following permissions:
* Read
* Write
* Modify
* Read & Execute
* List Folder Contents
You can also use the command line to allow access to the application pool. For example: `icacls "" /grant "IIS APPPOOL\DefaultAppPool":(OI)(M)`
#### Configure Server Permissions
If you are using sftpserver or ftpserver, you must ensure that the application pool has the correct permissions set to the root directory that you have configured for the server. If you created the root directory as a child of the application directory path, setting permissions on the parent application directory and its subfolders should be sufficient.
#### Prevent Application Processes from Unloading
IIS can shut down a web application for several reasons, including when an idle timeout is exceeded, or when it deems the application pool's resource usage is too high. This might prevent background tasks from running in your application. Ensure that the application stays running by modifying the following settings:
1. Enable the optional Application Initialization feature.
In Windows Server 2016, open **Server Manager** and click **Dashboard > Quick Start > Add Roles and Features**. The **Add Roles and Features** wizard opens. In the Server Roles step, click **Web Server (IIS) > Web Server > Application Development > Application Initialization**.
In Windows 10, open the **Control Panel** and click **Programs and Features > Turn Windows Features On or Off**. Click **Internet Information Services > World Wide Web Services > Application Development Features > Application Initialization**.
2. In the IIS Manager, click **Application Pools** in the **Connections** panel.
3. In the workspace, right-click the application pool and click **Advanced Settings**.
4. In the General settings, set **Start Mode** to **AlwaysRunning**.
5. In the Process Model settings, set **Idle Timeout** to **0**.
6. In the CPU section, set **LimitInterval** to **0**.
7. In the Recycling section, set **Regular Time Interval** to **0**.
8. In the Generate Recycle Event Log Entry node, under the Recycling section, set **Regular Time Interval** to **False**. Click the **OK** button.
9. Back in IIS Manager, right-click on your website and click **Manage Website > Advanced Settings**.
10. In the General settings, set **Preload Enabled** to **True**, then click **OK**. This ensures that the application starts up immediately after a recycle.
#### Configure ASP.NET App Pool Recycling
IIS recycles regularly so that it can clean up the ASP.NET app pool processes. You can schedule recycling during off-peak hours instead by navigating to the Recycling section, setting **Specific Time** to **True**, and entering the times to recycle in the format hh:mm:ss.
#### Preloading Applications
IIS's preloading feature improves performance by allowing the application to run prior to a user connecting. To enable this feature, right-click the web application associated with {siteNameShort} in the **Connections** pane and select **Manage Application > Advanced Settings**. In the PreloadEnabled menu, select **True**.
When PreloadEnabled is set to **True**, IIS simulates a user request to the default page of the website or virtual directory so that the application initializes.
#### Confirm Settings
To open the application, navigate to `http://localhost/arc`. If you get any errors, see [Troubleshooting IIS](#troubleshooting-iis).
#### Host TLS/SSL Connections (IIS)
You can use TLS/SSL to protect the confidentiality of your business-critical and mission-critical communications with trading partners. The following steps assume you already have a certificate you can use to enable TLS/SSL on your server.
1. In IIS Manager, click your website's node from the **Connections** pane.
2. Click **Bindings** on the **Actions** pane.
3. Click **Add** and select **HTTPS**.
4. Choose the server certificate.
5. If you want to require TLS/SSL, double-click the SSL/TLS Settings icon in the workspace with your website's node still selected. Select **Require SSL/TLS** and click **Apply** in the Actions pane.
### Windows Authentication
Configuring {siteNameShort} to use Windows Authentication when {siteNameShort} is hosted in IIS is similar to the configuration required to use the .NET [embedded web server](#using-the-embedded-server). However, instead of making changes inside the embedded web server, you make the necessary changes inside IIS.
To set up Windows Authentication when {siteNameShort} is hosted in IIS, follow these steps:
1. Log into {siteNameShort} and add all Windows AD [Users](../administration/settings/user-roles#users) who need access to {siteNameShort} to the application. Windows AD {siteNameShort} user names must use the following syntax: *DOMAIN\Username*.
You must add users individually, because an entire group cannot be granted access to the application.
2. Open IIS to stop the site that is configured for {siteNameShort}. Right-click on the site and select **Manage Website > Stop**.
3. Click the {siteNameShort} site to open the **Home** page. Select **Authentication** under the **IIS** section.
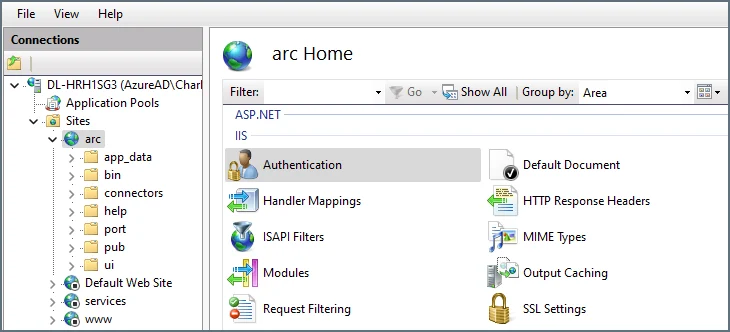 A screen appears listing a set of authentication methods. Right-click **Forms Authentication** and select **Disable**. This turns off the default authentication method that requires logging in with a username and password.
4. Right-click **Windows Authentication** and select **Enable**.
5. Restart your site in IIS.
You might need to edit your Windows Authentication providers in IIS so IIS no longer prompts you for a username and password when accessing {siteNameShort}. To do this from the IIS authentication settings, right-click **Windows Authentication** and select **Providers**. A list of providers opens:
A screen appears listing a set of authentication methods. Right-click **Forms Authentication** and select **Disable**. This turns off the default authentication method that requires logging in with a username and password.
4. Right-click **Windows Authentication** and select **Enable**.
5. Restart your site in IIS.
You might need to edit your Windows Authentication providers in IIS so IIS no longer prompts you for a username and password when accessing {siteNameShort}. To do this from the IIS authentication settings, right-click **Windows Authentication** and select **Providers**. A list of providers opens:
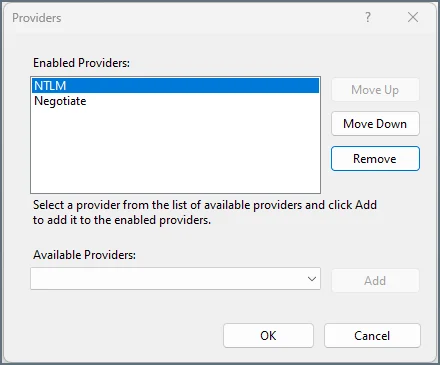 Ensure that **NTLM** is at the top of the list so that provider has priority when {siteNameShort} is authenticating. You might need to completely remove **Negotiate** to stop the username and password requests.
Once Windows Authentication has been correctly configured in IIS, when you access the application you are automatically logged into {siteNameShort} as the logged in Windows AD user.
### Troubleshooting IIS
The sections below provide resolutions for several common errors.
#### The application stops responding some time after I log out
IIS might be unloading your application after it times out from inactivity. By default, IIS terminates the worker process assigned to the application after 20 minutes of inactivity. See [Prevent Application Processes from Unloading](#prevent-application-processes-from-unloading) to learn how to override this feature.
#### Visiting [http://localhost/application](http://localhost/application) results in a "Page Cannot Be Displayed" error (an HTTP 404 error)
This can be an indication that ASP.NET is not enabled. If you are able to browse to a static image like the favicon.ico successfully (for example, `http://localhost/arc/favicon.ico`), but not to login.rst, this is a strong indication that ASP.NET is not enabled.
In IIS, select **Control Panel > Programs (or Programs and Features) > Turn Windows Features On or Off > Internet Information Services > World Wide Web Services > Application Development Features**. Select the check box next to **ASP.NET**.
#### The section is locked at a parent level
Locking is either by default (`overrideModeDefault="Deny"`), or set explicitly by a location tag with `overrideMode="Deny"` or the legacy `allowOverride="false"`.
This error can occur if ASP.NET is not installed.
#### HTTP 503 Error: The service is unavailable
This error can appear if you select a port in IIS that you have previously used with the {siteNameShort} embedded web server. It means the service did not start successfully. IIS does not report any issues when starting the service, but the error appears when you attempt to reach the site. This happens because the embedded web server reserves any ports that you bind against so that any other process that attempts to bind on that port cannot make that reservation.
To confirm the issue is caused by a port reservation, open a command prompt and run the following command:
```
netsh http show urlacl
```
This lists all reserved entries on the machine. If the URL that you are trying to bind is in the list (for example, `Reserved URL : http://+:8001/`) you can use another `netsh` command to remove the reservation (use the same value from the `show` list). For example, the following port removes the reservation from port `8001`:
```
netsh http delete urlacl http://+:8001/
```
## Managing Users
When you first launch {siteNameShort}, it prompts you to create a user with username/password credentials. Once the first user is created, users can be added, deleted, and managed on the **Users** tab of the [Settings page](../administration/settings/settings-page).
See [User Roles](../administration/settings/user-roles) to learn more about user management and roles.
## Configuring the Application Directory
The {siteNameShort} application directory contains all of the data used by the application: configuration data, application data, logging data, certificates, etc. The application directory defaults to the following location:
```
C:\ProgramData\CData\Arc
```
You can change the application directory to a different folder, which is useful in several scenarios:
* [Clustering](../administration/clustering) multiple instances of {siteNameShort}
* Using a shared network drive for application data
* Embedding {siteNameShort} within other systems accessing the same folders
Changing the application directory moves the application's data files, but it does not move other application resources, such as .exe's or .jar's.
### Change the Application Directory
To set a custom application directory, open the `Web.Config` file in the `www` folder of the installation directory. At the bottom of the file, inside the `` tags, locate this value:
```xml theme={null}
```
Replace the text inside the quotation marks after `value` with the new application directory. This can be any local or network path to which the application has read and write permissions.
## Configuring the Application Database
The {siteNameShort} application database stores several tables of application data, including:
* Transaction Log (metadata for each transaction processed by the application)
* Application Log (application-level errors and events)
* Access Log (requests to the application's web endpoint)
* Audit Log (user-made changes to the {siteNameShort} configuration)
By default, {siteNameShort} uses a SQLite database in the installation directory as the application database. This database is recommended for up to 100,000 transactions. Once you hit that number, {companyName} recommends moving to an external database. You can configure the application to use an enterprise database like SQL Server, PostgreSQL, or MySQL.
For security reasons, if you ever switch to a different application database, you must run the [integrityResetTampering](../../scripting/operations/op-integrity-reset-tampering) operation to reset the hash chain.
The application database is configured in the `Web.Config` file in the `www` folder of the installation directory. It contains a commented-out `AppDb` block that describes the following `connectionStrings` tag. Set the connection string and provider name for the target database in the `AppDb` key.
### Set the Connection Strings
The following sections provide example connection strings for various server configurations in the `Web.Config` file. You can set these values in plain text, or you can [generate an encrypted connection string](#generating-an-encrypted-database-connection-string) to use for the `connectionString` value.
#### SQL Server
```xml theme={null}
```
To reduce the possibility of deadlocks when using SQL Server as your application database, CData recommends that you ensure that READ\_COMMITTED\_SNAPSHOT is enabled.
#### MySQL
```xml theme={null}
```
#### PostgreSQL
```xml theme={null}
```
### Generating an Encrypted Database Connection String
{siteNameShort} provides the ability to generate an encrypted connection string for your application database connection. You can use this encrypted connection string to specify the application database without storing your login credentials in plain text in the {siteNameShort} configuration files. To generate an encrypted connection string, issue the following command in the installation directory where `CData.Arc.exe` is located, substituting your connection information for the example string at the end:
```
CData.Arc.exe -EncryptConnectionString server=serverName;database=databaseName;user=userName;password=passwordSample;
```
After you issue the command, the command window prints the encrypted string. For example:
```
ENCRYPTEDA:XuUY73BQHKdzWn52z6AqLvZ7uG6jlwkcsQL8yGM8sQ2Znfm1HwG6BpH+LP92mGBBCQX2/IWMal2V5a1AujfltOwResXjAijDzxJ7JmvgUt4=
```
You can then use this encrypted string in place of the plain text value for `connectionString` as shown in [Set the Connection Strings](#set-the-connection-strings).
### Specifying the Default Character Set (MySQL only)
For MySQL versions such as MySQL 8.0 and later, the default character set (charset) for the database and its tables is UTF8 (specifically `utf8mb4`). However, in versions of MySQL prior to 8.0, the default charset is typically Latin1, which can cause issues with data that includes characters outside the basic Latin alphabet.
If you use an older version of MySQL you can avoid these problems by configuring the database to use `utf8mb4` instead. You have two ways to make this change: update the existing database directly, or use MySQL's export and import tools to migrate the data to a new UTF8-encoded database.
#### Update the Database Directly
1. Backup the database: `mysqldump -u root -p --default-character-set=latin1 --databases [database name] > backup.sql`
2. Change the default charset to UTF8: `ALTER DATABASE [database name] CHARACTER SET utf8mb4 COLLATE utf8mb4_unicode_ci;`
3. Generate SQL statements to change the default charset to UTF8 for all database tables:
```
SELECT CONCAT('ALTER TABLE ', table_name, ' CONVERT TO CHARACTER SET utf8mb4 COLLATE utf8mb4_unicode_ci;') AS alter_sql
FROM information_schema.TABLES
WHERE table_schema = '[database name]' AND table_type = 'BASE TABLE';
```
4. Execute the SQL statements generated in the previous step.
#### Use the Export and Import Tools
1. Export the Data Definition Language (DDL) and data:
```
mysqldump -u root -p --default-character-set=latin1 --no-create-info [database name] > data.sql
mysqldump -u root -p --no-data [database name] > schemas.sql
```
2. Change the default charset in schemas.sql from `CHARSET=latin1` to `CHARSET=utf8mb4`.
3. Create a new database with UTF8 as the default charset: `CREATE DATABASE [new database name] CHARACTER SET utf8mb4 COLLATE utf8mb4_unicode_ci;`
4. Import to the new database:
```
mysql -u root -p [new database name] < schema.sql
mysql -u root -p [new database name] < data.sql
```
## Setting Login Lockouts
In order to prevent brute force attacks, {siteNameShort} automatically locks out users who enter incorrect passwords too many times. By default, a user who enters 6 incorrect passwords within 5 minutes is locked out for 30 minutes when the 7th try fails.
You can modify these settings by editing the `Web.Config` file in the `www` folder of the installation directory. There are 3 settings relevant to lockouts:
* **LockoutFailedAttempts**: the number of incorrect passwords that trigger a lockout (set this to 0 to disable lockouts)
* **LockoutMinutes**: the duration of the lockout (default 30 minutes)
* **LockoutTimeCheckPeriod**: the period after which the number of failed attempts is reset to 0 (default 5 minutes)
Each of these can be set under the `` tag in the `Web.Config` file. For example, the following snippet disables lockouts:
```xml theme={null}
```
Ensure that **NTLM** is at the top of the list so that provider has priority when {siteNameShort} is authenticating. You might need to completely remove **Negotiate** to stop the username and password requests.
Once Windows Authentication has been correctly configured in IIS, when you access the application you are automatically logged into {siteNameShort} as the logged in Windows AD user.
### Troubleshooting IIS
The sections below provide resolutions for several common errors.
#### The application stops responding some time after I log out
IIS might be unloading your application after it times out from inactivity. By default, IIS terminates the worker process assigned to the application after 20 minutes of inactivity. See [Prevent Application Processes from Unloading](#prevent-application-processes-from-unloading) to learn how to override this feature.
#### Visiting [http://localhost/application](http://localhost/application) results in a "Page Cannot Be Displayed" error (an HTTP 404 error)
This can be an indication that ASP.NET is not enabled. If you are able to browse to a static image like the favicon.ico successfully (for example, `http://localhost/arc/favicon.ico`), but not to login.rst, this is a strong indication that ASP.NET is not enabled.
In IIS, select **Control Panel > Programs (or Programs and Features) > Turn Windows Features On or Off > Internet Information Services > World Wide Web Services > Application Development Features**. Select the check box next to **ASP.NET**.
#### The section is locked at a parent level
Locking is either by default (`overrideModeDefault="Deny"`), or set explicitly by a location tag with `overrideMode="Deny"` or the legacy `allowOverride="false"`.
This error can occur if ASP.NET is not installed.
#### HTTP 503 Error: The service is unavailable
This error can appear if you select a port in IIS that you have previously used with the {siteNameShort} embedded web server. It means the service did not start successfully. IIS does not report any issues when starting the service, but the error appears when you attempt to reach the site. This happens because the embedded web server reserves any ports that you bind against so that any other process that attempts to bind on that port cannot make that reservation.
To confirm the issue is caused by a port reservation, open a command prompt and run the following command:
```
netsh http show urlacl
```
This lists all reserved entries on the machine. If the URL that you are trying to bind is in the list (for example, `Reserved URL : http://+:8001/`) you can use another `netsh` command to remove the reservation (use the same value from the `show` list). For example, the following port removes the reservation from port `8001`:
```
netsh http delete urlacl http://+:8001/
```
## Managing Users
When you first launch {siteNameShort}, it prompts you to create a user with username/password credentials. Once the first user is created, users can be added, deleted, and managed on the **Users** tab of the [Settings page](../administration/settings/settings-page).
See [User Roles](../administration/settings/user-roles) to learn more about user management and roles.
## Configuring the Application Directory
The {siteNameShort} application directory contains all of the data used by the application: configuration data, application data, logging data, certificates, etc. The application directory defaults to the following location:
```
C:\ProgramData\CData\Arc
```
You can change the application directory to a different folder, which is useful in several scenarios:
* [Clustering](../administration/clustering) multiple instances of {siteNameShort}
* Using a shared network drive for application data
* Embedding {siteNameShort} within other systems accessing the same folders
Changing the application directory moves the application's data files, but it does not move other application resources, such as .exe's or .jar's.
### Change the Application Directory
To set a custom application directory, open the `Web.Config` file in the `www` folder of the installation directory. At the bottom of the file, inside the `` tags, locate this value:
```xml theme={null}
```
Replace the text inside the quotation marks after `value` with the new application directory. This can be any local or network path to which the application has read and write permissions.
## Configuring the Application Database
The {siteNameShort} application database stores several tables of application data, including:
* Transaction Log (metadata for each transaction processed by the application)
* Application Log (application-level errors and events)
* Access Log (requests to the application's web endpoint)
* Audit Log (user-made changes to the {siteNameShort} configuration)
By default, {siteNameShort} uses a SQLite database in the installation directory as the application database. This database is recommended for up to 100,000 transactions. Once you hit that number, {companyName} recommends moving to an external database. You can configure the application to use an enterprise database like SQL Server, PostgreSQL, or MySQL.
For security reasons, if you ever switch to a different application database, you must run the [integrityResetTampering](../../scripting/operations/op-integrity-reset-tampering) operation to reset the hash chain.
The application database is configured in the `Web.Config` file in the `www` folder of the installation directory. It contains a commented-out `AppDb` block that describes the following `connectionStrings` tag. Set the connection string and provider name for the target database in the `AppDb` key.
### Set the Connection Strings
The following sections provide example connection strings for various server configurations in the `Web.Config` file. You can set these values in plain text, or you can [generate an encrypted connection string](#generating-an-encrypted-database-connection-string) to use for the `connectionString` value.
#### SQL Server
```xml theme={null}
```
To reduce the possibility of deadlocks when using SQL Server as your application database, CData recommends that you ensure that READ\_COMMITTED\_SNAPSHOT is enabled.
#### MySQL
```xml theme={null}
```
#### PostgreSQL
```xml theme={null}
```
### Generating an Encrypted Database Connection String
{siteNameShort} provides the ability to generate an encrypted connection string for your application database connection. You can use this encrypted connection string to specify the application database without storing your login credentials in plain text in the {siteNameShort} configuration files. To generate an encrypted connection string, issue the following command in the installation directory where `CData.Arc.exe` is located, substituting your connection information for the example string at the end:
```
CData.Arc.exe -EncryptConnectionString server=serverName;database=databaseName;user=userName;password=passwordSample;
```
After you issue the command, the command window prints the encrypted string. For example:
```
ENCRYPTEDA:XuUY73BQHKdzWn52z6AqLvZ7uG6jlwkcsQL8yGM8sQ2Znfm1HwG6BpH+LP92mGBBCQX2/IWMal2V5a1AujfltOwResXjAijDzxJ7JmvgUt4=
```
You can then use this encrypted string in place of the plain text value for `connectionString` as shown in [Set the Connection Strings](#set-the-connection-strings).
### Specifying the Default Character Set (MySQL only)
For MySQL versions such as MySQL 8.0 and later, the default character set (charset) for the database and its tables is UTF8 (specifically `utf8mb4`). However, in versions of MySQL prior to 8.0, the default charset is typically Latin1, which can cause issues with data that includes characters outside the basic Latin alphabet.
If you use an older version of MySQL you can avoid these problems by configuring the database to use `utf8mb4` instead. You have two ways to make this change: update the existing database directly, or use MySQL's export and import tools to migrate the data to a new UTF8-encoded database.
#### Update the Database Directly
1. Backup the database: `mysqldump -u root -p --default-character-set=latin1 --databases [database name] > backup.sql`
2. Change the default charset to UTF8: `ALTER DATABASE [database name] CHARACTER SET utf8mb4 COLLATE utf8mb4_unicode_ci;`
3. Generate SQL statements to change the default charset to UTF8 for all database tables:
```
SELECT CONCAT('ALTER TABLE ', table_name, ' CONVERT TO CHARACTER SET utf8mb4 COLLATE utf8mb4_unicode_ci;') AS alter_sql
FROM information_schema.TABLES
WHERE table_schema = '[database name]' AND table_type = 'BASE TABLE';
```
4. Execute the SQL statements generated in the previous step.
#### Use the Export and Import Tools
1. Export the Data Definition Language (DDL) and data:
```
mysqldump -u root -p --default-character-set=latin1 --no-create-info [database name] > data.sql
mysqldump -u root -p --no-data [database name] > schemas.sql
```
2. Change the default charset in schemas.sql from `CHARSET=latin1` to `CHARSET=utf8mb4`.
3. Create a new database with UTF8 as the default charset: `CREATE DATABASE [new database name] CHARACTER SET utf8mb4 COLLATE utf8mb4_unicode_ci;`
4. Import to the new database:
```
mysql -u root -p [new database name] < schema.sql
mysql -u root -p [new database name] < data.sql
```
## Setting Login Lockouts
In order to prevent brute force attacks, {siteNameShort} automatically locks out users who enter incorrect passwords too many times. By default, a user who enters 6 incorrect passwords within 5 minutes is locked out for 30 minutes when the 7th try fails.
You can modify these settings by editing the `Web.Config` file in the `www` folder of the installation directory. There are 3 settings relevant to lockouts:
* **LockoutFailedAttempts**: the number of incorrect passwords that trigger a lockout (set this to 0 to disable lockouts)
* **LockoutMinutes**: the duration of the lockout (default 30 minutes)
* **LockoutTimeCheckPeriod**: the period after which the number of failed attempts is reset to 0 (default 5 minutes)
Each of these can be set under the `` tag in the `Web.Config` file. For example, the following snippet disables lockouts:
```xml theme={null}
```