> ## Documentation Index
> Fetch the complete documentation index at: https://docs.arc.cdata.com/llms.txt
> Use this file to discover all available pages before exploring further.

# Workspaces

> Manage CData Arc workspaces to isolate flows, control user access, and organize connectors.

export const siteNameShort = "Arc";

**Workspaces** enable you to isolate flow canvases. Connectors and flows that are configured in separate workspaces are held in entirely separate folders on disk, which allows a complete separation of processes for organizational purposes.

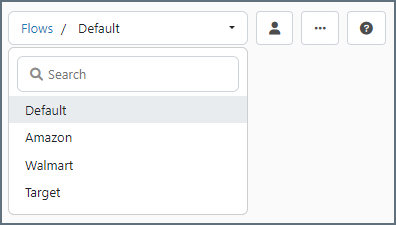
Only the connectors from one workspace are displayed at a time, so using multiple workspaces can help reduce clutter on the **Flows** page. For example, a single flow canvas could contain an automated trading process for each of Amazon, Target, and Walmart but these independent flows could also be separated out into new workspaces, as shown in the following image:

<img src="https://mintcdn.com/cdata-arc/Lo_2D5t4szDfleFN/public/images/Workspaces.png?fit=max&auto=format&n=Lo_2D5t4szDfleFN&q=85&s=39a255fb8014f61e95b694e214039d15" alt="Three workspace cards for Amazon, Target, and Walmart" width="300" data-path="public/images/Workspaces.png" />

Using workspaces to compartmentalize flows also provides a means to easily control the permissions of users and their access to those flows. Using the previous image, the user account assigned to Jenny might have full access to the Amazon workspace, more limited access to the Target workspace, and no access at all to the Walmart workspace. For more information about permissions, see [User Management and Roles](../getting-started/administration/settings/user-roles).

Connectors in one workspace cannot be connected to connectors from a different workspace.

The [Activity page](../getting-started/administration/activity) collects and displays data across all workspaces. You can filter by workspace name on the **Messages** and **Transactions** tabs, but workspaces are treated as functionally the same for application monitoring and management.

## Using the Workspaces Grid

When you click the **Flows** tab, you are presented with the workspaces grid. From here you can perform actions on individual workspaces or use the checkboxes on the [workspace cards](#workspace-cards) to select multiple workspaces on which to perform bulk actions. The toolbar at the top of the page lets you perform the following actions:

<table>
  <colgroup>
    <col style={{ width: "65px" }} />

    <col />
  </colgroup>

  <thead>
    <tr><th>Icon</th><th>Action</th></tr>
  </thead>

  <tbody>
    <tr>
      <td style={{ verticalAlign: "middle", padding: "0.25rem 0.75rem" }}>
        <img src="https://mintcdn.com/cdata-arc/97fbscTC2p-cCdS3/public/images/workspace_grid_refresh.png?fit=max&auto=format&n=97fbscTC2p-cCdS3&q=85&s=a9fccc628b3c06ab1989d1a9286a4369" alt="Refresh icon" noZoom style={{ display: "block", height: "24px" }} width="26" height="25" data-path="public/images/workspace_grid_refresh.png" />
      </td>

      <td style={{ verticalAlign: "middle", padding: "0.25rem 0.75rem" }}>Refreshes the selected workspace (all workspaces if none are selected).</td>
    </tr>

    <tr>
      <td style={{ verticalAlign: "middle", padding: "0.25rem 0.75rem" }}>
        <img src="https://mintcdn.com/cdata-arc/97fbscTC2p-cCdS3/public/images/workspace_grid_export.png?fit=max&auto=format&n=97fbscTC2p-cCdS3&q=85&s=2b97aa18b2ee0ec8460502d9d779d601" alt="Export icon" noZoom style={{ display: "block", height: "24px" }} width="24" height="25" data-path="public/images/workspace_grid_export.png" />
      </td>

      <td style={{ verticalAlign: "middle", padding: "0.25rem 0.75rem" }}>Exports the selected workspace into a <code>.arc</code> file (only available when at least one workspace card is selected).</td>
    </tr>

    <tr>
      <td style={{ verticalAlign: "middle", padding: "0.25rem 0.75rem" }}>
        <img src="https://mintcdn.com/cdata-arc/97fbscTC2p-cCdS3/public/images/workspace_grid_delete.png?fit=max&auto=format&n=97fbscTC2p-cCdS3&q=85&s=10938dfc7407c620049d1dd2c0db88ad" alt="Delete icon" noZoom style={{ display: "block", height: "24px" }} width="62" height="25" data-path="public/images/workspace_grid_delete.png" />
      </td>

      <td style={{ verticalAlign: "middle", padding: "0.25rem 0.75rem" }}>Deletes the selected workspace (only available when at least one workspace card is selected).</td>
    </tr>

    <tr>
      <td style={{ verticalAlign: "middle", padding: "0.25rem 0.75rem" }}>
        <img src="https://mintcdn.com/cdata-arc/97fbscTC2p-cCdS3/public/images/workspace_grid_import.png?fit=max&auto=format&n=97fbscTC2p-cCdS3&q=85&s=6f7ba037816d62b2885744b0a4a6f0ca" alt="Import icon" noZoom style={{ display: "block", height: "24px" }} width="66" height="25" data-path="public/images/workspace_grid_import.png" />
      </td>

      <td style={{ verticalAlign: "middle", padding: "0.25rem 0.75rem" }}>Imports an <code>.arcflow</code> file into the selected workspace(s).</td>
    </tr>
  </tbody>
</table>

You can also manually create a new workspace by clicking **Add Workspace**.

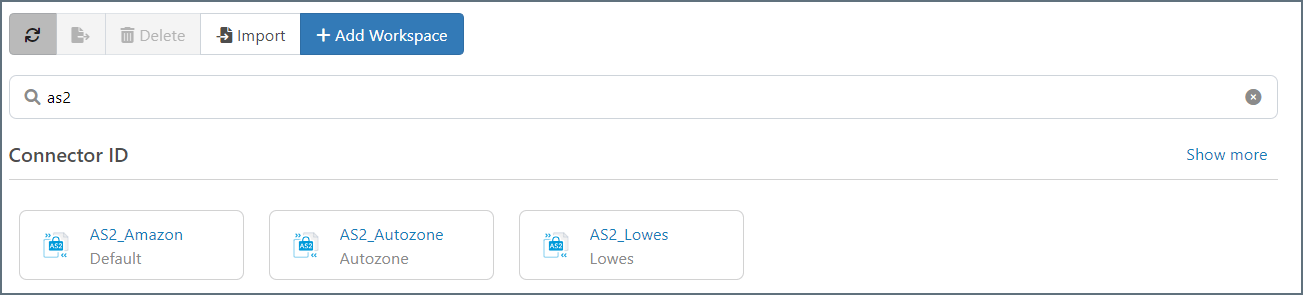
The search bar lets you search for specific workspaces, [connectors](../connectors), connector types, or [Flow APIs](./flow-api).

<img src="https://mintcdn.com/cdata-arc/97fbscTC2p-cCdS3/public/images/workspace_searchresults.png?fit=max&auto=format&n=97fbscTC2p-cCdS3&q=85&s=2e92ac0bd34b35e7d67908e32dd4de17" alt="Workspace search results" width="800" data-path="public/images/workspace_searchresults.png" />

Clicking on a result takes you to that object in its workspace card.

You can filter the workspace cards by the following criteria:

* Alphabetical order
* Last modified date
* Last accessed date

## Workspace Cards

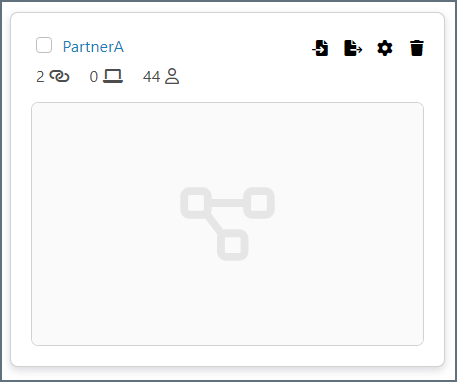
Each workspace card is a snapshot view that shows the workspace name along with a count of the connectors, Flow APIs, and users with access to that workspace.
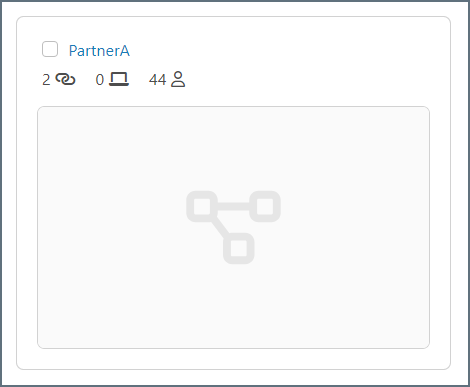
<img src="https://mintcdn.com/cdata-arc/j59334epfVQRoK96/public/images/workspace_card.png?fit=max&auto=format&n=j59334epfVQRoK96&q=85&s=f0d20680663aff220ff487bf36ad1e3d" alt="Workspace card" width="450" data-path="public/images/workspace_card.png" />

<table>
  <colgroup>
    <col style={{ width: "65px" }} />

    <col />
  </colgroup>

  <thead>
    <tr><th>Icon</th><th>Description</th></tr>
  </thead>

  <tbody>
    <tr>
      <td style={{ verticalAlign: "middle", padding: "0.25rem 0.75rem" }}>
        <img src="https://mintcdn.com/cdata-arc/j59334epfVQRoK96/public/images/workspace_card_chain_icon.png?fit=max&auto=format&n=j59334epfVQRoK96&q=85&s=3d1a06696023178f2789cae808143015" alt="Chain icon" noZoom style={{ display: "block", height: "24px" }} width="21" height="18" data-path="public/images/workspace_card_chain_icon.png" />
      </td>

      <td style={{ verticalAlign: "middle", padding: "0.25rem 0.75rem" }}>Hover over this icon to see the list of connectors in the workspace.</td>
    </tr>

    <tr>
      <td style={{ verticalAlign: "middle", padding: "0.25rem 0.75rem" }}>
        <img src="https://mintcdn.com/cdata-arc/97fbscTC2p-cCdS3/public/images/workspace_card_screen_icon.png?fit=max&auto=format&n=97fbscTC2p-cCdS3&q=85&s=c43f9bc944890f49f7442d22ccebfe9a" alt="Screen icon" noZoom style={{ display: "block", height: "24px" }} width="21" height="18" data-path="public/images/workspace_card_screen_icon.png" />
      </td>

      <td style={{ verticalAlign: "middle", padding: "0.25rem 0.75rem" }}>Hover over this icon to see the list of all Flow APIs in the workspace and the HTTP method being used.</td>
    </tr>

    <tr>
      <td style={{ verticalAlign: "middle", padding: "0.25rem 0.75rem" }}>
        <img src="https://mintcdn.com/cdata-arc/97fbscTC2p-cCdS3/public/images/workspace_card_user_icon.png?fit=max&auto=format&n=97fbscTC2p-cCdS3&q=85&s=84aea6eb98b91d6f7b73986fab72d0cf" alt="User icon" noZoom style={{ display: "block", height: "24px" }} width="21" height="24" data-path="public/images/workspace_card_user_icon.png" />
      </td>

      <td style={{ verticalAlign: "middle", padding: "0.25rem 0.75rem" }}>Hover over this icon to see the list of users with permissions on the workspace.</td>
    </tr>
  </tbody>
</table>

When you hover over a card, an additional set of icons appears.

<img src="https://mintcdn.com/cdata-arc/97fbscTC2p-cCdS3/public/images/workspace_card_icons.png?fit=max&auto=format&n=97fbscTC2p-cCdS3&q=85&s=1ddac0d31aa70b62fd8ca5a7d8304ad5" alt="Workspace card hover icons" width="450" data-path="public/images/workspace_card_icons.png" />

<table>
  <colgroup>
    <col style={{ width: "65px" }} />

    <col />
  </colgroup>

  <thead>
    <tr><th>Icon</th><th>Action</th></tr>
  </thead>

  <tbody>
    <tr>
      <td style={{ verticalAlign: "middle", padding: "0.25rem 0.75rem" }}>
        <img src="https://mintcdn.com/cdata-arc/97fbscTC2p-cCdS3/public/images/workspace_card_import_icon.png?fit=max&auto=format&n=97fbscTC2p-cCdS3&q=85&s=e7000c64281caeb502a295599094dba4" alt="Import icon" noZoom style={{ display: "block", height: "24px" }} width="26" height="25" data-path="public/images/workspace_card_import_icon.png" />
      </td>

      <td style={{ verticalAlign: "middle", padding: "0.25rem 0.75rem" }}>
        Opens the <strong>Workspace Import</strong> dialog. Navigate to the <code>.arcflow</code> file you want to import and choose <strong>Open</strong>. Click <strong>Next</strong> to set your workspace import options, then click <strong>Next</strong> to check for conflicts and to complete the import. See <a href="../getting-started/administration/importing-exporting-flows#setting-import-options">Setting Import Options</a> and <a href="../getting-started/administration/importing-exporting-flows#resolving-import-conflicts">Resolving Import Conflicts</a> for details.
        <Tip>To import a global <code>.arc</code> file, use <a href="../getting-started/administration/settings/settings-page">Settings</a> > <strong>Migration</strong>. See <a href="../getting-started/administration/importing-exporting-flows#importing-multiple-workspaces-and-global-application-data">Importing Multiple Workspaces and Global Application Data</a> for details.</Tip>
      </td>
    </tr>

    <tr>
      <td style={{ verticalAlign: "middle", padding: "0.25rem 0.75rem" }}>
        <img src="https://mintcdn.com/cdata-arc/97fbscTC2p-cCdS3/public/images/workspace_card_export_icon.png?fit=max&auto=format&n=97fbscTC2p-cCdS3&q=85&s=98e7bcbb41b9dc924c59772db44df6a8" alt="Export icon" noZoom style={{ display: "block", height: "24px" }} width="27" height="25" data-path="public/images/workspace_card_export_icon.png" />
      </td>

      <td style={{ verticalAlign: "middle", padding: "0.25rem 0.75rem" }}>Opens the <strong>Workspace Export</strong> dialog which allows you to export an <code>.arcflow</code> file that contains the workspace contents. See <a href="../getting-started/administration/importing-exporting-flows#exporting-a-workspace">Exporting a Workspace</a> for details.</td>
    </tr>

    <tr>
      <td style={{ verticalAlign: "middle", padding: "0.25rem 0.75rem" }}>
        <img src="https://mintcdn.com/cdata-arc/97fbscTC2p-cCdS3/public/images/workspace_card_gear_icon.png?fit=max&auto=format&n=97fbscTC2p-cCdS3&q=85&s=b09d0983e39ae08770f273b5e9cbcbf8" alt="Gear icon" noZoom style={{ display: "block", height: "24px" }} width="26" height="25" data-path="public/images/workspace_card_gear_icon.png" />
      </td>

      <td style={{ verticalAlign: "middle", padding: "0.25rem 0.75rem" }}>Opens the <strong>Workspace Settings</strong> dialog.</td>
    </tr>

    <tr>
      <td style={{ verticalAlign: "middle", padding: "0.25rem 0.75rem" }}>
        <img src="https://mintcdn.com/cdata-arc/97fbscTC2p-cCdS3/public/images/workspace_card_delete_icon.png?fit=max&auto=format&n=97fbscTC2p-cCdS3&q=85&s=b37b613ffcf4766d33a37675bef7244f" alt="Delete icon" noZoom style={{ display: "block", height: "24px" }} width="26" height="25" data-path="public/images/workspace_card_delete_icon.png" />
      </td>

      <td style={{ verticalAlign: "middle", padding: "0.25rem 0.75rem" }}>Deletes the current workspace.</td>
    </tr>
  </tbody>
</table>

## Default Workspace

{siteNameShort} includes a special *Default* workspace that you cannot delete. You are not required to use multiple workspaces because you can configure all flows in the default workspace.

The default workspace stores all of the application data files and configuration files in a `data` folder in the Application Directory. The data and configuration files for any other workspaces are held in a `workspaces` folder in the Application Directory.

## Navigating and Managing Workspaces from a Flow Canvas

From the workspaces grid, click into a workspace.

You can use the top toolbar of a flow canvas to manage your workspaces:

<img src="https://mintcdn.com/cdata-arc/6KwLqCromZpN96Gn/public/images/flows_canvas_workspace_options.png?fit=max&auto=format&n=6KwLqCromZpN96Gn&q=85&s=6867b5811a3e75dc11c82114f514776d" alt="Flow canvas workspace toolbar options" width="800" data-path="public/images/flows_canvas_workspace_options.png" />

* Use the workspace selector dropdown on the left to switch to a different workspace.
* <img src="https://mintcdn.com/cdata-arc/6KwLqCromZpN96Gn/public/images/flows_view_users.png?fit=max&auto=format&n=6KwLqCromZpN96Gn&q=85&s=0ec6fb2b21141fbde4cd6f43f4d41640" alt="View users icon" noZoom style={{ display: "inline-block", verticalAlign: "middle", height: "1.6em", margin: 0 }} width="23" height="23" data-path="public/images/flows_view_users.png" /> See which users can access this workspace, or add new users. This option is only visible to {siteNameShort} admin users.
* Click the ellipses for additional options, then make your selection:
  * Select **Import Workspace** to import a workspace from another {siteNameShort} instance. Navigate to the `.arcflow` file you want to import and choose **Open**. Click **Next** to set your workspace import options, then click **Next** to check for conflicts and to complete the import. See [Setting Import Options](../getting-started/administration/importing-exporting-flows#setting-import-options) and [Resolving Import Conflicts](../getting-started/administration/importing-exporting-flows#resolving-import-conflicts) for details.
  * Select **Export Workspace** to export a workspace that can be imported into another {siteNameShort} instance. Set your export preferences, then click **Export** to create the `.arcflow` file. See [Setting Export Options](../getting-started/administration/importing-exporting-flows#setting-export-options) for details.
  * Click **Settings** to open the workspace-specific [Settings](#workspace-settings) dialog.
* <img src="https://mintcdn.com/cdata-arc/6KwLqCromZpN96Gn/public/images/flows_help.png?fit=max&auto=format&n=6KwLqCromZpN96Gn&q=85&s=1be6908460105f1f0b99c88faa0517c9" alt="Help icon" noZoom style={{ display: "inline-block", verticalAlign: "middle", height: "1.6em", margin: 0 }} width="29" height="27" data-path="public/images/flows_help.png" /> Click the **Help** button to open the documentation for the flow designer in a new browser tab.
* Use the search bar to search for connectors, [flow APIs](./flow-api), saved views, and [notes](./designing-a-flow#using-notes) in the current workspace. When you find what you are searching for, click it to be taken to the object in the canvas.
* <img src="https://mintcdn.com/cdata-arc/6KwLqCromZpN96Gn/public/images/flows_cursor_select.png?fit=max&auto=format&n=6KwLqCromZpN96Gn&q=85&s=875592d1ed29577d0c230ff352f0a3f0" alt="Cursor select toggle" noZoom style={{ display: "inline-block", verticalAlign: "middle", height: "1.6em", margin: 0 }} width="49" height="27" data-path="public/images/flows_cursor_select.png" /> Use the toggle to set what action the cursor performs. The options are:
  * **Move**: Allows users to click and drag around the canvas to navigate within the canvas. This is the default action.
  * **Multi-Select**: Allows users to draw a rectangle around a group of connectors. This is useful when creating flow APIs or when you need to move or delete multiple connectors at once. Right-click on the rectangle to see the available actions you can take on all the objects in the rectangle.
* <img src="https://mintcdn.com/cdata-arc/6KwLqCromZpN96Gn/public/images/flows_undo.png?fit=max&auto=format&n=6KwLqCromZpN96Gn&q=85&s=f5ca392d3611ed138d4a7887cb0c751b" alt="Undo icon" noZoom style={{ display: "inline-block", verticalAlign: "middle", height: "1.6em", margin: 0 }} width="28" height="27" data-path="public/images/flows_undo.png" /> Undo your most recent action.
* <img src="https://mintcdn.com/cdata-arc/6KwLqCromZpN96Gn/public/images/flows_redo.png?fit=max&auto=format&n=6KwLqCromZpN96Gn&q=85&s=4cfa44db62444a89f58799241e9d1452" alt="Redo icon" noZoom style={{ display: "inline-block", verticalAlign: "middle", height: "1.6em", margin: 0 }} width="28" height="27" data-path="public/images/flows_redo.png" /> Restore a previously undone layout on the canvas.
* <img src="https://mintcdn.com/cdata-arc/6KwLqCromZpN96Gn/public/images/flows_save_view.png?fit=max&auto=format&n=6KwLqCromZpN96Gn&q=85&s=0e4f8ef46af350067fe685d1a9a6821d" alt="Save view icon" noZoom style={{ display: "inline-block", verticalAlign: "middle", height: "1.6em", margin: 0 }} width="29" height="27" data-path="public/images/flows_save_view.png" /> Save the current workspace view.
* <img src="https://mintcdn.com/cdata-arc/6KwLqCromZpN96Gn/public/images/flows_autoformat.png?fit=max&auto=format&n=6KwLqCromZpN96Gn&q=85&s=ad2cfac09b800379b413153cc747c8b3" alt="Auto-format icon" noZoom style={{ display: "inline-block", verticalAlign: "middle", height: "1.6em", margin: 0 }} width="26" height="23" data-path="public/images/flows_autoformat.png" /> Auto-format and lay out the entire flow canvas. If you select multiple connectors in the workspace, use this to auto-format just the selected connectors.
<Tip>
  Click the **Flows** breadcrumb link to return to the workspace grid.

  The small map in the bottom right corner of the flow canvas shows silhouettes of the connectors in the workspace. The current view of the canvas is represented by the white rectangle in the map. As you move around the canvas, the white rectangle also moves, so you always have a high level picture of where you are in the workspace.
</Tip>

## Workspace Settings

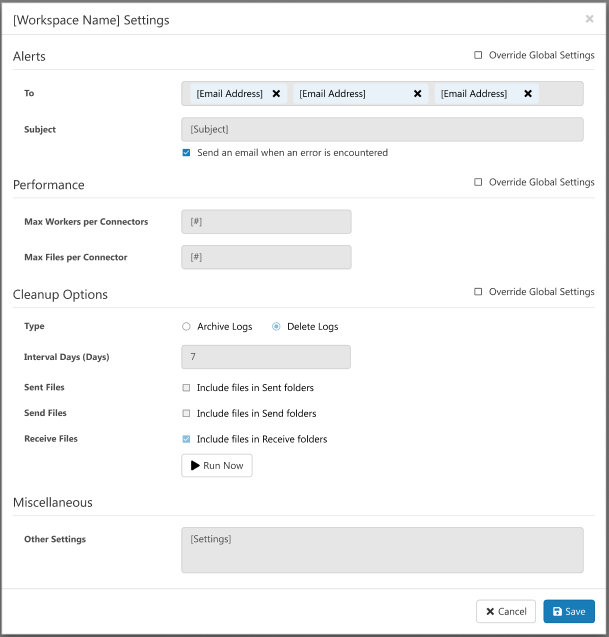
The Workspace Settings dialog gives you the ability to control specific settings and aspects on a per-workspace basis. For each category of settings, you must click the **Override Global Settings** checkbox for the workspace-specific settings to take effect. These settings are a subset of the options on the [Settings page](../getting-started/administration/settings/settings-page). You can configure:

* [Alerts](../getting-started/administration/settings/alerts)
* [Performance Settings](../getting-started/administration/settings/performance-settings)
* [Cleanup Settings](../getting-started/administration/settings/cleanup-settings)
* Miscellaneous Other Settings: Enables you to configure hidden connector settings in a semicolon-separated list (for example, `setting1=value1;setting2=value2`). Normal connector use cases and functionality should not require the use of these settings.

  <img src="https://mintcdn.com/cdata-arc/97fbscTC2p-cCdS3/public/images/workspace_settings.png?fit=max&auto=format&n=97fbscTC2p-cCdS3&q=85&s=5ce450e2794a3585ad79ca715d232a69" alt="Workspace settings dialog" width="600" data-path="public/images/workspace_settings.png" />