


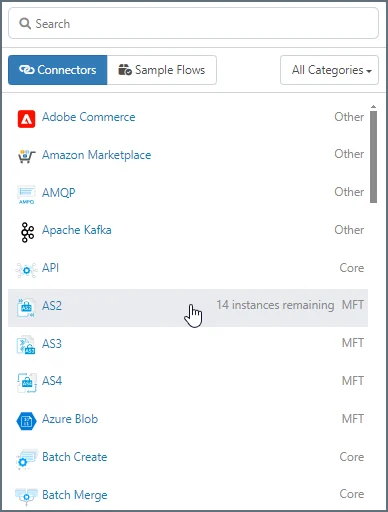
 Once you make your selection, the **Add Connector** pane opens. Here you can name the connector and select which action(s) it should perform. For descriptions of all the information presented in the pane, see [Explaining the Add Connector Pane](#explaining-the-add-connector-pane).
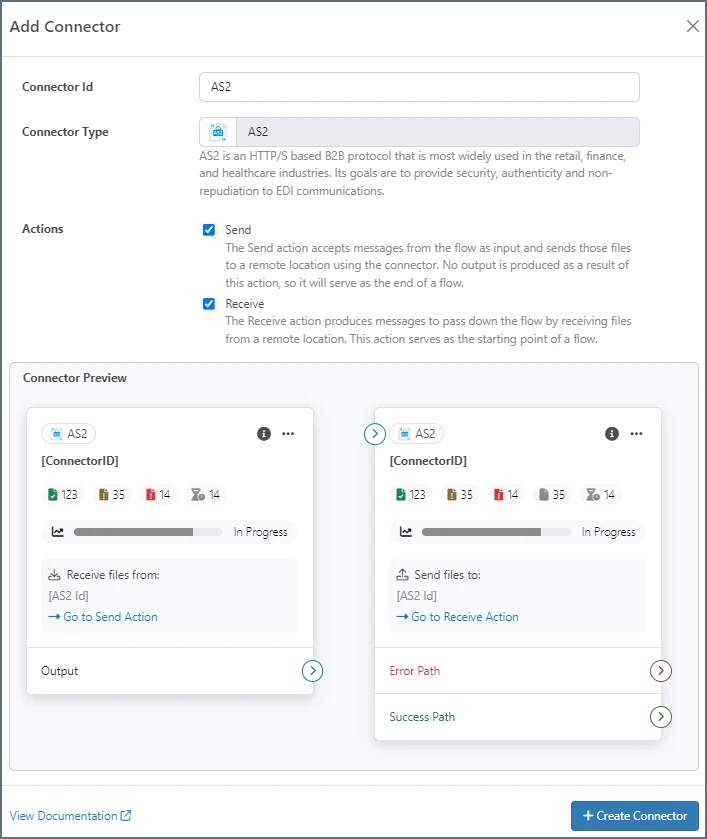
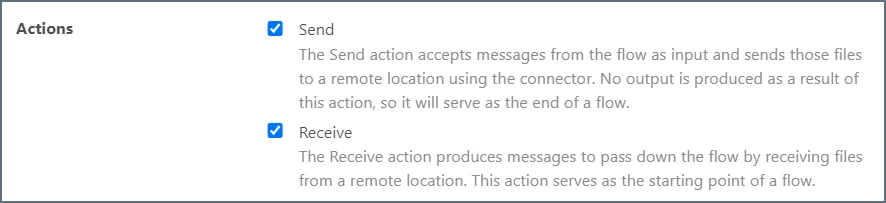
Depending on your connector choice, the options visible in the pane vary. For example, some connectors do not have any actions, some have multi-select checkboxes, some have single choice radio buttons, and some have single-select dropdowns. See [Specifying Actions](#specifying-actions) for more information. The pane also displays a preview of the connector as it will appear in the flow, and includes a link to the connector-specific documentation. The following image shows an [AS2](../connectors/as2) connector.
Once you make your selection, the **Add Connector** pane opens. Here you can name the connector and select which action(s) it should perform. For descriptions of all the information presented in the pane, see [Explaining the Add Connector Pane](#explaining-the-add-connector-pane).
Depending on your connector choice, the options visible in the pane vary. For example, some connectors do not have any actions, some have multi-select checkboxes, some have single choice radio buttons, and some have single-select dropdowns. See [Specifying Actions](#specifying-actions) for more information. The pane also displays a preview of the connector as it will appear in the flow, and includes a link to the connector-specific documentation. The following image shows an [AS2](../connectors/as2) connector.
 If you select both the send and receive actions, {siteNameShort} creates two connector cards, one for each action. The card for the send action has a **Go to Receive Action** link, and the receive card has a **Go to Send Action** link. The following image shows an AS4 connector:
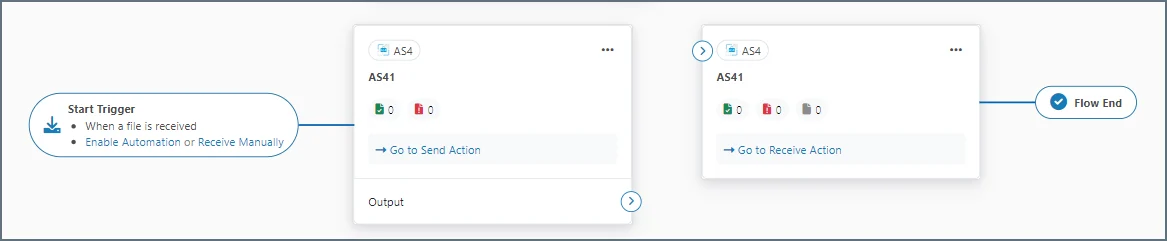
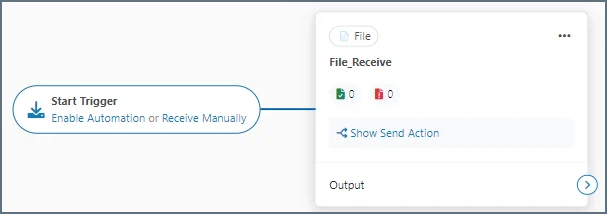 Start triggers can have one or more states depending on which of the following configurations is being used by the connector:
* Active receives: Appear when **Receive Automation** is enabled for the connector. The trigger displays *Next scheduled receive*, along with the datetime of the next receive.
* Passive receives: Appear when the connector supports passive receiving. This means that external clients can send a file or a request to the connector at anytime. For example, the trigger for an [AS2](../connectors/as2) connector displays *When a file is received* while the trigger for a [Webhook](../connectors/webhook) displays *When a request is received*.
* Enable Automation or Receive Manually: Enable Automation works when the user configures **Receive Automation** for a specific time interval. Receive Manually means you need to navigate to the connector Output and click the **Receive** button. This triggers the receive action once.
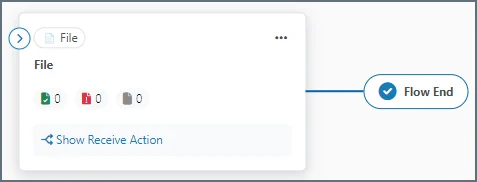
The **Flow End** displays on terminal connectors at the end of a flow, when {siteNameShort} hands the message off to the underlying disk or where the message is consumed by the connector during its send action and no output is generated.
Start triggers can have one or more states depending on which of the following configurations is being used by the connector:
* Active receives: Appear when **Receive Automation** is enabled for the connector. The trigger displays *Next scheduled receive*, along with the datetime of the next receive.
* Passive receives: Appear when the connector supports passive receiving. This means that external clients can send a file or a request to the connector at anytime. For example, the trigger for an [AS2](../connectors/as2) connector displays *When a file is received* while the trigger for a [Webhook](../connectors/webhook) displays *When a request is received*.
* Enable Automation or Receive Manually: Enable Automation works when the user configures **Receive Automation** for a specific time interval. Receive Manually means you need to navigate to the connector Output and click the **Receive** button. This triggers the receive action once.
The **Flow End** displays on terminal connectors at the end of a flow, when {siteNameShort} hands the message off to the underlying disk or where the message is consumed by the connector during its send action and no output is generated.
 ## Using Notes
If you have permission to modify a flow, you can add notes to your workspaces. Notes can provide clarity regarding the purpose of the flow, and help with organization. Each note includes user names and timestamps detailing when it was created, and when it was last modified. Notes can be placed anywhere on the canvas, and you can drag them to a different position at any time. Because notes are associated with a workspace, they can be [imported and exported](../getting-started/administration/importing-exporting-flows) with their workspace.
* To add a note, right-click on a flow canvas and choose **Add Note**.
* Give the note a title and provide the body text.
* Click **Add Note** to save the note on the canvas.
* Use the ellipses on a note to edit or delete it.
## Using Notes
If you have permission to modify a flow, you can add notes to your workspaces. Notes can provide clarity regarding the purpose of the flow, and help with organization. Each note includes user names and timestamps detailing when it was created, and when it was last modified. Notes can be placed anywhere on the canvas, and you can drag them to a different position at any time. Because notes are associated with a workspace, they can be [imported and exported](../getting-started/administration/importing-exporting-flows) with their workspace.
* To add a note, right-click on a flow canvas and choose **Add Note**.
* Give the note a title and provide the body text.
* Click **Add Note** to save the note on the canvas.
* Use the ellipses on a note to edit or delete it.
 ## Connecting Connectors
To rearrange connectors in the designer, drag them to move around the canvas and rearrange them into your desired configuration.
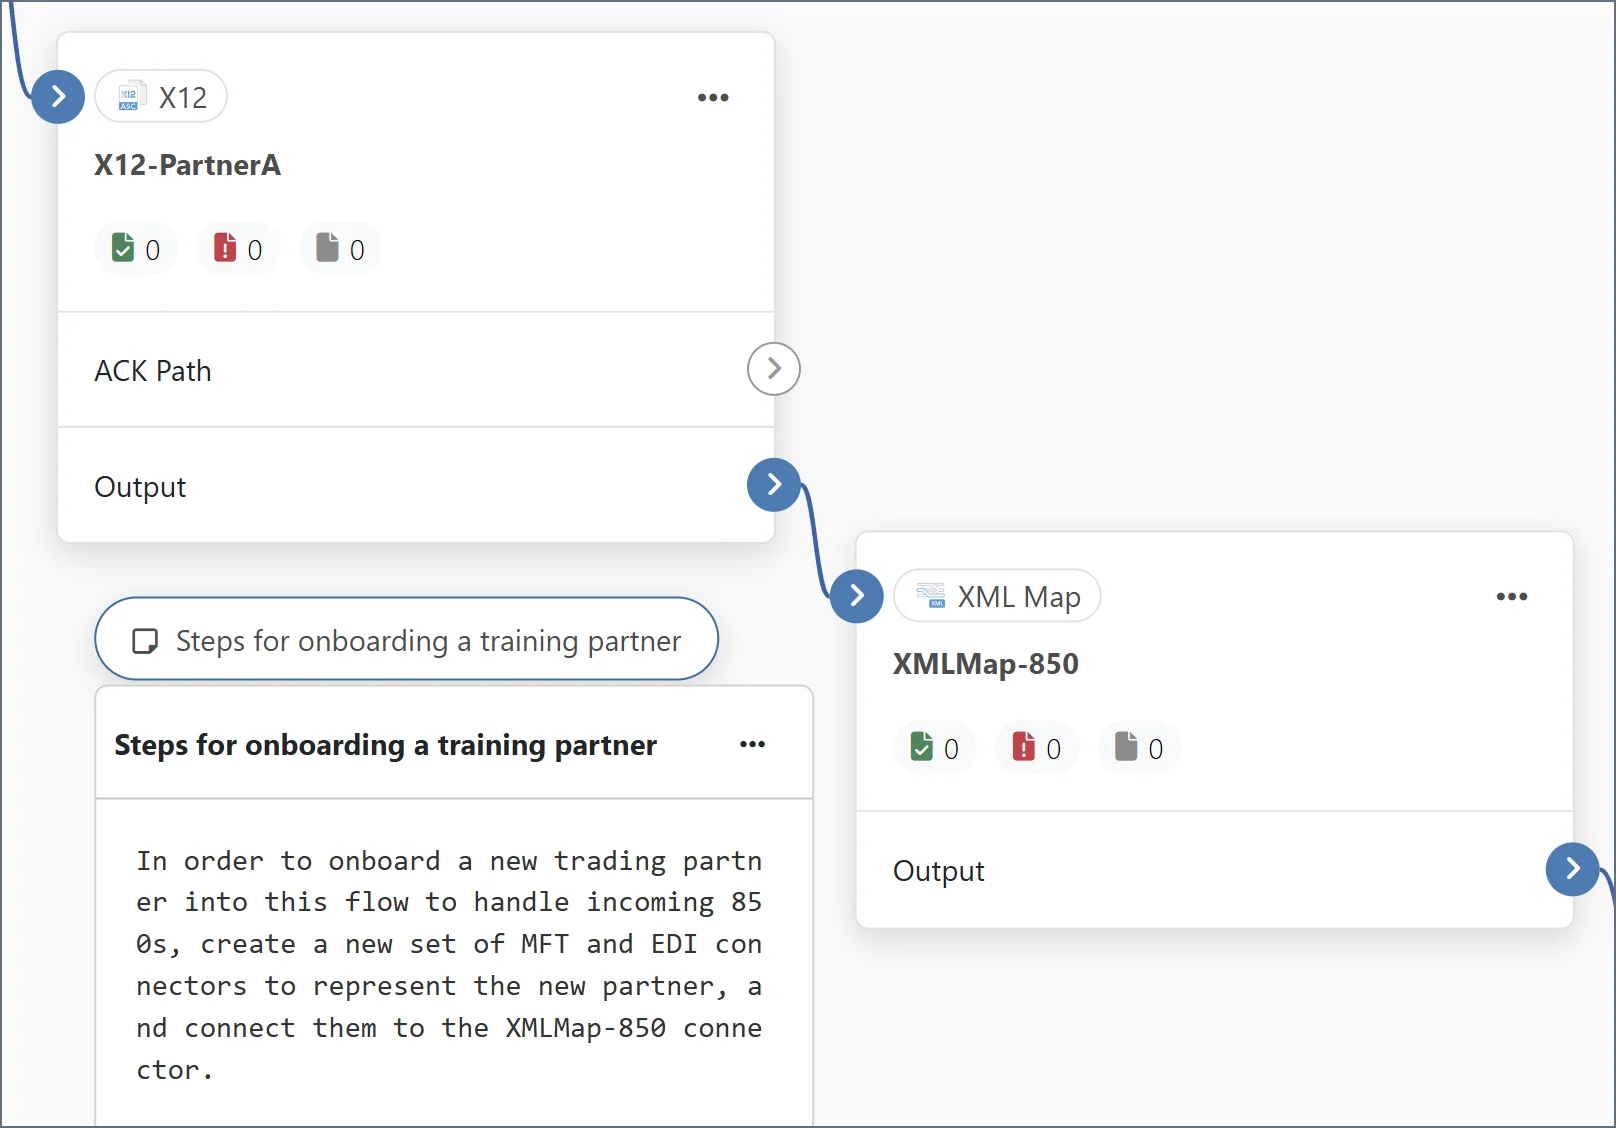
To connect connectors, drag from the arrow in the **Output** section of the first connector to the arrow on the left side of the second connector, as shown in the following image:
## Connecting Connectors
To rearrange connectors in the designer, drag them to move around the canvas and rearrange them into your desired configuration.
To connect connectors, drag from the arrow in the **Output** section of the first connector to the arrow on the left side of the second connector, as shown in the following image:
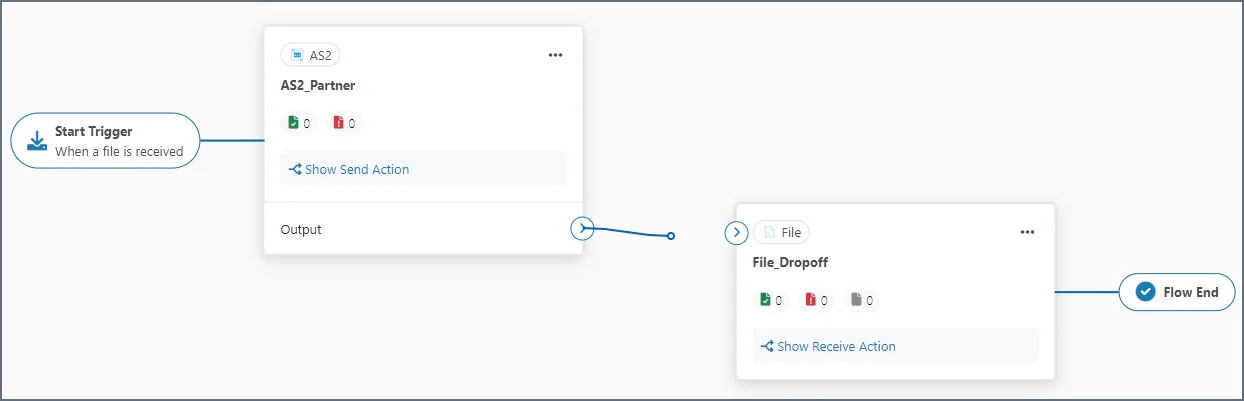 This creates a logical relationship between the two connectors so that when the first connector generates a message or file, it is passed directly to the second connector for processing.
To connect a connector to a different connector, hover over the connection line and click and drag the handlebar at the end of the connection you want to change. Drop the connection onto the new connector. To disconnect a connector, click the handlebars next to the arrows at either end of the connection.
## Configuring Connectors
To configure a connector, click the connector on the canvas to open the connector configuration wizard, as shown in the following image:
This creates a logical relationship between the two connectors so that when the first connector generates a message or file, it is passed directly to the second connector for processing.
To connect a connector to a different connector, hover over the connection line and click and drag the handlebar at the end of the connection you want to change. Drop the connection onto the new connector. To disconnect a connector, click the handlebars next to the arrows at either end of the connection.
## Configuring Connectors
To configure a connector, click the connector on the canvas to open the connector configuration wizard, as shown in the following image:
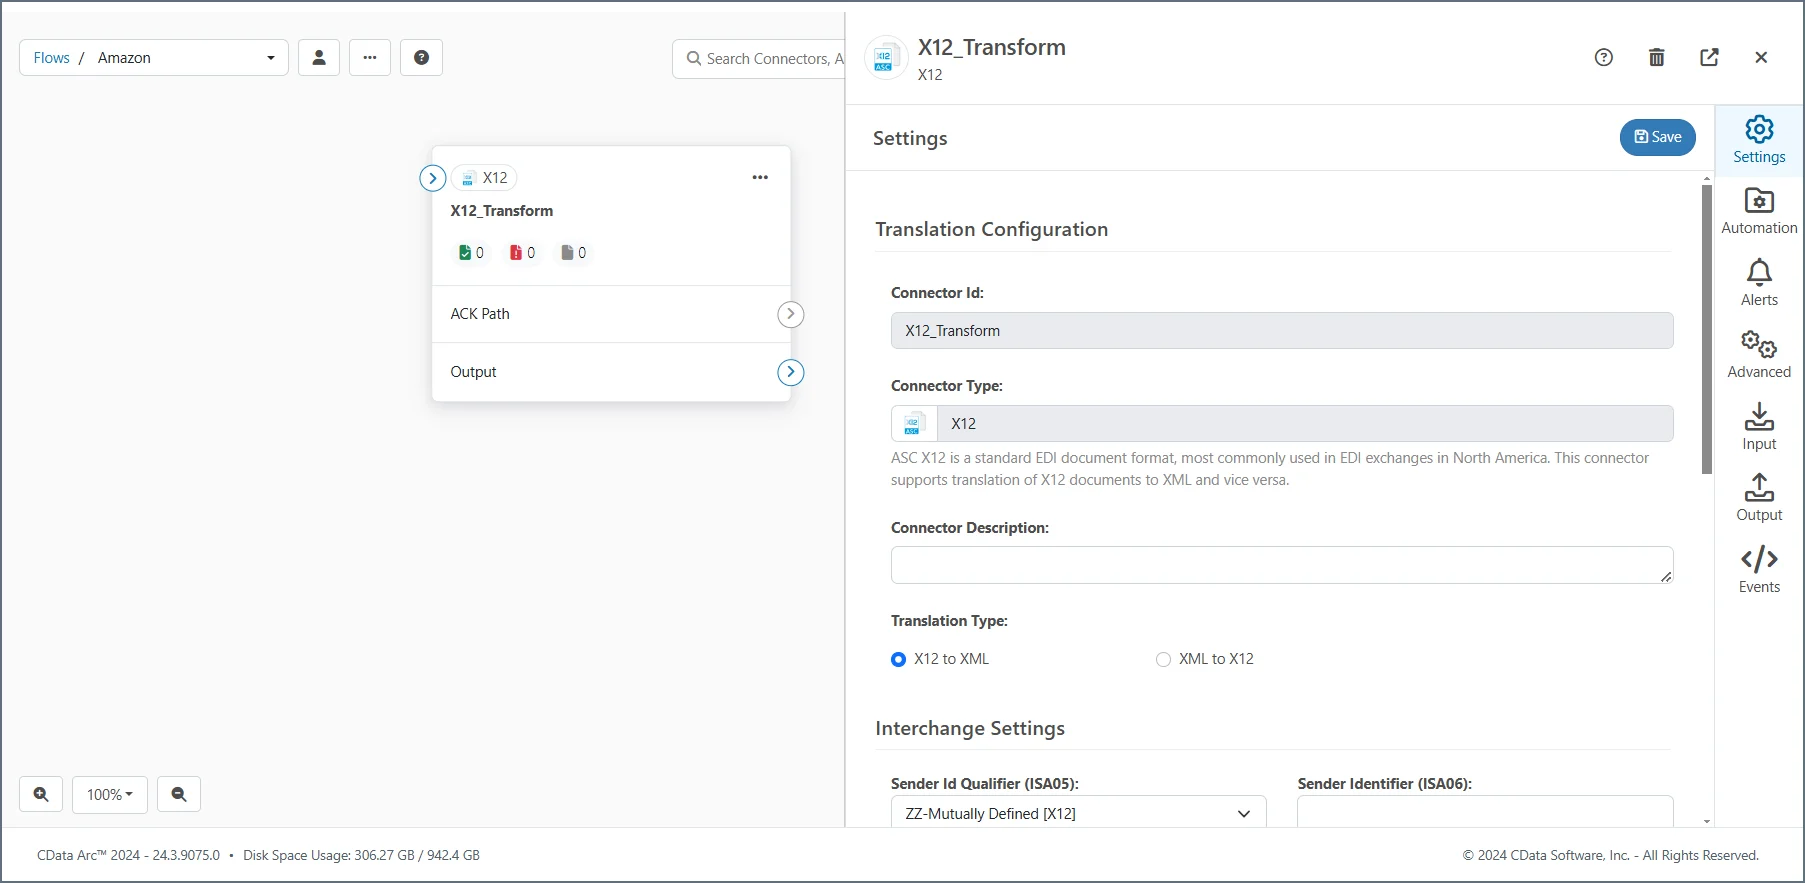 On the series of tabs that appear, you can configure and test all of the connector settings. When you finish making changes, select the gray x on the left side of the panel to close the connector configuration wizard and return that space to the canvas.
### Additional Configuration Options
Right-clicking a connector in a flow brings up the following options:
* **Delete Connector** deletes the connector.
* **Show Error Path** displays the error path. Use it to specify the connector where files that throw an error should be routed.
* **Show Success Path** displays the success path. Use it to specify the connector where files that are successfully sent should be routed.
* **Export Connector Settings** exports connector settings from the current server as a zipped file (named `ConnectorId.arcflow`).
* **Copy Connector** creates a copy of the configured connector with a new Connector Id.
* **Create API Settings** creates a Flow API from the selected connector(s). See [Flow API](./flow-api) for more details.
* **Show Receive Action** Only visible on connectors that allow multiple actions but the **Receive** action is currently hidden. Use it to show the receive action for the connector on the canvas.
* **Show Send Action** Only visible on connectors that allow multiple actions but the **Send** action is currently hidden. Use it to show the send action for the connector on the canvas.
## Explaining the Add Connector Pane
The following image of an AS2 **Add Connector** pane has been annotated to explain what each element in the preview is for. Each number corresponds to a description below.
On the series of tabs that appear, you can configure and test all of the connector settings. When you finish making changes, select the gray x on the left side of the panel to close the connector configuration wizard and return that space to the canvas.
### Additional Configuration Options
Right-clicking a connector in a flow brings up the following options:
* **Delete Connector** deletes the connector.
* **Show Error Path** displays the error path. Use it to specify the connector where files that throw an error should be routed.
* **Show Success Path** displays the success path. Use it to specify the connector where files that are successfully sent should be routed.
* **Export Connector Settings** exports connector settings from the current server as a zipped file (named `ConnectorId.arcflow`).
* **Copy Connector** creates a copy of the configured connector with a new Connector Id.
* **Create API Settings** creates a Flow API from the selected connector(s). See [Flow API](./flow-api) for more details.
* **Show Receive Action** Only visible on connectors that allow multiple actions but the **Receive** action is currently hidden. Use it to show the receive action for the connector on the canvas.
* **Show Send Action** Only visible on connectors that allow multiple actions but the **Send** action is currently hidden. Use it to show the send action for the connector on the canvas.
## Explaining the Add Connector Pane
The following image of an AS2 **Add Connector** pane has been annotated to explain what each element in the preview is for. Each number corresponds to a description below.
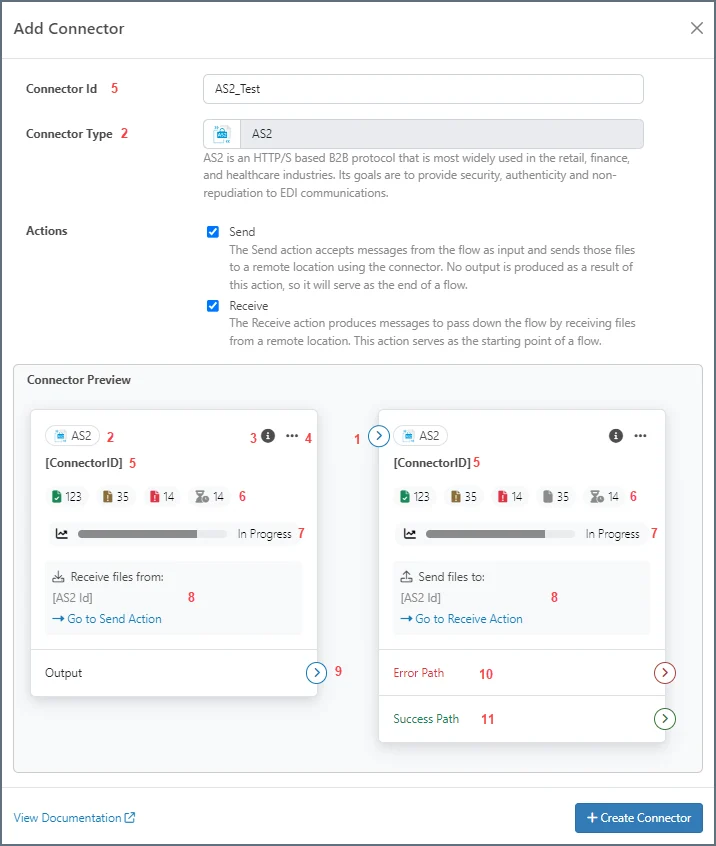 1. Use this arrow to connect the connector with the previous connector in the flow.
2. The connector type. Hover over the icon to see a static description of its intended use.
3. Hover over the information icon to see user-defined information about the connector and its role in the flow. The content displayed comes from the **Connector Description** field on the **Settings** tab.
4. Click the ellipses to open the context menu. It includes actions such as **Show Success Path**, **Show Error Path**, **Copy**, **Delete**, and others.
5. The user-defined name of the connector (from the **Connector Id** field).
6. These five icons show transaction counts. The warning and pending icons are hidden if there are no transactions to display.
1. Use this arrow to connect the connector with the previous connector in the flow.
2. The connector type. Hover over the icon to see a static description of its intended use.
3. Hover over the information icon to see user-defined information about the connector and its role in the flow. The content displayed comes from the **Connector Description** field on the **Settings** tab.
4. Click the ellipses to open the context menu. It includes actions such as **Show Success Path**, **Show Error Path**, **Copy**, **Delete**, and others.
5. The user-defined name of the connector (from the **Connector Id** field).
6. These five icons show transaction counts. The warning and pending icons are hidden if there are no transactions to display.
| Icon | Description |
|---|---|
|
|
Count of successful transactions. |
|
|
Count of unsent transactions. |
|
|
Count of transactions with warnings. |
|
|
Count of failed transactions. |
|
|
Count of pending transactions. |
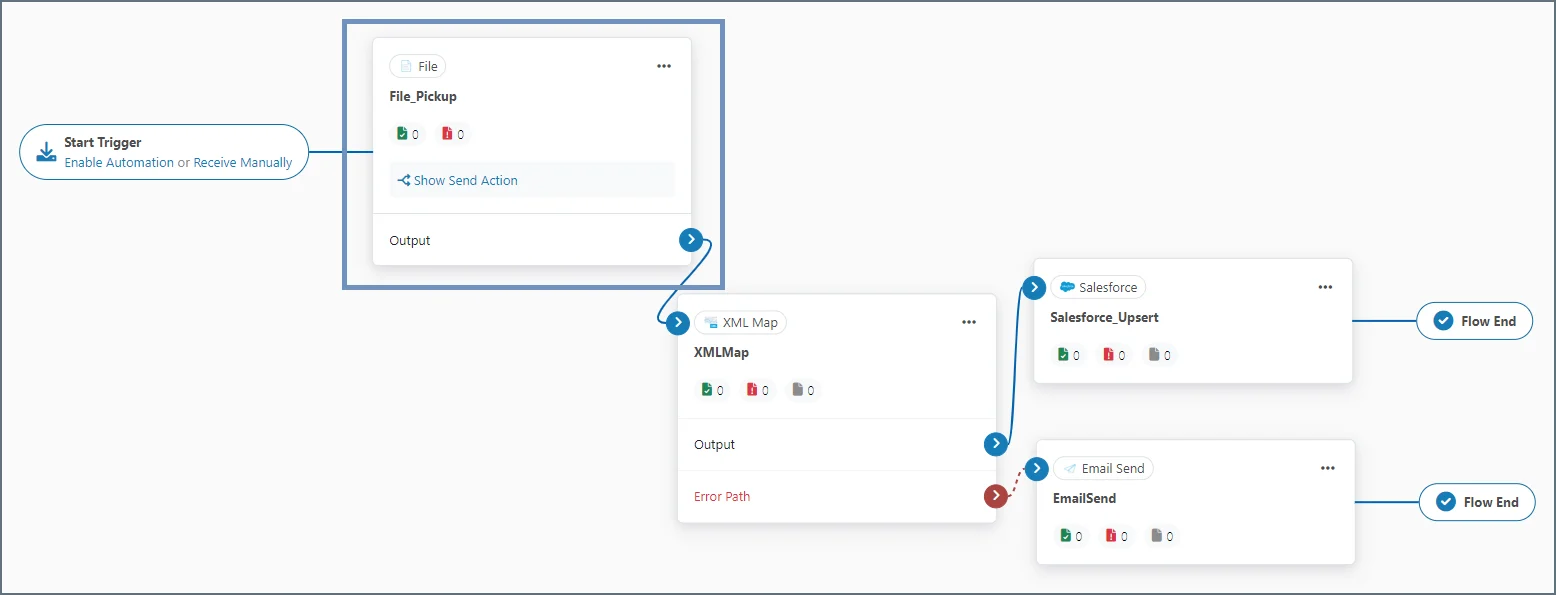 Then follow these steps to configure the connector:
1. Open the **Settings** tab.
2. Set the **Path** property to the directory that you want to monitor. You can use macros to dynamically resolve paths based on date and time; hover over the **Path** field for more information.
3. Configure the **File Mask** property with the file pattern that you want to retrieve.
4. To avoid reprocessing files that have already been picked up, configure one of these two options based on what works best for your flow:
* In the **Receive** section, check the box for **Delete files (after received)**. This option deletes files after they have been processed.
* In the **Caching** section, check one or both caching options to maintain a file size and/or timestamp record of files that have been processed. The application skips cached files but does not delete them.
5. Open the **Automation** tab.
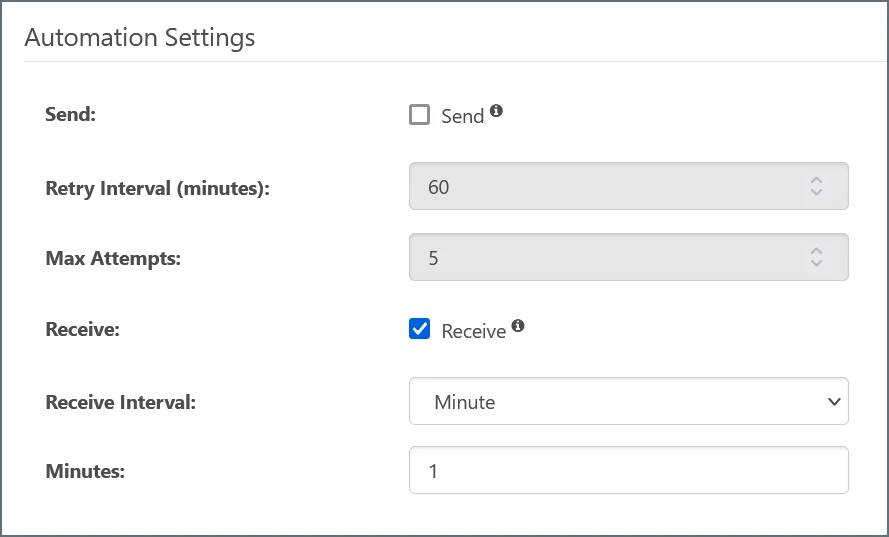
6. **Receive** automation should already be enabled. Set the desired polling interval for the directory.
Then follow these steps to configure the connector:
1. Open the **Settings** tab.
2. Set the **Path** property to the directory that you want to monitor. You can use macros to dynamically resolve paths based on date and time; hover over the **Path** field for more information.
3. Configure the **File Mask** property with the file pattern that you want to retrieve.
4. To avoid reprocessing files that have already been picked up, configure one of these two options based on what works best for your flow:
* In the **Receive** section, check the box for **Delete files (after received)**. This option deletes files after they have been processed.
* In the **Caching** section, check one or both caching options to maintain a file size and/or timestamp record of files that have been processed. The application skips cached files but does not delete them.
5. Open the **Automation** tab.
6. **Receive** automation should already be enabled. Set the desired polling interval for the directory.
 #### File Drop-Off
To drop off processed files to the local file system, add a terminal File connector to the end of your flow.
#### File Drop-Off
To drop off processed files to the local file system, add a terminal File connector to the end of your flow.
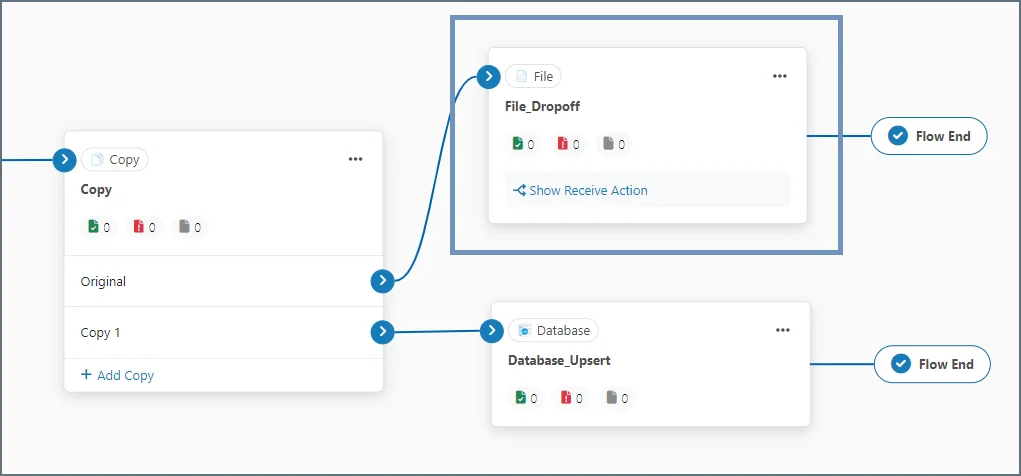 Follow these steps to configure the connector:
1. Open the **Settings** tab.
2. Set the **Path** property to the directory where you want to drop off files. You can use macros to dynamically resolve paths based on date and time; hover over the **Path** field for more information.
3. Open the **Advanced** tab.
4. Use the **Overwrite Option** to specify how to handle files that already exist in the destination path.
### Partner-Specific File Transfer Connectors
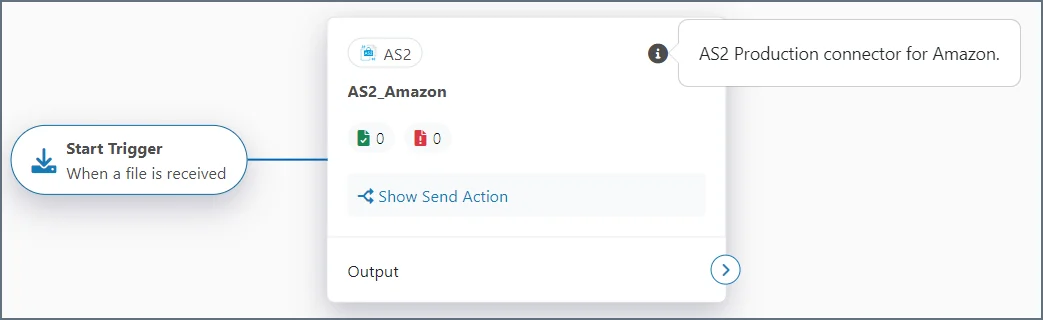
Connectors that send or receive files over the network (for example, AS2, AS4, FTP, SFTP, OFTP, and others) are bi-directional, but are configured for a single trading partner. In other words, a single AS2 connector could send *and* receive AS2 messages with Amazon, but it could not also send and receive files with Walmart.
Many MFT (Managed File Transfer) connectors require setting up a profile to exchange files. The [Profiles Page](../getting-started/administration/profiles) contains a tab for configuring application-wide settings for each supported protocol. For example, the information configured in the AS2 profile is used in all AS2 connectors, and partner-specific AS2 connection details are configured in each AS2 connector.
### Connector Naming Conventions
Connectors should always be given a descriptive name that communicates the role of the connector in the flow.
* The name of an MFT connector (for example, AS2, AS4, FTP, SFTP, OFTP, and others) should indicate the remote party with whom files are exchanged, and the protocol over which the exchange occurs (for example: *Walmart\_Production\_AS2*).
* The name of an EDI connector (such as X12 and EDIFACT) should indicate the name of the partner with whom the EDI document is exchanged, the direction of translation, and the format of the document (for example: *Walmart\_X12\_Outbound*).
* The name of a Data Mapping connector (such as XML Map) should indicate the format/schemas that the connector is mapping from and mapping to (for example: *Map\_850\_to\_Orders*).
* The name of a Back-End Integration connector (for example, Database, MySQL, CData) should indicate the specific back-end system and the table in that back-end system if applicable (for example: *PostgreSQL\_Orders\_table*).
If you use the **Connector Description** field on a connector, you can hover your cursor over the information icon to see your description of that connector. If you do not see an information icon, the connector does not have any text in the field.
Follow these steps to configure the connector:
1. Open the **Settings** tab.
2. Set the **Path** property to the directory where you want to drop off files. You can use macros to dynamically resolve paths based on date and time; hover over the **Path** field for more information.
3. Open the **Advanced** tab.
4. Use the **Overwrite Option** to specify how to handle files that already exist in the destination path.
### Partner-Specific File Transfer Connectors
Connectors that send or receive files over the network (for example, AS2, AS4, FTP, SFTP, OFTP, and others) are bi-directional, but are configured for a single trading partner. In other words, a single AS2 connector could send *and* receive AS2 messages with Amazon, but it could not also send and receive files with Walmart.
Many MFT (Managed File Transfer) connectors require setting up a profile to exchange files. The [Profiles Page](../getting-started/administration/profiles) contains a tab for configuring application-wide settings for each supported protocol. For example, the information configured in the AS2 profile is used in all AS2 connectors, and partner-specific AS2 connection details are configured in each AS2 connector.
### Connector Naming Conventions
Connectors should always be given a descriptive name that communicates the role of the connector in the flow.
* The name of an MFT connector (for example, AS2, AS4, FTP, SFTP, OFTP, and others) should indicate the remote party with whom files are exchanged, and the protocol over which the exchange occurs (for example: *Walmart\_Production\_AS2*).
* The name of an EDI connector (such as X12 and EDIFACT) should indicate the name of the partner with whom the EDI document is exchanged, the direction of translation, and the format of the document (for example: *Walmart\_X12\_Outbound*).
* The name of a Data Mapping connector (such as XML Map) should indicate the format/schemas that the connector is mapping from and mapping to (for example: *Map\_850\_to\_Orders*).
* The name of a Back-End Integration connector (for example, Database, MySQL, CData) should indicate the specific back-end system and the table in that back-end system if applicable (for example: *PostgreSQL\_Orders\_table*).
If you use the **Connector Description** field on a connector, you can hover your cursor over the information icon to see your description of that connector. If you do not see an information icon, the connector does not have any text in the field.
 ### XML for Data Transformation
{siteNameShort} uses XML as an intermediary format for data manipulation and transformation. Many connectors translate files of various formats into XML and vice versa (for example, the X12 connector, EDIFACT connector, CSV connector, and others). Additionally, {siteNameShort} uses XML to model back-end system input and output (such as SELECTS and INSERTS into database-like systems).
Since most source and destination formats can be represented as XML, data transformation flows often have the following structure:
* A connector that pulls or receives data in its original (source) format
* A connector that converts this source format into XML (if it is not already XML)
* An XML Map connector that transforms this source XML into a new structure representing the target (destination) format
* A connector that converts this transformed XML into the destination format (if a non-XML format is required)
* A connector that sends the finalized file to its intended destination
The [XML Map Connector](../connectors/xml-map/xml-map) is the engine that performs the critical work in these data transformation flows. Becoming comfortable with data transformation is often a matter of familiarizing yourself with the XML Map connector's visual designer.
### Organize Flows into Workspaces
You can configure multiple separate flows on the same flow canvas without risk of cross-contamination, but dividing flows into different [Workspaces](./workspaces) can help reduce clutter and maintain organization.
Click the **Flows** tab to launch the workspaces grid. From here you can create new workspaces, import or export workspace configuration settings, and delete workspaces (except for the Default workspace). Only the connectors from the current workspace are displayed at any given time.
Connectors in different workspaces cannot be connected to each other, and the data and configuration files specific to these connectors are held in separate folder structures.
### XML for Data Transformation
{siteNameShort} uses XML as an intermediary format for data manipulation and transformation. Many connectors translate files of various formats into XML and vice versa (for example, the X12 connector, EDIFACT connector, CSV connector, and others). Additionally, {siteNameShort} uses XML to model back-end system input and output (such as SELECTS and INSERTS into database-like systems).
Since most source and destination formats can be represented as XML, data transformation flows often have the following structure:
* A connector that pulls or receives data in its original (source) format
* A connector that converts this source format into XML (if it is not already XML)
* An XML Map connector that transforms this source XML into a new structure representing the target (destination) format
* A connector that converts this transformed XML into the destination format (if a non-XML format is required)
* A connector that sends the finalized file to its intended destination
The [XML Map Connector](../connectors/xml-map/xml-map) is the engine that performs the critical work in these data transformation flows. Becoming comfortable with data transformation is often a matter of familiarizing yourself with the XML Map connector's visual designer.
### Organize Flows into Workspaces
You can configure multiple separate flows on the same flow canvas without risk of cross-contamination, but dividing flows into different [Workspaces](./workspaces) can help reduce clutter and maintain organization.
Click the **Flows** tab to launch the workspaces grid. From here you can create new workspaces, import or export workspace configuration settings, and delete workspaces (except for the Default workspace). Only the connectors from the current workspace are displayed at any given time.
Connectors in different workspaces cannot be connected to each other, and the data and configuration files specific to these connectors are held in separate folder structures.