> ## Documentation Index
> Fetch the complete documentation index at: https://docs.arc.cdata.com/llms.txt
> Use this file to discover all available pages before exploring further.
# CSV Map Connector
> Transforms flat XML files into CSV, TSV, and PSV formats using a visual Designer or ArcScript Code view for complex mappings.
export const NameDescription = ({extraRows}) =>
| Setting |
Description |
| Connector Id |
The static, unique identifier for the connector. |
| Connector Type |
Displays the connector name and a description of what it does. |
| Connector Description |
An optional field to provide a free-form description of the connector and its role in the flow. |
{extraRows}
;
export const SlasTab = ({siteName = "CData Arc"}) => <>
Settings related to configuring Service Level Agreements (SLAs).
SLAs enable you to configure the volume you expect connectors in your flow to send or receive, and to set the time frame in which you expect that volume to be met. {siteName} sends emails to warn the user when an SLA is not met, and marks the SLA as At Risk, which means that if the SLA is not met soon, it will be marked as Violated. This gives the user an opportunity to step in and determine the reasons the SLA is not being met, and to take appropriate actions. If the SLA is still not met at the end of the at-risk time period, the SLA is marked as violated, and the user is notified again.
To define an SLA, toggle Expected Volume on, then click the Settings tab.
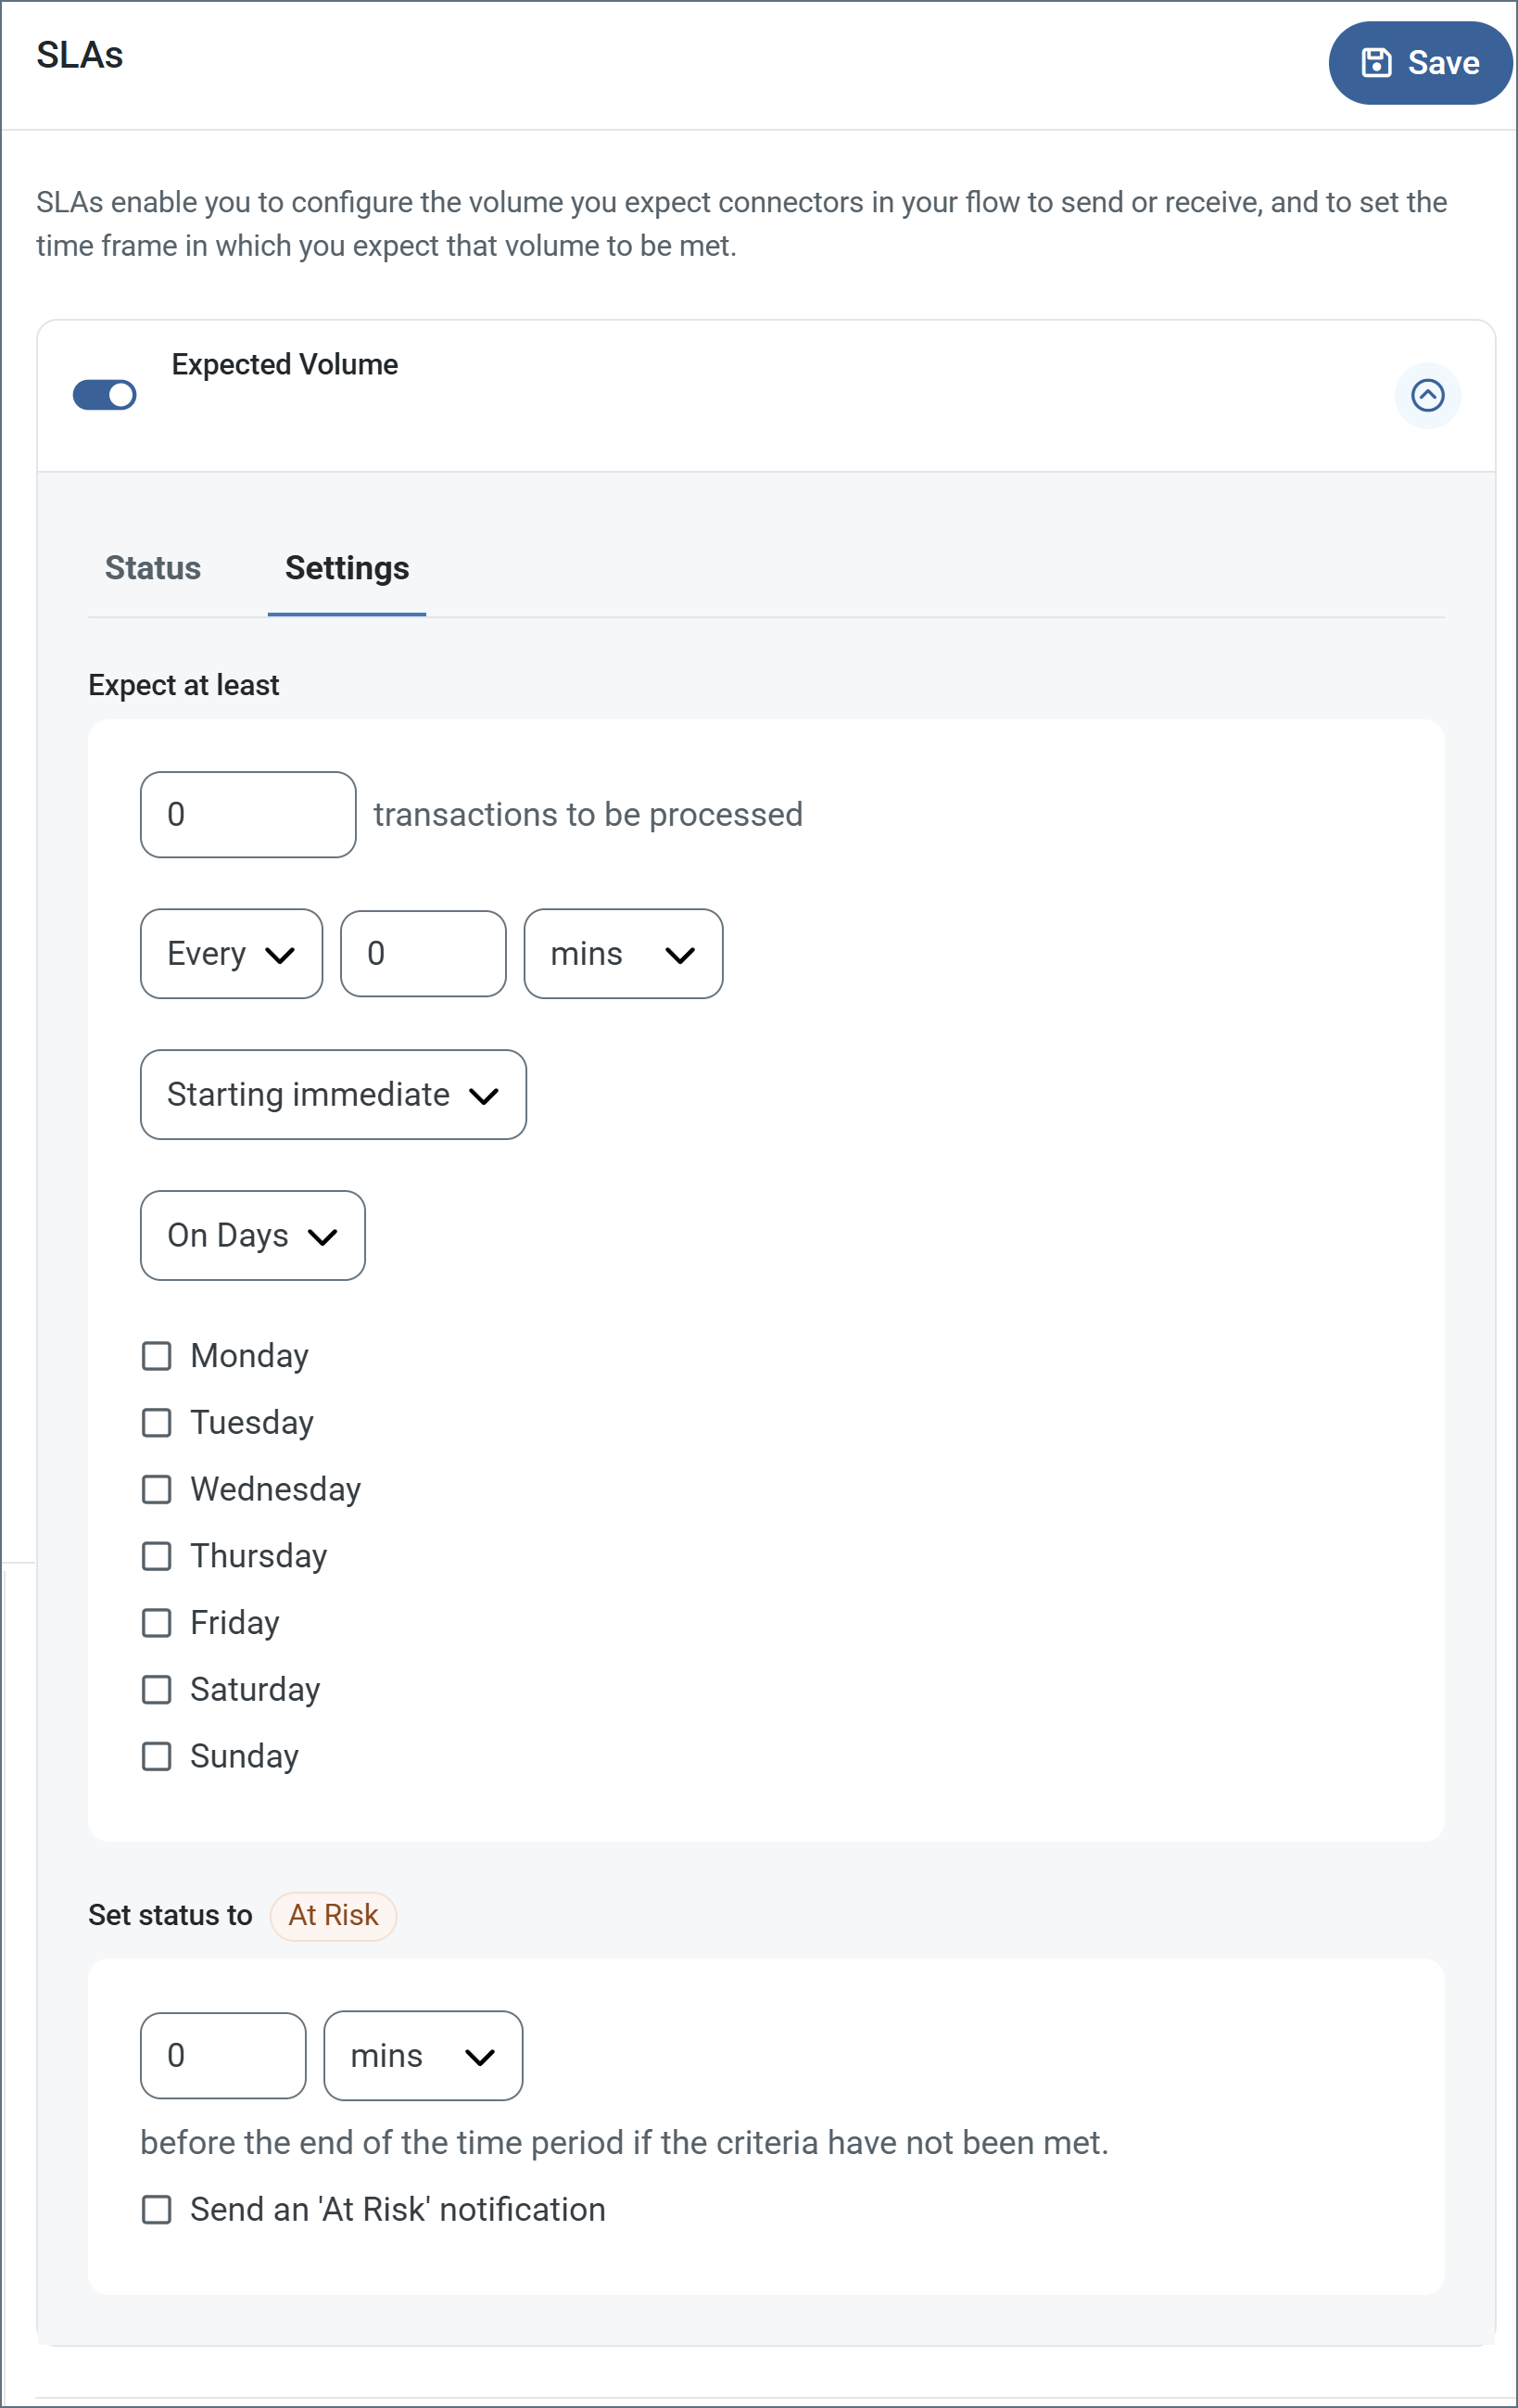
- If your connector has separate send and receive actions, use the radio buttons to specify which direction the SLA pertains to.
- In the Expect at least portion of the window:
- Set the minimum number of transactions you expect to be processed (the volume)
- Use the Every fields to specify the time frame
- Indicate when the SLA should go into effect. If you choose Starting on, complete the date and time fields.
- Check the boxes for the days of the week that you want the SLA to be in effect. Use the dropdown to choose Everyday if necessary.
- In the Set status to 'At Risk' portion of the window, specify when the SLA should be marked as at risk.
- By default, notifications are not sent until an SLA is in violation. To change that, check Send an 'At Risk' notification.
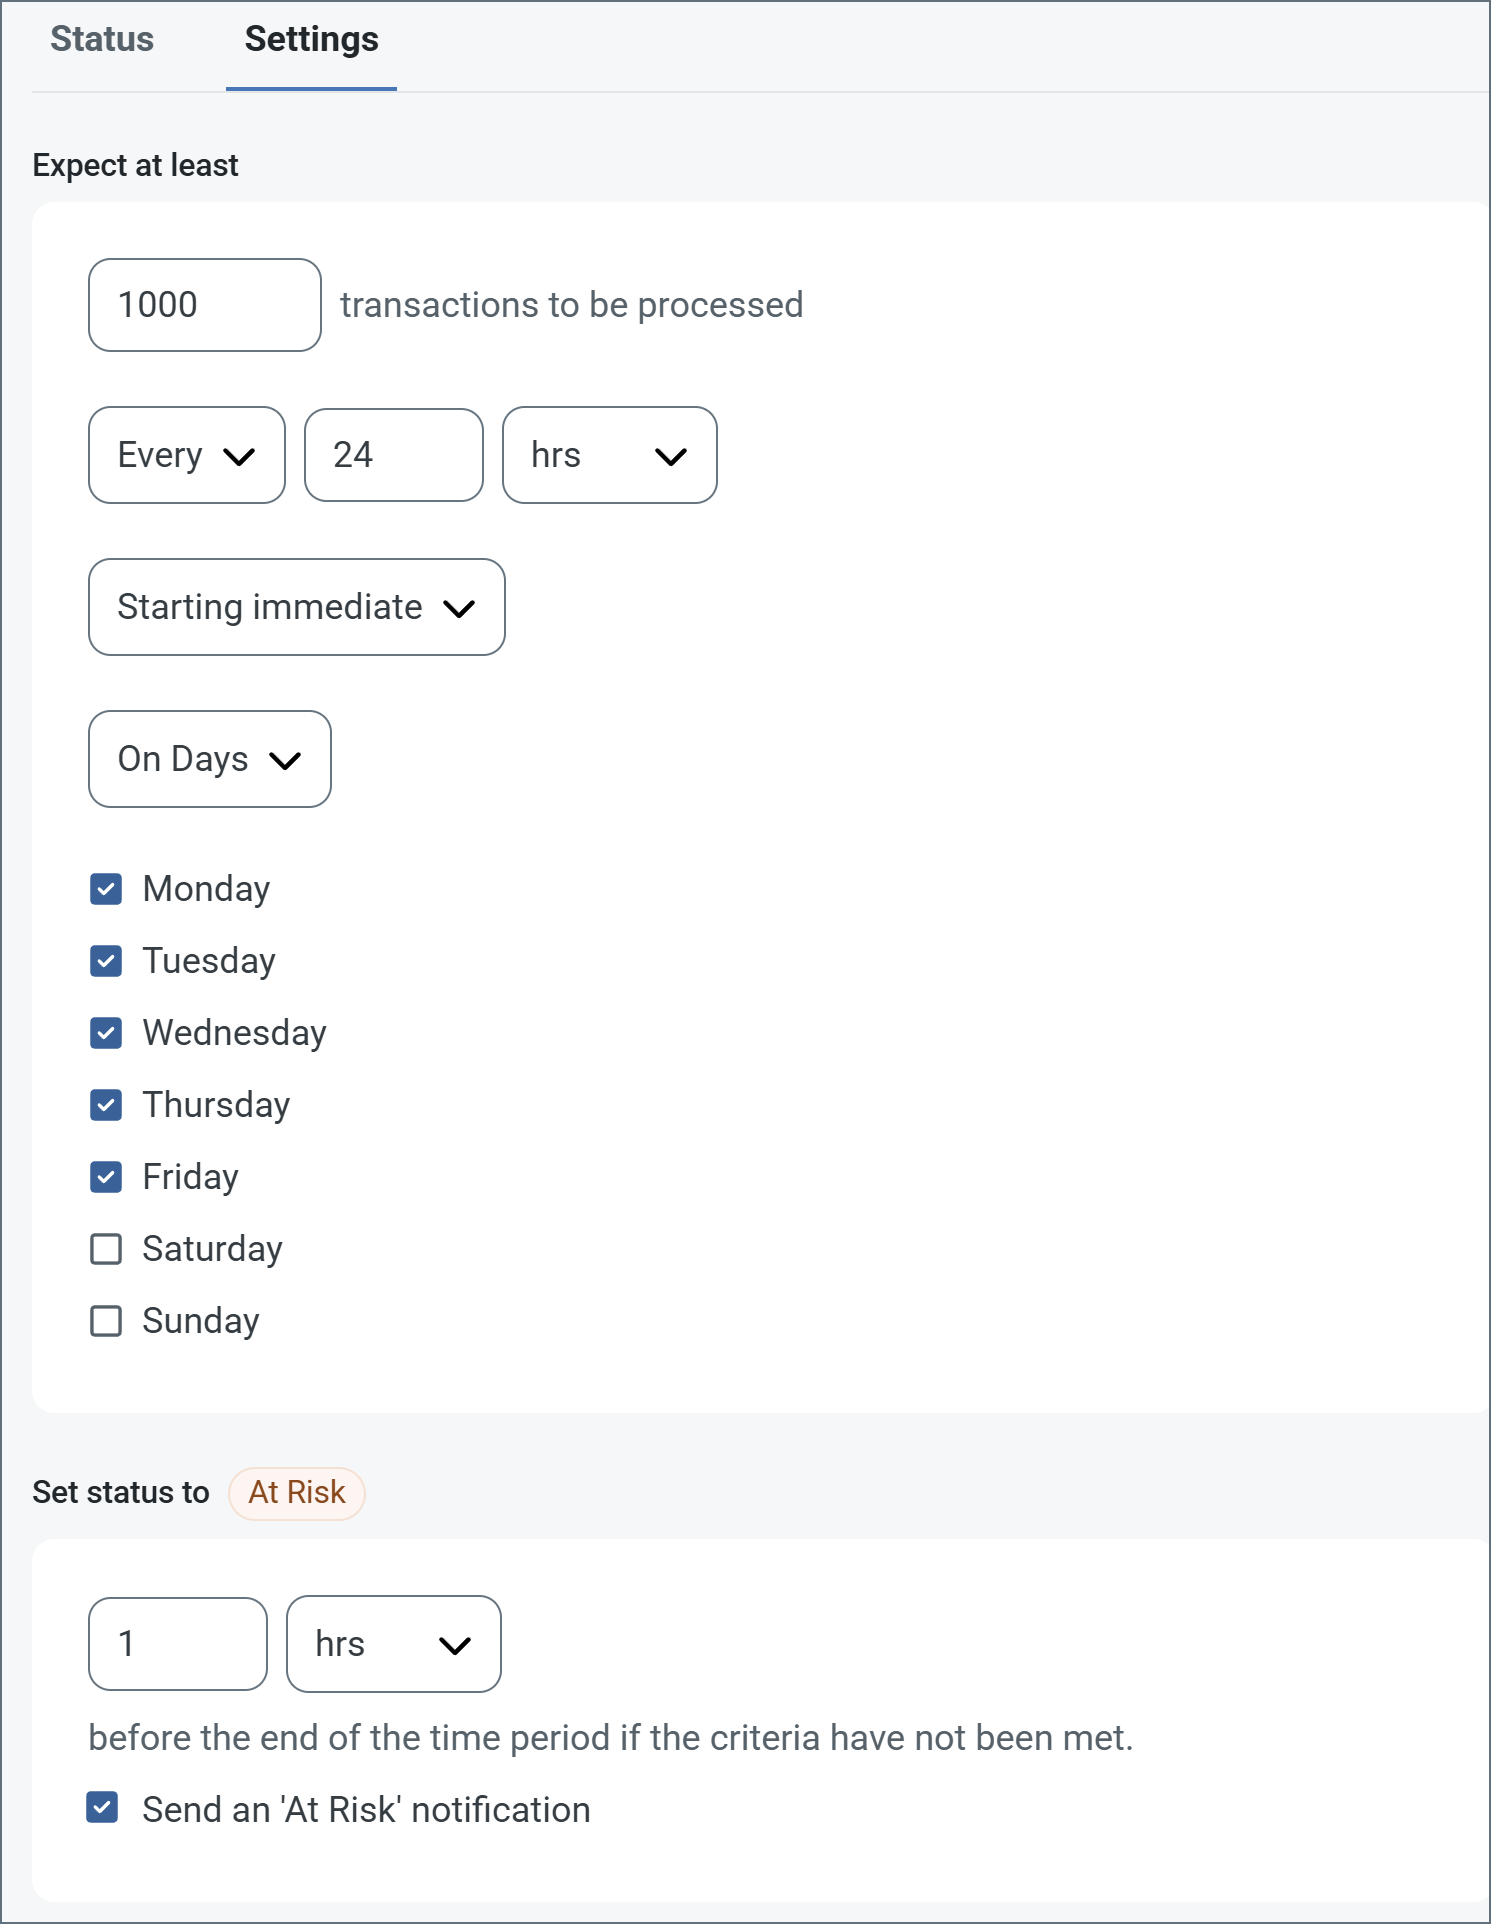
The following example shows an SLA configured for a connector that expects to receive 1000 files every day Monday-Friday. An at-risk notification is sent 1 hour before the end of the time period if the 1000 files have not been received.
 You can turn off SLA alerts if necessary. This can be useful during maintenance windows. Click Settings on the navbar, then navigate to Alerts > General Alerts. Click the tablet and pencil icon to edit, and uncheck the SLA Alerts setting.
;
export const AlertsTab = ({siteNameShort = "Arc"}) => <>
You can turn off SLA alerts if necessary. This can be useful during maintenance windows. Click Settings on the navbar, then navigate to Alerts > General Alerts. Click the tablet and pencil icon to edit, and uncheck the SLA Alerts setting.
;
export const AlertsTab = ({siteNameShort = "Arc"}) => <>
Settings related to configuring alerts.
Before you can execute Service Level Agreements (SLAs), you need to set up email alerts for notifications. By default, {siteNameShort} uses the global settings on the Alerts tab. To use other settings for this connector, toggle Override global setting on.
By default, error alerts are enabled, which means that emails are sent whenever there is an error. To turn them off, uncheck the Enable checkbox.
Enter a Subject (mandatory), then optionally enter a comma-separated list of Recipient emails.
;
export const MiscConnector = () => <>
Miscellaneous settings are for specific use cases.
| Setting |
Description |
| Other Settings |
Enables you to configure hidden connector settings in a semicolon-separated list (for example, setting1=value1;setting2=value2). Normal connector use cases and functionality should not require the use of these settings. |
;
export const Logging = () => <>
Settings that govern the creation and storage of logs.
| Setting |
Description |
| Log Level |
The verbosity of logs generated by the connector. When you request support, set this to Debug. |
| Log Subfolder Scheme |
Instructs the connector to group files in the Logs folder according to the selected interval. The Weekly option (which is the default) instructs the connector to create a new subfolder each week and store all logs for the week in that folder. Leaving this setting blank tells the connector to save all logs directly in the Logs folder. For connectors that process many transactions, using subfolders helps keep logs organized and improves performance. |
| Log Messages |
Check this to have the log entry for a processed file include a copy of the file itself. If you disable this, you might not be able to download a copy of the file from the Transactions tab. |
;
export const MacrosExamples = ({extraMacros = []}) => <>
Some macros, such as %Ext% and %ShortDate%, do not require an argument, but others do. All
macros that take an argument use the following syntax: %Macro:argument%
Here are some examples of the macros that take an argument:
- %Header:headername%: Where
headername is the name of a header on a message.
- %Header:mycustomheader% resolves to the value of the
mycustomheader header set on the input message.
- %Header:ponum% resolves to the value of the
ponum header set on the input message.
- %RegexFilename:pattern%: Where
pattern is a regex pattern. For example, %RegexFilename:^([\w][A-Za-z]+)% matches and resolves to the first word in the filename and is case insensitive (test_file.xml resolves to test).
- %Vault:vaultitem%: Where
vaultitem is the name of an item in the vault. For example, %Vault:companyname% resolves to the value of the companyname item stored in the vault.
- %DateFormat:format%: Where
format is an accepted date format (see Sample Date Formats for details). For example, %DateFormat:yyyy-MM-dd-HH-mm-ss-fff% resolves to the date and timestamp on the file.
{extraMacros.filter(item => item.example).map(item => - {item.example}
)}
You can also create more sophisticated macros, as shown in the following examples:
- Combining multiple macros in one filename:
%DateFormat:yyyy-MM-dd-HH-mm-ss-fff%%EXT%
- Including text outside of the macro:
MyFile_%DateFormat:yyyy-MM-dd-HH-mm-ss-fff%
- Including text within the macro:
%DateFormat:'DateProcessed-'yyyy-MM-dd_'TimeProcessed-'HH-mm-ss%
;
export const MacrosTable = ({siteName = "CData Arc", extraMacros = []}) => <>
Using macros in file naming strategies can enhance organizational efficiency and contextual
understanding of data. By incorporating macros into filenames, you can dynamically include
relevant information such as identifiers, timestamps, and header information, providing
valuable context to each file.
{siteName} supports these macros, which all use the following syntax: %Macro%.
| Macro | Description |
|---|
| ConnectorID | Evaluates to the ConnectorID of the connector. |
| Ext | Evaluates to the file extension of the file currently being processed by the connector. |
| Filename | Evaluates to the filename (extension included) of the file currently being processed by the connector. |
| FilenameNoExt | Evaluates to the filename (without the extension) of the file currently being processed by the connector. |
| MessageId | Evaluates to the MessageId of the message being output by the connector. |
| RegexFilename:pattern | Applies a RegEx pattern to the filename of the file currently being processed by the connector. |
| Header:headername | Evaluates to the value of a targeted header (headername) on the current message being processed by the connector. |
| LongDate | Evaluates to the current datetime of the system in long-handed format (for example, Wednesday, January 24, 2024). |
| ShortDate | Evaluates to the current datetime of the system in a yyyy-MM-dd format (for example, 2024-01-24). |
| DateFormat:format | Evaluates to the current datetime of the system in the specified format (format). See Sample Date Formats for the available datetime formats. |
| Vault:vaultitem | Evaluates to the value of the specified vault item. |
{extraMacros.map(item =>
| {item.name} |
{item.description} |
)}
;
export const Performance = () => <>
Settings related to the allocation of resources to the connector.
| Setting |
Description |
| Max Workers |
The maximum number of worker threads consumed from the threadpool to process files on this connector. If set, this overrides the default setting on the Performance Settings portion of the Advanced Settings page. |
| Max Files |
The maximum number of files sent by each thread assigned to the connector. If set, this overrides the default setting on the Performance Settings portion of the Advanced Settings page. |
;
export const siteNameShort = "Arc";
export const siteName = "CData Arc";
The CSV Map connector uses {siteNameShort}Script to transform flat XML files into CSV, TSV, and PSV file formats. A flat XML file is one where, in addition to the root element, the depth is not more than two levels.
## Key Capabilities
* Transforms flat XML files into CSV, TSV, and PSV formats using ArcScript templating
* Visual Designer for simple mappings with automatic field matching and Code view for complex transformations
* XPath navigation for extracting values from nested XML structures with dynamic template generation
## Overview
The CSV Map connector has two modes of operation: the visual **Designer** and the scripting-focused **Code** view. The Designer enables you to visually establish simple relationships between document types. More complicated translations require the Code view, which leverages the {siteNameShort}Script scripting language to create a mapping template between XML and a flat file structure.
To begin, from the **Settings** tab, upload a sample **Source File** and **Destination File**. If the structure of both sample files allows for designer-driven mapping, the visual Designer is populated with the source and destination fields. The application also attempts to populate the Code window with as much of the destination structure as it can.
## Connector Configuration
This section contains all of the configurable connector properties.
### Mapping Tab
*Upload files to initiate design-driven mapping of source and destinations fields.*
Click **Upload File**, then choose your source and destination files.
* The **Source File** represents the XML structure of input documents. Any files processed by the connector should have a matching XML structure. To support designer-driven mapping, this file must be a simple XML, CSV, PSV, or TSV structure.
* The **Destination File** file represents the structure of output documents. To use designer-driven mapping, this file must be a simple XML, CSV, PSV, or TSV structure.
#### Mappings
This section defines the mapping relationship between input and output files. The Designer view can map simple XML, CSV, PSV, and TSV structures, and the Code view can map more complicated XML structures. See [Using the Designer](#using-the-designer) and [Using Code View](#using-the-code-view) for details.
### Settings Tab
#### Connector Configuration
*Settings related to the core operation of the connector.*
### Advanced Tab
#### Advanced Settings
| Setting | Description |
| --------------------- | ------------------------------------------------------------------------------------------------------------------------------------------------------------------------------------------------------------------------------------------------------------------------------------------------------------ |
| **Processing Delay** | The amount of time (in seconds) by which the processing of files placed in the **Transactions** tab is delayed. This is a legacy setting. Best practice is to [use a File connector](../flows/designing-a-flow#interacting-with-the-local-file-system) to manage local file systems instead of this setting. |
| **Local File Scheme** | A scheme for assigning filenames to messages that are output by the connector. You can use macros in your filenames dynamically to include information such as identifiers and timestamps. For more information, see [Macros](#macros). |
#### Logging
#### Miscellaneous
### Automation Tab
#### Automation Settings
*Settings related to the automatic processing of files by the connector.*
| Setting | Description |
| -------- | ----------------------------------------------------------------------- |
| **Send** | Whether messages arriving at the connector are automatically processed. |
#### Performance
### Alerts Tab
### SLAs Tab
## Using the Designer
The visual designer is only available for CSV, PSV, TSV, and simple XML files. Below is an example of a simple XML document as the source file:
```xml theme={null}
124455
Bob
Smith
```
This source file might be paired with the following CSV document as the destination file:
```csv theme={null}
id,first name,last name,time
124455,Bob,Smith,2017-07-18T17:38:53-04:00
```
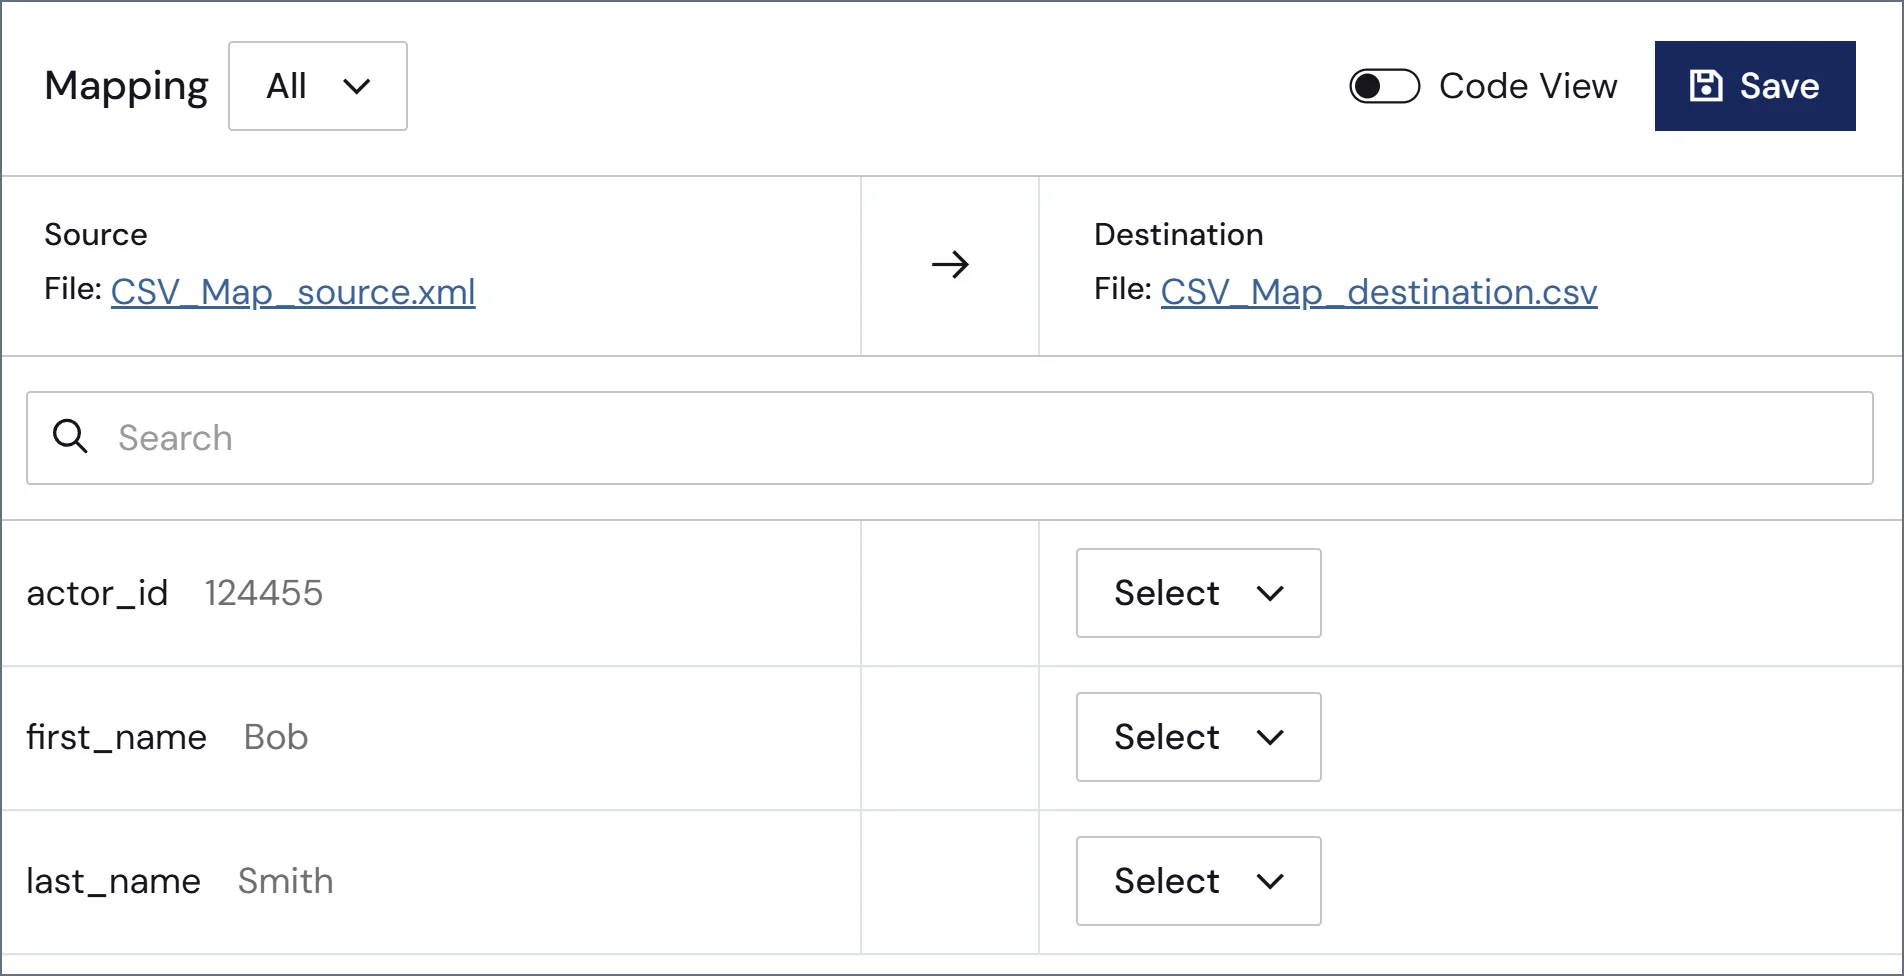
When these files are configured as the source and destination files, the designer displays rows in the **Source** column for each row in the source file (actor\_id, first\_name, and last\_name). For each field in the source, use the dropdown to select the appropriate **Destination** column. The application automatically attempts to match the source and destination fields based on the column names. In the above example, the *actor\_id* row would automatically be matched with the *id* column.
 ## Using the Code View
The Code view provides the ability to generate the mapping template manually using {siteNameShort}Script. This allows for more granular control over the possible input and output formats. The code view defines how the destination file looks once rendered, with {siteNameShort}Script elements dynamically filling in the template with values from the source document. {siteNameShort}Script elements all start with an *arc* prefix: for example, ``. Any content in the code view that is not {siteNameShort}Script is included as part of the output file.
### Navigating XML Input
{siteNameShort}Script supports navigating complicated XML structures to parse out values from the Source File. The [xmlDOMSearch](../scripting/operations/op-xml-dom-search) operation takes an xpath as input and loads the XML structure at the given path. This operation loops for each instance of the xpath found in the source document: to load the entire document and avoid looping, provide the root element of the XML source as input to [xmlDOMSearch](../scripting/operations/op-xml-dom-search). For example:
```xml theme={null}
```
Once the XML document is loaded, the [xpath formatter](../scripting/value-formatters/function-formatters#xpath-xpath) supports reading out values from the XML at the specified xpath. This formatter accepts absolute xpaths as well as xpaths relative to the path loaded by [xmlDOMSearch](../scripting/operations/op-xml-dom-search). The xpath formatter, like all formatters, can only be used in square brackets \[]. For example:
```xml theme={null}
[xpath('name')]
```
Take the following simple XML as an example input to the above script:
```xml theme={null}
Stephen King
Kurt Vonnegut
```
In this example, the [xmlDOMSearch](../scripting/operations/op-xml-dom-search) operation loops over each `author` element in the `root`. Within each `author` loop, the value from the `name` element is read as content in the output file. The output file in this case would look like this:
```
Stephen King
Kurt Vonnegut
```
### Templating Output Data
The Code view serves as a template of the output file, and {siteNameShort}Script fills in the values to the defined template. As a simple example, if data is formatted as comma-separated values, these commas can be included as part of the Code view to provide structure to the {siteNameShort}Script functions. Therefore, you can generate more complex CSV files from more complicated XML structures than the Designer mode allows.
For example, take the following XML, which has nested elements that prevent the use of Designer mode:
```xml theme={null}
12445
Viggo
Mortensen
12522
Gal
Gadot
```
The nested elements can be retrieved by passing the appropriate paths to {siteNameShort}Script's [xpath formatter](../scripting/value-formatters/function-formatters#xpath-xpath). These formatters can be placed in commas and after header names to provide the desired CSV structure, and an additional [csvescape formatter](../scripting/value-formatters/encoding-decoding-string-formatters#csvescape) ensures that the values are properly quoted:
```xml theme={null}
id,first name,last name
[xpath('actor_id') | csvescape],[xpath('name/first_name') | csvescape],[xpath('name/last_name') | csvescape]
```
You can generate a wide range of text files with this mix of templating data and {siteNameShort}Script calls.
### Additional Scripting Features
Since full {siteNameShort}Script is available in Code view, you might want to leverage {siteNameShort}Script [Operations](../scripting/operations/operations) in the template. For example, if the source file only includes the Id of an item in the database, but you need the actual item name, you can use the [dbQuery](../scripting/operations/op-db-query) operation to look up the name for the corresponding Id.
{siteNameShort}Script also supports conditional logic in a mapping template. The `arc:if` keyword is one of many keywords available to help with performing conditional logic in templates. For example, if the source file contains information about customers in QuickBooks, you might want to perform different business logic for customers with an outstanding balance versus customers who have paid in full. A simple example of this use case might look like the following:
```xml theme={null}
id,first name,last name, paid in full
[xpath('customer_id') | csvescape],[xpath('first_name') | csvescape],[xpath('last_name') | csvescape],[Customer.paidinfull]
```
## Macros
### Examples
## Using the Code View
The Code view provides the ability to generate the mapping template manually using {siteNameShort}Script. This allows for more granular control over the possible input and output formats. The code view defines how the destination file looks once rendered, with {siteNameShort}Script elements dynamically filling in the template with values from the source document. {siteNameShort}Script elements all start with an *arc* prefix: for example, ``. Any content in the code view that is not {siteNameShort}Script is included as part of the output file.
### Navigating XML Input
{siteNameShort}Script supports navigating complicated XML structures to parse out values from the Source File. The [xmlDOMSearch](../scripting/operations/op-xml-dom-search) operation takes an xpath as input and loads the XML structure at the given path. This operation loops for each instance of the xpath found in the source document: to load the entire document and avoid looping, provide the root element of the XML source as input to [xmlDOMSearch](../scripting/operations/op-xml-dom-search). For example:
```xml theme={null}
```
Once the XML document is loaded, the [xpath formatter](../scripting/value-formatters/function-formatters#xpath-xpath) supports reading out values from the XML at the specified xpath. This formatter accepts absolute xpaths as well as xpaths relative to the path loaded by [xmlDOMSearch](../scripting/operations/op-xml-dom-search). The xpath formatter, like all formatters, can only be used in square brackets \[]. For example:
```xml theme={null}
[xpath('name')]
```
Take the following simple XML as an example input to the above script:
```xml theme={null}
Stephen King
Kurt Vonnegut
```
In this example, the [xmlDOMSearch](../scripting/operations/op-xml-dom-search) operation loops over each `author` element in the `root`. Within each `author` loop, the value from the `name` element is read as content in the output file. The output file in this case would look like this:
```
Stephen King
Kurt Vonnegut
```
### Templating Output Data
The Code view serves as a template of the output file, and {siteNameShort}Script fills in the values to the defined template. As a simple example, if data is formatted as comma-separated values, these commas can be included as part of the Code view to provide structure to the {siteNameShort}Script functions. Therefore, you can generate more complex CSV files from more complicated XML structures than the Designer mode allows.
For example, take the following XML, which has nested elements that prevent the use of Designer mode:
```xml theme={null}
12445
Viggo
Mortensen
12522
Gal
Gadot
```
The nested elements can be retrieved by passing the appropriate paths to {siteNameShort}Script's [xpath formatter](../scripting/value-formatters/function-formatters#xpath-xpath). These formatters can be placed in commas and after header names to provide the desired CSV structure, and an additional [csvescape formatter](../scripting/value-formatters/encoding-decoding-string-formatters#csvescape) ensures that the values are properly quoted:
```xml theme={null}
id,first name,last name
[xpath('actor_id') | csvescape],[xpath('name/first_name') | csvescape],[xpath('name/last_name') | csvescape]
```
You can generate a wide range of text files with this mix of templating data and {siteNameShort}Script calls.
### Additional Scripting Features
Since full {siteNameShort}Script is available in Code view, you might want to leverage {siteNameShort}Script [Operations](../scripting/operations/operations) in the template. For example, if the source file only includes the Id of an item in the database, but you need the actual item name, you can use the [dbQuery](../scripting/operations/op-db-query) operation to look up the name for the corresponding Id.
{siteNameShort}Script also supports conditional logic in a mapping template. The `arc:if` keyword is one of many keywords available to help with performing conditional logic in templates. For example, if the source file contains information about customers in QuickBooks, you might want to perform different business logic for customers with an outstanding balance versus customers who have paid in full. A simple example of this use case might look like the following:
```xml theme={null}
id,first name,last name, paid in full
[xpath('customer_id') | csvescape],[xpath('first_name') | csvescape],[xpath('last_name') | csvescape],[Customer.paidinfull]
```
## Macros
### Examples